Adventure Escape: Framed for Murder is a new game, known for its mystery puzzle adventures. In this game, you follow Detective Kate Grey, a familiar character from other Mystery games. The story takes place in a university where your former police colleague is wrongly accused of a student’s murder. With evidence pointing to her and the police chief seeking a quick conclusion, you take on the task of uncovering the truth.
The game consists of 5 chapters filled with various clues, objects to discover, and different characters to engage with. In this comprehensive guide, you will learn the detective skills and problem-solving abilities to investigate and solve puzzles to finish the game.
Chapter 1
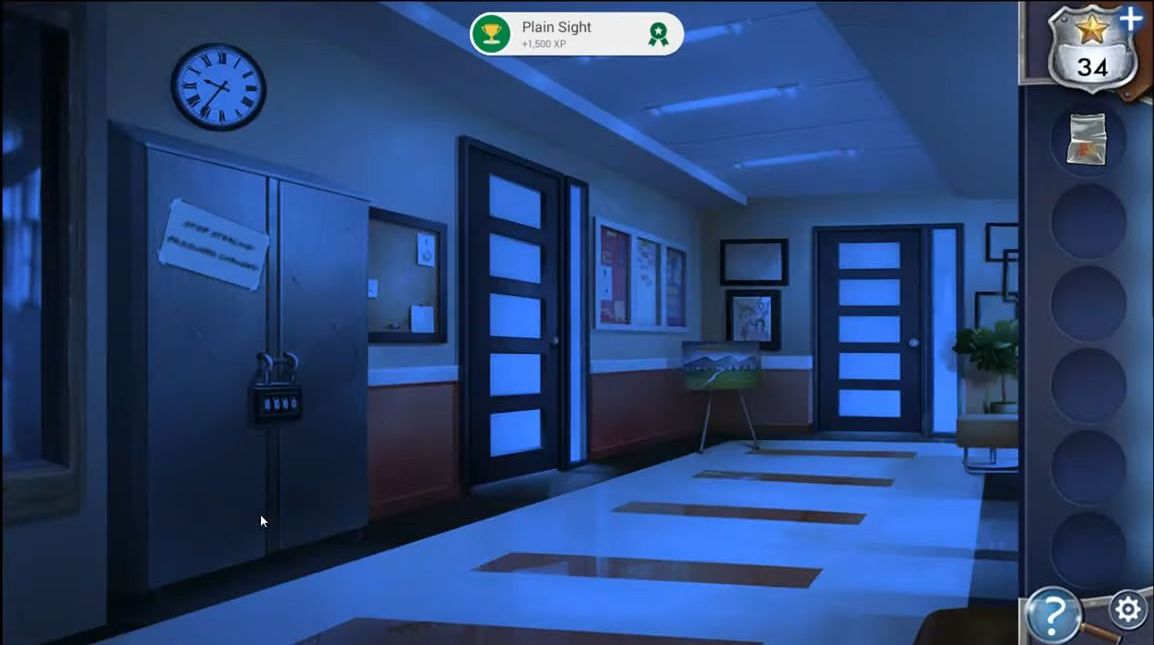
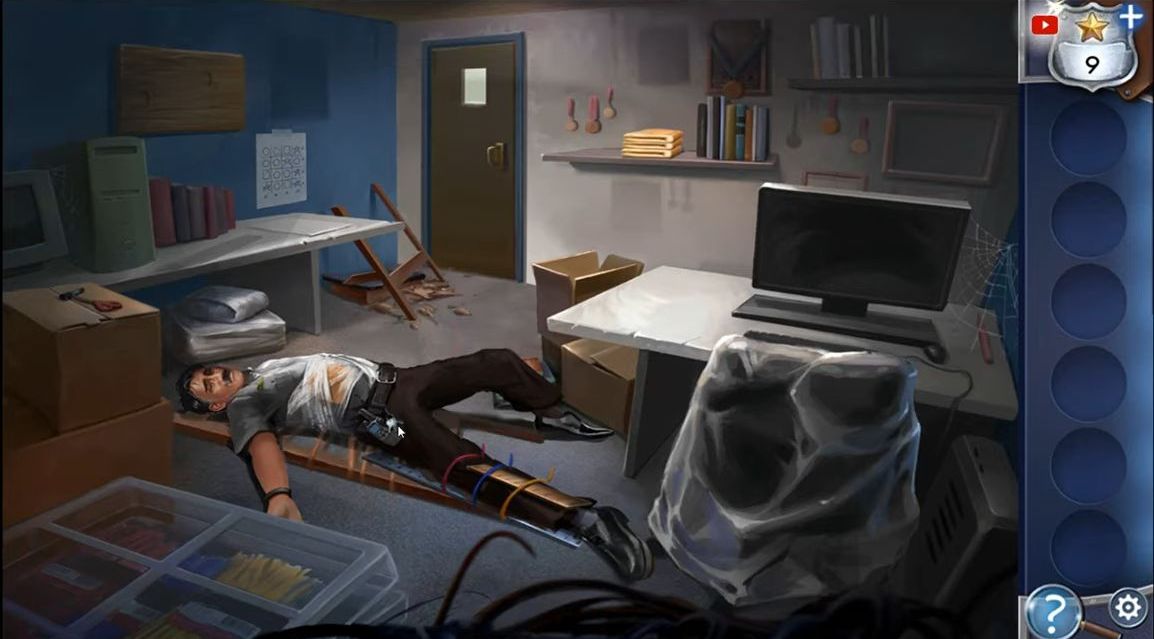
At the beginning of the game’s first chapter, you’ll receive instructions on what to do. You’ll be asked to peek through the door’s peephole and discover a dead body. Also, you’ll be prompted to open a box on the table to gather fingerprint powder.
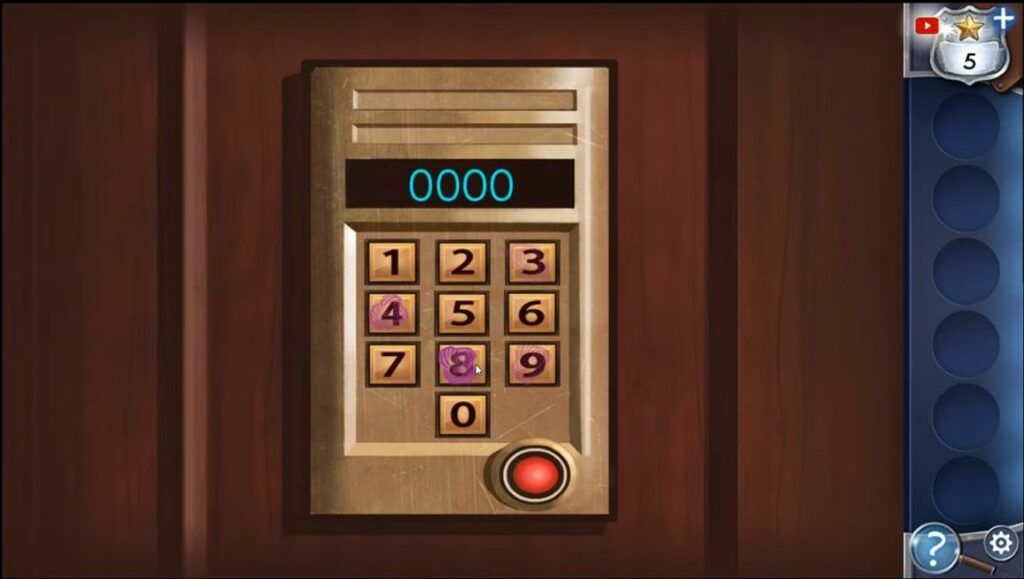
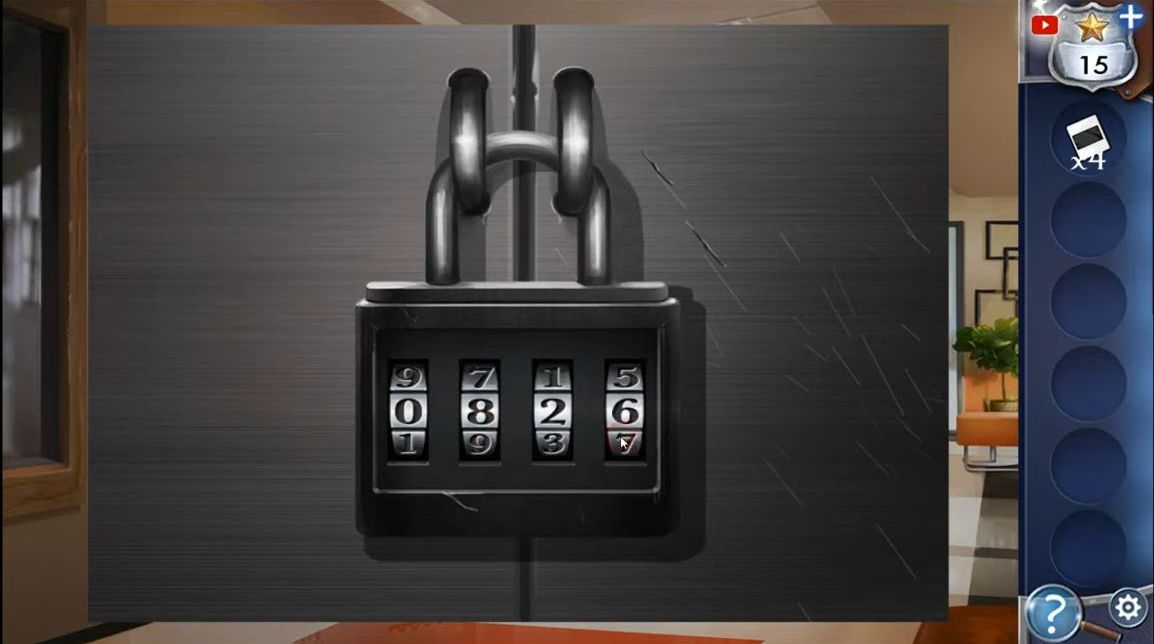
Take a closer look at the keypad on the door and apply the dusting powder to reveal the fingerprints. Follow the clue given, starting from the darkest fingerprint and moving toward the lightest. Use this sequence of fingerprints (8493) to unlock the door.
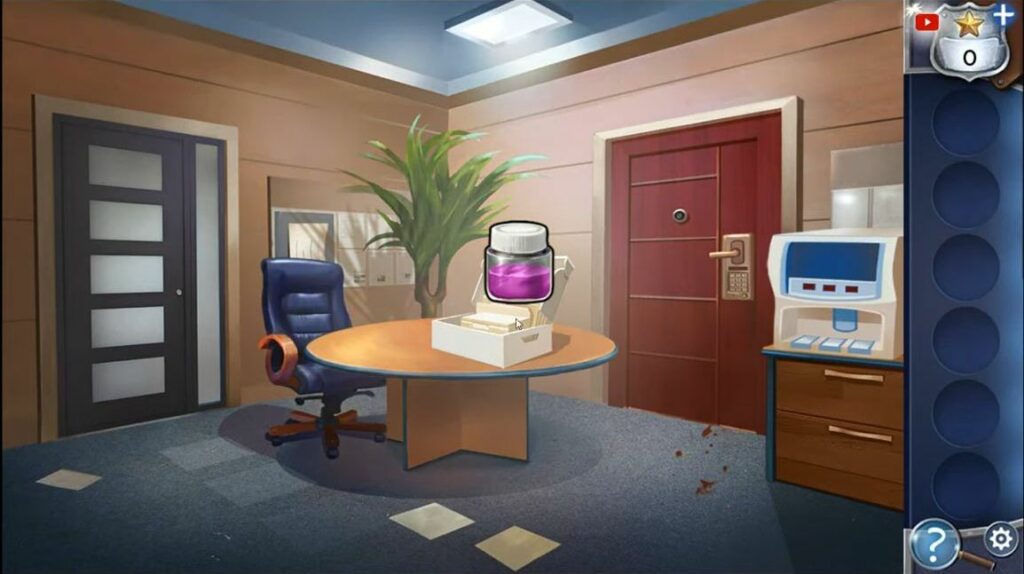
Before you go through the door, pick the star from the light above. Go into the office and in the top left corner, there’s a spotlight. First, pick up the cane to the left of the sofa, and then grab the gloves from the box at the back. After that, go to the shelf on the far left and open the kit to get the forceps. Tap on the desk to the left to see a clue written on a piece of paper.
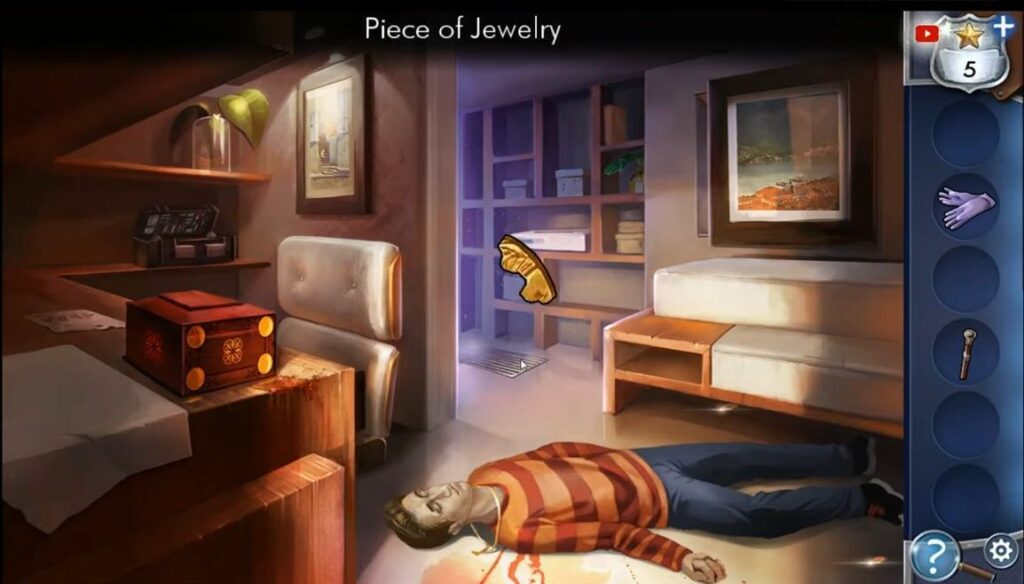
Next, click on the wooden box placed on the table to reveal a puzzle. Adjust the four circles by tapping them to rotate. Align the triangle shapes on the dials with the positions shown in the clue above and utilize the gloves to examine the weapon inside the box. To collect a piece of jewelry, tap on the bottom right of the office scene.
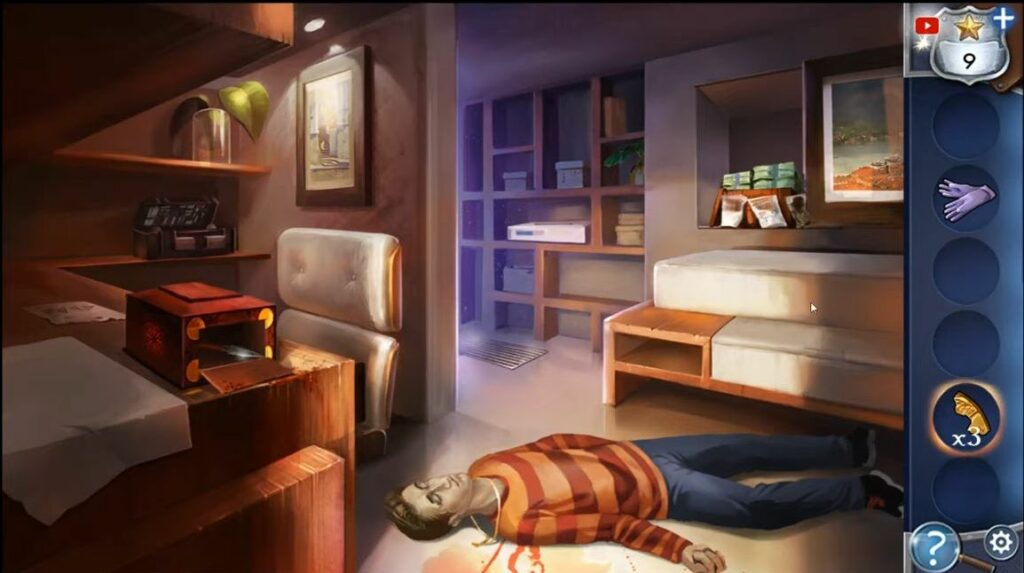
Take the cane and use it to grab another piece of jewelry from beneath the couch. Use the forceps to retrieve another piece of jewelry from the floor vent located at the back of the room. Put on the gloves and examine the broken necklace on the dead body. Combine the three pieces of jewelry that you’ve gathered.
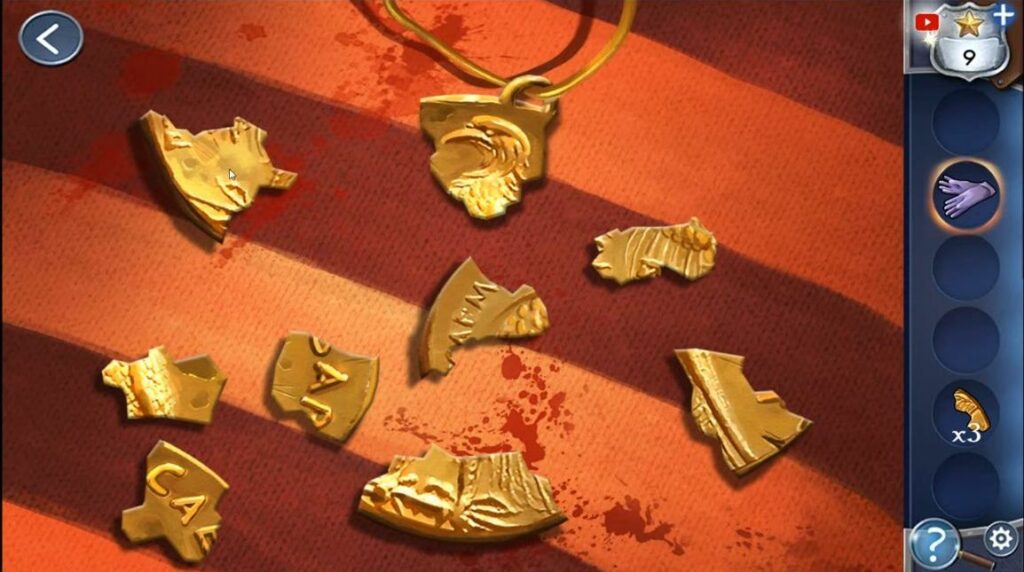
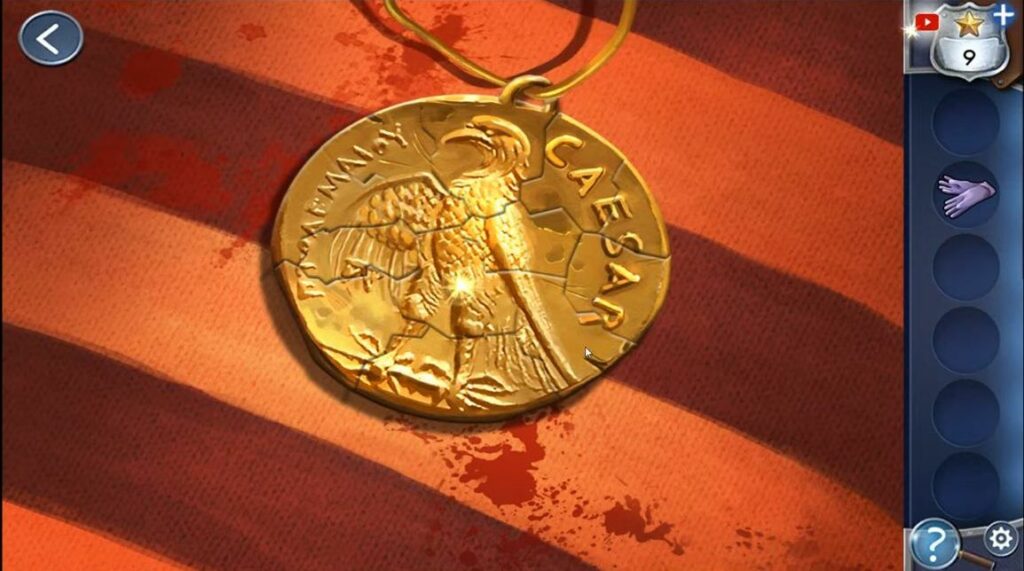
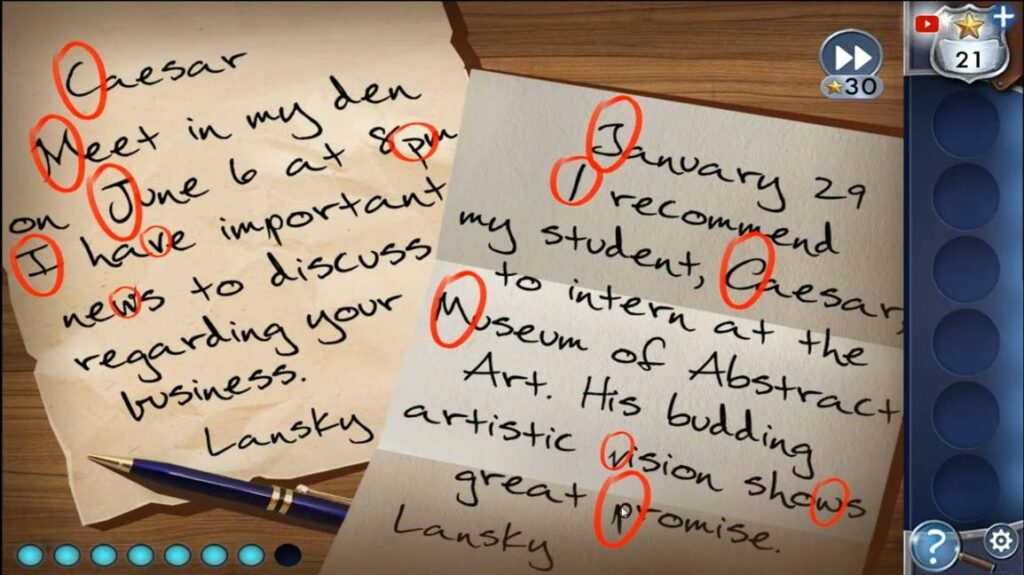
Put the pieces together to rebuild the jewelry. When you finish, it reveals the name Caesar. Next, tap on the painting located above the sofa and you’ll discover a box with a puzzle lock on it.
Slide the ball along the track by using your finger and twist the center to navigate it across the board. Guide the ball through each section until it reaches the hole on the right. Inside the box, there’s cocaine and money. Your next step is to go to the security office and find the spare key.
Once outside the security office, grab the ladder. Then, tap on the tool bag positioned on the right side to gather a utility knife. First, set up the ladder under the tree and use the utility knife to cut down the broken branch from the right side. Use the knife again on the branch to help you collect a sturdy branch.
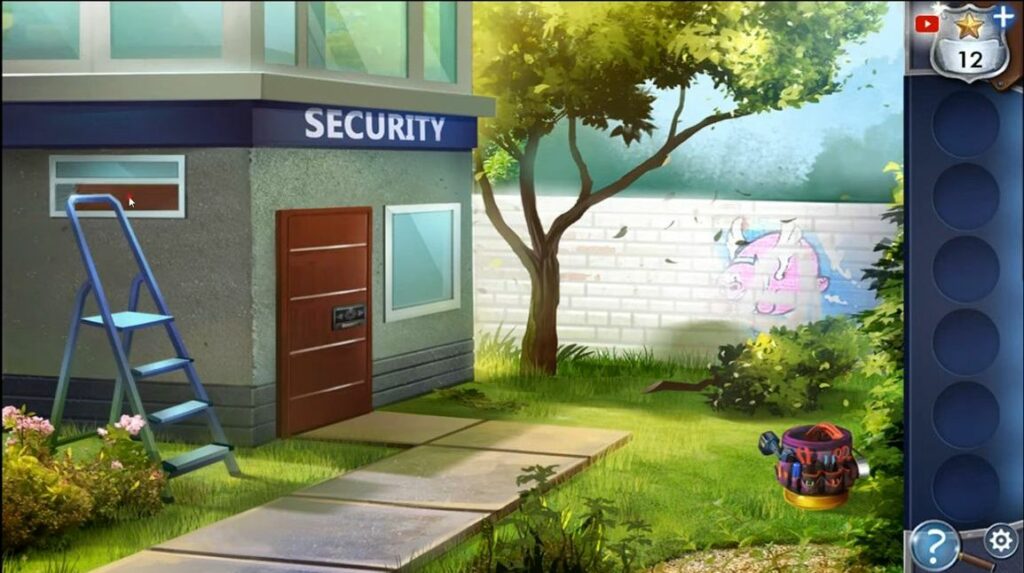
Get the ladder once more and position it beneath the window of the security office on the left side. Use the solid branch to open the window. Tap the now-open window to get into the office. Click on the power extension lying on the floor to disconnect the fan, then tap it again to pick up the extension cord.
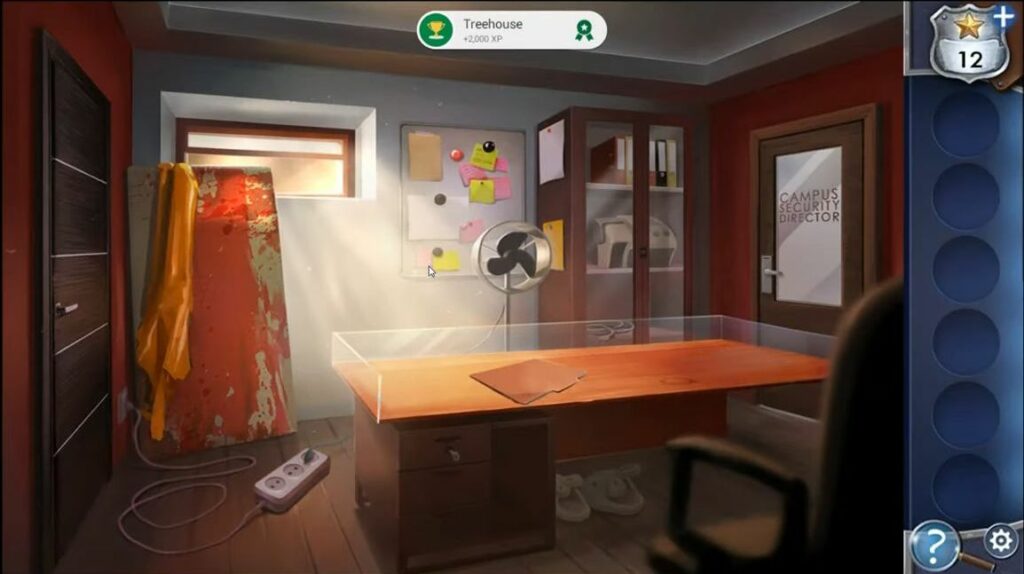
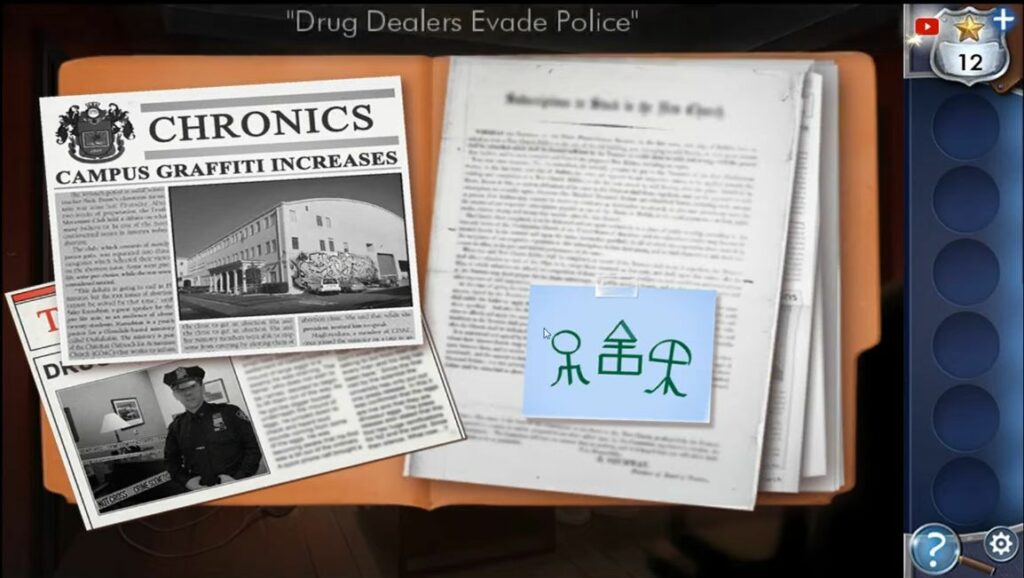
Next, click on the notice board to gather a magnet and tap on the desk drawers to collect the key. Tap the drawer once more to open it and retrieve the key card from inside. Look at the file placed on the desk and tap the papers to examine them until you come across a clue.
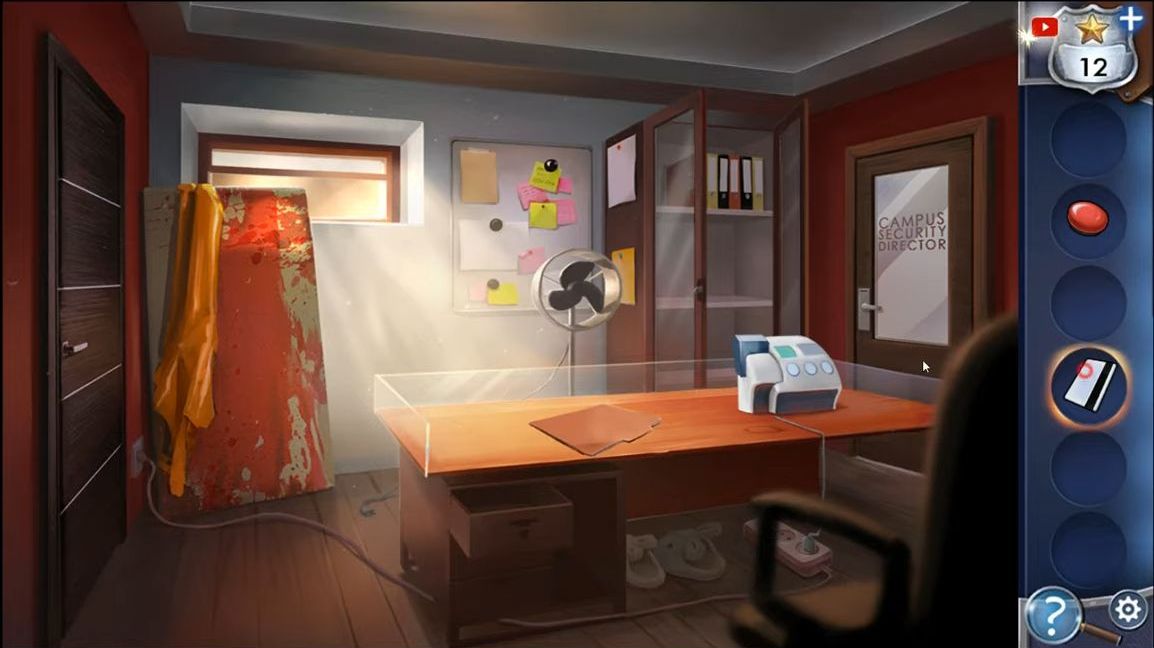
Take the key and unlock the cabinet located on the right. Inside, gather the key card printer and the power cord. Put the key card printer on the desk. Connect the power cord to the printer, and then use the extension cord to plug it in.
Try using the key card you have with the printer, but it won’t work as it’s already programmed. The card will be on the desk and use the magnet on the key card to erase its data. Collect the card again after using the magnet on it.
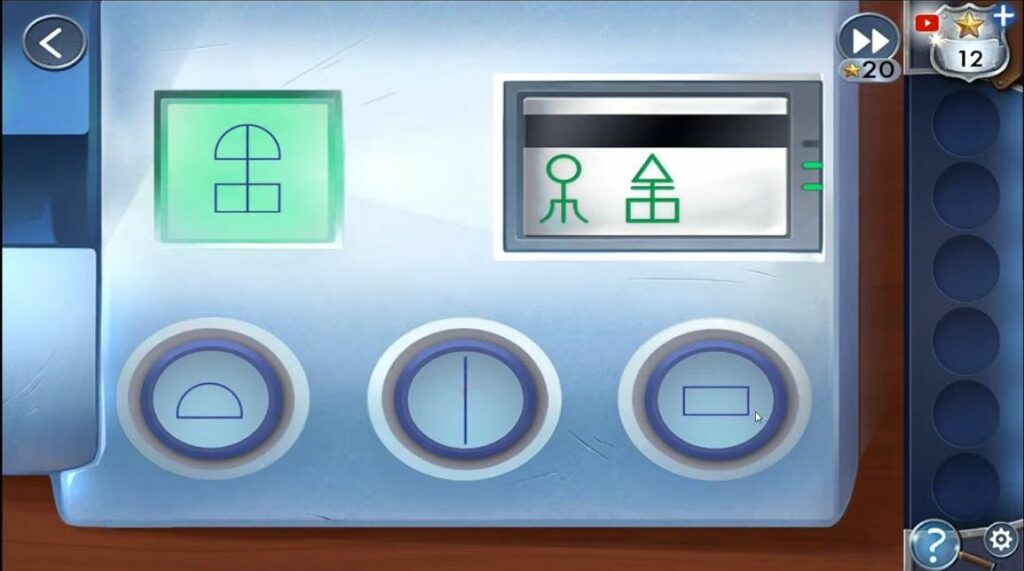
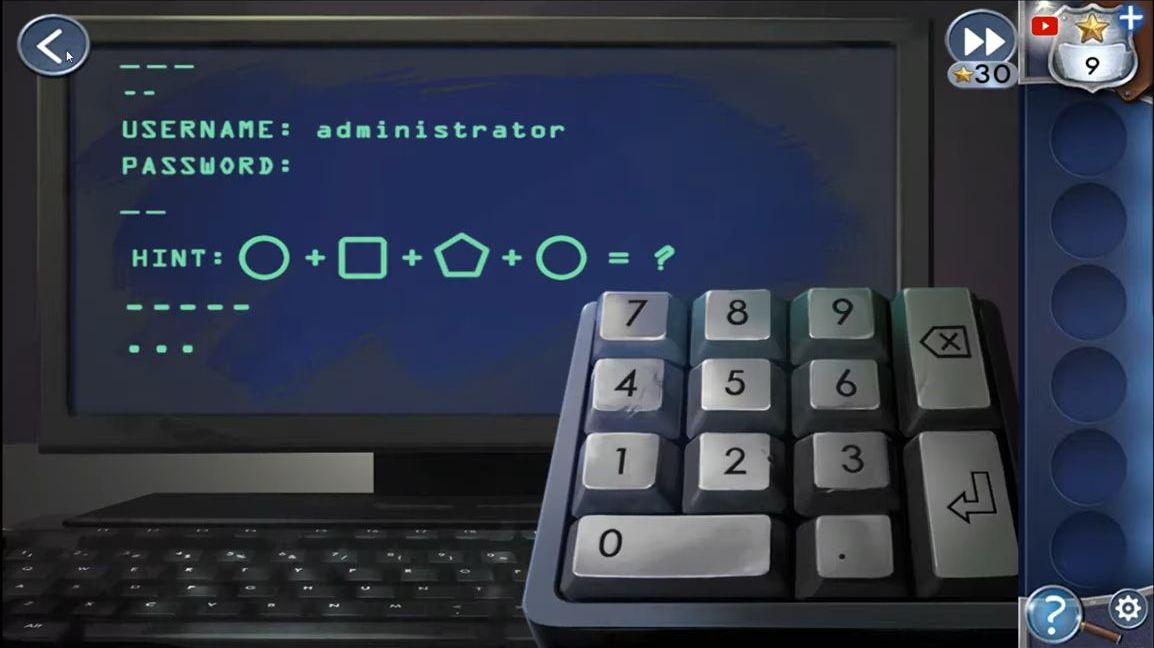
Now use the key card on the printer. This part is a puzzle and there are three blue buttons you can use to pick shapes and make one combined shape within the green square. Form and save the three symbols according to the ones seen in the file on the desk. Once you’ve done this, retrieve the key card.
Swipe the key card on the door located to the right and step into the Campus Security Director’s office. Look for a star positioned at the top right corner of the noticeboard situated on the left side of the door.
On the left side of the desk, pick up a bottle of water and a magnifying glass. On the desk’s right side, tap to open a box and acquire a ruler. Open the second drawer to gather some glue. Take a look at the framed photograph and use the magnifying glass to examine the writing at the bottom right, which reads 5/20.

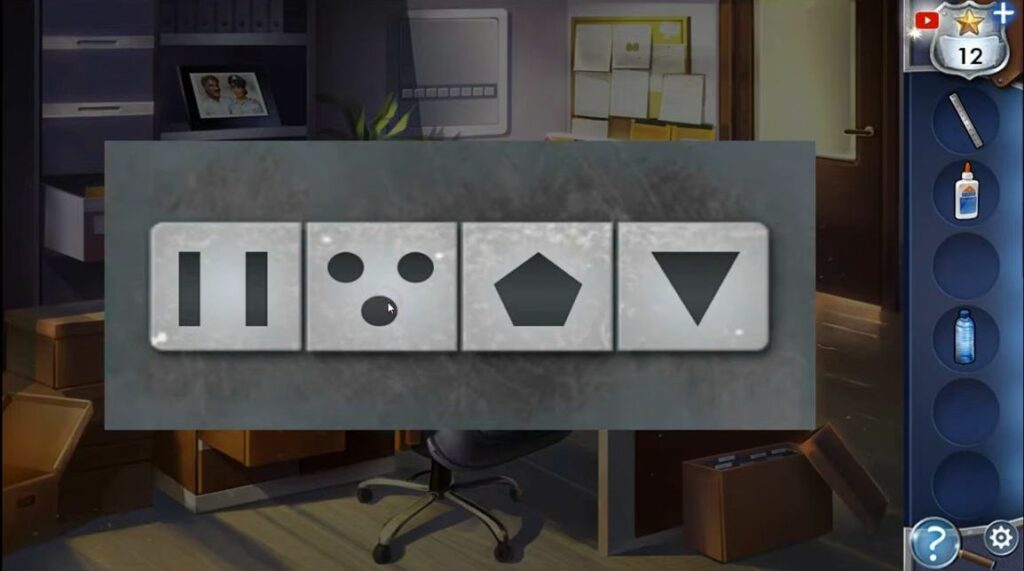
At last, look at the items placed on the shelf underneath the photo to find a hint. On the left side of these items, there’s a drawer that has a puzzle lock. Tap to adjust the shapes displayed on each square of the lock. Align the shapes according to the hint you found on the shelf. The objects on the shelf correspond to shapes on the board below them.
You’ll receive a sealed envelope and pour the water from the bottle into the kettle placed on the desk. Tap the kettle to heat the water until it boils and produces steam. Hold the sealed envelope over the steam.
Next, use the ruler on the envelope that’s now on the desk. After you’ve finished, use the glue to seal the envelope again. Take the envelope and put it back in the drawer. A piece of paper will fall to the ground; pick it up and it says, Congratulations class of 2014.
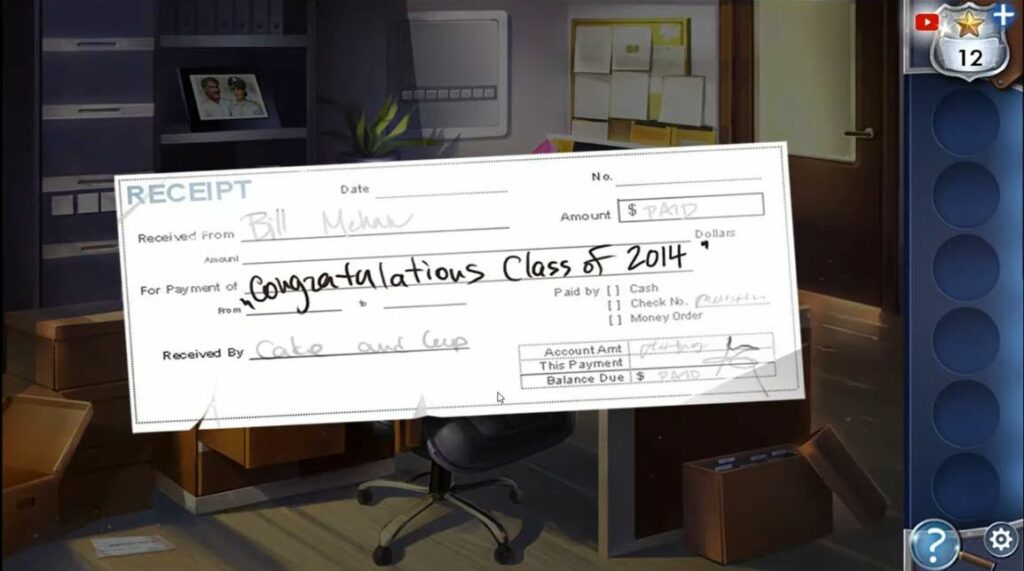
Next, tap on the cabinet mounted on the wall above the desk. There’s an 8-digit code (05202014). The code comes from the date on the photo and the year from the check, which is 05/20/2014.

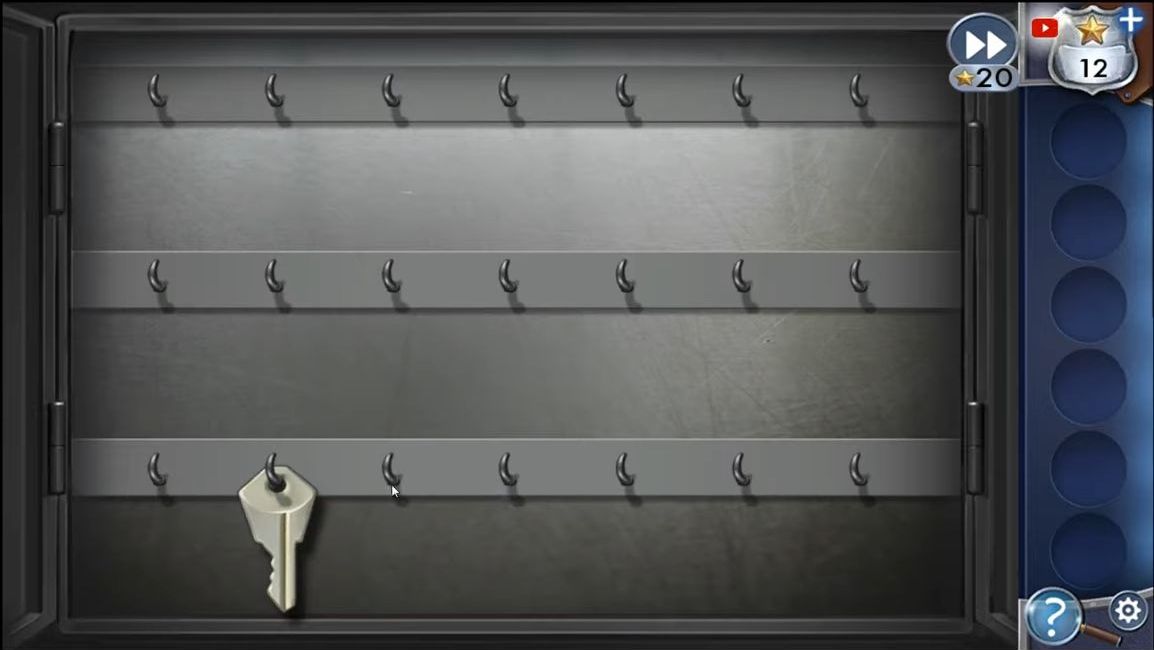
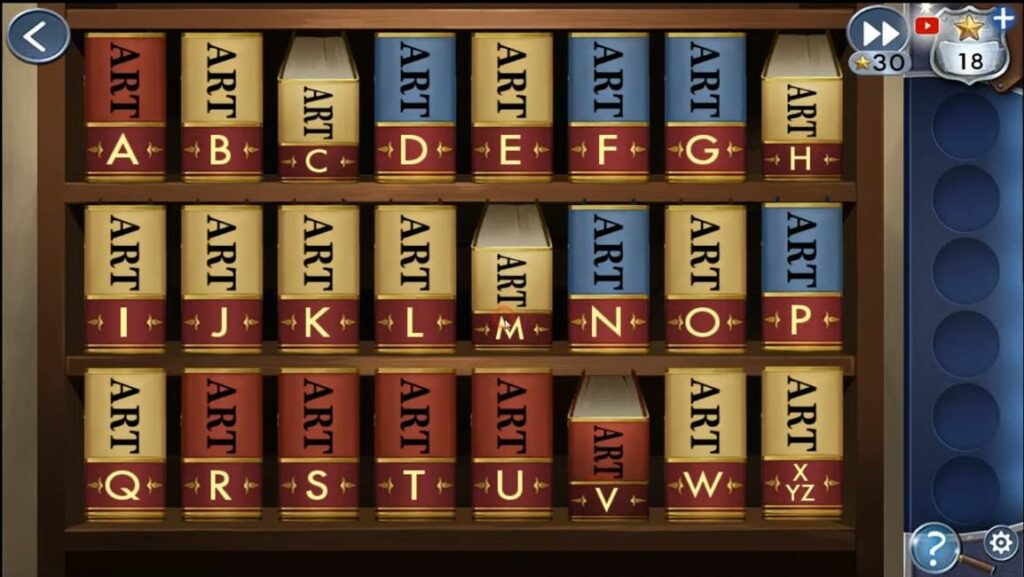
Now that the key cabinet is open, the task is to find the spare key for Sylvia’s office among the 21 keys. All the keys are in pairs except for the spare one you are looking for. Tap the matching pairs to remove them until only one key remains. When you find the correct key, that will conclude Chapter 1.
Chapter 2
You have to get the spare key from the security office and head back to the main building to keep investigating. Now it’s time to visit Prof. Lansky and look for a star on the furthest ceiling light. Tap on the clock above the locked cabinet to take a closer look at it.
Next, examine the padlock on the cabinet and use the time shown on the clock (0827) to unlock it. Inside the cabinet, grab a screwdriver and use it on the flashlight below to get a light bulb. Tap the door located at the end of the corridor to open it and then go into the Art room.
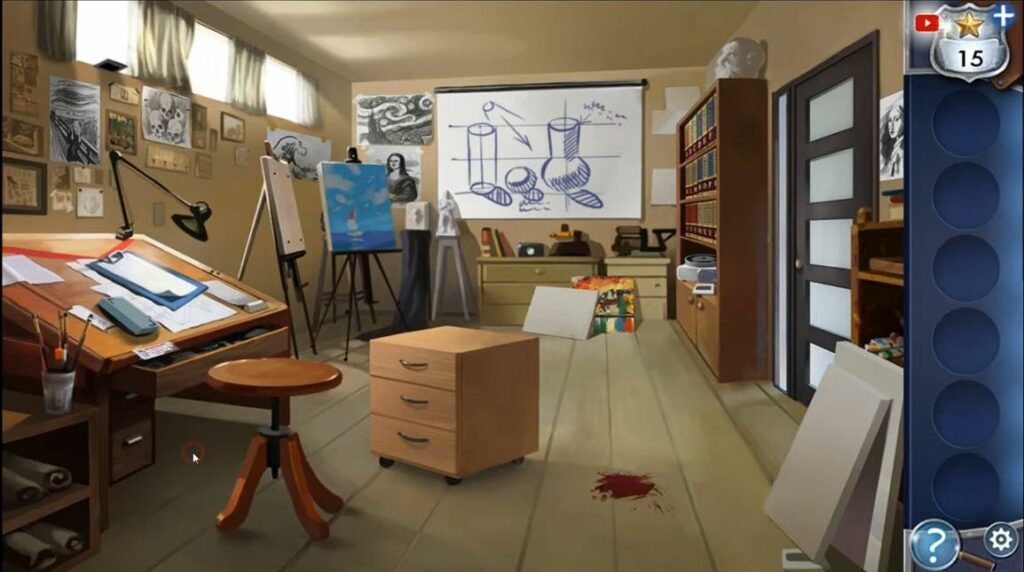
Touch the drawers in the middle to open the top one. Remember to take the slide projector remote control from inside. There are four slides to gather from different spots in the room: one is under a canvas in the bottom right corner.
Another is on the bookshelf located on the right side, and a third one is by the window in the top left corner. Tap on the clipboard positioned on the desk to view information about the victim and locate the fourth slide.
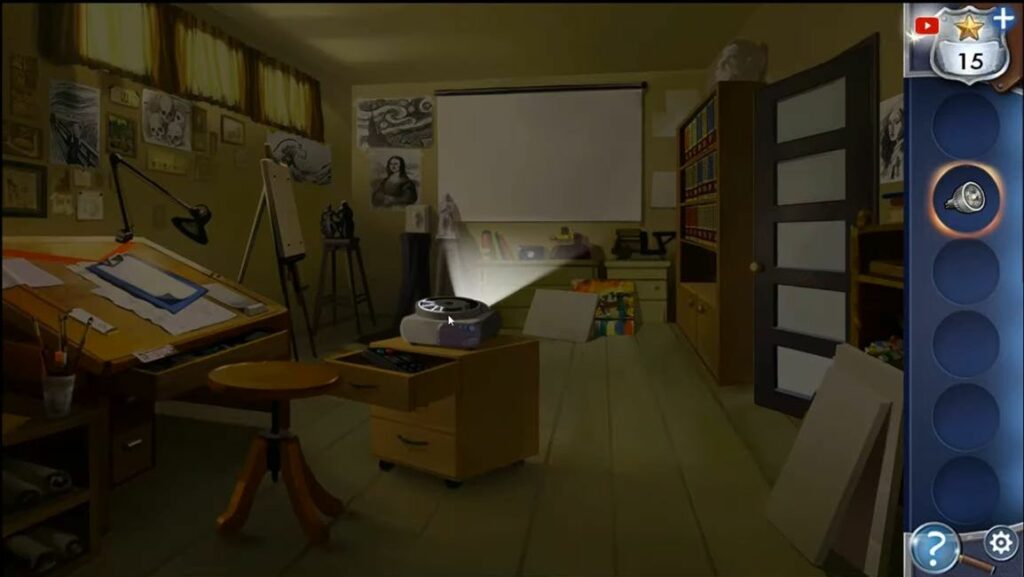
Also, get the slide projector from the bookshelf on the right side, and the desk on the left, and pick up an eraser. Tap on the blue painting displayed on the easel to move it, then take the stand itself. On the walls to the left, there are five drawings of famous paintings that you can look at for clues. Put the slide projector on the drawer unit along with the remote control.
Afterward, insert the slides into the projector and use the eraser to wipe away the sketches from the whiteboard. Use the stand to close the curtains on the three windows. Now, use the remote to switch on the projector and the light will spark, but the bulb is broken. Replace it with the spare bulb you have from the flashlight.
The image projected appears blurry, tap on the projector to solve a puzzle to focus the lens. There are five dials to turn and align the overlapping images until they match one of the pictures from the wall.
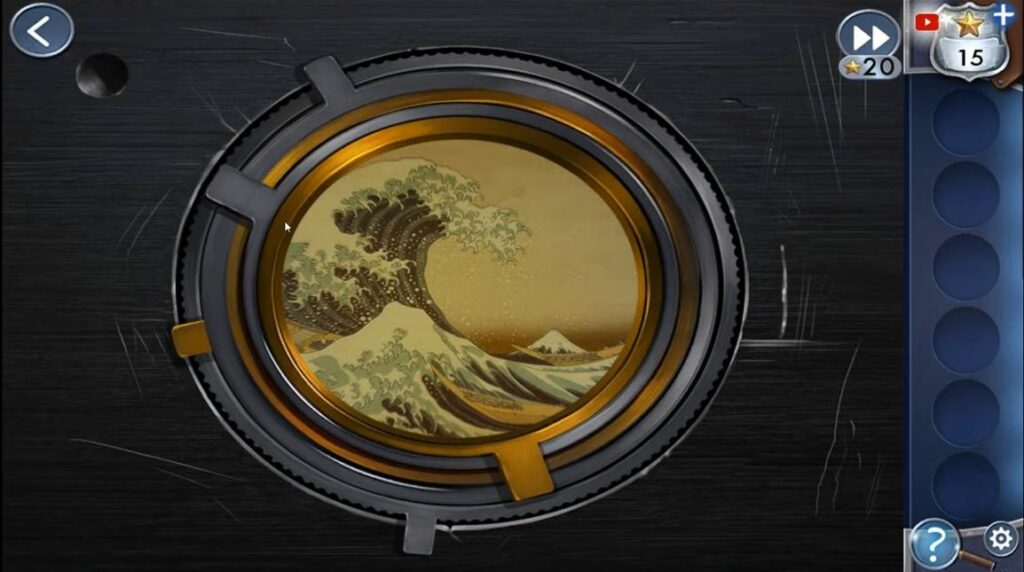
You’ll see four pictures one after another that you can view again by tapping the projector remote. Use the clues on the wall to figure out the names of the artists for these four paintings. Then, tap on the book placed on the bookcase on the right.
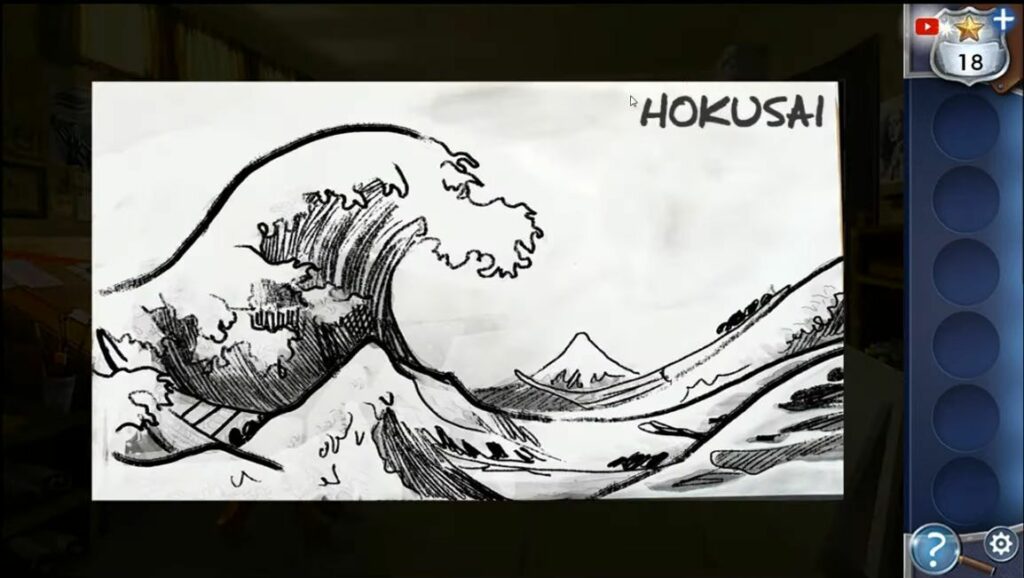
Touch the books to pull them down and follow the initials of the artists. Tap on the initials H V C M. Tap the projector once more to remove the light bulb from it. After that, leave and return to the corridor, then add the bulb to the flashlight so that you can also pick it up. Now, you’re able to enter the secret passage.
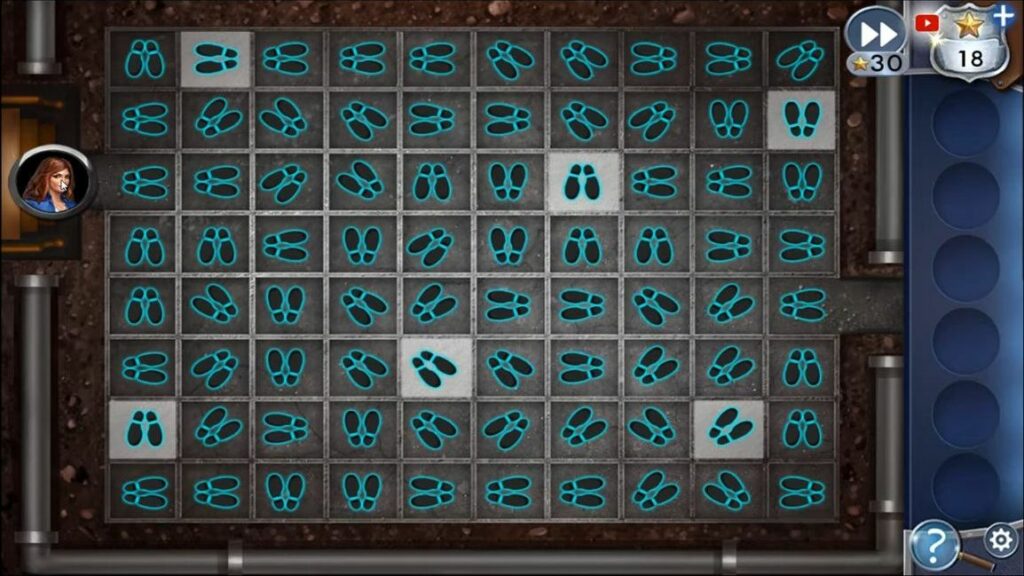
Get a puzzle that looks like a maze and tap on the white boxes to turn the black shoe prints. Your goal is to make a path that goes through all the squares and leads out of the maze.
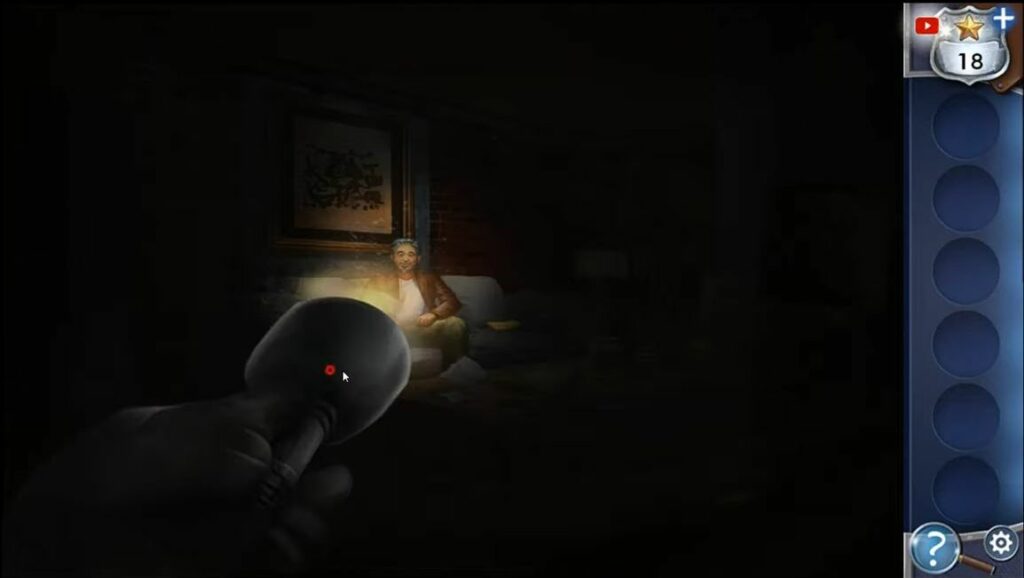
Now, you’ve discovered Prof. Lansky with some drugs. Use the flashlight to explore the room and find hidden items. You’re missing six more pieces of jewelry and look for a star in the upper center, to the right of the painting.
Once you’ve found all the missing pieces, you’ll put together another Caesar badge. The police have been contacted, but you still need to investigate more about the victim. Next, go to the Dorm building to continue your investigation.
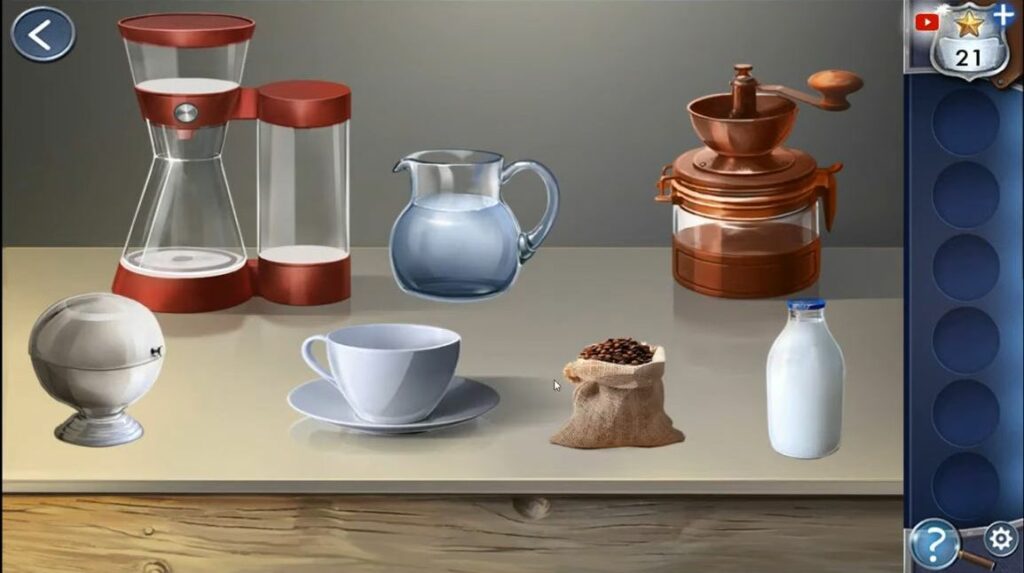
To start, gather the three colored transparencies from the floor; blue, yellow, and pink. Then, interact with the woman at the desk. Amazingly, she asks you to make precisely 6 oz. of coffee. Take the coffee from the counter.
Open the drawer under the coffee machine to find sugar, and then check the fridge to get milk. After that, open the cabinets above to get the pitcher and a coffee grinder.
Take the pitcher and use it on the water dispenser to fill it up. Tap on the coffee machine to see the counter. Put the coffee grinder, coffee beans, water pitcher, milk, and sugar on the counter. Drag the coffee beans to the grinder, tap on it, and you’ll get ground coffee. Drag the ground coffee to the top of the coffee maker.
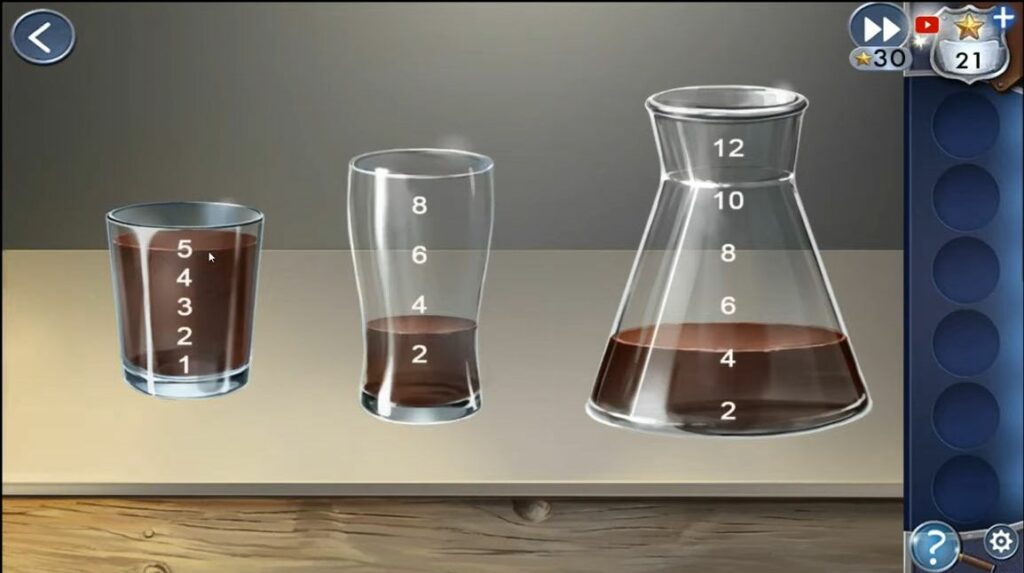
Pour the water into the coffee maker and press the button to start brewing. The next task is to measure exactly 6 oz of coffee, using glasses that can hold 5 oz, 8 oz, and 12 oz. It’s like a puzzle and here’s the sequence; pour from the 12 oz glass into the 8 oz glass, then pour from the 8 oz glass into the 5 oz glass. Pour from the 5 oz glass back into the 12 oz glass.
Place the cup of coffee on the front desk. After that, look at a piece of paper with a list of names and symbols. Tap to see a grid on the small table and then, place the three clean sheets on it. Use the clues to move these clear sheets around until they fit just right. Move the yellow sheet so that the number 817 lines up where the boxes for 8 and 17 meet.
The pink sheet has a compass symbol that matches and put this on top in the right spot. Then, the blue sheet has another matching symbol (two people dancing), and put this in place as well. Now, you can find out the number for Caesar’s room by matching the symbol on the list of names (315).

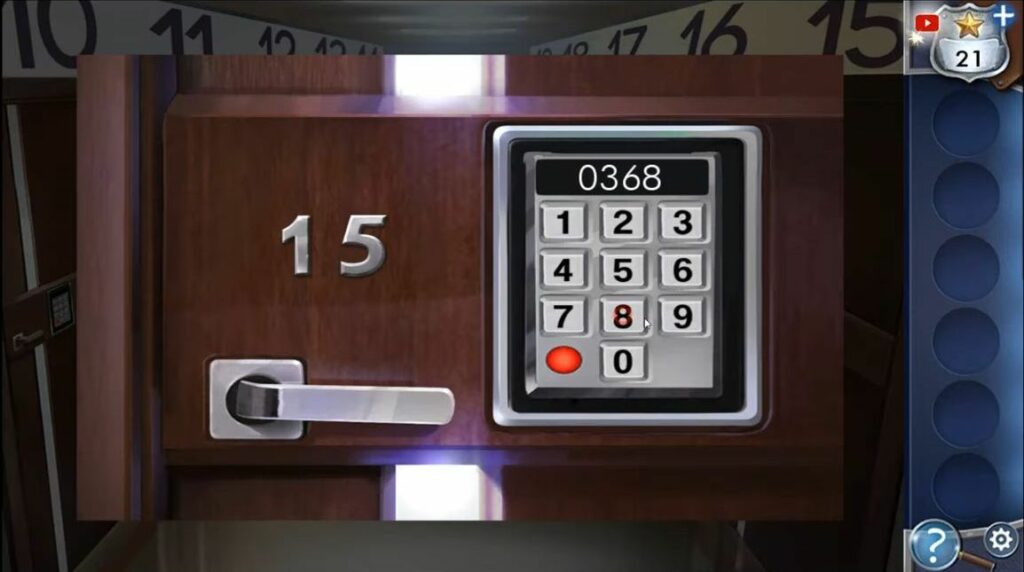
Before going up to the room, notice a note stuck on the board by the reception with a clue (it says to count the triangles). Next, look at the drawing on the wall to the right and count the triangles in each symbol. Now, use the elevator on the right, choose the 3rd floor, and exit. Tap on door 15. The code to enter the room is the code you found above (3 6 8 9) and enter the room.
Gather the palette knife and a key from the back of the unit. Also, pick up a jar of wooden sticks from the shelves on the right and grab the stool. Open the closet to see some shoes, use the palette knife on them, and you can find a second key. After that, open two low cabinet doors to discover a bucket and a heat gun. Now, take a look at the table.
Put the heat gun, sticks, and bucket (glass jar) on the table. Pour the plaster (the white and blue packet) and water into the bucket. After that, use a stick to stir the mixture and pour the mixed plaster into the three molds. Then, use the chisel to break open all three molds.
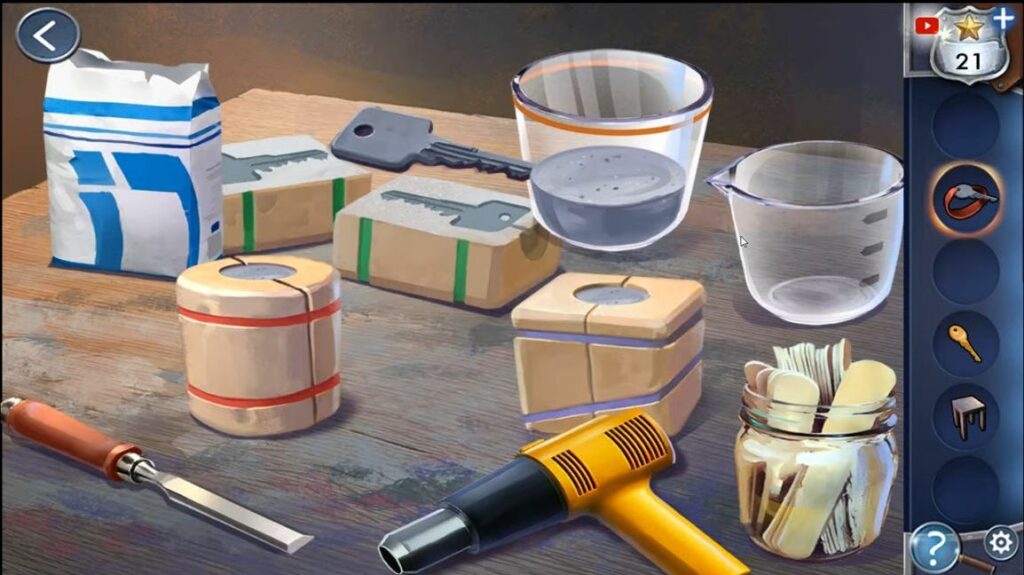
Utilize the heat gun on the plaster key to dry it, and then pick it up. Position the stool by the left closet door. Now, you can reach the case placed on top of the closet, which has 3 keyholes. Use the three keys to unlock the briefcase and find a note.
You’ll be able to compare it with another note and locate all eight differences in handwriting to solve this puzzle. Tap on pairs of words to highlight the letter differences and this completes chapter 2.
Chapter 3
Now you will get a complete guide for Chapter 3 of Adventure Escape: Framed for Murder, another great escape room game.
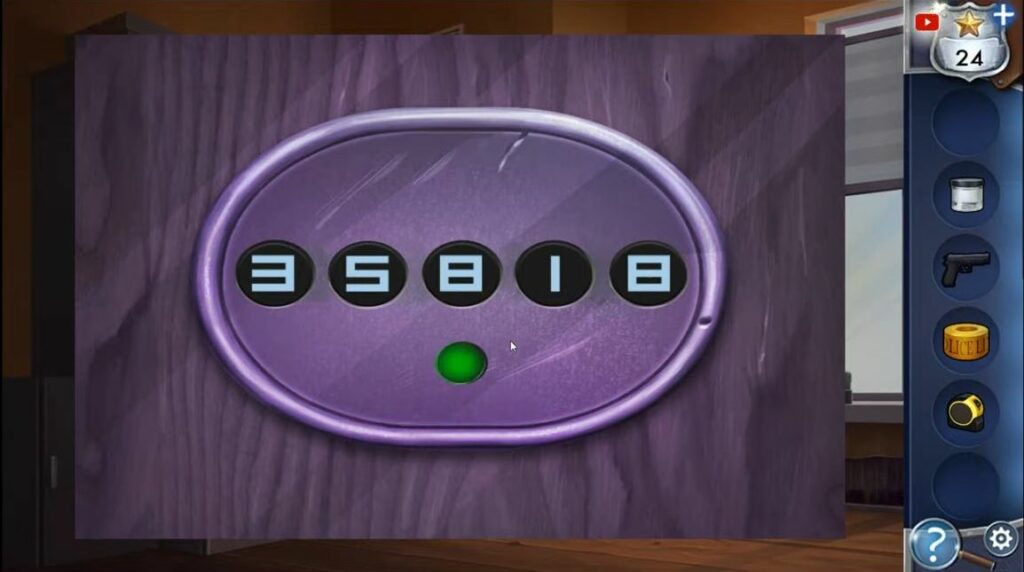
Firstly, gather the crime scene tape, batteries, and yellow paper from the desk. Look under the desk for cotton swabs and get a tape measure from the bin. Find evidence containers on top of the drawers on the right side and put the batteries in the radio on the desk shelf to hear a message of numbers.
Look at the safe above for a 5-digit code, related to the radio (35818). Take a badge, there are two posters on the wall, check the one with the radio codes.
You can now touch the drawer on the left side of the desk that has a code lock. The code to unlock it is 9578 and inside, you’ll find an ammo clip. Next, open the cabinet on the right side of the desk to discover a gun. Use the ammo clip on the gun, and then take the pistol.
Tap on the case near the window to open it and see the police kit. Put all the things you’ve gathered so far onto the pile on the right side.
Take the ammo clip and look inside the cabinet on the right side of the desk to find a gun. Put the ammo clip into the gun and then take the pistol. Tap on the case near the window to open it and see the police kit. Put all the things you’ve gathered until now onto the pile on the right.
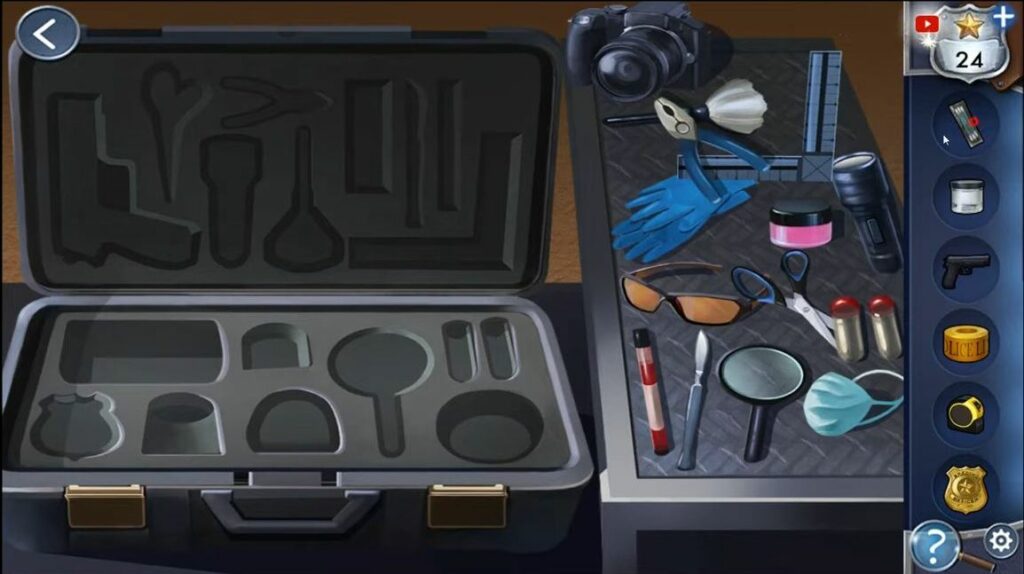
Drag and put each item in its matching spot in the case on the left side. When the case is full, you can open the drawer to locate the file in the cabinet. Arrange the files in the correct order once you find them and look at the other poster on the wall that has different colored sections.
The poster shows the order for arranging colors; red, light blue, orange, yellow, and pink. Begin with Red at the bottom and arrange the numbers within each color in ascending order. Now, you need to solve another puzzle to get into the holding cells.
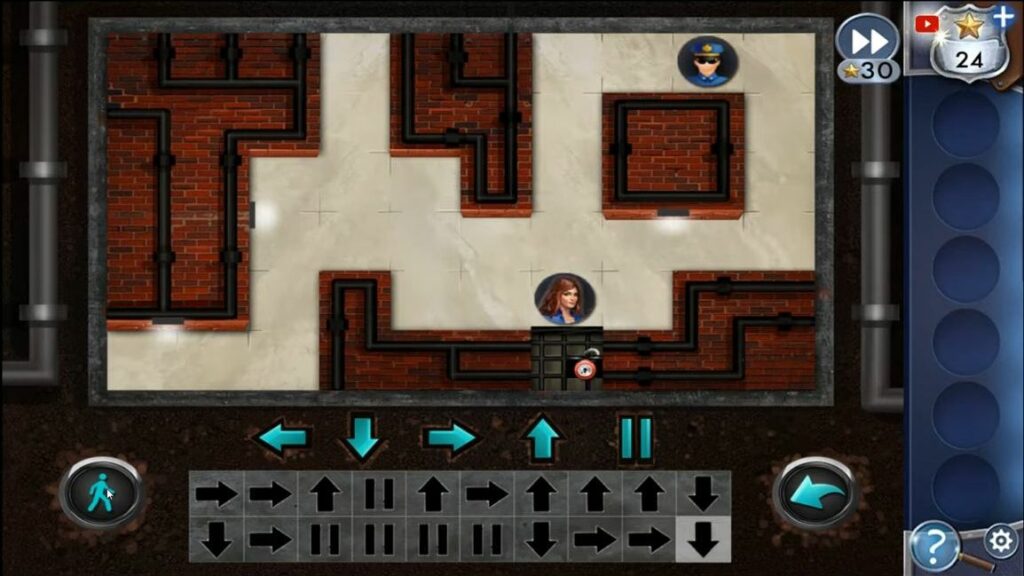
Create a path using the controls at the bottom. After setting it up, press the walk button to follow that path and every time you move, the guard will also move. If the guard sees you at any point while you’re in their line of sight, you’ll be caught, and you’ll have to start over. Practice a few times to understand how the guard moves. Now you’re at the cells, starting from the bottom right corner.
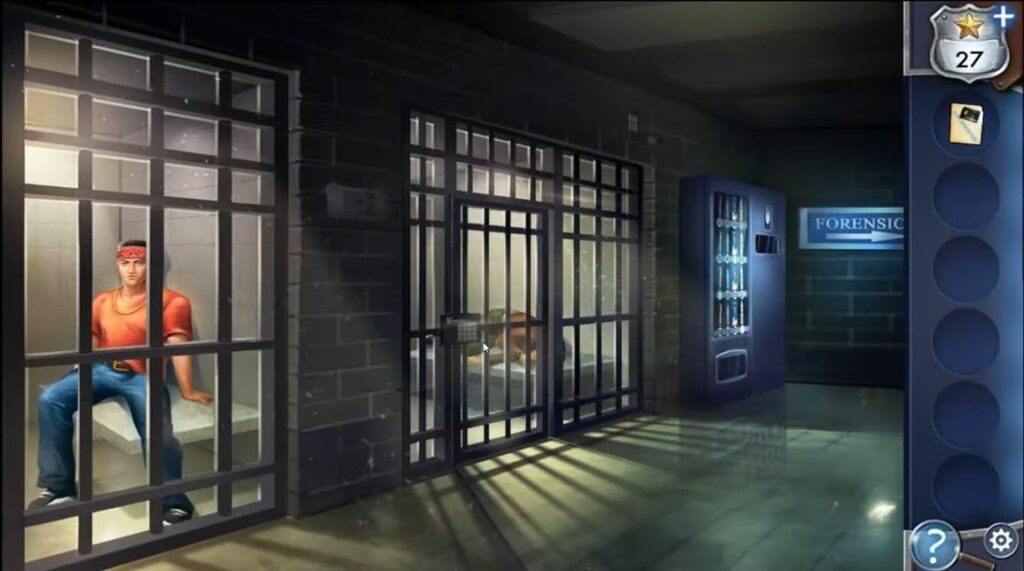
Tap to have a conversation with Romeo, who is Caesar’s brother. You’ll be given different questions to choose from. Place the case file on the third question, which is about why Caesar was murdered. You won’t be able to answer the other two questions just yet.
Go back and explore the areas around the cells for clues. There’s a piece of paper on the wall and a pattern made of blocks. Combine these clues to figure out a code to unlock the cell next to Romeo’s.
Next, head to the Forensics lab and tap on the sign located to the right to go there. You’ll find a star on the center-right. Open the medicine cabinet and take the smelling salts. Additionally, look at the poster on the door to learn the steps for reviving someone.
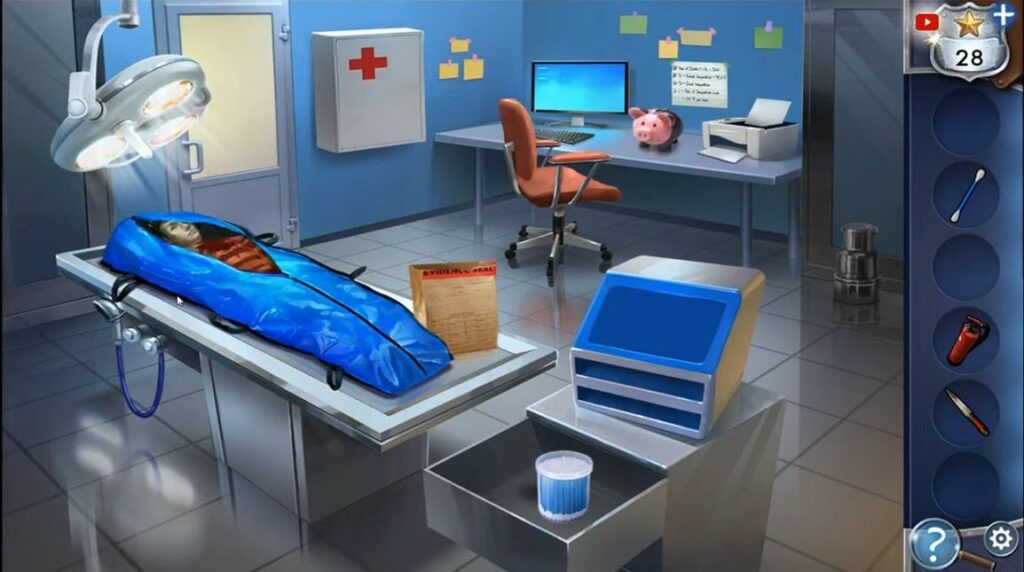
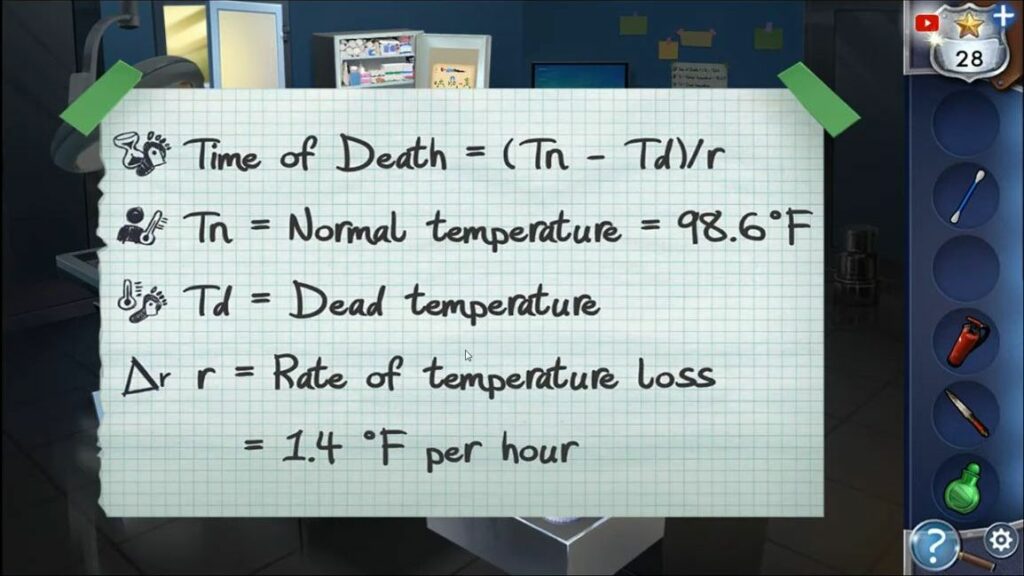
Gather the fire extinguisher and open the evidence bag near the body to take the Bloody Letter opener. Look for a cupboard door under the autopsy table and open it to get a thermometer. Open the top drawer next to the Autopsy table to find a Cotton swab. Above the piggy bank on the right, there’s a poster that provides information about body temperature loss.
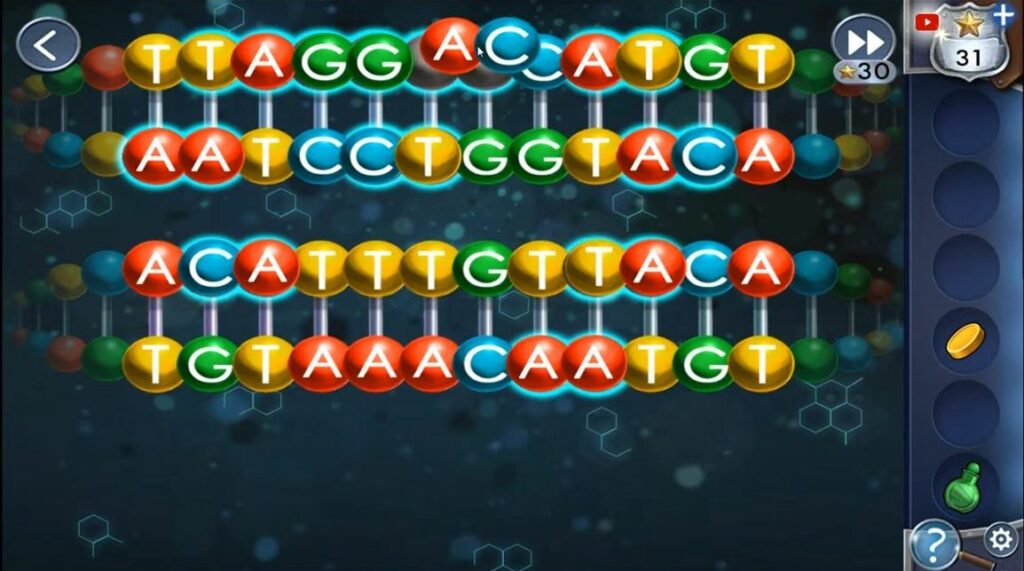
Unzip the body bag and use the cotton swab to collect some of Caesar’s blood. Afterward, put the cotton swab and the bloody letter opener into the blue machine on the drawers. This machine is a DNA analyzer. There’s a puzzle involving DNA where you have to match the pairs at the bottom to the chain at the top. Remember, in DNA, C always pairs with G and A always pairs with T.
Once the blood matches, tap on the computer to open it. You have to guess a password, kind of like a game called Mastermind, and the password has four letters. When you guess, it will tell you how many letters are correct and in the right spot, how many are correct but in the wrong spot, and how many are completely wrong.
You have ten chances to guess the right password and the password changes each time you try. Now, check the body’s temperature using the thermometer and it reads 79°F.
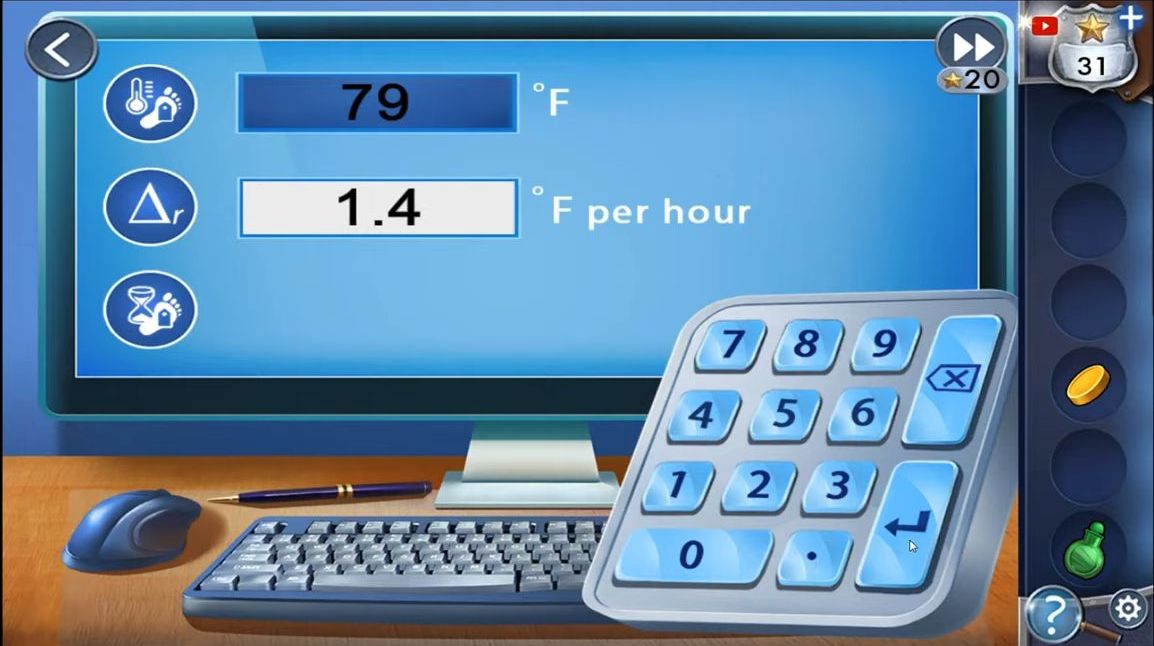
Go to the computer and type in 79 for the temperature of the deceased person and 1.4 for how fast the temperature dropped. The computer will say he passed away 14 hours ago, at 9 PM yesterday. Press the printer to get a report on the time of death and another report on the weapon used in the murder.
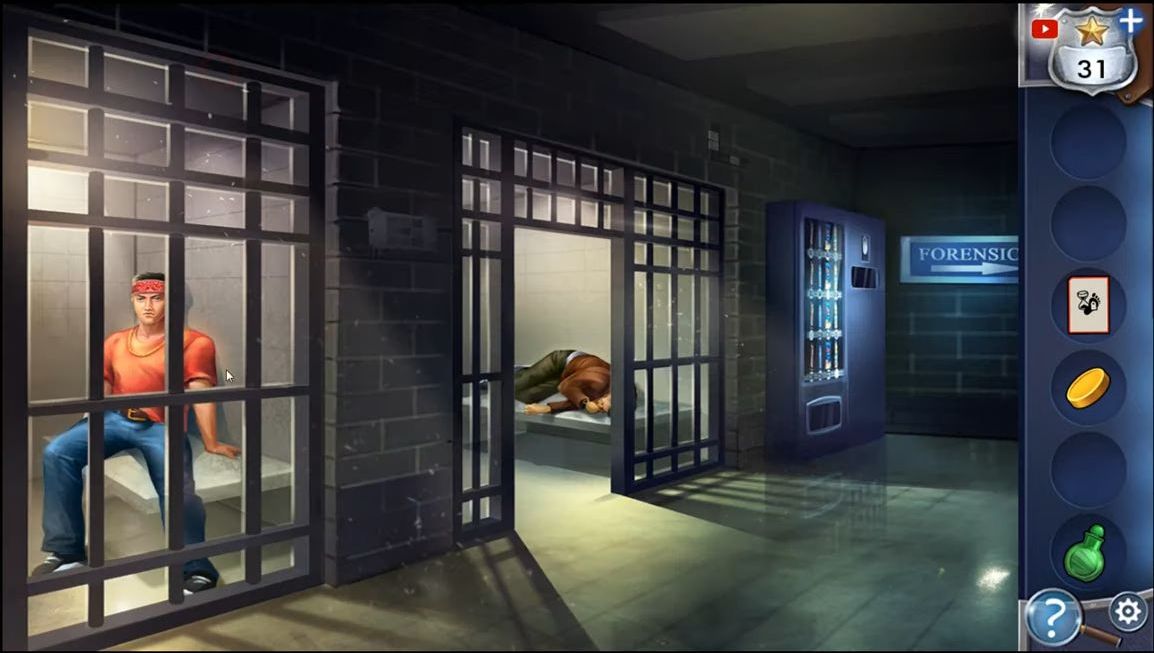
Before leaving, use the smelling salts on the water hose near the table where the body is examined to activate them. Then, use the fire extinguisher on the piggy bank to break it and get a coin. Tap the door to leave and return to the jail cells. Talk to Romeo again.
Now, with the Time of Death Report and the Murder Weapon Report, you can answer two questions. Romeo will provide more information. Finally, give the activated smelling salts to the unconscious prisoner.
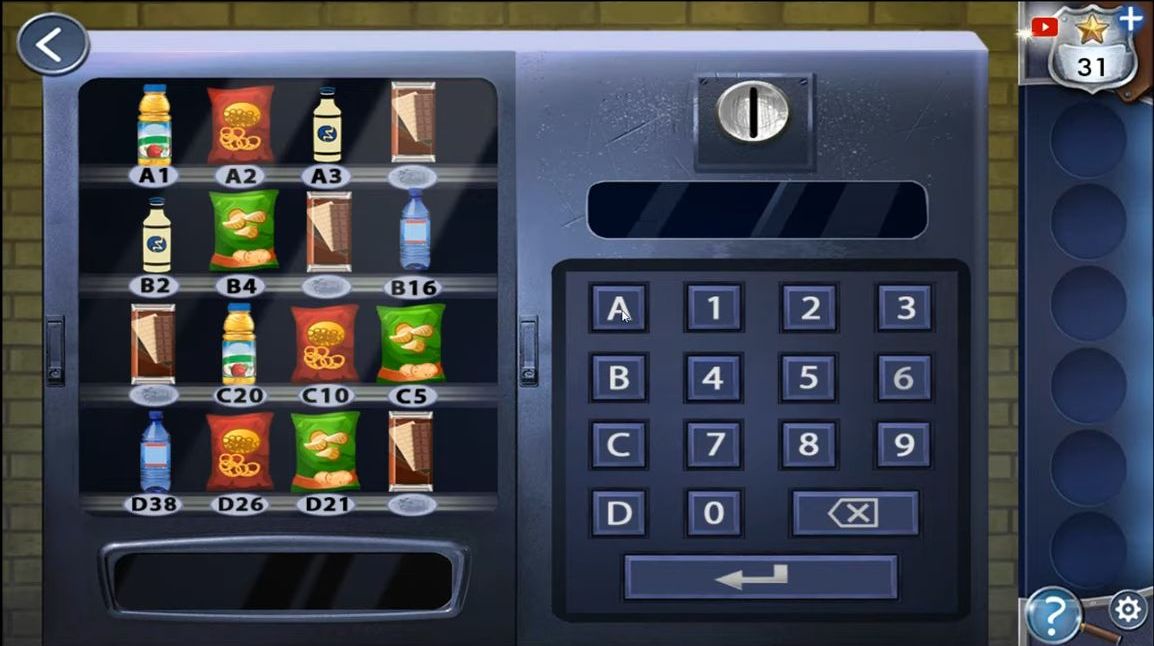
He wants chocolate, so tap the vending machine and put in the coin. There are four chocolate items inside, but they aren’t labeled. Figure out which number to press to get a chocolate bar. You only need one for now, get the chocolate and give it to the prisoner. Now that the Prof is fully awake, you can talk with him and get more information. This finishes Chapter 3.
Chapter 4
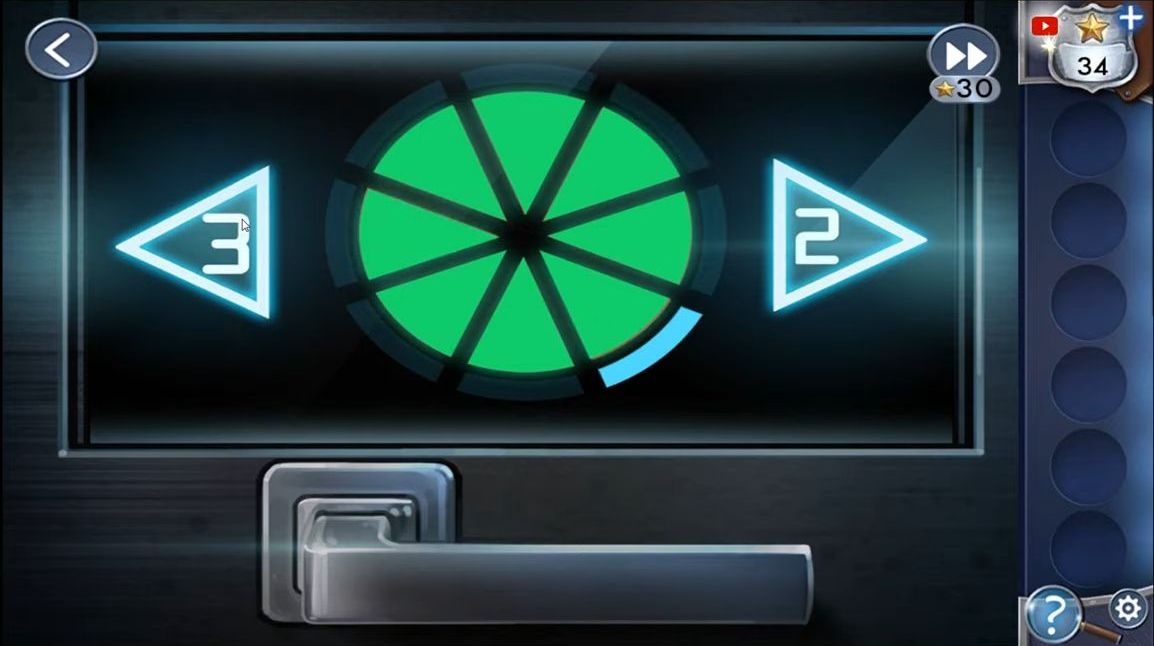
First, go back to the security office on campus to check the damaged painting. Look for a star in the top right of the tree and tap on the door to see a lock puzzle. Your goal is to turn all the pieces green.
The right arrow moves two segments clockwise and changes their color. The left arrow moves three pieces counter-clockwise and changes their color. If you’re starting from the beginning, use this combination; Left, Right, Left, Right, Left, Left, Right.
Enter the office and look for a star on the ceiling in the top right corner. Open the drawers on the desk. Gather a utility knife blade and a clear plastic bag. Use the blade on the utility knife that’s on the desk to detach it, then take the knife.
Use the knife on the painting in the left corner, and afterward, use the plastic bag to pick up the piece from the ground. Now, go back to the corridor outside Sylvia’s office.
The padlock’s cupboard password got changed and look at the clock again for a clue. The clock reads 9:36, but since it’s nighttime, you should set it to show 9 PM, which is 2136 in military time. Grab the flashlight and tap on the left door to get into the office.
Look for a star underneath the chair and table, then open the lower drawer on the right to get the evidence container. After that, go through the sealed-off door.
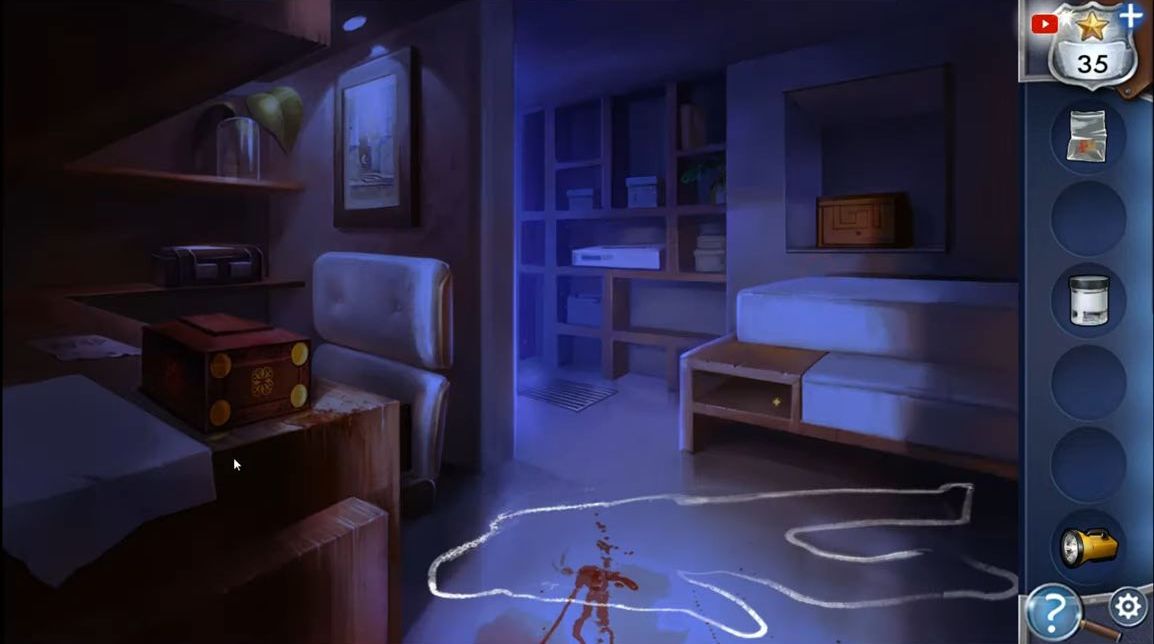
Look for a star in the sofa pocket, just above the body outline. On the shelf located at the far left, there’s a kit bag; open it and grab another evidence container. Return to the hallway, open the door at the end of the hall, and enter the art room.
Get a paint scraper from the pot of brushes on the far left side and use the scraper to remove dried blood from the floor. Then, use an evidence container to collect the blood. Use the flashlight to reveal and access the secret passage, allowing you to go downstairs.
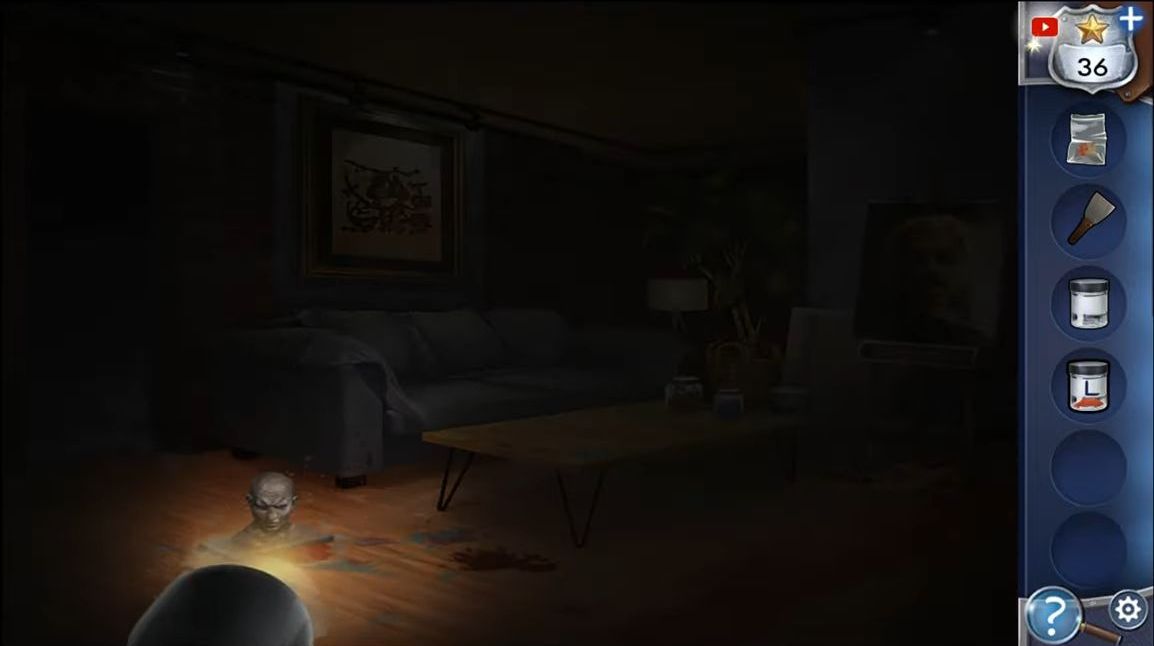
Utilize the flashlight to explore the room and discover three more blood samples. Collect them using the L-labeled evidence container, just like before. Return to the corridor and enter the office to examine the crime scene. Use the scraper and a second evidence container to gather a blood sample from the floor.
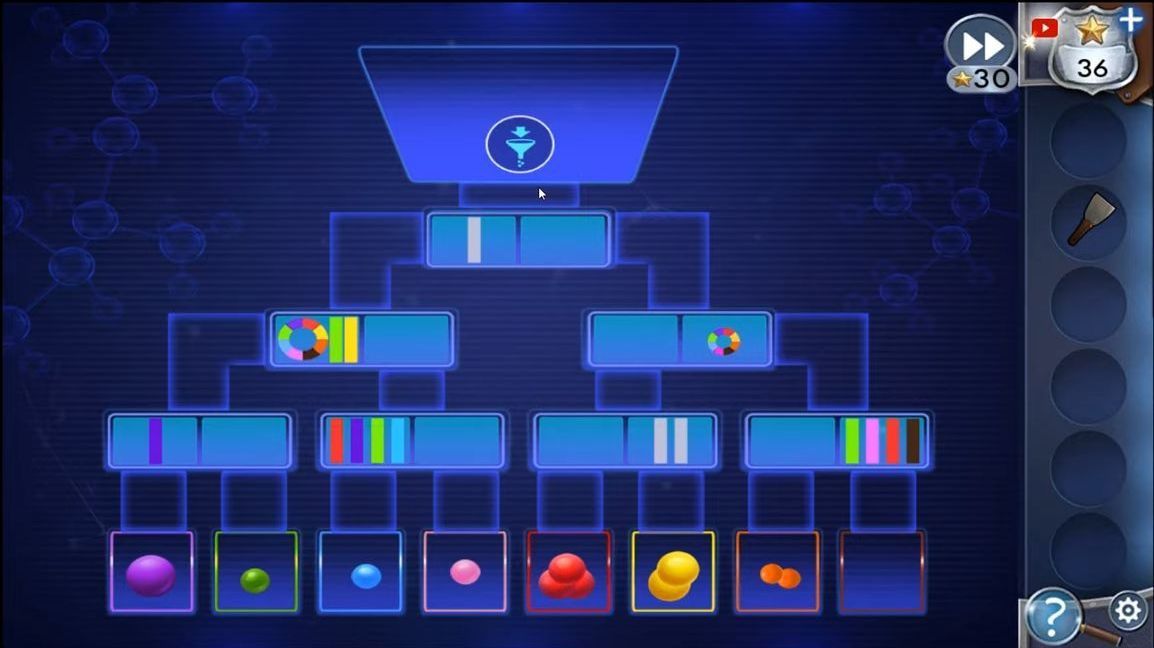
Go back to the outer office, and put both evidence containers and the painting sample into the machine on the right. Arrange the filters into the slots of the puzzle in a way that when the processing begins, the molecules end up in the correct colored boxes at the bottom.
Now you should go back to the Dorm for more clues. You are interested in looking into Caesar’s room, but first, go to the basement by pressing the B button. Get the sponge from the washer and the paperclip from the table there. Go up to the third floor and head to room 15, just like you did earlier.
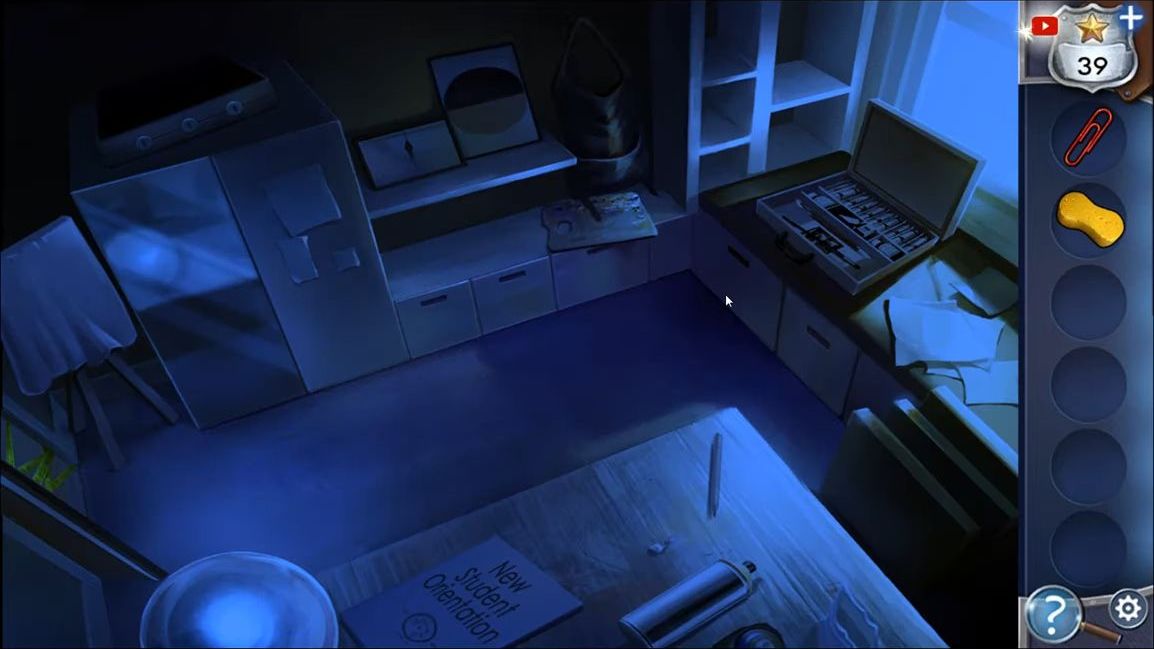
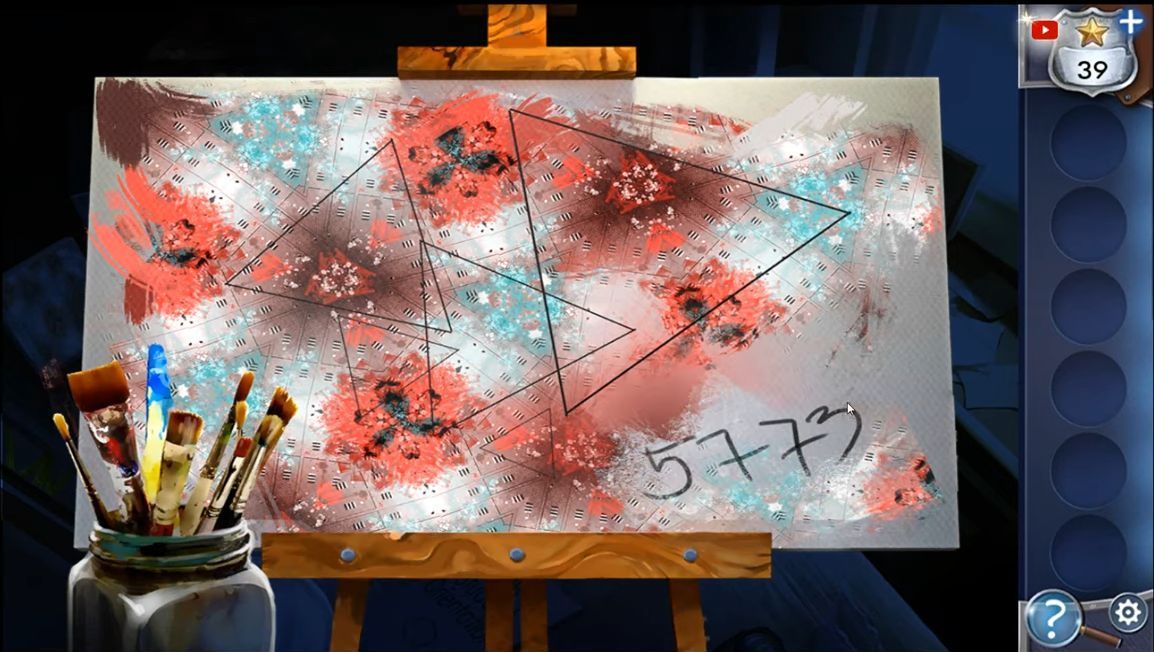
Tap on the table to see the New student orientation. This tells you Caesar’s locker number. Also, there’s a spray can on the table, but its nozzle is clogged. Use the paperclip to unclog the nozzle, and then you can take the Paint Thinner.
Tap on the covered easel located on the left to remove the sheet and check it. Apply the paint thinner on it and then use the sponge to uncover a hidden number.
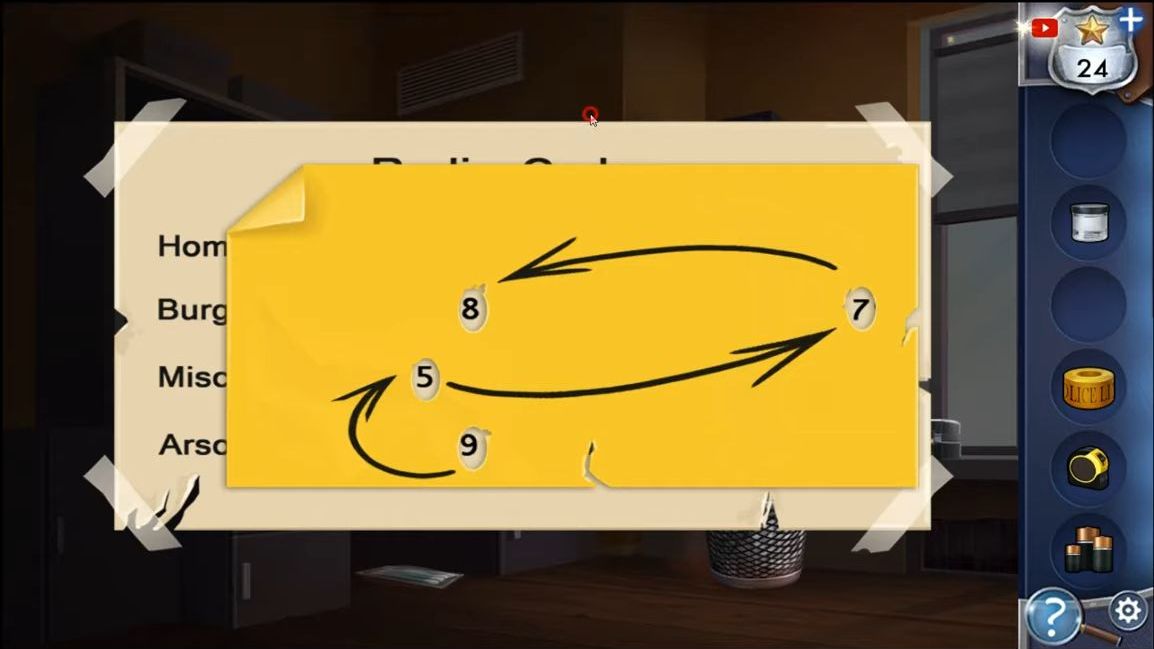
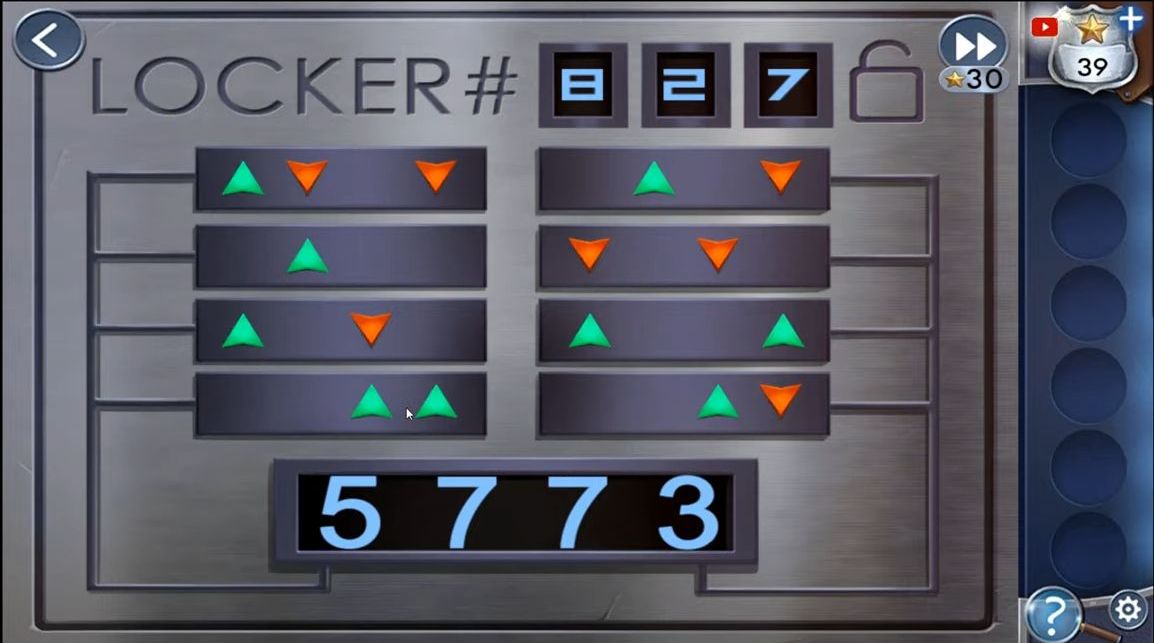
Return to the basement and tap on the Lockers access panel to see it. Enter the locker number at the top: 827. Use the eight wide buttons to set the code. Each button changes several digits, as shown by the arrows, and sets the code to 5773.
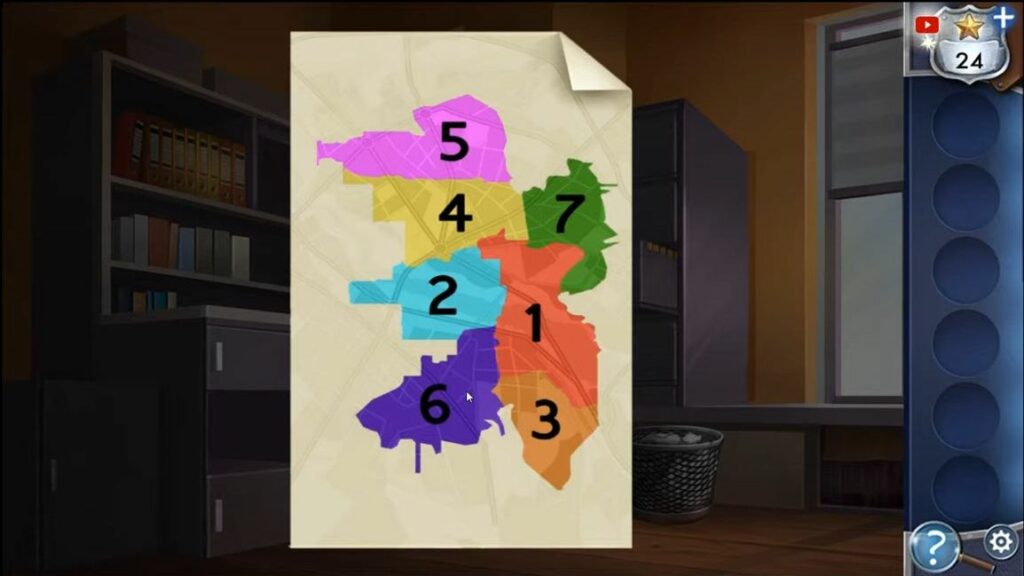
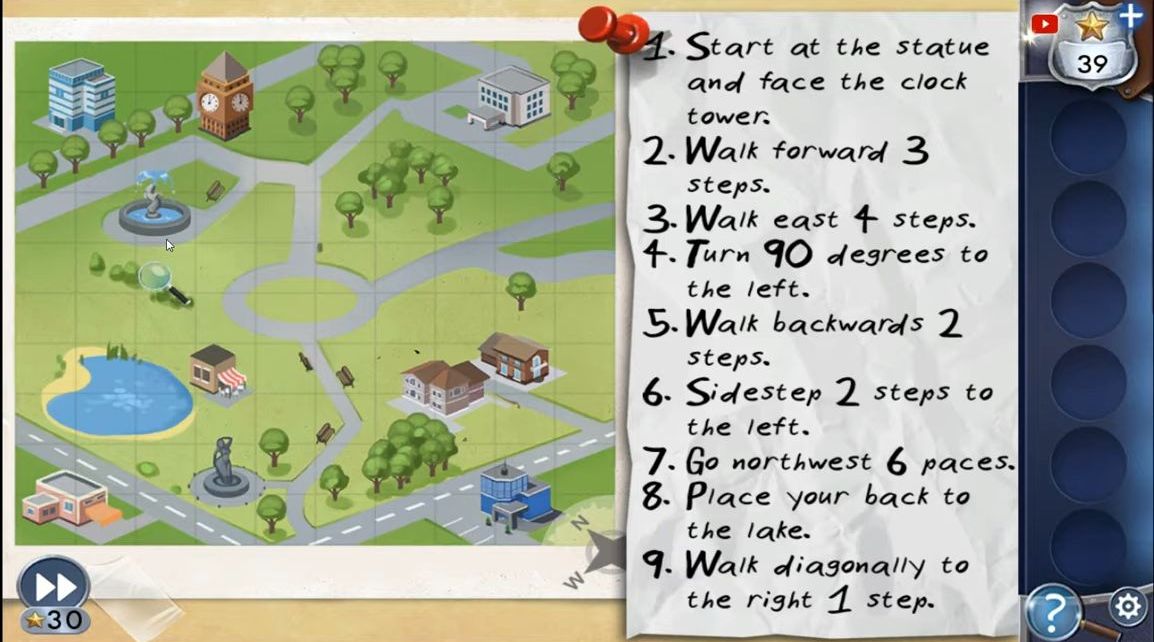
Now, you’ll get a map and a set of instructions. Follow these directions on the map. Tap on the map to explore and search the area to discover Caesar’s hidden collection. Pay attention to the compass at the bottom of the map for the correct directions. Remember, on this map, North may not be at the top and this concludes Chapter 4.
Chapter 5
This section is a complete guide for Chapter 5 of Adventure Escape: Framed for Murder, a cool escape room game created by Haiku.
First, you should go to the gardens to pick up the rake and shears from the ground near the fountain. Look around to gather a red puzzle piece from the top of three figures and a pink one from the statue’s base. Use the shears to trim the bushes on the top right to uncover a green piece.
Use the rake on the sand at the top left to discover a blue piece. Take the hat from the left figure. Use the shears on the kite hanging on the bush to the left of the statue to collect a kite frame. Attach the kite frame to the blocked pipe on the fountain to clear it, causing something to fall out. Use the hat in the water to get a Yellow Puzzle piece.
The statue in the middle can be moved and posed by tapping on the head, arms, and legs. Follow these clues to decide the correct pose or position for the statue.
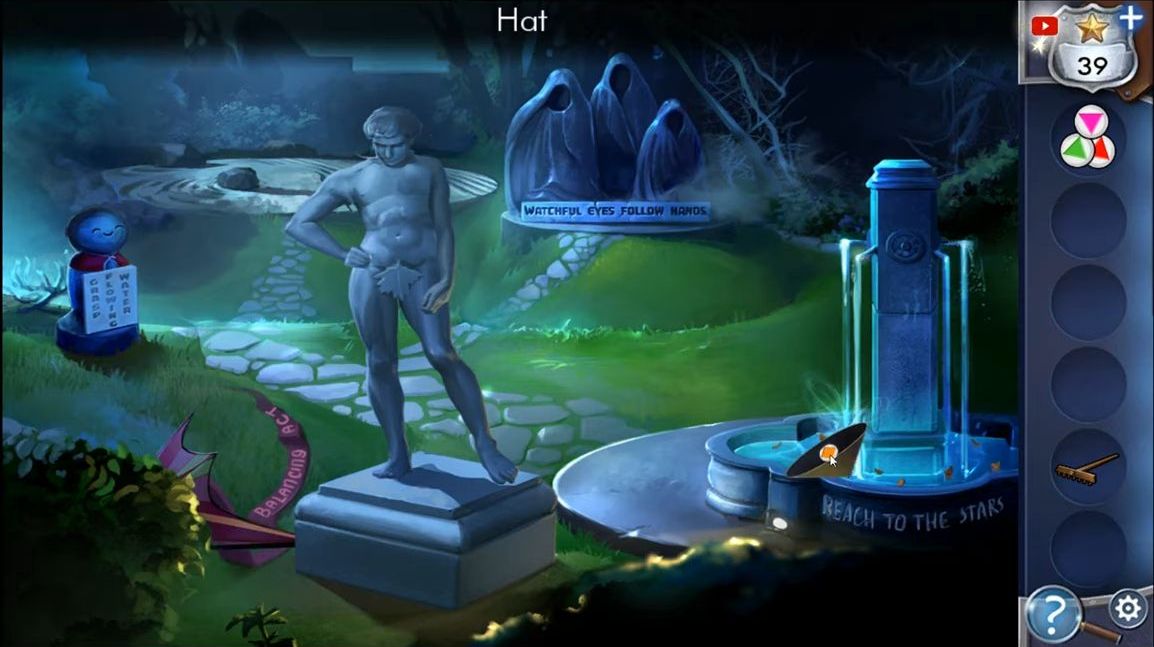
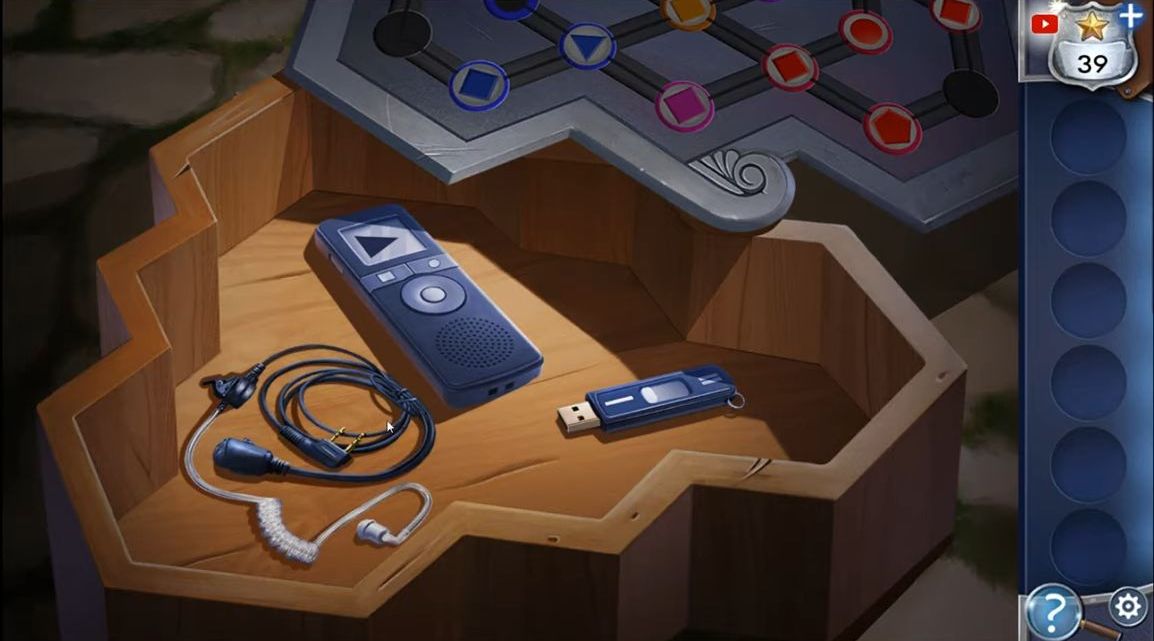
Now, there’s a puzzle box at the bottom of the statue. Start by placing the five extra pieces into the puzzle. Your task is to shift all the pieces to their proper spots. Each piece has a matching color and shape. Once completed, the box will open, revealing a tape recorder. Listen to the recording, and then you’ll be able to take the USB stick.
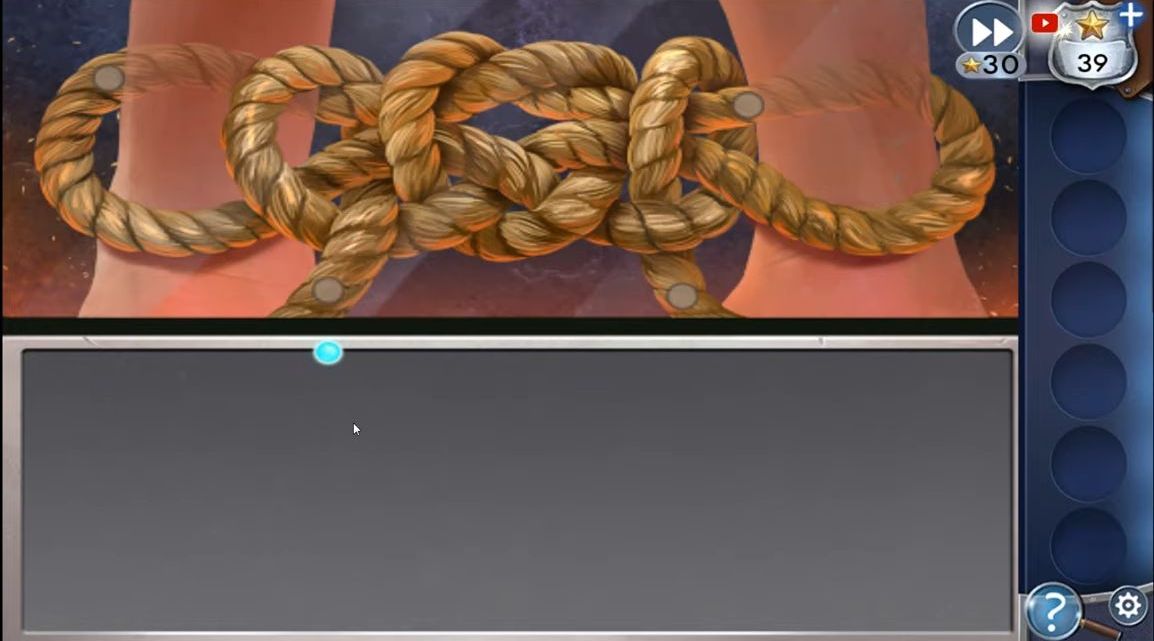
Kate has been taken and is now tied up in a room that’s on fire. Begin by tapping on the mirror located on the far right. Then, tap on the reflected image of the hands to initiate a rope puzzle.
To solve this puzzle, you’ll need to trace the lines of the ropes in the lower section to match the actual rope pattern shown in the top section, as it’s reflected. It might be a bit challenging, so take your time and make adjustments to match the movements carefully. Passing through the circles will mark a checkpoint for you in the puzzle.
Once you solve the puzzle, you’ll be untied and your next task is to extinguish the fire. On the left side of the room, gather the tongs, and shovel, and examine the fire safety poster. Also, pick up the multi-tool from the floor, along with the fire extinguisher and rope from in front of the window. Open the small cupboard on the far left to find a baking sheet.
Start by using the tongs to fetch a paint can from the left and place it in the blue water barrel. Then, cover the flames with the baking sheet to put them out. Retrieve the sheet and repeat the same process with the other paint can. Repeat this for the other two boxes and other items. Once all the fires are out, you can open the door and leave.
Bill is hurt, and you need to assist him by using your multi-tool to take the axe mounted on the wall. Get two rulers from the desks and pick up some cable ties from the lower-left box. Also, grab the roll of plastic wrap located near the door, and take a cloth from the shelf above. Place the cloth on the wound.
Cover and safeguard it using plastic wrap. Use your multi-tool again to collect the wall-mounted axe and gather two rulers from the desks. Obtain cable ties from the box in the lower-left corner. Take the roll of plastic wrap from beside the door, and get a cloth from the shelf above. Place the cloth on the wound, and use the plastic wrap to cover and protect it.
Next, insert the USB stick into the computer and tap on the screen to see its contents. You’ll need a password to proceed. If you input the wrong number and tap enter, the system will give you a hint. The hint consists of four shapes to help you calculate their respective values.
Take the paper on the wall to understand the values of the shapes. Now, examine the new puzzle on the USB stick. Look at the patterns on the left. Notice that for the first two rows, the third image is a combination of the first two.
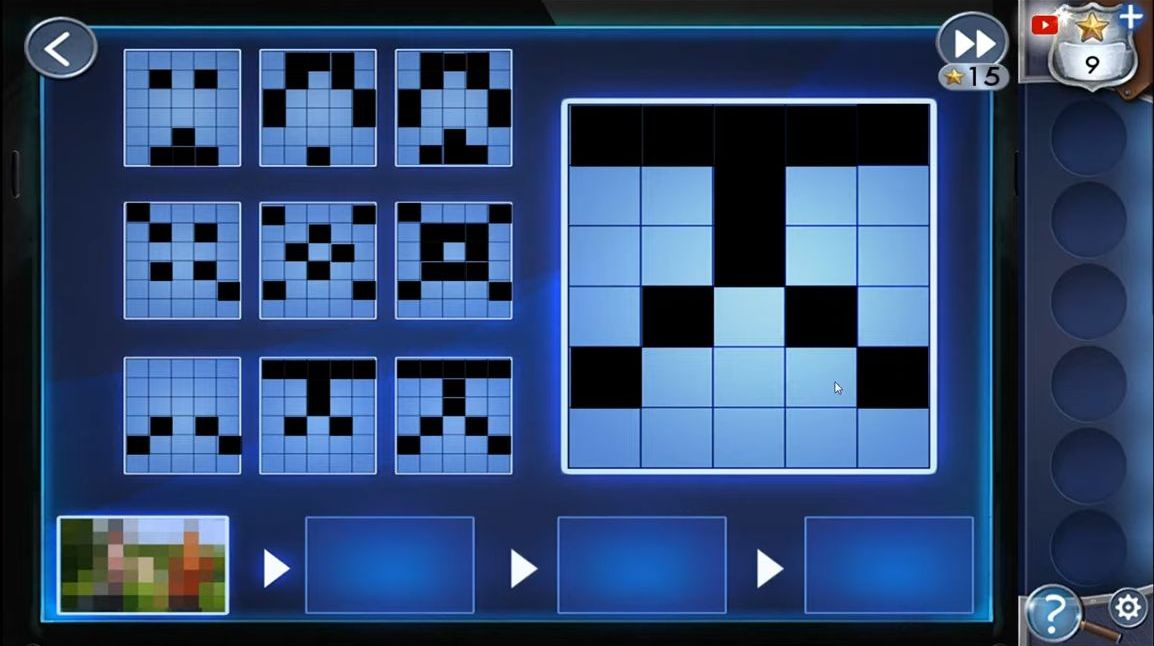
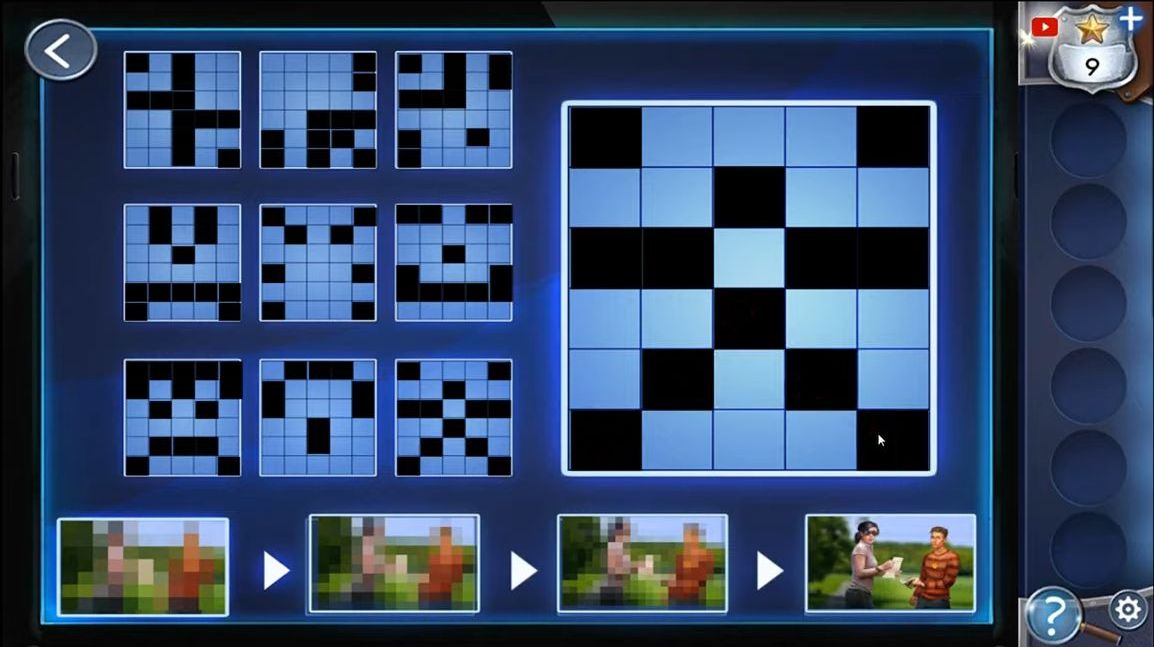
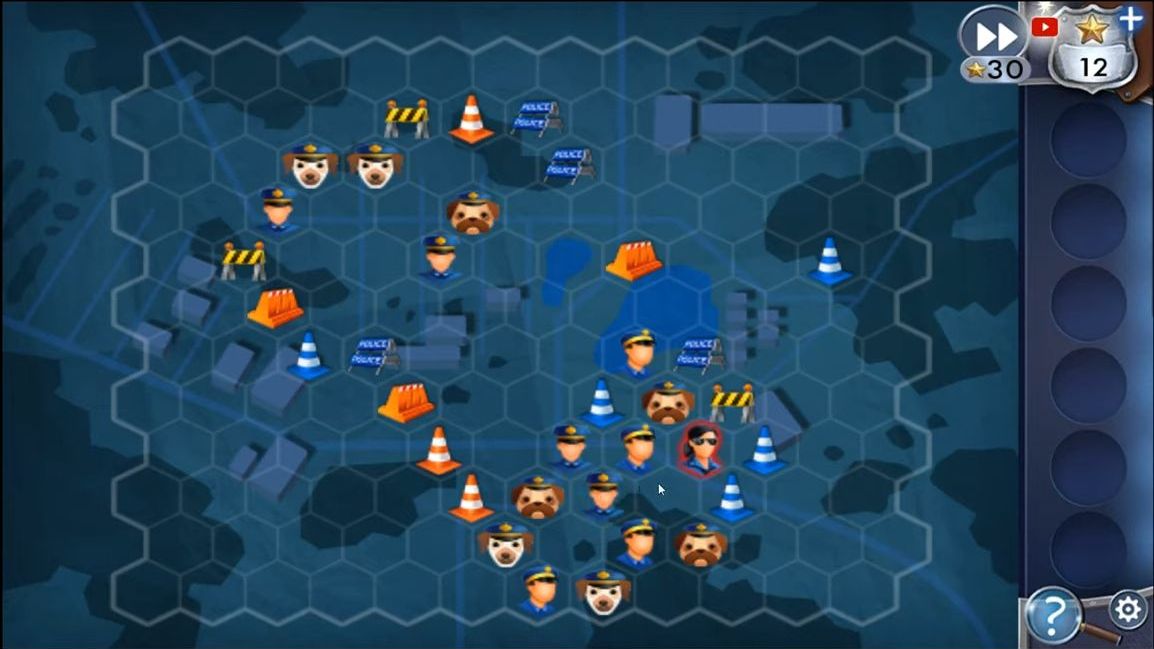
Solving the puzzle will reveal the image, allowing you to identify the informant. Now it’s time to capture Carla and this triggers another mini-game. Tap on any spot to put up a barrier that stops Carla’s movement.
If Carla reaches the edge of the grid, she escapes. Keep placing barriers until she’s surrounded and can’t move anymore. Once she’s trapped, the game ends, and you can arrest Carla, freeing Sylvia.