This guide will help you to configure CS2 dedicated server setup. First, you have to use game files for the dedicated server, adjust SteamCMD for a separate dedicated server (VPS, another PC, etc.), and create a Start file (SteamCMD).
After that, create a Start file (Game files), get a server token/set Steam account and test your server (SteamCMD). Downloading game files (SteamCMD), testing your server (SteamCMD), add a server.cfg (Set name + More config), join your CS2 dedicated server. Finally, and then get friends to join.
Use game files for the dedicated server
In this section, we will take you through the steps to configure CS2 Dedicated Server Setup using game files for the dedicated server.
- First, you need to download the dedicated server files for Counter-Strike (CS2). To use the official CS2 files, you should have CS2 currently installed.
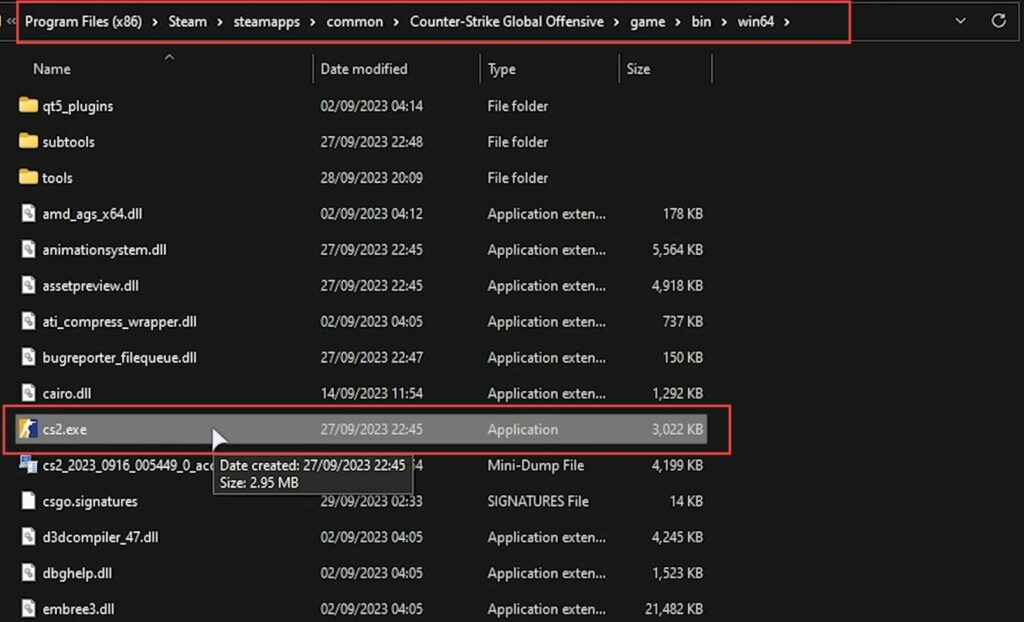
- Open Steam, right-click on CS2 in your Steam library, hover over Manage in the context menu, and click on Browse local files.
This will take you to the location where CS2 is installed. - Navigate through the following folders: steamapps > common > Counter-Strike Global Offensive > game.
- Inside the game folder, open up the bin folder, followed by win64 to find the dedicated server files you need for CS2.
SteamCMD for a separate dedicated server (VPS, another PC, etc.)
This section describes how to configure CS2 Dedicated Server Setup using the SteamCMD for a separate dedicated server (VPS, another PC, etc.).
- If you’re planning to set up a dedicated server for CS2 or want to download a fresh copy of the game, you can use a tool called SteamCMD.
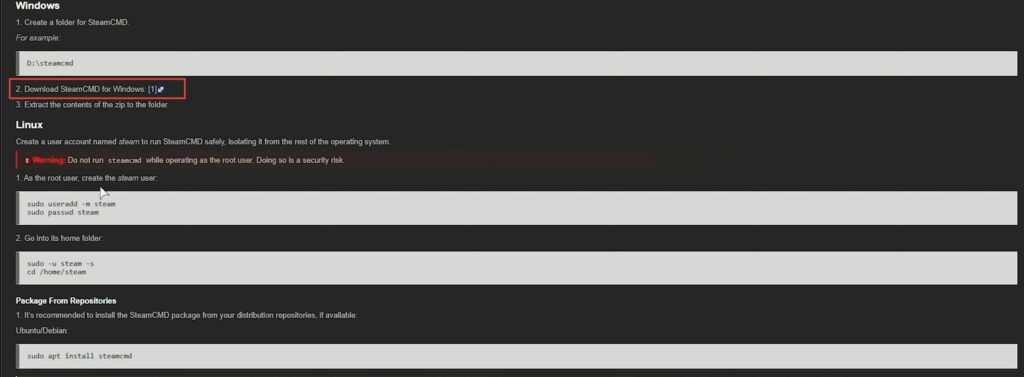
- Go to Valve Software to find the download option that suits your operating system.
Once you’ve downloaded SteamCMD, you’ll be ready to use it to set up a fresh copy of CS2 or a dedicated server. You’ll have a zip file that contains steamcmd.exe.
- You have to create a new folder on your desktop or any location of your choice for your CS2 server.
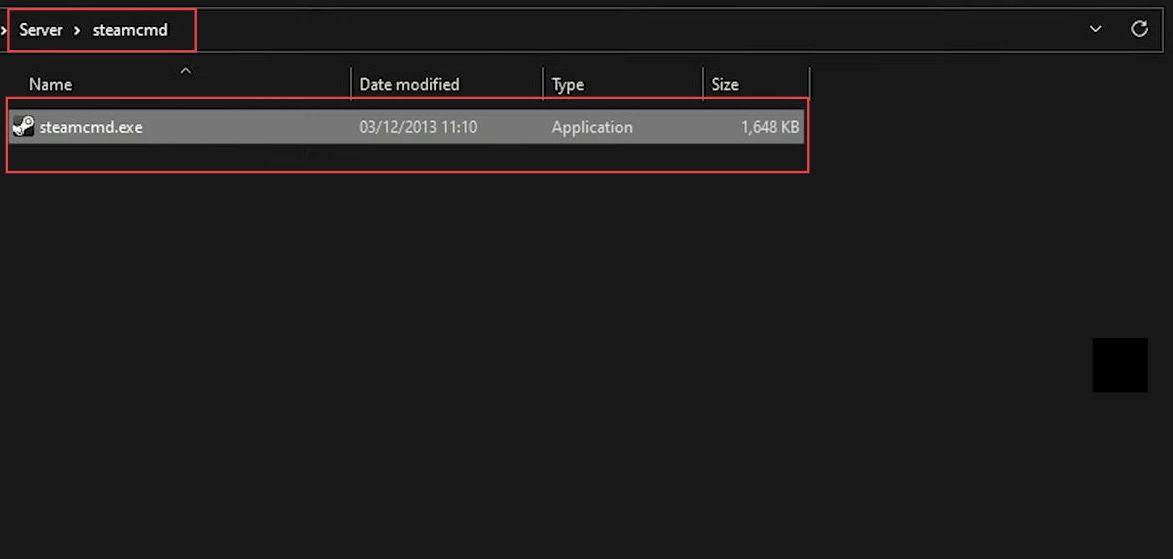
You can name it something like a server. - Inside the server folder, create another folder called SteamCMD without spaces. You need to open the SteamCMD folder and extract the steamcmd.exe file that you downloaded previously into this SteamCMD folder. After that, close and delete the zip file.
Create a Start file (SteamCMD)
This section explains how to create a Start file SteamCMD.
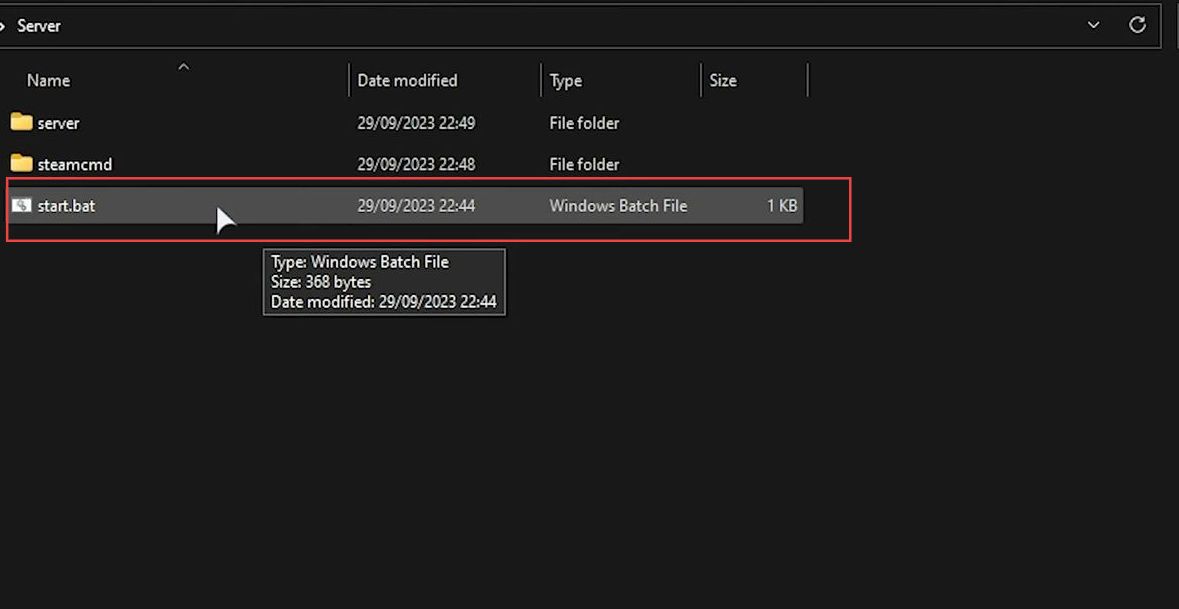
- Go back to one folder upward, right-click in the folder, and choose New. Select Text Document and you need to rename the text document to start.bat without the quotes and press Enter.
- If you don’t see the .txt extension or if the icon hasn’t changed, make sure that file extensions are visible. On Windows 10, go to the View tab, click Show, and ensure that both File name extensions and Hidden items are checked.
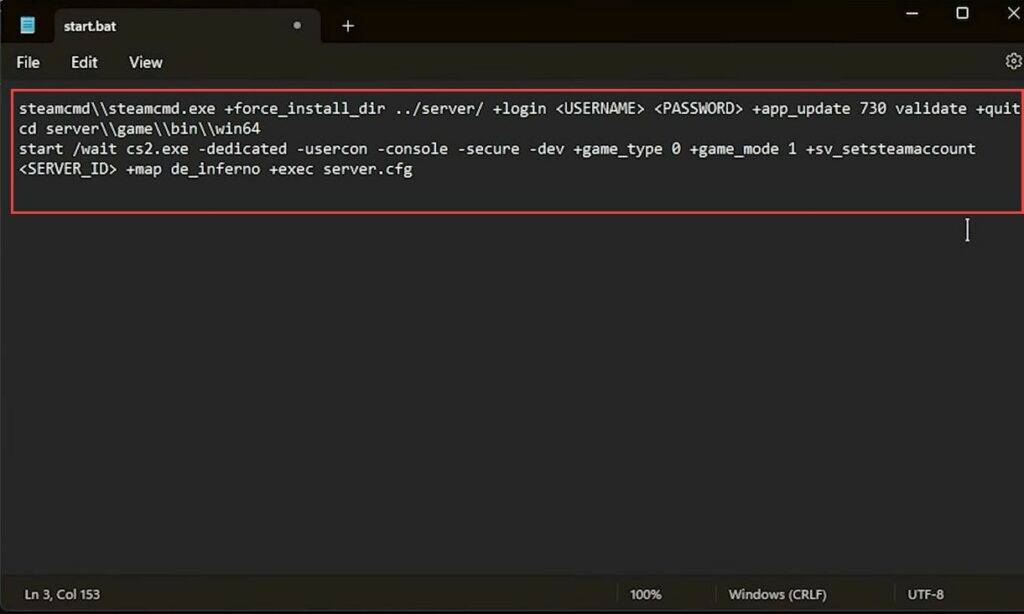
- Open the start.bat file with a text editor like Notepad, paste the provided text into the file, and then save it.
steamcmd\\steamcmd.exe +force_install_dir ../server/ +login <USERNAME> <PASSWORD> +app_update 730 validate +quit

cd server\\game\\bin\\win64

start /wait cs2.exe -dedicated -usercon -console -secure -dev +game_type 0 +game_mode 1 +sv_logfile 1 -serverlogging +sv_setsteamaccount <SERVER_ID> +map de_inferno +exec server.cfg- Don’t close the start.bat file just yet, as you need to make some modifications.
- Since there isn’t a dedicated server for CS2 as in CS:GO 730, you have to use the game’s ID 730 to download the game files and host the server. You can’t use login anonymous for CS2 servers; instead, you need to enter a Steam account username and password.
You can use your Steam account or create a new one for this purpose. - Replace the username with your Steam account username and password with your Steam account password within the start.bat file.
- Additionally, the batch file is set to start the server automatically. To allow your server to be accessible from the internet, you need to set up a Steam account. You can add your Steam account information in the batch file as needed.
Create a Start file (Game files)
This section will take you through the steps to creating a Start file (Game file).
- To help users with existing game files get up to this point, right-click on CS2 in Steam, select Manage, and then click Browse local files.
- In the CS2 installation folder, navigate to game > bin > win64, and you’ll find the CS2 executable. Create a new text document, rename it to server.bat without the quotes, and press Enter. If the file extension hasn’t changed to .bat, you might need to ensure file extensions are visible.
- On Windows 10, go to the View tab, click Show, and ensure that both File name extensions and Hidden items are checked.
After renaming, the icon should change to indicate that it’s a batch file. You can run your server using this file. - To edit the server.bat file, right-click on it and select Edit. You can also open it in any text editor.
- You have to copy the provided code and paste it into the server.bat file you’re editing. Be sure to replace the CS2 path in the code with the full path to your CS2 game folder and then save the file.
cd "<CS2_PATH>"
start /wait cs2.exe -dedicated -usercon -console -secure -dev +game_type 0 +game_mode 1 +sv_logfile 1 -serverlogging +sv_setsteamaccount <SERVER_ID> +map de_inferno +exec server.cfg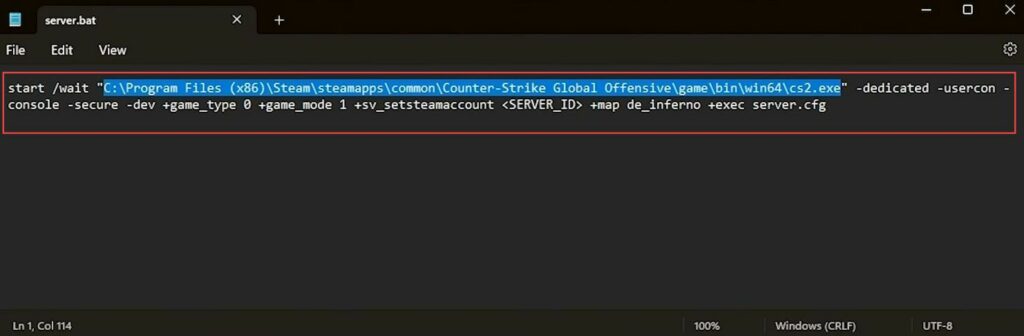
Get server token/Set steam account
This section explains how to get a server token/setting Steam account.
- You need to keep in mind that when you create a dedicated server, it counts as logging in and running the game. If you use your main Steam account for this, you won’t be able to play CS2 on that main account.
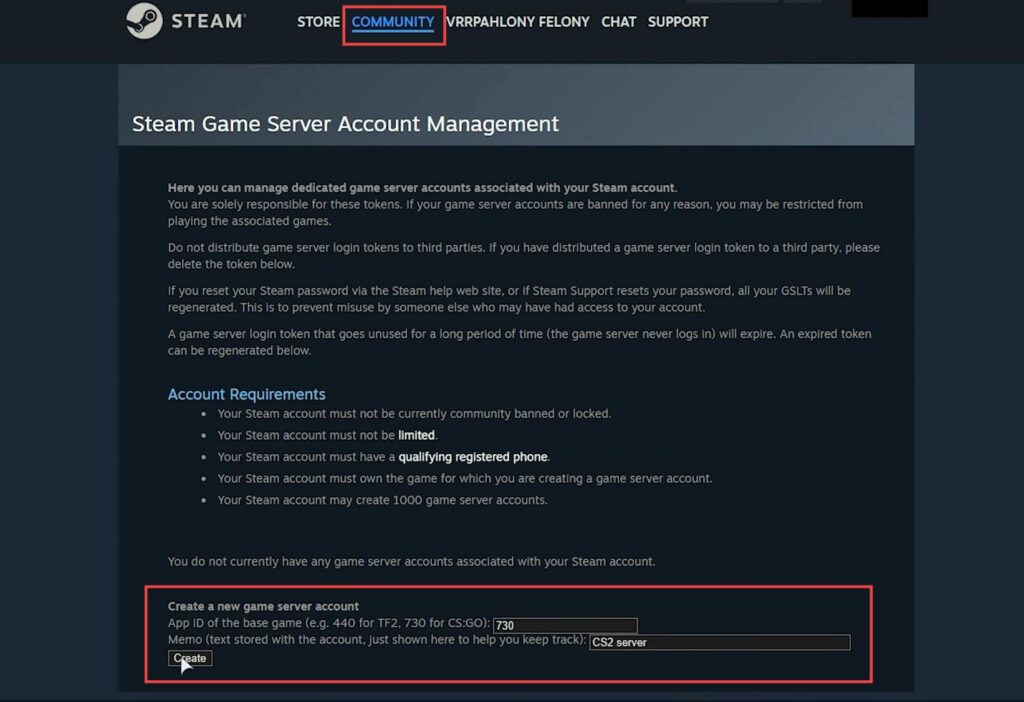
You’ll need another Steam account to do this. - To get a unique ID, go to the Server ID section and head to the Manage Game Servers page on Steam. You can access it by clicking on Manage Game Servers.
This will open a new tab in your web browser. - On the Servers page, you’ll need to enter some information such as for App ID, enter 730. In the Memo field, you can give your server a name and then click the Create button.
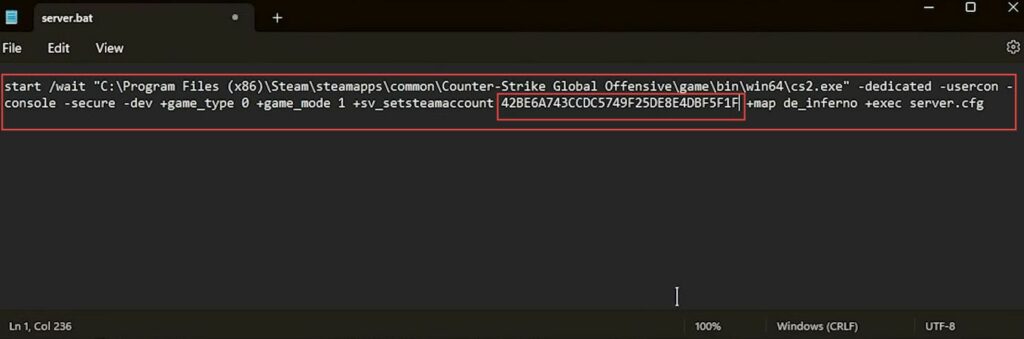
- After creating your unique server token on the Manage Game Servers page, you should now have a unique code. You need to copy it.
- For both users using the game files and those using SteamCMD to set up your CS2 server, replace the server ID in your configuration files with the unique token you just copied.
Testing your server (SteamCMD)
In this section, we will take you through the steps to test your server SteamCMD to configure the CS2 Dedicated Server setup.
- If you’re using the existing game files, you can run your server after saving the configuration file. Double-click on the server.bat file, and the server should start running immediately.
- Make sure the CS2 path in the batch file points to your CS2 game folder. You can do it by copying the folder path. After that, double-click server.bat to start your server.
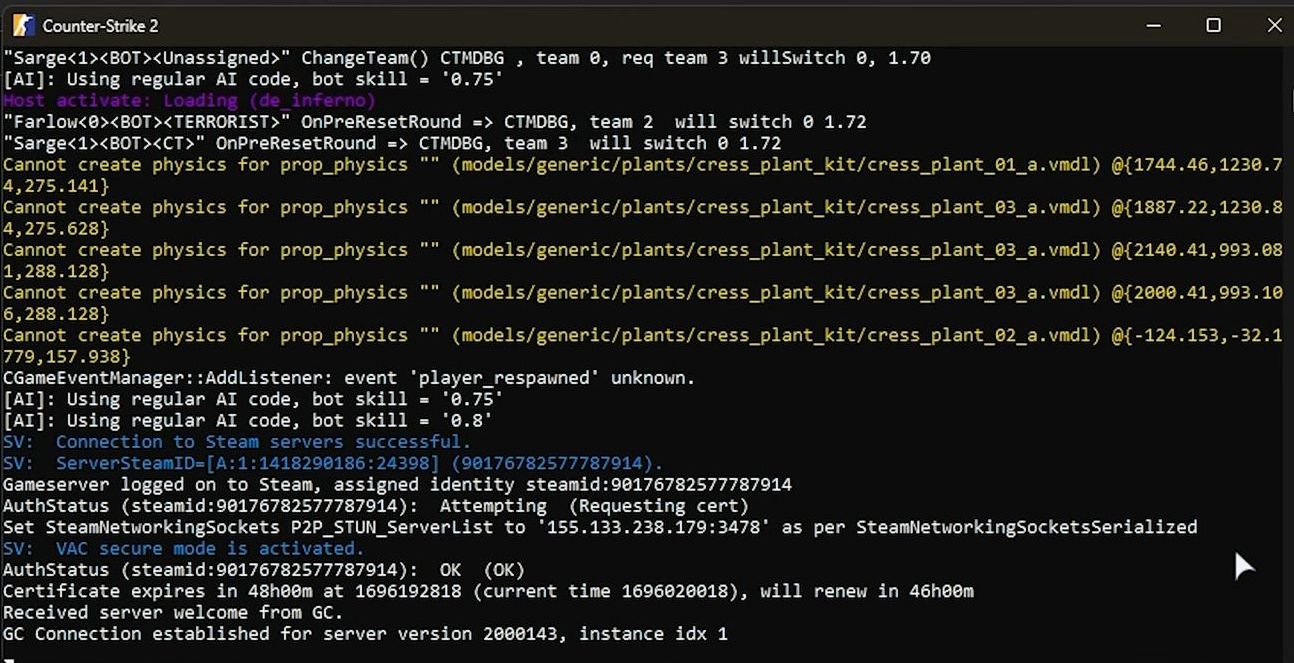
A command window will pop up, indicating that your server is starting. You can minimize this window. Your CS2 server is now running and ready to be joined by other players.
Downloading game files (SteamCMD)
This section explains how to download the game files SteamCMD.
- In your batch file, replace your username and password with your Steam username and password. Save the batch file, close it, and run the batch file.
It will start by downloading SteamCMD, it should automatically launch and log in using the provided credentials. - If you encounter issues logging in, or if you prefer to manually download the server files, open a command prompt by typing CMD at the top, and then hit Enter.
- After that, manually run the install command to download CS2 server files. You can copy the command and paste it into the command prompt, then hit Enter.
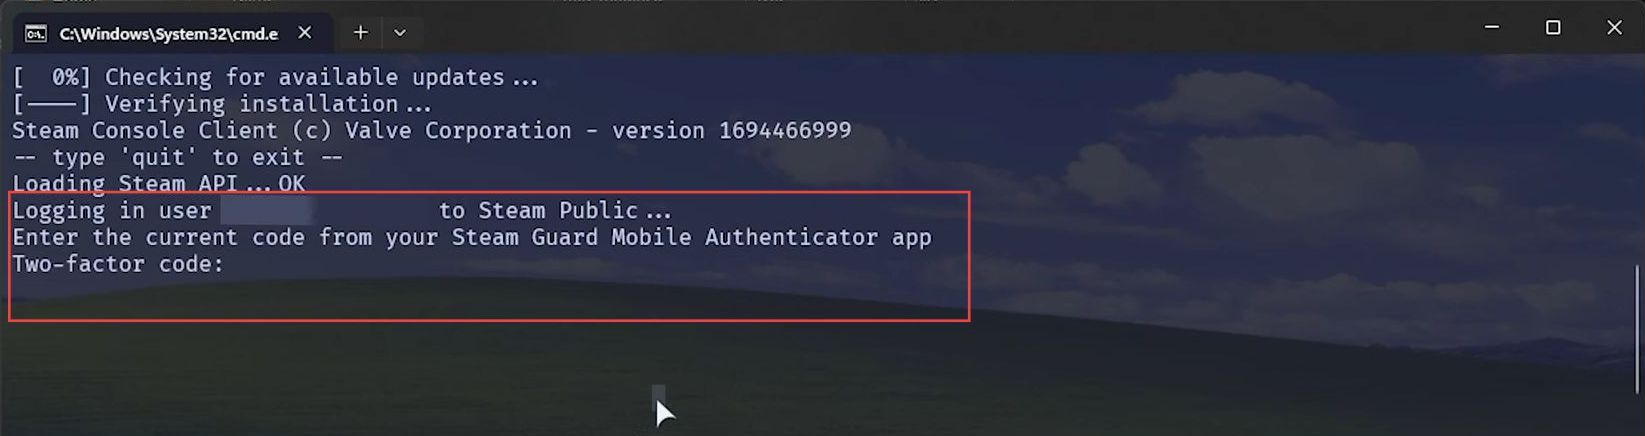
steamcmd.exe +force_install_dir ../server/ +login <USERNAME> <PASSWORD> +app_update 730 validate +quit- If prompted for a two-factor authentication code, enter your Steam authenticator code and hit Enter.
CS2 server files should start downloading and the server should attempt to start. - If you use the normal batch file, it will initiate the server startup. If you manually downloaded the server files, you can close the command prompt when the download is finished.
Testing your server (SteamCMD)
This section will take you through the steps to test your server SteamCMD.
- At this point, your CS2 server files should be downloaded and ready for use.
- If you manually downloaded the server files using SteamCMD, you can run the batch file once more to start up your CS2 server.
- When you run the batch file, it will initiate the server, and your CS2 server should start running.
Add server.cfg (Set name + More config)
This section explains how to add a server.cfg such as set name + more config.
For SteamCMD Users:
- Open the SteamCMD folder, navigate to server > game > CSO > CFG, and look for the server.cfg file. If it doesn’t exist, create a new text document and rename it to server.cfg. You have to open the server.cfg file with any text editor and paste in the code provided.
- Customize the configuration settings as desired, including the server name, opening to the internet, performance settings, enabling bunny hopping, slow motion, setting a password, and remote admin password. After that, save the server.cfg file and close it.
For Users with Normal Game Files:
- Navigate to your CS2 installation folder, typically found in Counter-Strike Global Offensive > game > CSO > CFG, and look for the server.cfg file. If it doesn’t exist, create a new text document and rename it to server.cfg.
- Open the server.cfg file with any text editor and paste in the code provided. Customize the configuration settings as desired and then save the server.cfg file.
echo ---------------------------
echo - Loading server settings -
echo ---------------------------

hostname "TroubleChute's Test Server"					// Server name
sv_lan "0"												// Show online
sv_region "255"											// Set region (255 is worldwide)


// Performance
sv_maxrate "0"											// Max bandwidth rate allowed on server, 0 == unlimited
sv_minrate "0"											// Min bandwidth rate allowed on server, 0 == unlimited
sv_parallel_sendsnapshot "1"							// Enables multi-threading.
sv_clockcorrection_msecs "15"							// The server tries to keep each players m_nTickBase withing this many msecs of the server absolute tickcount
sv_hibernate_when_empty "0"								// Puts the server into extremely low CPU usage mode when no clients connected

// FUN:
// sv_accelerate "5.15"									// Used to increase max speed
// sv_airaccelerate "12" 								// Used to increase strafe speed
// sv_cheats false										// Allow clients to use cheat commands
// host_timescale "1"									// Change the speed of time on your server.
// sv_autobunnyhopping "1"								// Enable bhopping

// ADMIN:
// sv_password "pass"									// Protect your server with a password
// rcon_password "asdf1234password"						// Allow users to run RCON console commands. Do not enable unless you know what you're doing.
// sv_downloadurl "http://fastdl.server.com/csgo"		// Server FastDL (Should not end with a /) - If you have a FastDL server

echo ---------------------------
echo - Done loading server.cfg -
echo ---------------------------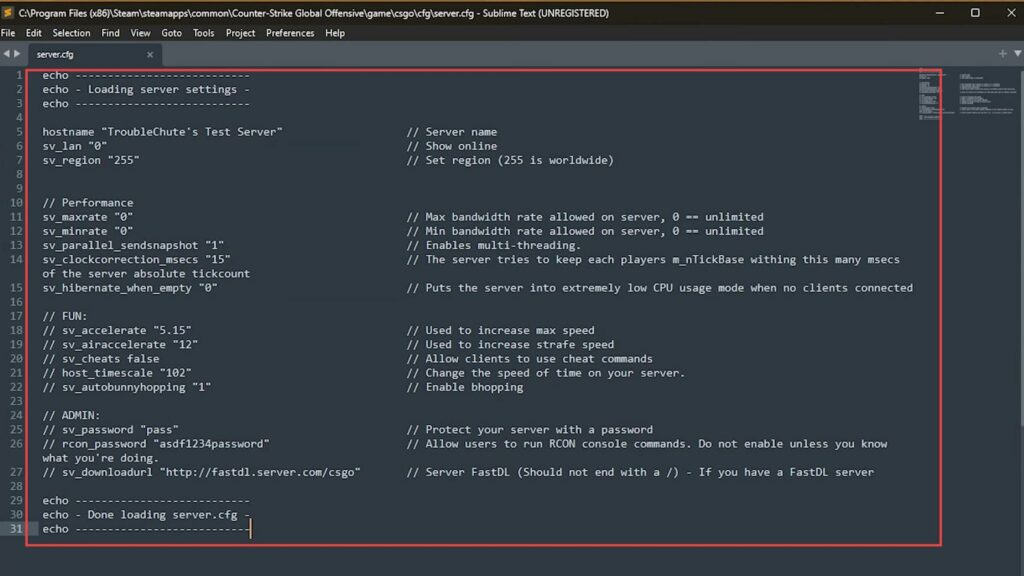
Joining your CS2 Dedicated Server
This section describes how to join your CS2 dedicated server.
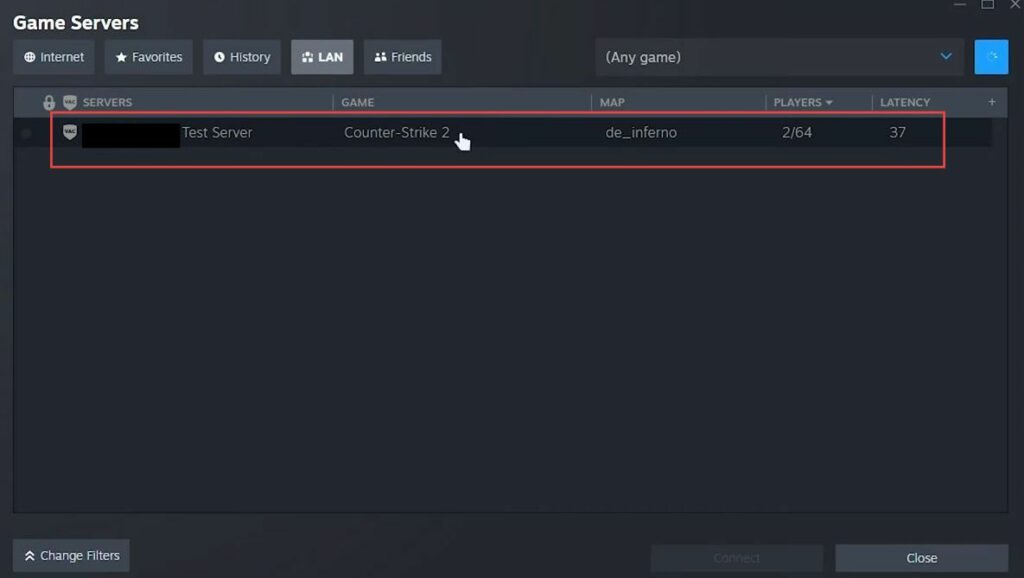
- Start CS2 on your PC, click on Play, and select the Server Browser option.
- Now go to the LAN tab, click on your dedicated server, and choose the Connect option to join it. Open the in-game console by pressing the tilde key (~), type the following command and press Enter:
This command will connect you to your CS2 Dedicated Server, and you can start playing or configuring it as needed.
connect 127.0.0.1:27015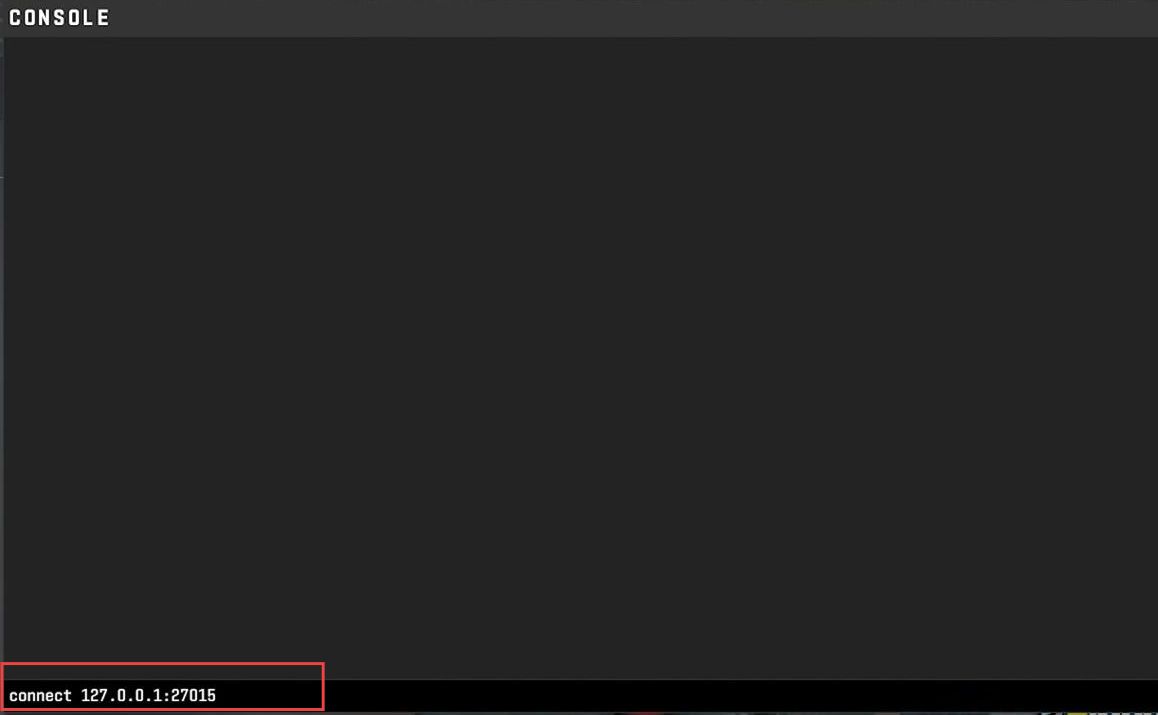
How to get friends to join
In this section, we will take you through the steps to get friends to join the CS2 dedicated server setup.
- Open your computer’s local firewall settings and allow the CS2 server application through your firewall. You’ll typically need to locate the game’s executable file (CS2.exe) and grant it access.
- Ensure that the server application is allowed to communicate through both private and public networks. Access your router’s settings, open a web browser, and enter your router’s IP address in the address bar.
You may need to enter login credentials for your router; check your router’s manual for default login information. - Look for the port forwarding section in your router settings. It might be under Applications & Gaming and create a new port forwarding rule for your CS2 Dedicated Server. You’ll need to specify the following details:
- Service Name: Give your service a name, like CS2 Server.
- Port Range: Set the port range required by CS2 usually 27015 for the default port.
- Protocol: Choose Both or TCP/UDP to cover all protocols.
- IP Address: Enter the local IP address of the computer running your CS2 server.
- After that, save it and exit the router settings.
Firewall
This section describes how to configure CS2 Dedicated Server Setup by adjusting your Windows Firewall.
- You need to copy the necessary commands for forwarding both ports 27015 and 27016 for both TCP and UDP.
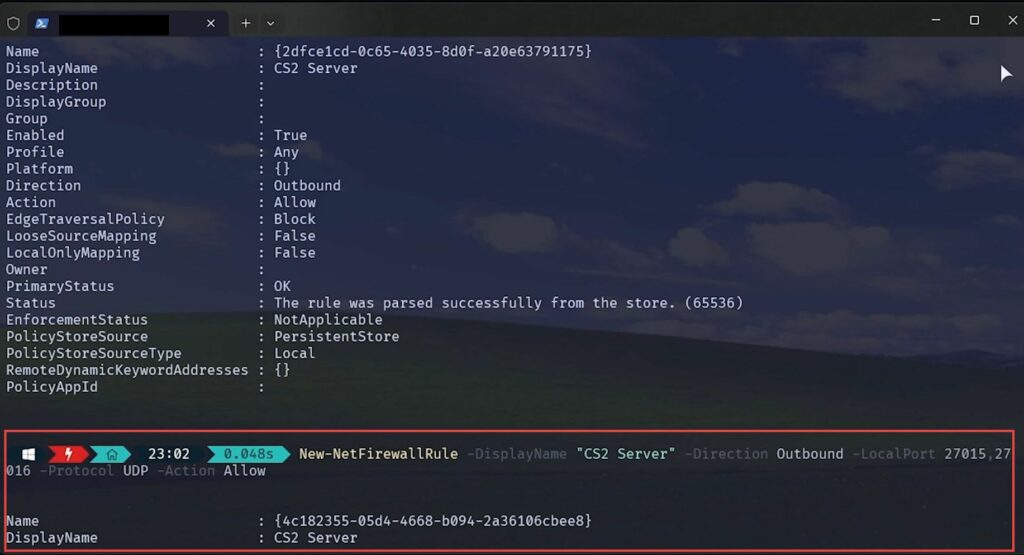
- Open an administrative Powershell window by pressing the Start button, typing Powershell, right-clicking on Windows PowerShell, and selecting Run as administrator. Paste the copied commands into the Powershell window and press Enter a few more times to ensure that everything has run.
New-NetFirewallRule -DisplayName "CS2 Server" -Direction Inbound -LocalPort 27015,27016 -Protocol TCP -Action Allow
New-NetFirewallRule -DisplayName "CS2 Server" -Direction Inbound -LocalPort 27015,27016 -Protocol UDP -Action Allow
New-NetFirewallRule -DisplayName "CS2 Server" -Direction Outbound -LocalPort 27015,27016 -Protocol TCP -Action Allow
New-NetFirewallRule -DisplayName "CS2 Server" -Direction Outbound -LocalPort 27015,27016 -Protocol UDP -Action Allow- Open the Windows Firewall with Advanced Security. You can do this by typing Windows Firewall in the search bar and selecting Windows Defender Firewall with Advanced Security.
- In the left panel, click on Inbound Rules and you should find a rule for your CS2 server allowing inbound traffic. Similarly, check the Outbound Rules section to make sure there’s a corresponding rule for outbound traffic related to your CS2 server.
Port Forwarding
This section explains how to adjust your port forwarding.
- Open a terminal, command prompt, or Powershell window, run the command ipconfig and press Enter. Look for your Ethernet adapter or Wireless LAN adapter depending on your connection and note the IPv4 address.
This is your local IP address that people on the same network can use to connect to your server. - People on the same local network as you can connect using your local IP address. They can open their game console and type connect [Your IP]:27015 to join your server.
- To allow people from the internet to join, set up port forwarding on your router and access your router’s settings page. You’ll need to log in using your router’s admin password.
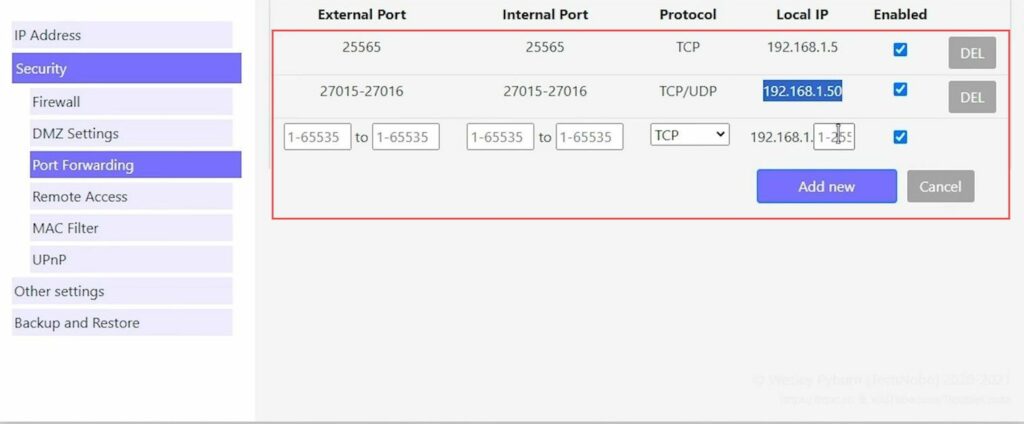
- Look for the Port Forwarding section which may vary based on your router’s make and model. In the port forwarding section, enter 27015 in both internal and external ports. If you can’t enter both, set up one for 27015 and another for 27016.
- For protocol, select both TCP and UDP. If your router doesn’t allow this, set up separate port forwarding rules for TCP and UDP. For the local IP, enter the local IP address of the computer running the CS2 server, and click Add New or equivalent to save the port forwarding settings.
- If there are multiple routers between your computer and the internet, you’ll need to port forward on each router along the chain.
For example, if you have a router connected to another router, port forward on the first router to the second router, and then port forward on the second router to your computer.
Playing on your CS2 Dedicated Server
This section describes how to configure CS2 Dedicated Server Setup by playing on your CS2 dedicated server.
- Port forward ports 27015 and 27016 on your router both TCP and UDP to your server’s local IP address. Allow your server’s .exe and the CS2 game ports through your local Windows Firewall.
- Set up a server configuration file such as server.cfg with your desired server settings. Ensure an auto-updater is in place if you’re using SteamCMD, and start your server using the server.bat file.
- Optionally, create a desktop shortcut for your server.bat for easier server launching, open CS2, and access the server browser.
- Look for your server in the LAN tab if you’re on the same local network and to join, use your local IP address and port.
- To allow friends outside your local network to join, share your public IP address using an online webpage such as WhatIsMyIP.
They can connect using your public IP and the port.