In this guide, you will learn how to fix the disconnected from Steam error in MW3/Warzone 3/Zombies. First, you need to know that, it could be due to the Steam maintenance.
You can try to get the game from Battle.net, verify game files, try a wired connection, or configure VPNs and proxies. You can also change DNS, flush DNS, fix slow internet, or disable texture streaming to resolve the issues.
Steam maintenance
In this section, we will take you through the steps to fix the error in case of Steam maintenance.
- Consider the possibility of Steam undergoing maintenance or emergency maintenance. To check if Steam is undergoing maintenance, open Steam and go to your friend’s list.
- If you appear offline during this time, it’s an indication that Steam might be under maintenance.
During maintenance, Steam services may be temporarily unavailable for a few minutes. - If your friends or local friends also experience the same issue, it confirms that Steam is indeed down.
In such cases, the only option is to wait for the maintenance to be completed.
Move to Battle.net
This section describes how to move to Battle.net to resolve the error.
- If you exclusively play Modern Warfare 3 and encounter a bothersome error frequently, consider downloading the game on Battle.net instead of having it on Steam.
It will eliminate the possibility of getting disconnected from Steam due to this specific error.
Essentially, if the game is not on Steam, you won’t face the issue associated with it. - However, if you’ve already purchased the game on Steam, there may be limited options to switch platforms.
- Note that this option might only be viable if you haven’t already purchased the game on Steam. If you’ve already bought it on Steam, switching to Battle.net might not be feasible.
Verify game files
This section will take you through the steps to verify the game files.
- Confirm that the Steam servers are operational if you’ve encountered the Disconnected from Steam error for another reason.
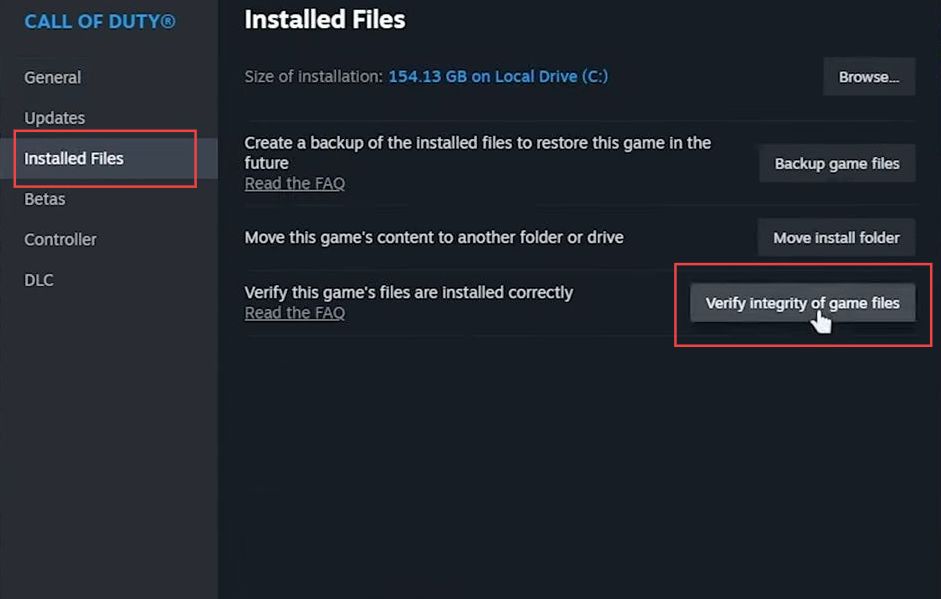
- In the Steam client, find Call of Duty in your game library, right-click, and choose Properties. Navigate to the Installed Files tab and click on Verify Integrity of Game Files.
This will check all the game files on your PC and compare them with the latest version on the server. If any files are corrupted or outdated, the verification process will fix them.
Now the game files should match the latest version, potentially resolving the issue. If missing files were found and corrected, the game might work correctly again.
Try wired
This section describes how to fix the error by switching to a wired connection.
- Double-check your internet connection to ensure it’s active. Ensure a stable internet connection by testing various online services. If you’re using a wireless connection, consider switching to a wired connection.
- Connect your device directly to the router using an Ethernet cable for a more stable connection.
Playing the game on a wired connection might help alleviate potential issues with a wireless connection.
VPNs and Proxies
In this section, we will take you through the steps to fix the error by adjusting VPNs and proxies.
- If you are using a proxy or VPN, disconnect from it temporarily and check if the stability of your internet connection improves without these services.
- Verify if the disconnection issue is resolved after disconnecting from the proxy or VPN.
These services may sometimes cause stability problems. - If you are not currently using a VPN or proxy, but have access to one, consider connecting to a local nearby server. Choose a local server to establish a different physical route from your PC to the game server.
This might introduce a slight increase in in-game ping but could potentially enhance overall stability. - After that, play the game and observe whether the change in routing improves stability.
Change DNS
This section describes how to change the DNS to resolve the error.
- Click on the Start button, open the Settings menu, and go to Network & Internet. Navigate to the section related to how you’re connected to the internet e.g., Ethernet.
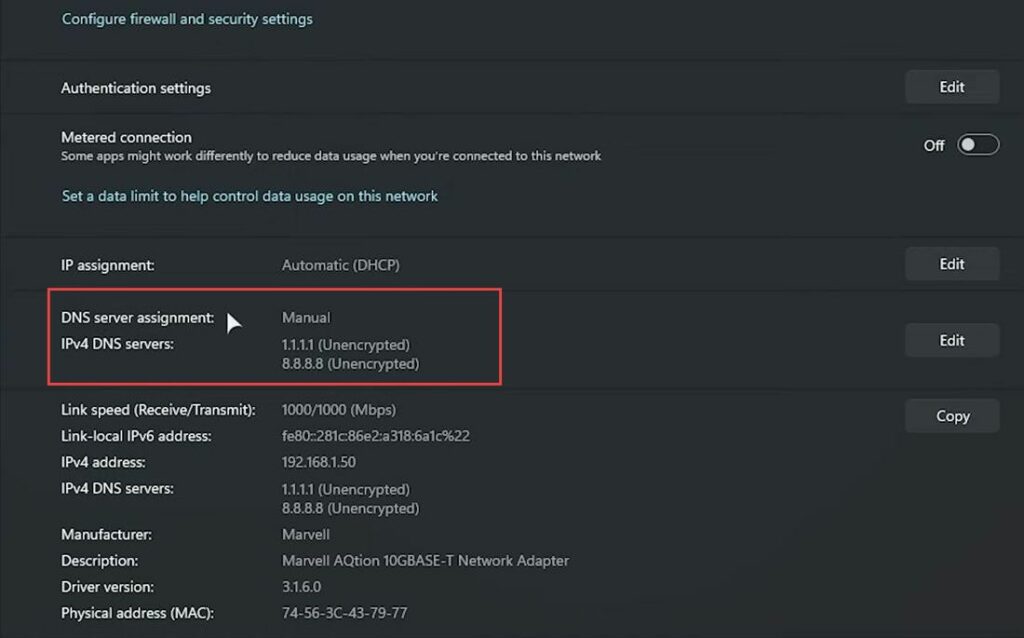
- If you’re at home, change the network type to Private Network; otherwise, leave it as Public if you’re in a public place. Scroll down to find the DNS server section, click on Edit, set the DNS server to manual mode, and enable IPv4.
- For the Preferred DNS server, enter 1.1.1.1, and for the Alternate DNS server, enter 8.8.8.8 (Google). You can swap these around or use different DNS servers if you prefer. After that, click Save to apply the changes and close out of the settings.
Flush DNS
This section will take you through the steps to flush DNS.
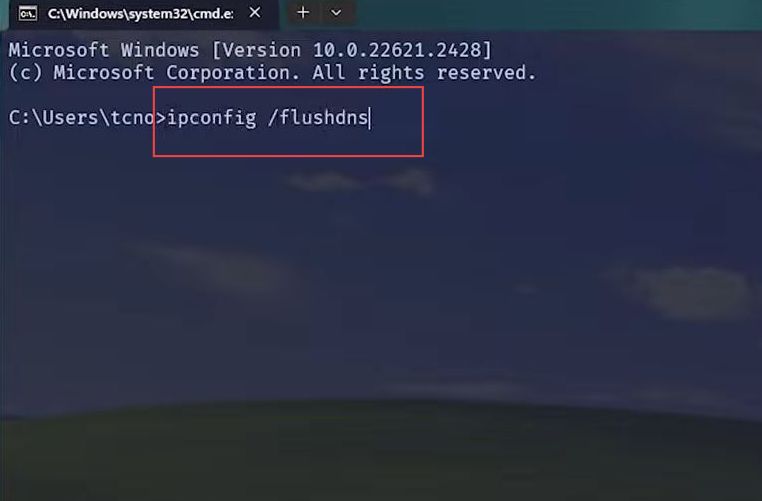
- Press the Windows key and the R key simultaneously to open the Run dialog. Type CMD in the Run dialog and press Enter.
This will open a new Command Prompt window. - You need to type the following command and press Enter.
ipconfig /flushdnsThe DNS cache will be cleared, and you should see a message indicating the success of the operation. Now, your DNS is refreshed, and it is expected that any issues related to DNS should be resolved.
- Check if the problem, such as a game not working properly, has been resolved.
Slow internet fixes
This section describes how to resolve the error by fixing slow internet.
- If you notice slow internet or packet loss during a speed test, then pause any ongoing downloads on your computer. Disconnect other devices, from your Wi-Fi network temporarily.
- Ensure no downloads are happening on your network.
The goal is to reduce the overall data traffic on your internet connection. Excessive data usage may lead to a temporary loss of connection to services like Steam.
By managing and reducing data activities on your network, you can potentially improve your internet speed and stability.
Disable Texture Streaming (Texture Downloading)
In this section, we will take you through the steps to disable texture streaming to resolve the error.
- Open the game, navigate to the settings menu, and look for settings related to texture streaming or downloading textures. Turn off the option for texture streaming or downloading textures completely.
By doing this, you can prevent the game from downloading higher-resolution textures from the internet. This not only saves disk space but also reduces internet usage and improves the stability of the game.
If you’re not actively downloading anything and still experiencing issues, background texture downloads could be a potential cause. - It’s essential to ensure that these settings are configured to your preference to avoid unexpected downloads during gameplay.
- If issues persist, the problem may be related to your Internet Service Provider (ISP) or the wider network infrastructure in your area, city, etc.