Constructing a build from scratch is tiring work, but it all pays off when you see your build yielding exceptional results. This new God-Mode build allows you to deliver mammoth damages while safeguarding your build from enemy damage. This expansive guide introduces a new healing glitch found in the game, the usage of essential engravings, increased damage values, and reinforced resistances to melee attacks. Without further ado, let’s dive in.
Healing Glitch
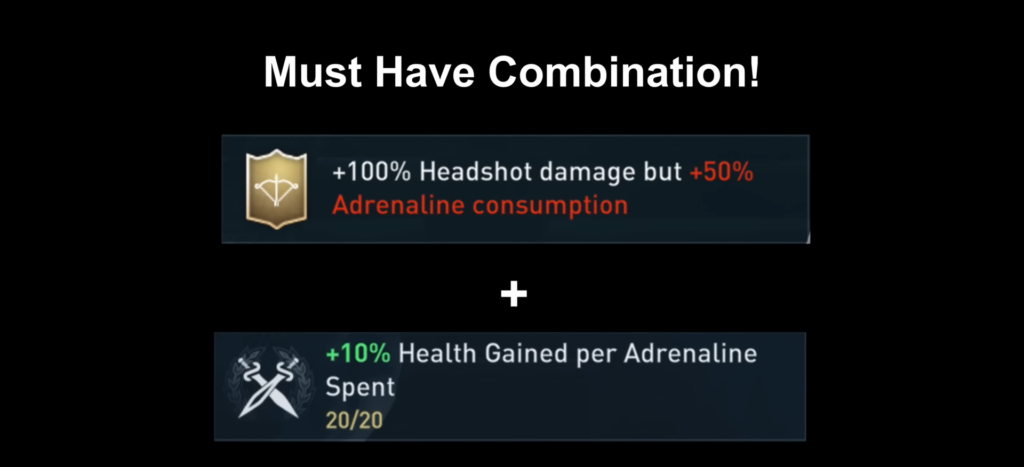
The Healing glitch involves using the Korfu engraving “+100% Headshot Damage but +50% Adrenaline consumption.” The engraving is unlocked by solving the “The Captain & the Cyclops” ostraka. The Ostraka is found in a bandit camp on Korfu Island, near the Shores of the Drepani. The solution to this Ostraka is found in Alieos Village by pressing A near a pot full of water.
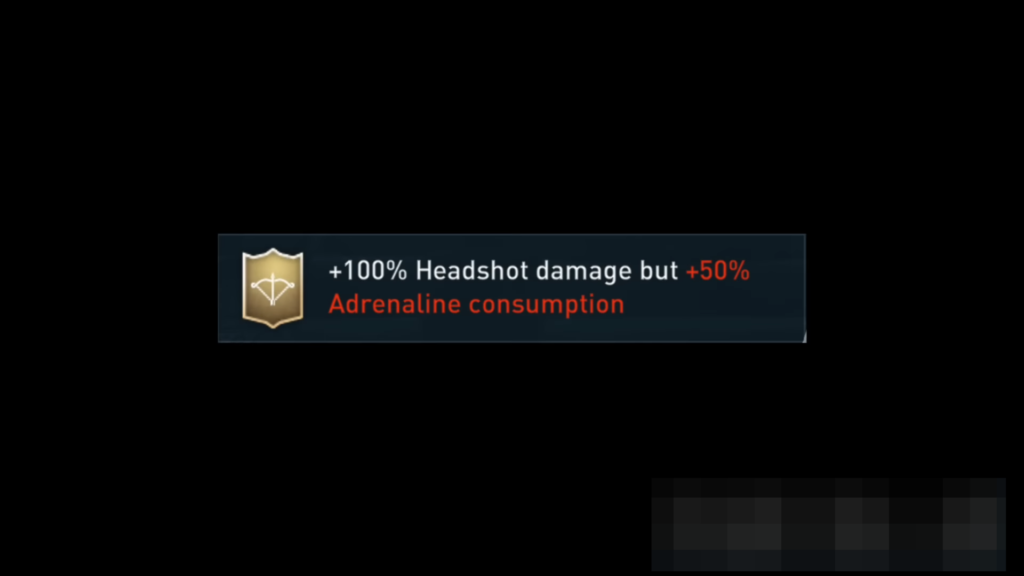
The 50% increase in Adrenaline consumption doesn’t affect the gameplay much, as it only consumes 1.5 bars of adrenaline, which gets refilled automatically in a few seconds anyway. Combining this vital information with using the Second Wind ability and the healing mastery of “10% Health gained per Adrenaline spent” allows players to restore a significant amount of health. For example, at 50% Health, using the Second Wind will grant you 60% Health but using the engraving paired with the healing ability doubles the 10% and gives us 70% health restored. It will completely heal your health, considering your health is not red. You’ll always fully heal if your health is above 25%.
The engraving from the Falx of Olympus lets you restore 20% of your health, as does Ring of Chaos, Devastating Shot, and Predator shot. Using the Korfu engraving and the Healing Mastery to restore your full health is crucial for this build.
Damage Values
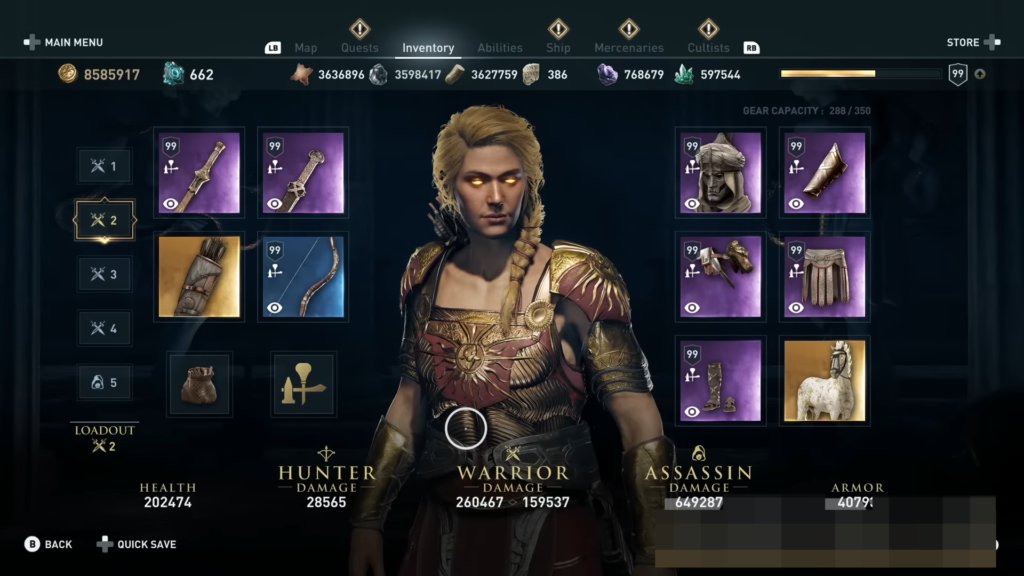
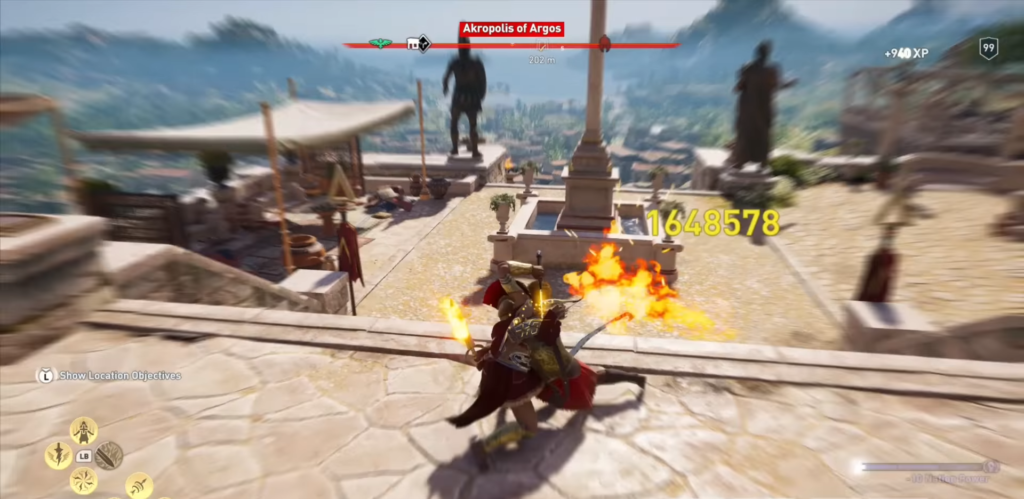
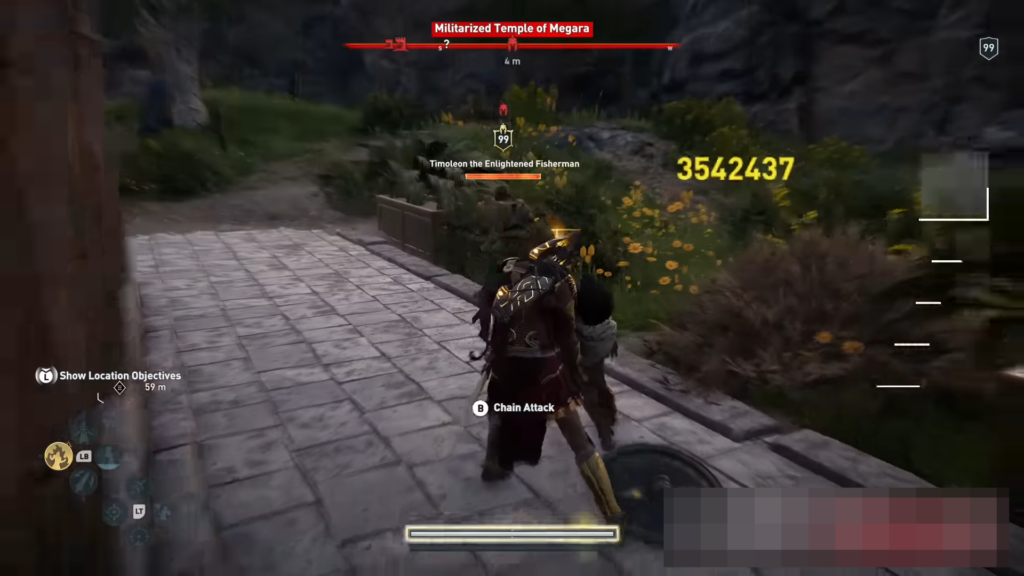
This remarkable build will improve on the damages of the previous build and surprise you with enhanced damage values for every attack. Using the melee weapons, Light attacks deal 1.7 million damage. Heavy attacks yield 2.5 million, Charged attacks deal 7.7 million, Ring of Chaos deal 4.4 million, 15 million for Fury of the Bloodline, and Overpowered attacks yield 27-30 million in damages. Ares Madness yields 9 million damage, and 9 million damage for Hero Strike.
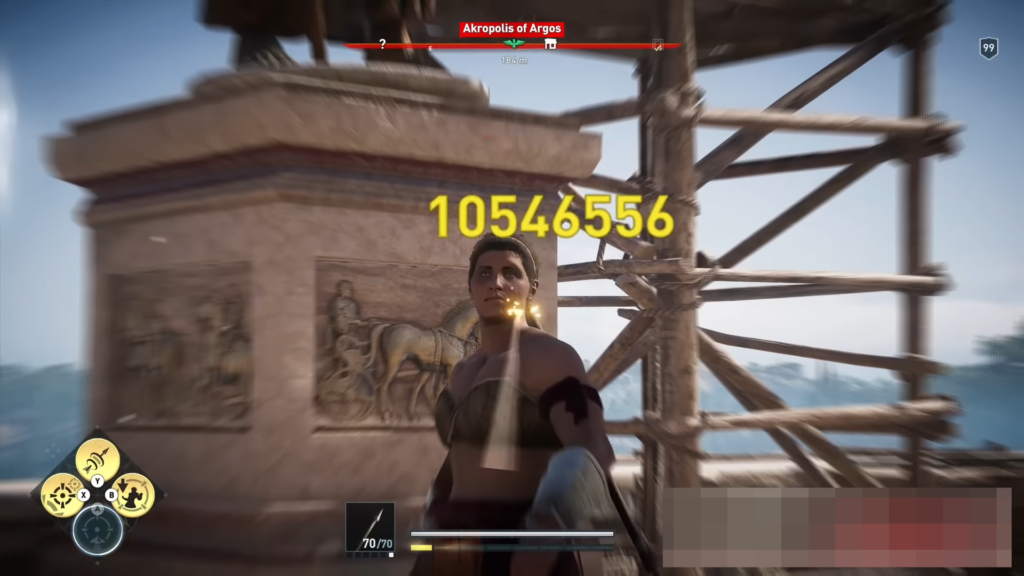
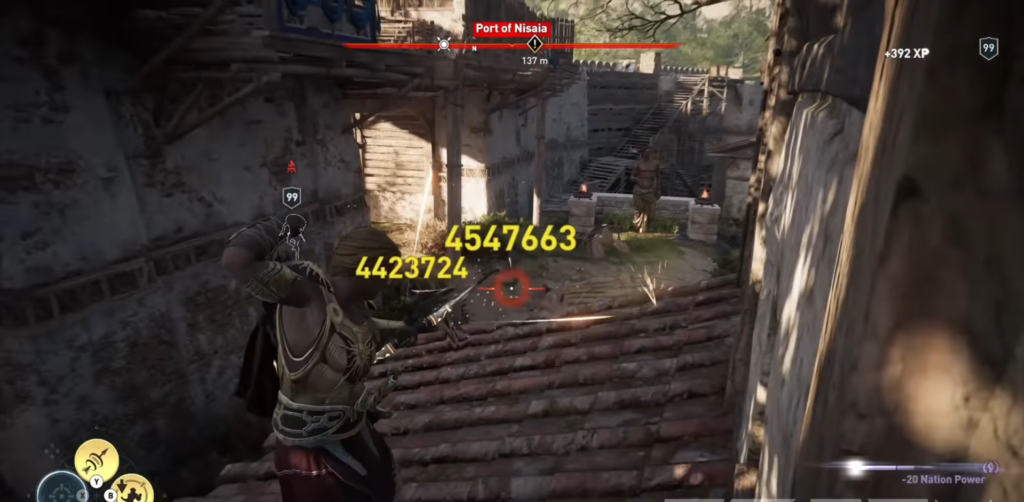
Ranged weapons also yield excellent damage with this build. Normal Arrows deal 4.2 million damage, Multishot ability yields 4.5 million per enemy damage, Devastating Shot deals 11 million damage, and Predator Shot gives 14 million damage per hit. This build will always One-Shot kill all enemies, and mercenary assassination will deal enormous damage as well. This truly makes this a God-Mode build by any standards.
The Build
Weapons
The build is unique and complex, different from the previous builds constructed. The Bighorn Bow is the most important item in this build, as it multiplies the Warrior damage by 1.6 and massively improves damage for your ranged weapon. Without the Bighorn Bow, the Warrior Damage falls by 100,000 plus.
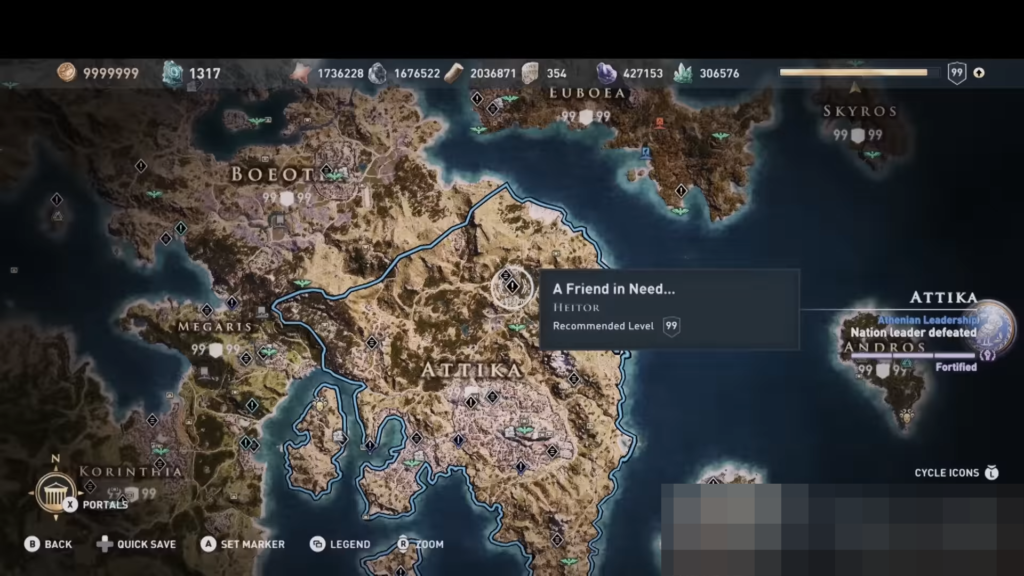
The first melee weapon in this build is the Heitor’s Harpe. This epic sword boasts a base DPS of 7829. It can be acquired by completing the quest “A Friend In Need” in Attika and keeping the sword instead of returning it to Heitor. It grants a 24% increase in Warrior Damage, a 50% increase in Critical Damage, and a 30% increase in Damage with Swords. We will equip the 30% increase in Armour Penetration engraving here too. This engraving allows light and heavy attacks to penetrate enemies’ armour easily and acts as a reverse multiplier by reducing the enemy’s armour and increasing damage. It’s one of the biggest damage drivers in the build.
The second melee weapon in this build is the Hoplite Sword; this epic sword has a DPS of 7829. It can be acquired from any Blacksmith, and if it doesn’t show up, save the game before interacting with the blacksmith and reload if the sword doesn’t appear. It provides us with a 24% increase in Warrior Damage, a 50% increase in Critical Damage, and a 30% increase in Damage with Swords. The additional engraving of Convert 50% of Hunter Damage Bonuses to All Damages is used in the last slot. It will enhance your overall damage and exceed the existing damage levels.
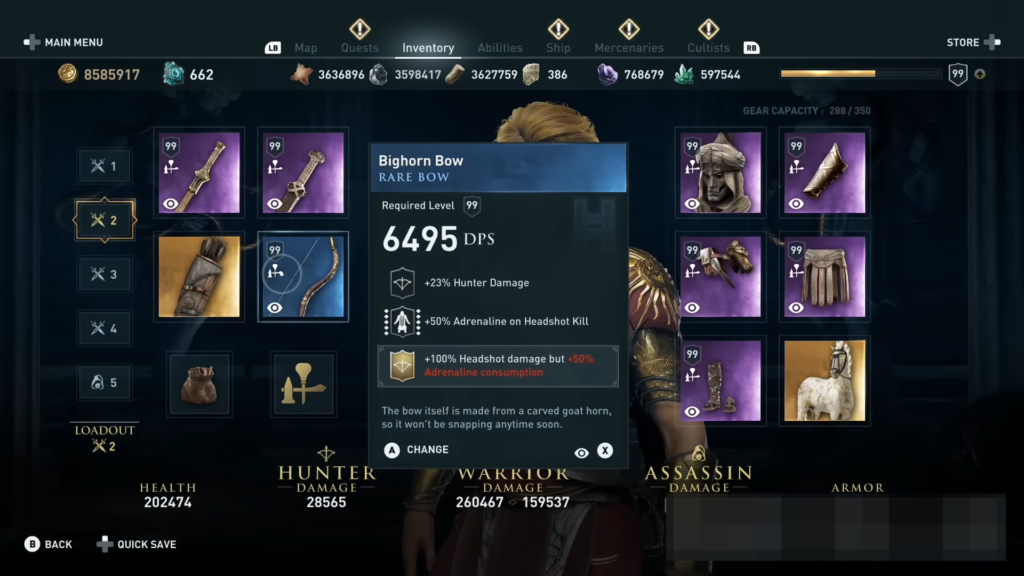
The ranged weapon for this build is the Bighorn Bow; this rare bow has a DPS of 6495. It can be acquired by using the free 200 Helix credits and buying it from the Helix Store in the Oikos market. Oikos is located in Kirrha Town in Phokis. It provides us with a 23% increase in Hunter Damage and a 50% increase in Adrenaline on Headshot Kill. The third vital engraving is a 100% increase in Headshot Damage with a 50% increase in Adrenaline Consumption. The engraving is collected by completing “The Captain & the Cyclops” Ostraka in Korfu Island.
Armour
For the head slot, the epic Persian Warrior Helmet is equipped. It provides us with a 24% increase in Warrior Damage, a 20% increase in Critical Chance in Full Health, a 20% increase in Damage with Swords & Daggers, and a 30% increase in Damage with Swords.
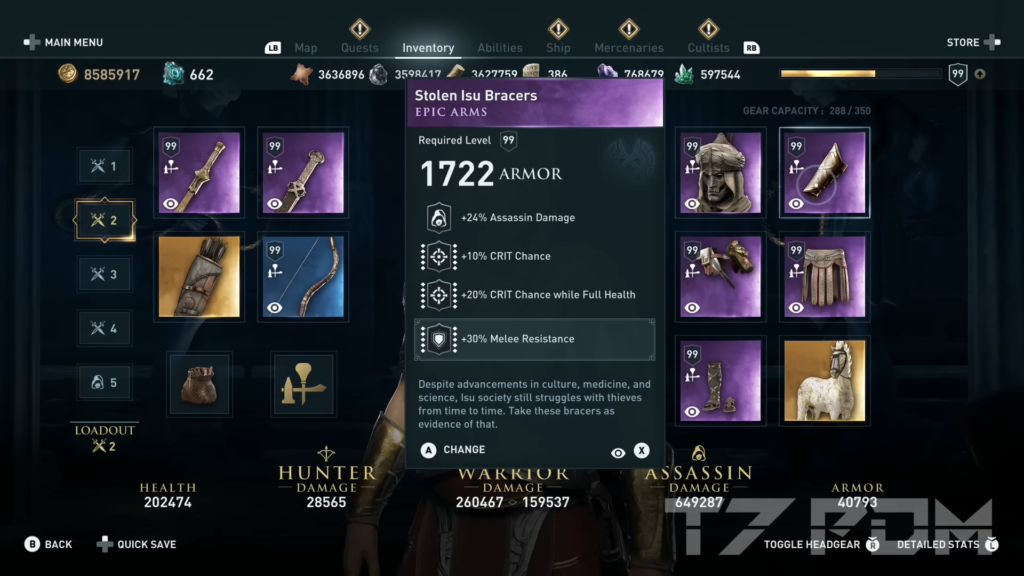
For the arms slot, the epic Stolen Isu Bracers are equipped. It gives us a 24% increase in Assassin Damage, a 10% increase in Critical Chance, a 20% increase in Critical chance in Full Health, and a 30% increase in Melee Resistance. This is a unique item in the build, as it has an overall 30% Critical Chance making it incredibly powerful. The Melee resistance engraving helps make the build immune from melee attacks, and the build can take up to eight consecutive melee hits in Nightmare mode. The weapon can be acquired in the third episode of the Atlantis DLC. They’re part of the story’s mission and are unmissable.
For the waist, the epic Mercenary Belt is equipped. It grants us a 24% increase in Warrior Damage, a 100% increase in Critical Damage in Full Health, a 40% increase in Chance to ignore Half damage, and again, a 30% increase in Melee Damage.
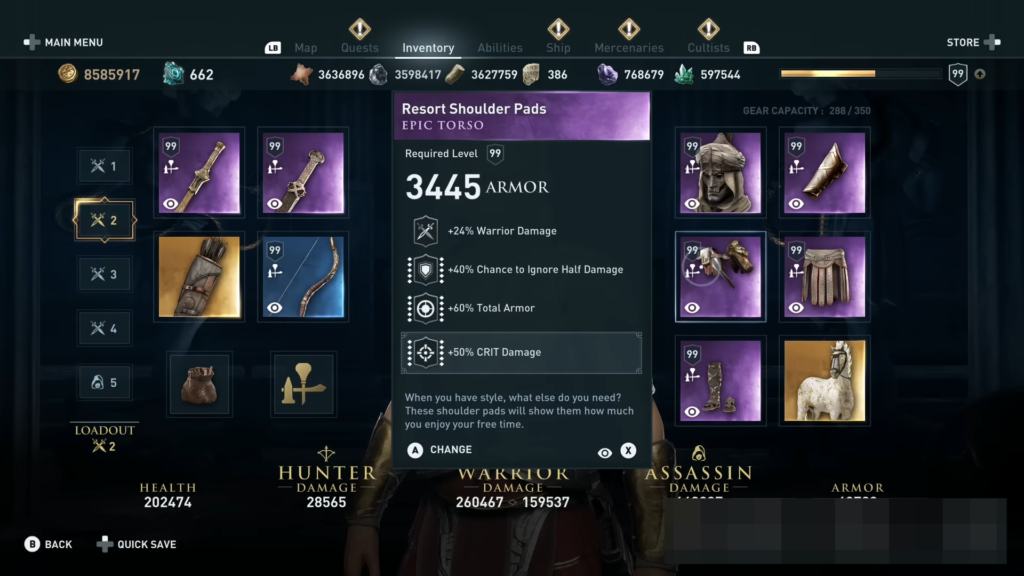
For the torso, the epic Resort Shoulder Pads will be fitted. This armour piece grants us a 24% increase in Warrior Damage, a 40% increase in the Chance to Ignore Half Damage, a 60% increase in Total Armour, and a 50% increase in Critical Damage. This armour piece can be acquired in the “A New Horizon” quest in the Korfu DLC. This is the only chest piece in the game with engraving “Ignoring Half Damage.” This allows us to get a 100% Chance to ignore half damage by equipping the Mercenary belt with a similar engraving.
Lastly, we will equip the epic Patched Bandit Greaves for the legs. This will provide us with a 24% increase in Warrior damage, a 20% increase In Critical Chance in Full Health, a 100% increase in Critical Damage on Full Health and the Korfu Engraving “a 100% increase in All Damage with a 100% decrease in all Resistances.” Players must collect ‘The Champion’ Ostraka from Koiladi Farm, north of Korfu Island, to get this engraving. The solution to this Ostraka is in the northeast of the island, on a dock where flowers are arranged and placed.
Equipping all the necessary weapons, armour pieces, and corresponding engravings will give you 545% in Warrior Damage, 425% in Assassin Damage, and 283% in Hunter Damage. An incredible 265% Headshot Damage and 140% Damage with Swords will be registered. Also, 525% Critical Damage in Full Health and 100% Critical Chance in Full Health will be noticeable.
Abilities & Masteries
250 Ability points are required to get the vital Abilities and Masteries to augment this God-Mode Build.
Hunter Abilities
The Sixth Sense ability slows time by eight seconds whenever an enemy spots you. Aimed Arrows get locked to the enemy’s head and deal 200% Hunter Damage. The Arrow Mastery ability unlocks Paralysing, Fire, Poison, and Explosive Arrows. The Multi-Shot ability allows you to simultaneously target up to eight enemies and deal 250% Hunter Damage to each target. The Devastating Shot ability unleashes a powerful arrow that deals 400% Hunter damage and doubles the damage when arrows are fully charged. The Predator Shot ability is the most powerful ranged ability allowing you to extract 600% Hunter damage, and arrows can travel 150% farther. This ability allows you to gain control of the arrow mid-flight and strike distant targets.
The Archery Master ability increases Hunter and Headshot damage by 40%. It also replenishes Adrenaline segments quickly outside combat and slows down time when aiming a bow in mid-air. This ability is also crucial for healing yourself as it fills the Adrenaline segments. Invest a solitary ability point in the Overpower Bow Strike, as the Bighorn Bow can’t utilize this ability, but it unlocks the top-tier ability of Ghost Arrows of Artemis. This exceptional ability allows you to shoot Ghost Arrows traveling through shields, enemies, and walls. Each Ghost arrow deals 340% Hunter damage.
Warrior Abilities
Charged Heavy Attack ability allows you to unleash a powerful attack that knocks away enemies and breaks their guard. It inflicts 150% Damage and reduces charge duration by 25%. With this build, the damage level is upgraded to 300%. The Weapons Master ability increases warrior Damage by 40% and Critical Chance with all weapons by 10%. Combo finishers also damage more when both light and heavy attacks are used. The Gear Master ability increases armor by 90%, reduces ranged damage received by 10%, and increases the enemy’s stagger chance by 10%. Spend a solitary point in the Flaming Attacks ability to unlock the Fire Mastery ability.
The Fire Mastery ability increases fire build-up by 40% and burning duration by six seconds. Additionally, fire damage increases by 40%. The Overpower Attacks ability extract enormous damage with this build as both damage and the number of attacks increase. The Ares Madness ability overpowers your melee weapons for 10 seconds, and all attacks deal 35% more Assassin Damage. Enemy attacks are also rendered non-lethal. The Fury of the Bloodline ability unleashes a flurry of six powerful attacks against a single enemy, each dealing 150% Warrior Damage. Additionally, it regenerates four Adrenaline segments. The Ring of Chaos ability causes a shocking blast, stunning enemies within seven meters and dealing 250% Warrior damage. Lastly, the Second Wind ability is essential for this build as it restores health by 50% and removes Fire and Poison effects. Combined with the build, the health restoration rate jumps to 70%.
Assassin Abilities
The Shadow Assassin ability increases Assassination and Knockout damages by 40%. It also automatically loots assassinated enemies, increases Critical damage by 50%, and adds one extra Adrenaline segment bonus. The Rush Assassination ability allows you to launch the spear at distant enemies and deal 150% Assassination damage. The Hero Strike Ability allows a single devastating attack that inflicts 100% assassination damage. Lastly, the Stealth Master ability increases all damage by 10% and eliminates any noise from the build while sneaking, making it near impossible for enemies to detect you.
Masteries
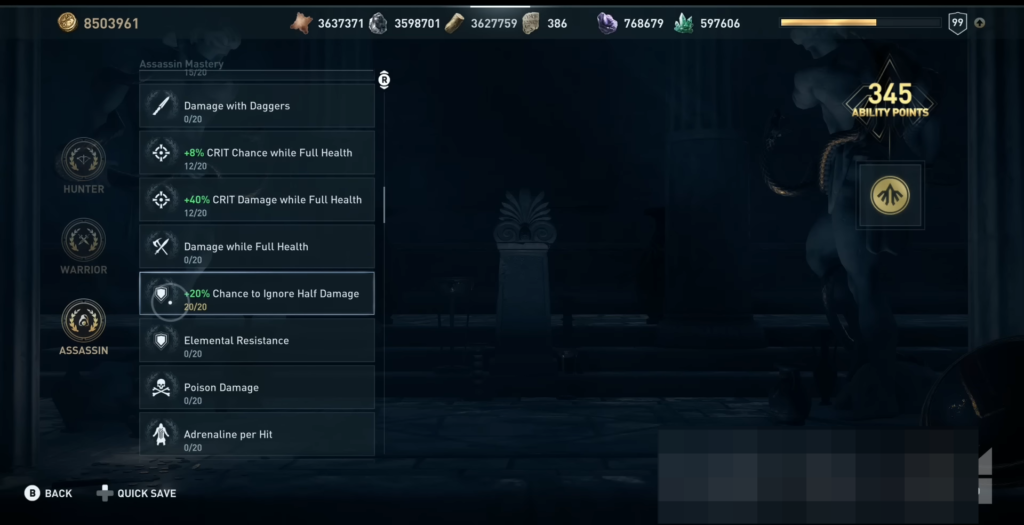
In the Assassin section, spend 20 points on Health gained per Adrenaline Spent. Also, max out the Chance to Ignore Half Damage. These two masteries are crucial from a defensive point of view and will make this build almost invincible by reducing your damage by 50% every time. Spend 12 points on Critical Damage in Full health and 12 on Critical Chance in Full Health. Spend 15 points on Damage with Swords.
In the Warrior section, spend 12 points on increasing Warrior Damage. Spend twelve points each on Health and Total Armour. Allocate 15 points to Melee Resistance and 8 points to Armour Penetration. Lastly, spend eight points on Damage Dealt Restored as Health.
In the Hunter section, allocate eight points to increase Hunter Damage. Spend twelve points each on Critical Chance, Critical Damage, and Headshot Damage.
That’s all from this comprehensive guide. Remember to get all the corresponding engravings equipped in the corresponding weapons and have enough ability points for getting the crucial masteries for this build.