This guide will let you know how to fix graphics glitches, and missing textures issues in RPCS3. You have to update RPCS3 if you are using an old version, then change the custom configuration and Configure the graphic card. Also, change some Display settings to get the best performance.
Remember different games needs different settings to give the best visuals.
Update RPCS3
You can face many graphics glitches and missing texture issues for any game if you are using an older version of RPCS3. So the first thing you have to do is update it ton the latest version.
Change Custom Configuration
In this section, we will take you through the steps to change the custom configuration on the RPCS3 emulator. By following the steps below, you will be able to make changes in the CPU, GPU and Advanced settings.
- You have to start by opening the RPCS3 emulator on your computer and navigating to the game you want to fix the issue for.
- Once you have located the game, right-click on it.
- From the context menu, click on the option that says “Change Custom Configuration.”

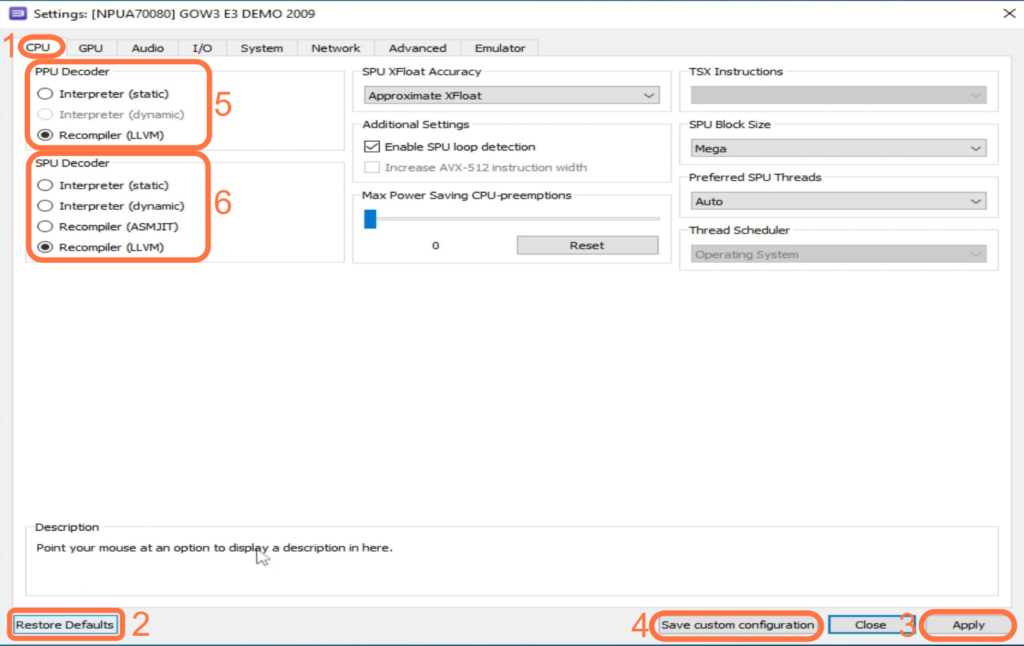
- Within the RPCS3 emulator, go to the CPU tab. look for the option to “Restore Default” at the bottom of the window and click on it.
It will reset the CPU settings to their default values. - After restoring the default settings, click on the “Apply” button and Save Custom Configuration.
- Within the CPU tab or the custom configuration settings, locate the options for PPU Decoder and SPU Decoder, and choose “Recompiler (LLVM)” for both decoders.
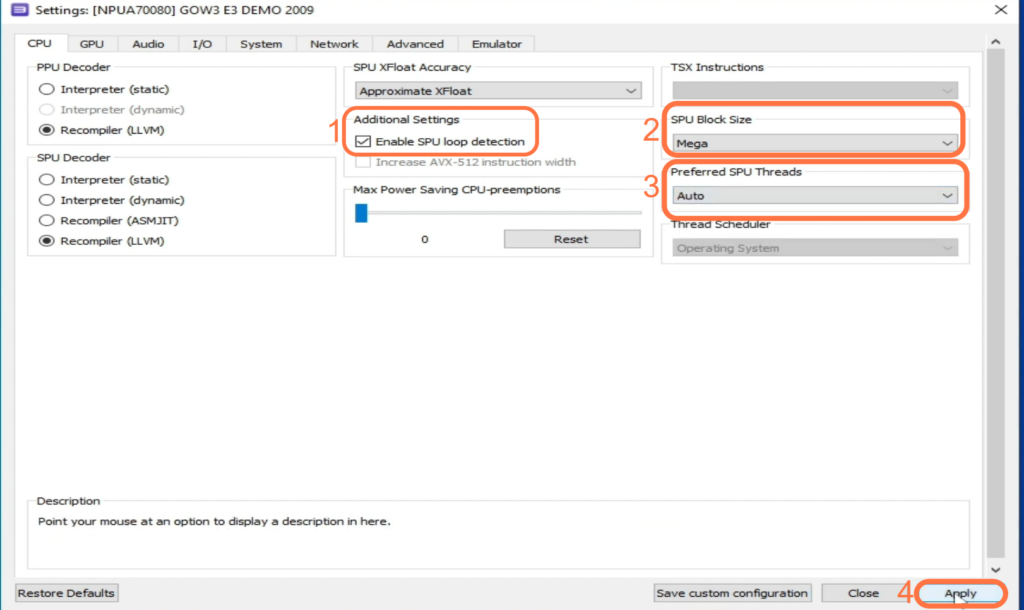
- Navigate to “Advanced Settings” to access the additional configuration options. Look for the option labelled “Enable SP Loop detection” and checkmark it.
- After that, change the SPU Block Size to Mega. Open the drop-down menu for “Preferred SPU Threads” and choose the option “Auto“.
- After making the above changes, hit the “Apply” button.
- Within the RPCS3 emulator, navigate to the GPU tab. Look for the setting labelled “Renderer“, click on the drop-down menu next to it and select “Vulkan” as the renderer.
Vulkan is a graphics API that provides high-performance and cross-platform support. - If you don’t have Vulkan in your RPCS3, then you need to update drivers for your GPU.
- Make sure to select your Graphics Device and set Anti-Aliasing as Disabled.
- On the right side of the RPCS3 emulator, go to the “Additional Settings” section, find the option labelled “Asynchronous Texture Streaming” and checkmark it.
- After that, checkmark Multithreaded RSX and Write Color Buffers.
- Within the Additional Settings section, locate the “Shader Mode” section and checkmark Async (multi-threaded).
- Go to the setting labelled “Default Resolution” and choose the resolution option “1280*720“.
- After making the above changes, tap on the “Apply” button and Save Custom Configuration.

- After that, right-click on the game and select Change Custom Configuration again.
- Within the custom configuration settings, click on the “Advanced” tab, look for the setting labelled “RSX FIFO Accuracy” and set it to “Atomic“. Set “Driver Wake-Up Delay” to “200“.
This option determines the delay time for the driver to wake up - On the right side of the custom configuration settings, click on the “Core” section. Navigate to the option labelled “Accurate RSX reservation access” and checkmark it.
- Set the Maximum number of Spurs Threads to Unlimited (Default), then hit the Apply button and Save Custom Configuration.

Configure graphic card
This section describes how to configure graphic cards to get the best result out of RPCS3. The steps involve managing 3D settings and configuring Surround, PhysX.
- Right-click on an empty space on your desktop and select the option that corresponds to your graphic card control panel from the context menu.
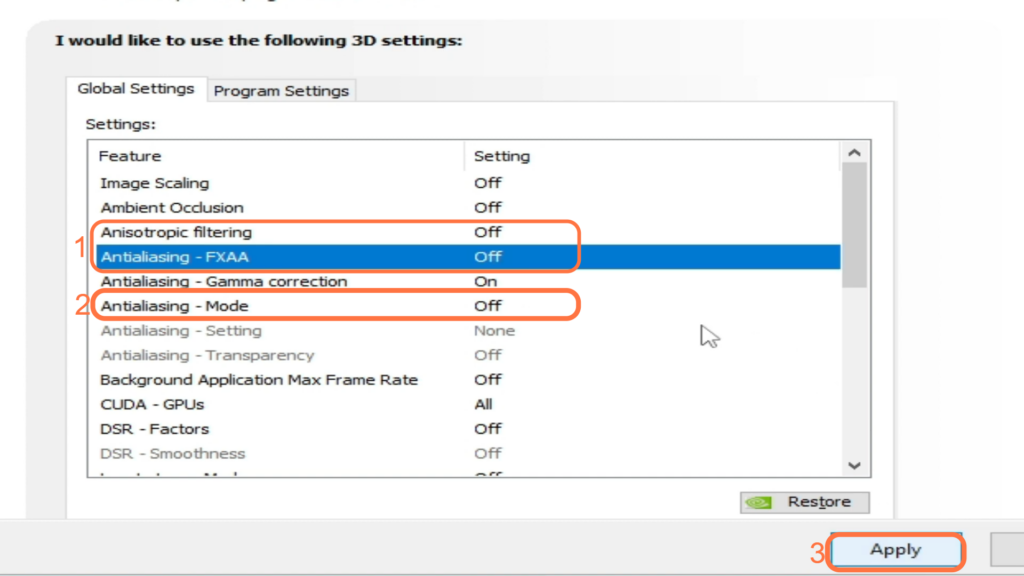
- Once you open the graphic card control panel, click on the option labelled “Manage 3D settings.”
This option allows you to adjust various 3D settings. - Scroll down until you find the setting called “Antialiasing – Mode” and turn it off. After that, turn off Anisotropic filtering and Antialiasing – FXAA.
- After making the above changes, tap on the “Apply” button and Save Custom Configuration.
- Within the graphic card control panel, locate the setting labelled “OpenGL rendering GPU“. Click on the drop-down menu next to the “OpenGL rendering GPU” setting and choose your GPU device from the available options.
- Look for the setting labelled “Power Management mode” and set it to “Prefer maximum performance“.
- After that, set Texture filtering – Quality to High performance and hit the Apply button.

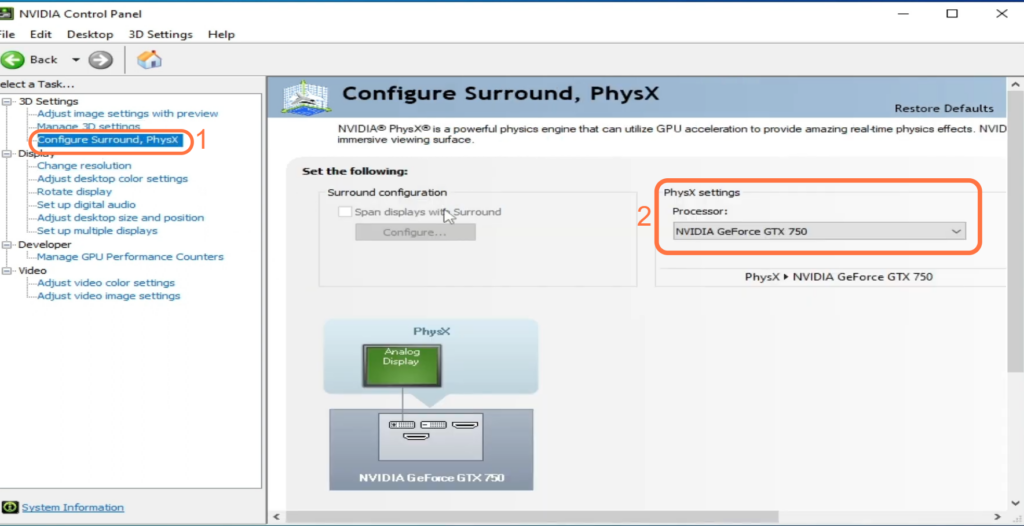
- Click on the “Configure Surround, PhysX” option to access the settings related to surround displays and PhysX.
- Within the Configure Surround, PhysX settings, navigate to “PhysX settings.”
- Open the drop-down menu under “Processors:“, select your GPU device and hit the Apply button.
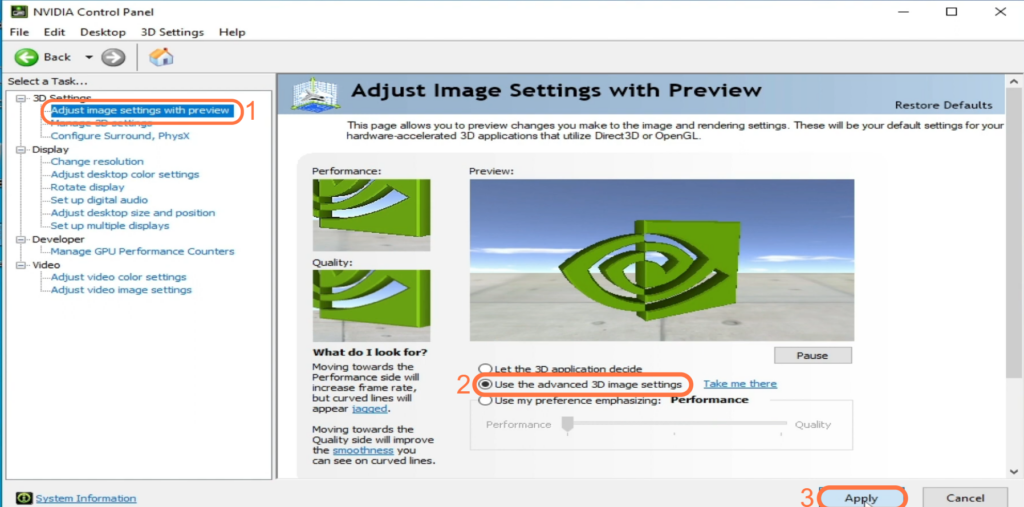
- Within the graphic card control panel, look for an option called “Adjust image settings with preview” and click on it.
- You need to checkmark “Use the Advanced 3D image settings” and click on Apply.
Change Display Settings
This section will take you through the steps to change the Display settings of your system to get the best performance of RPCS3.
- Right-click on an empty space on your desktop and choose the option labelled “Display Settings.”
- Within the display settings, scroll down until you find “Graphics settings” and Click on the Browse button.
It will open up the file explorer window. - Go to your RPCS3 folder select the application file, and then hit Add button.
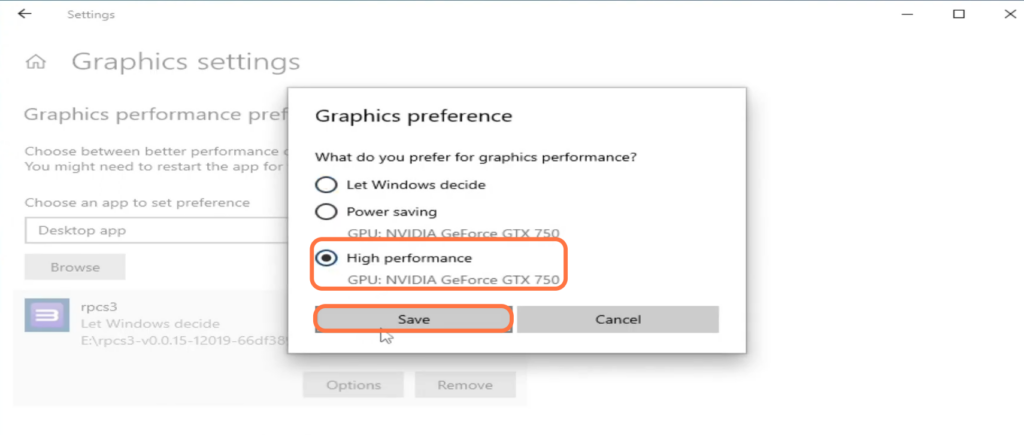
- After adding RPCS3 to the graphics settings, click on the “Options” button within the Graphics settings section.
This will open additional configuration options for RPCS3.- You have to select the High-Performance option, and then hit the Save button.
By making all these changes, all the graphics glitches and missing Textures in Rpcs3 will be fixed.