This guide helps to fix Yuzu Audio Stutter Crackling in your computer or any switch game. Set the Yuzu priority to high, Configure Yuzu audio settings, Change CPU and graphic settings, Update your prod keys, Update the User Emulator, and Check if you have updated graphic drivers are a few of the methods. You can try either of the methods to resolve the issue.
Set the Yuzu priority to high
In this section, we will take you through the steps to set the Yuzu priority to high to resolve the issue. You have to select the Yuzu details application from the taskbar and then set the yuzu.exe to high priority.
- First, click the Windows button from the taskbar.
- You have to search task manager from the search box and click the task manager application from the start menu.
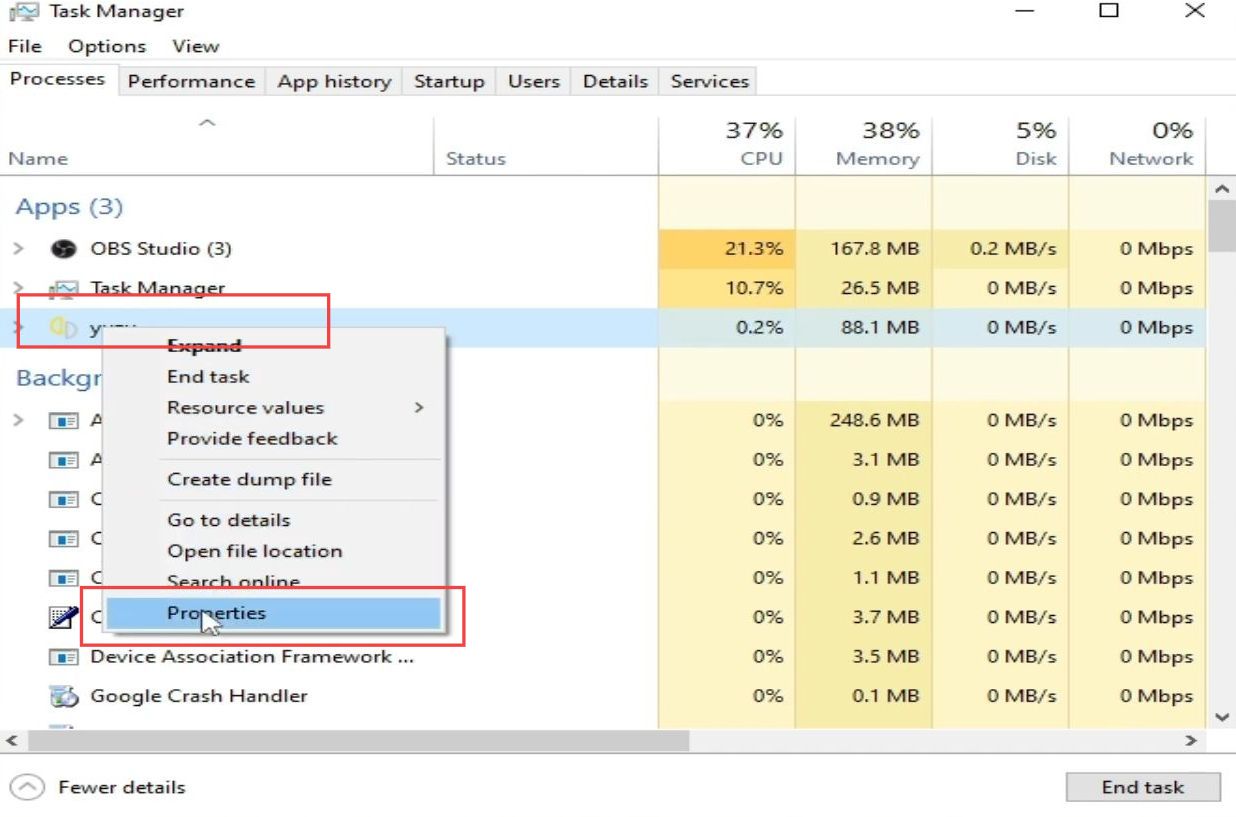
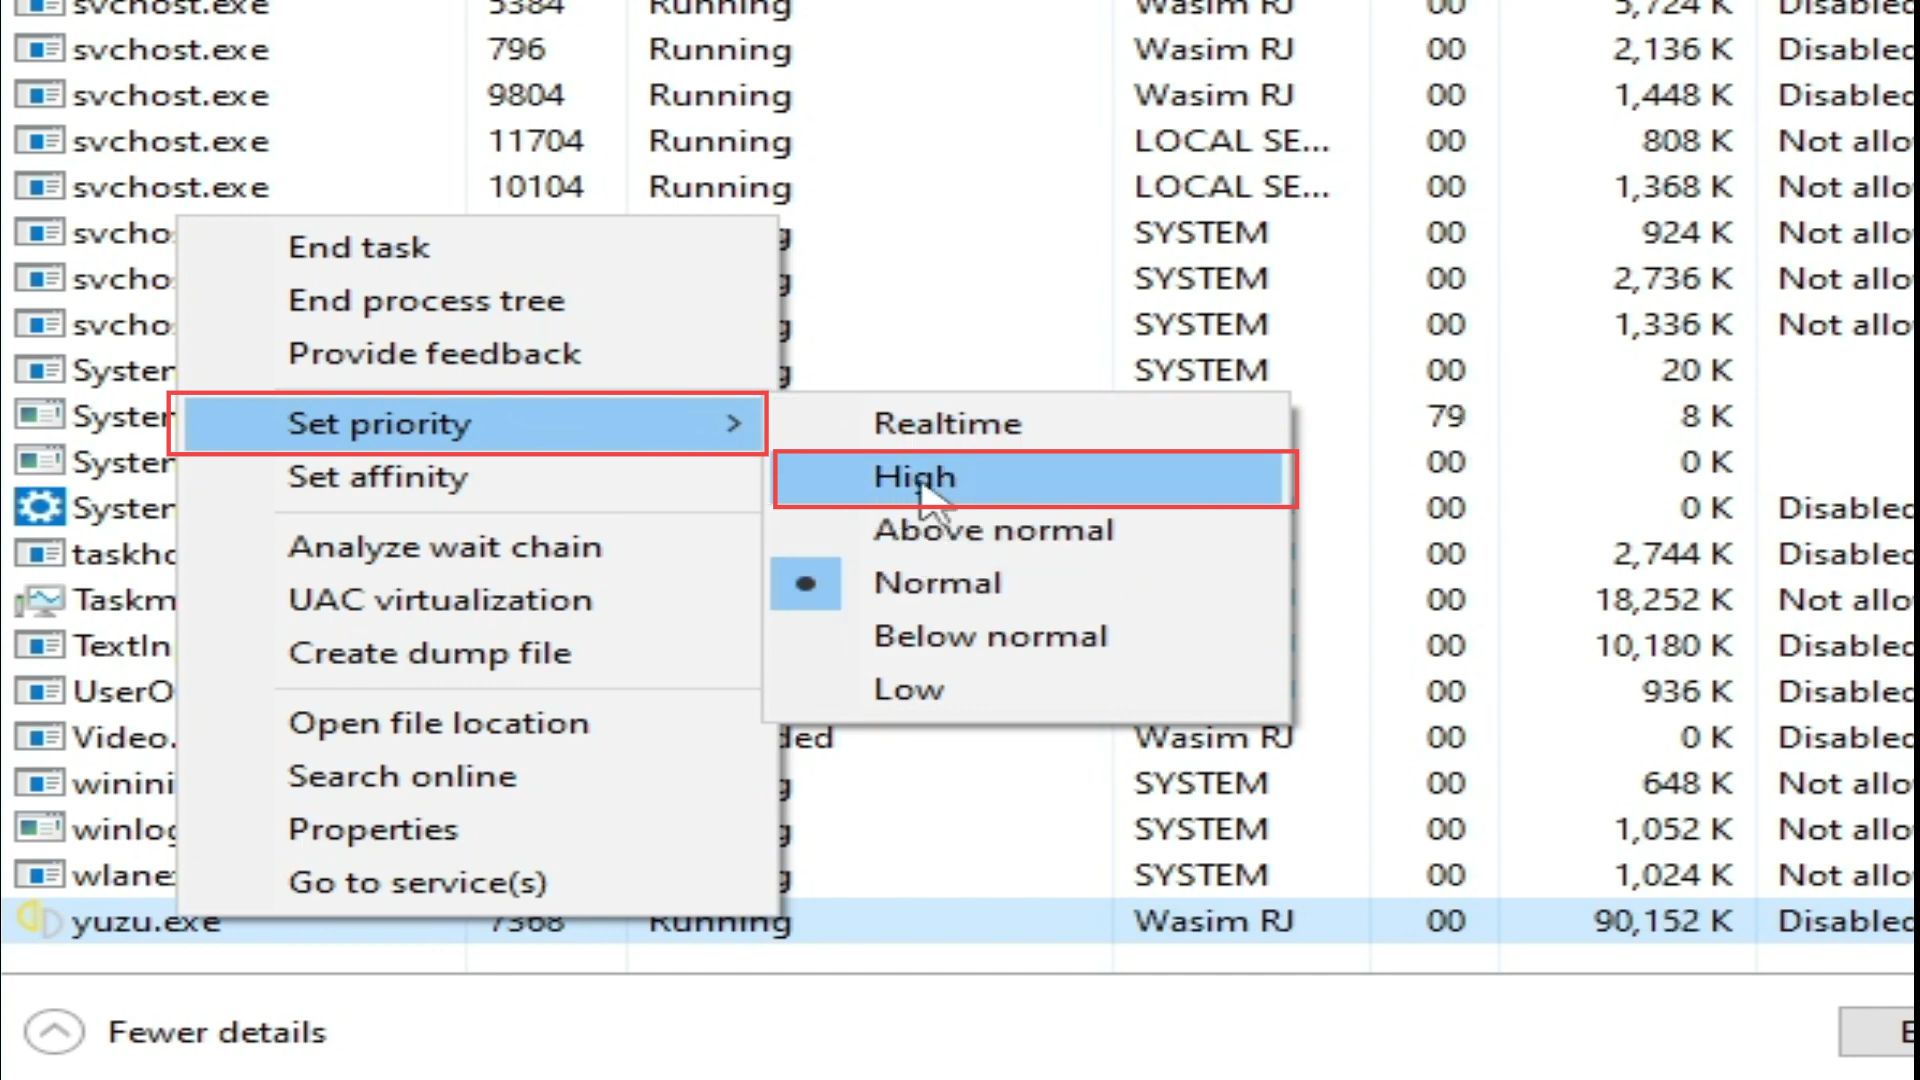
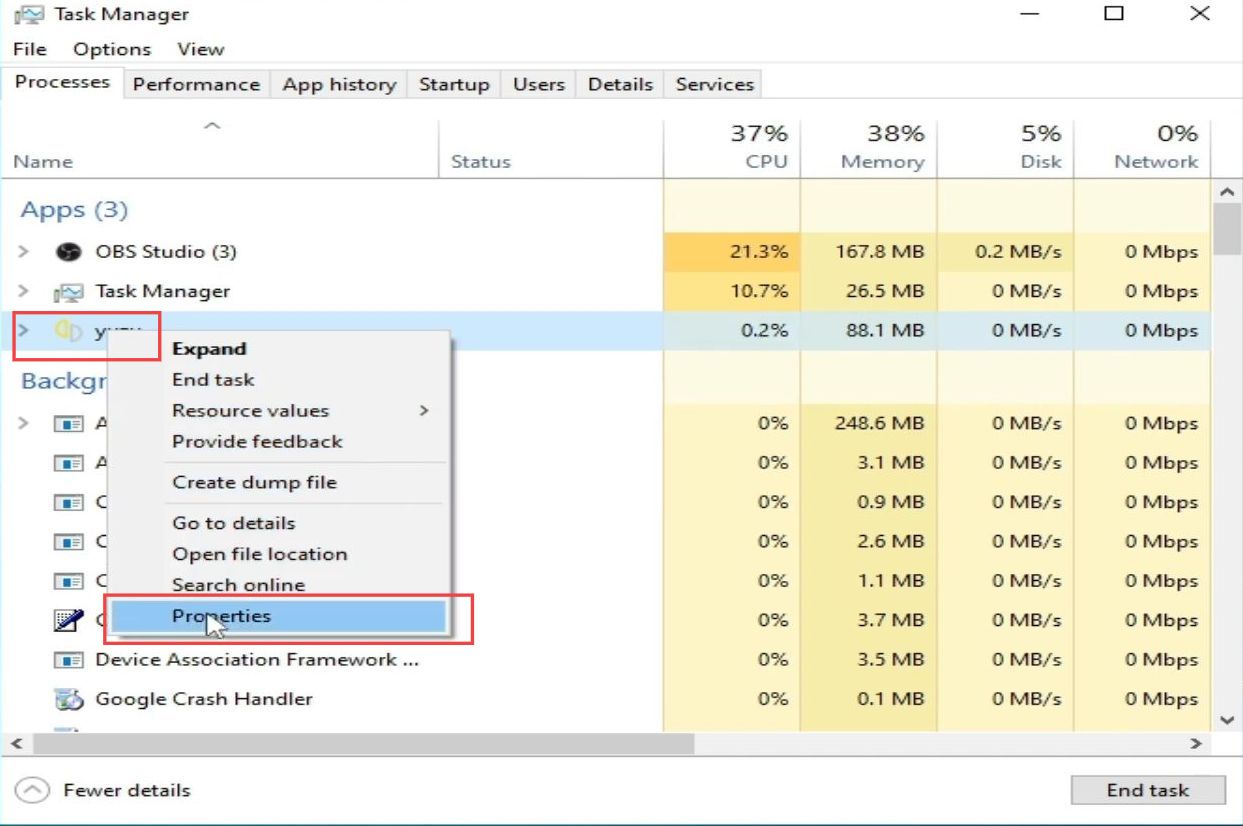
- Upon reaching this window, right-click the Yuzu application from the listings and tap on the “Go to details” option from the listings.
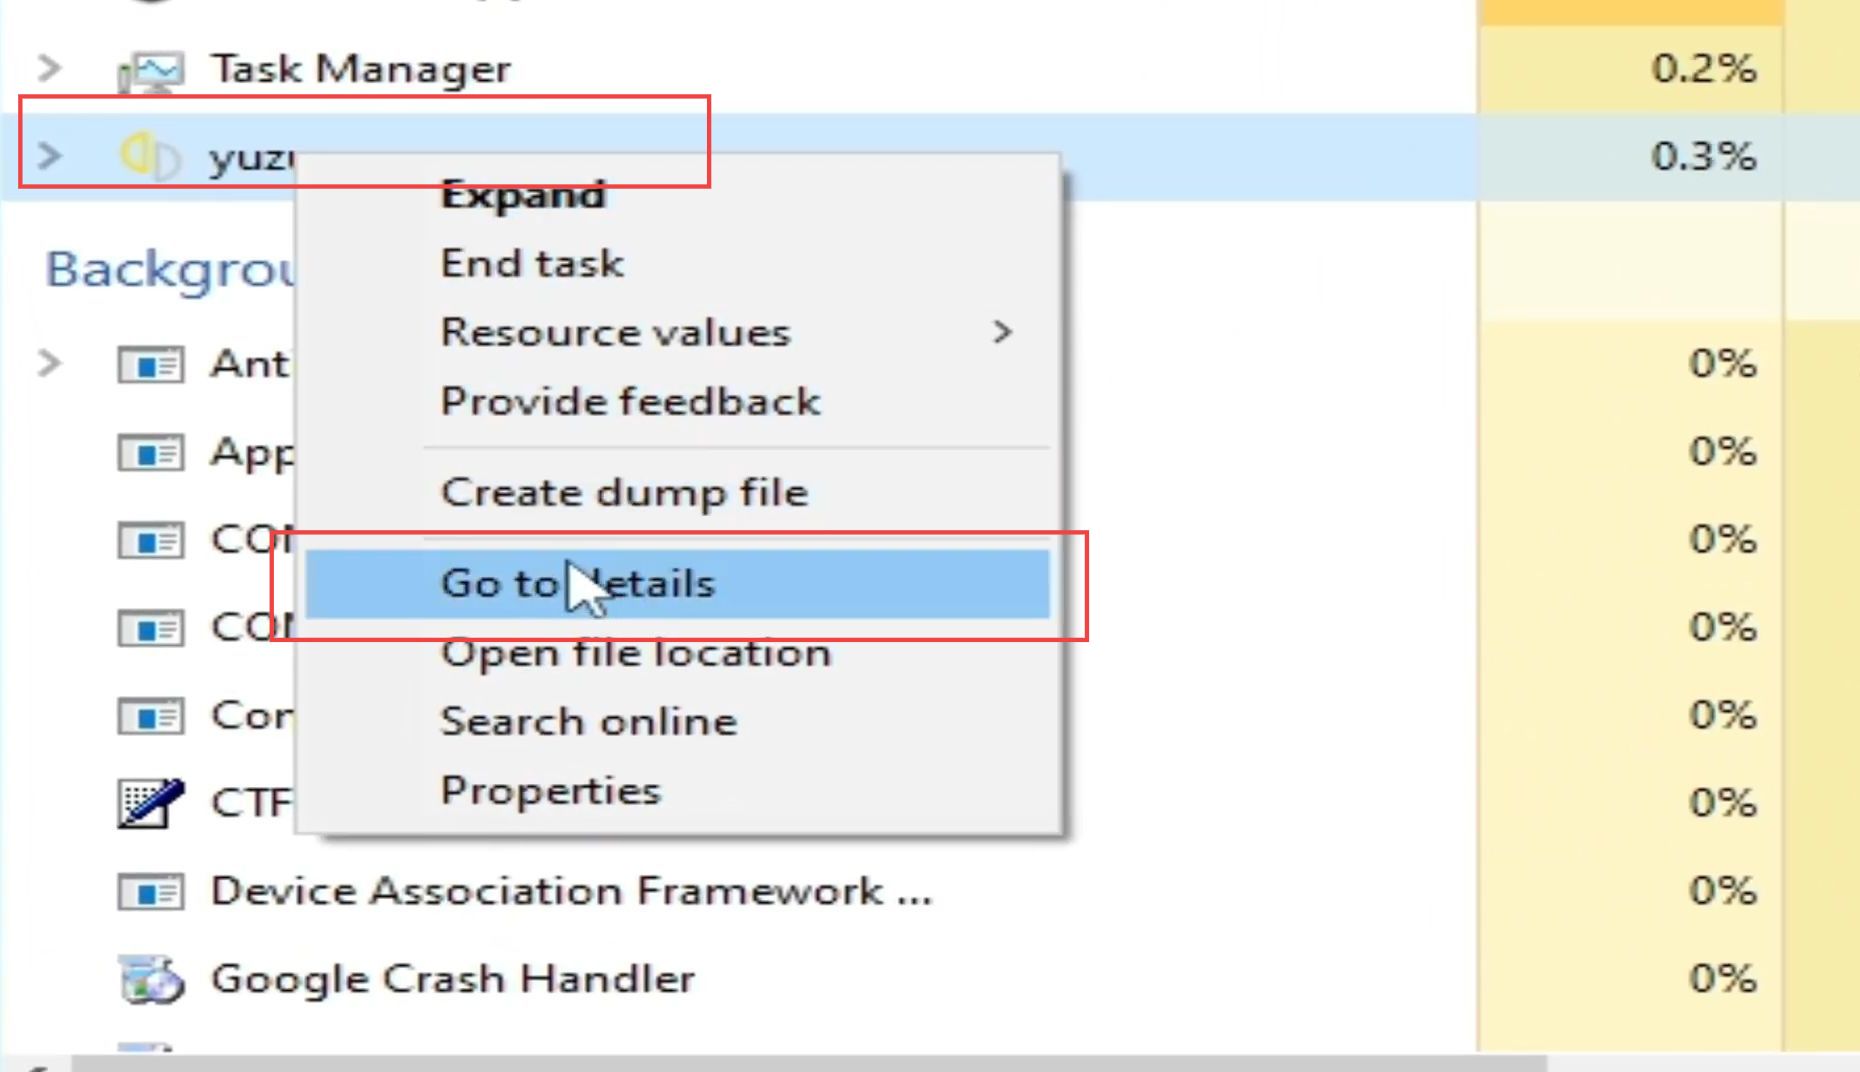
- Once this window is opened, scroll down and right-click the yuzu.exe file from the listings.
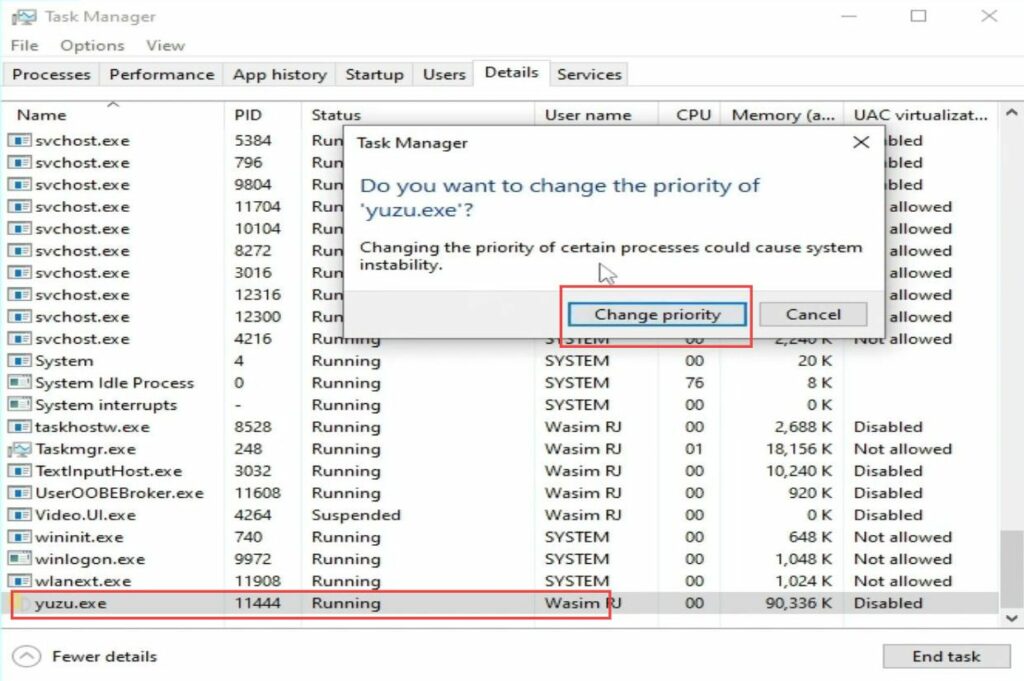
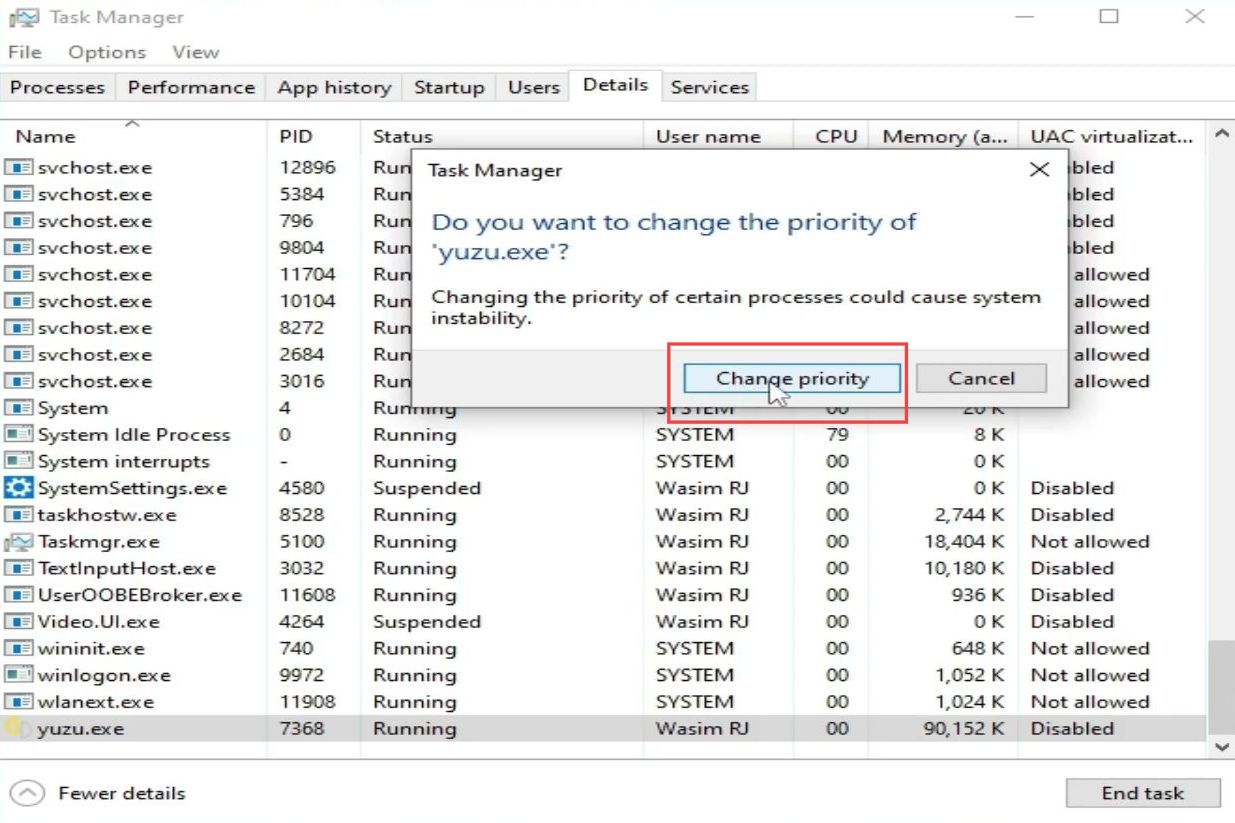
- Select the set priority option from the drop-down menu. After that, click the High option from the extended menu.

- Once you get a notification, you have to click the change priority button from the window.
- After that, close all the windows and restart your user emulator.
- Again open the task manager from the start menu and right-click the Yuzu application from the menu.
- Select the go-to details option from the menu.
- Upon reaching the new window, scroll down and right-click the yuzu.exe file from the listings.
- Select the set priority option from the drop-down menu.
- After that click the High option from the extended menu.
Whenever you want to play the game, it will allow you to play the game without any problem.
Configure Yuzu audio settings
This section describes how to configure Yuzu audio settings to fix the error. You have to open the configuration option from the emulation tab and set the output engine to some suitable value.
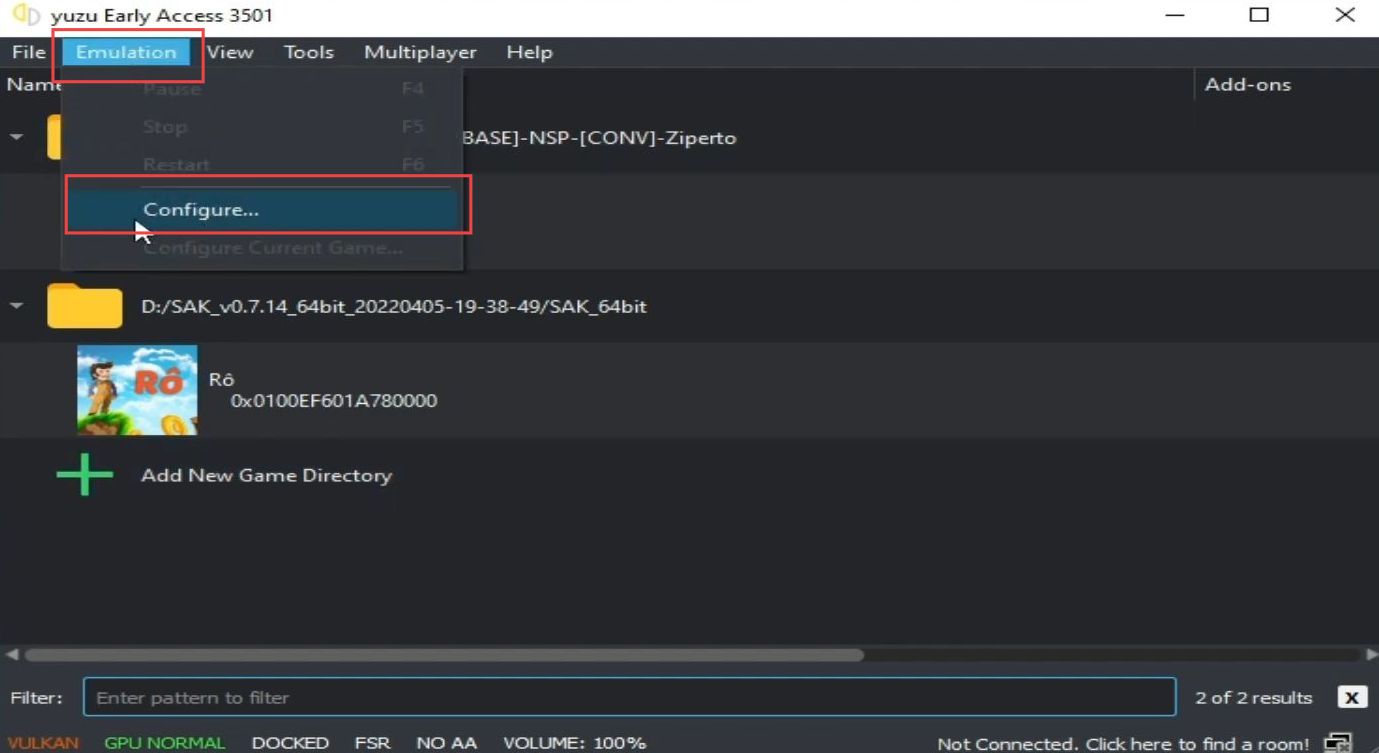
- First, open your Yuzu emulator on your computer.
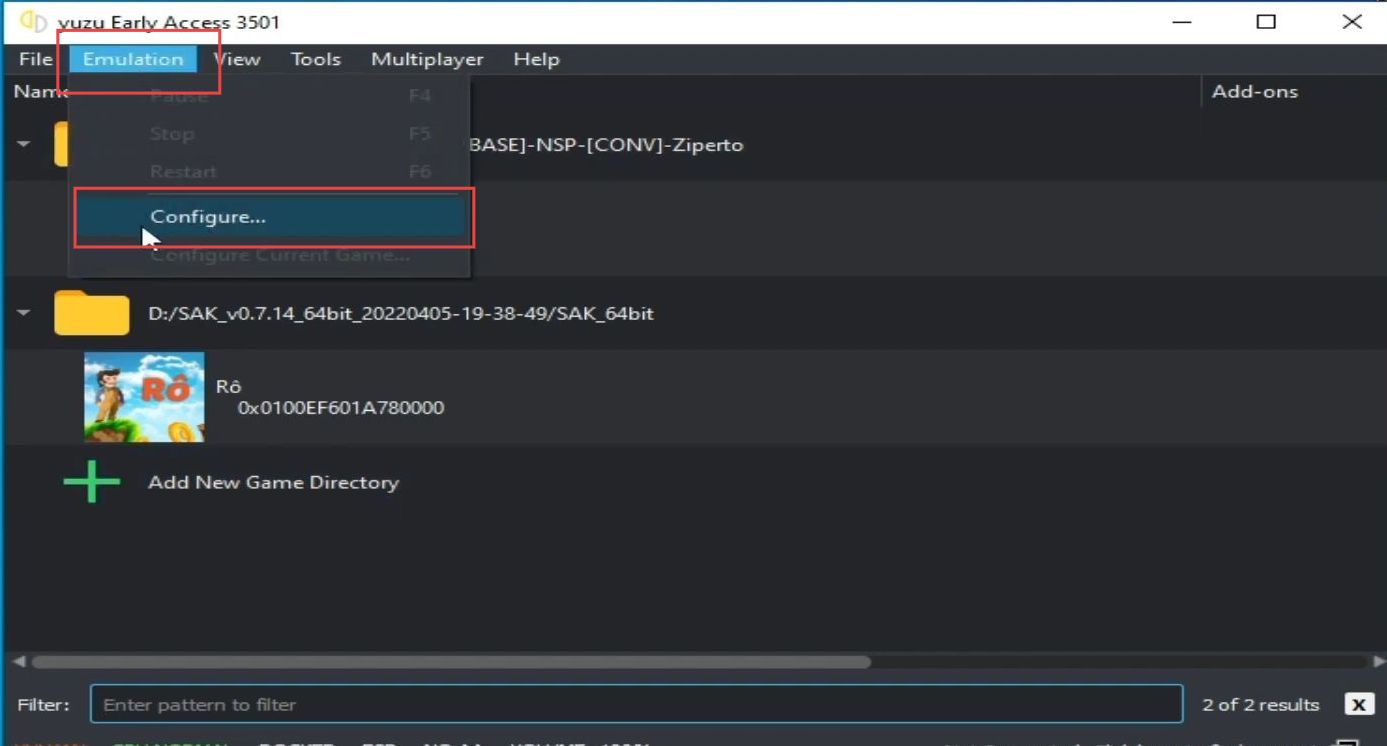
- Once it is opened, click the Emulation tab from the quick access toolbar and select the Configure option from the drop-down menu.
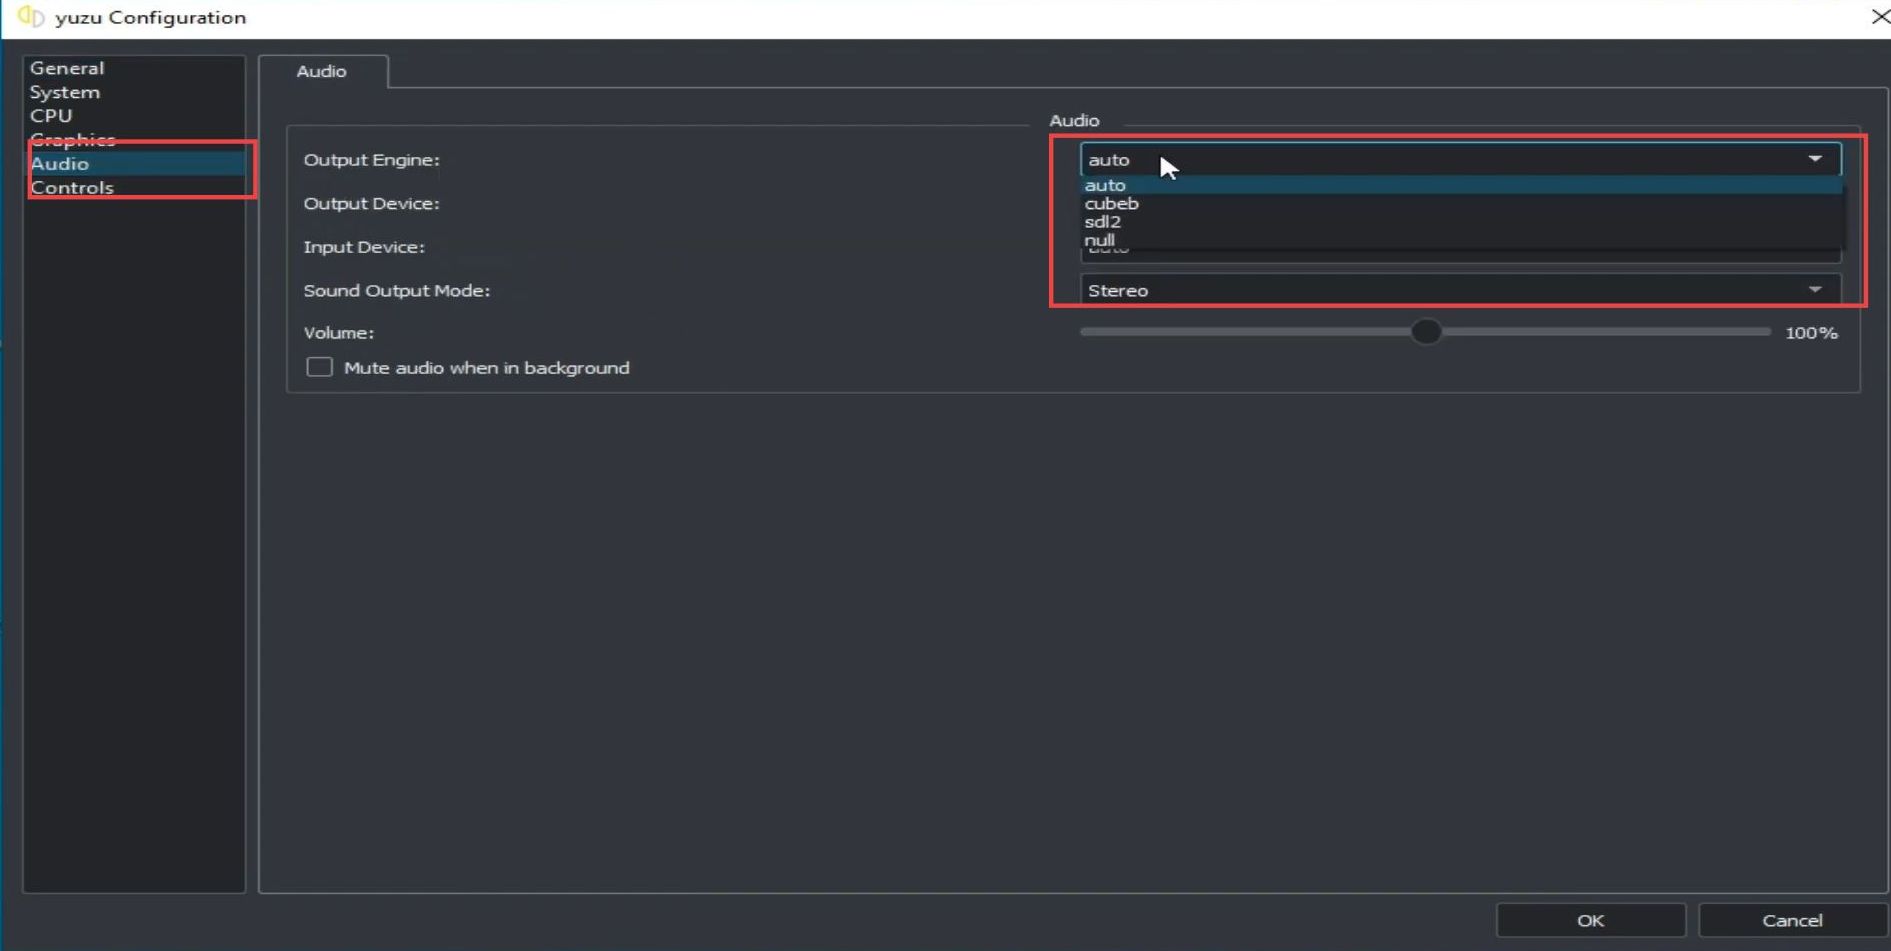
- Navigate to the audio tab from the left side panel.
- Set the output engine value as cubeb or sdl2 from the drop-down menu.
Changing CPU and graphic settings
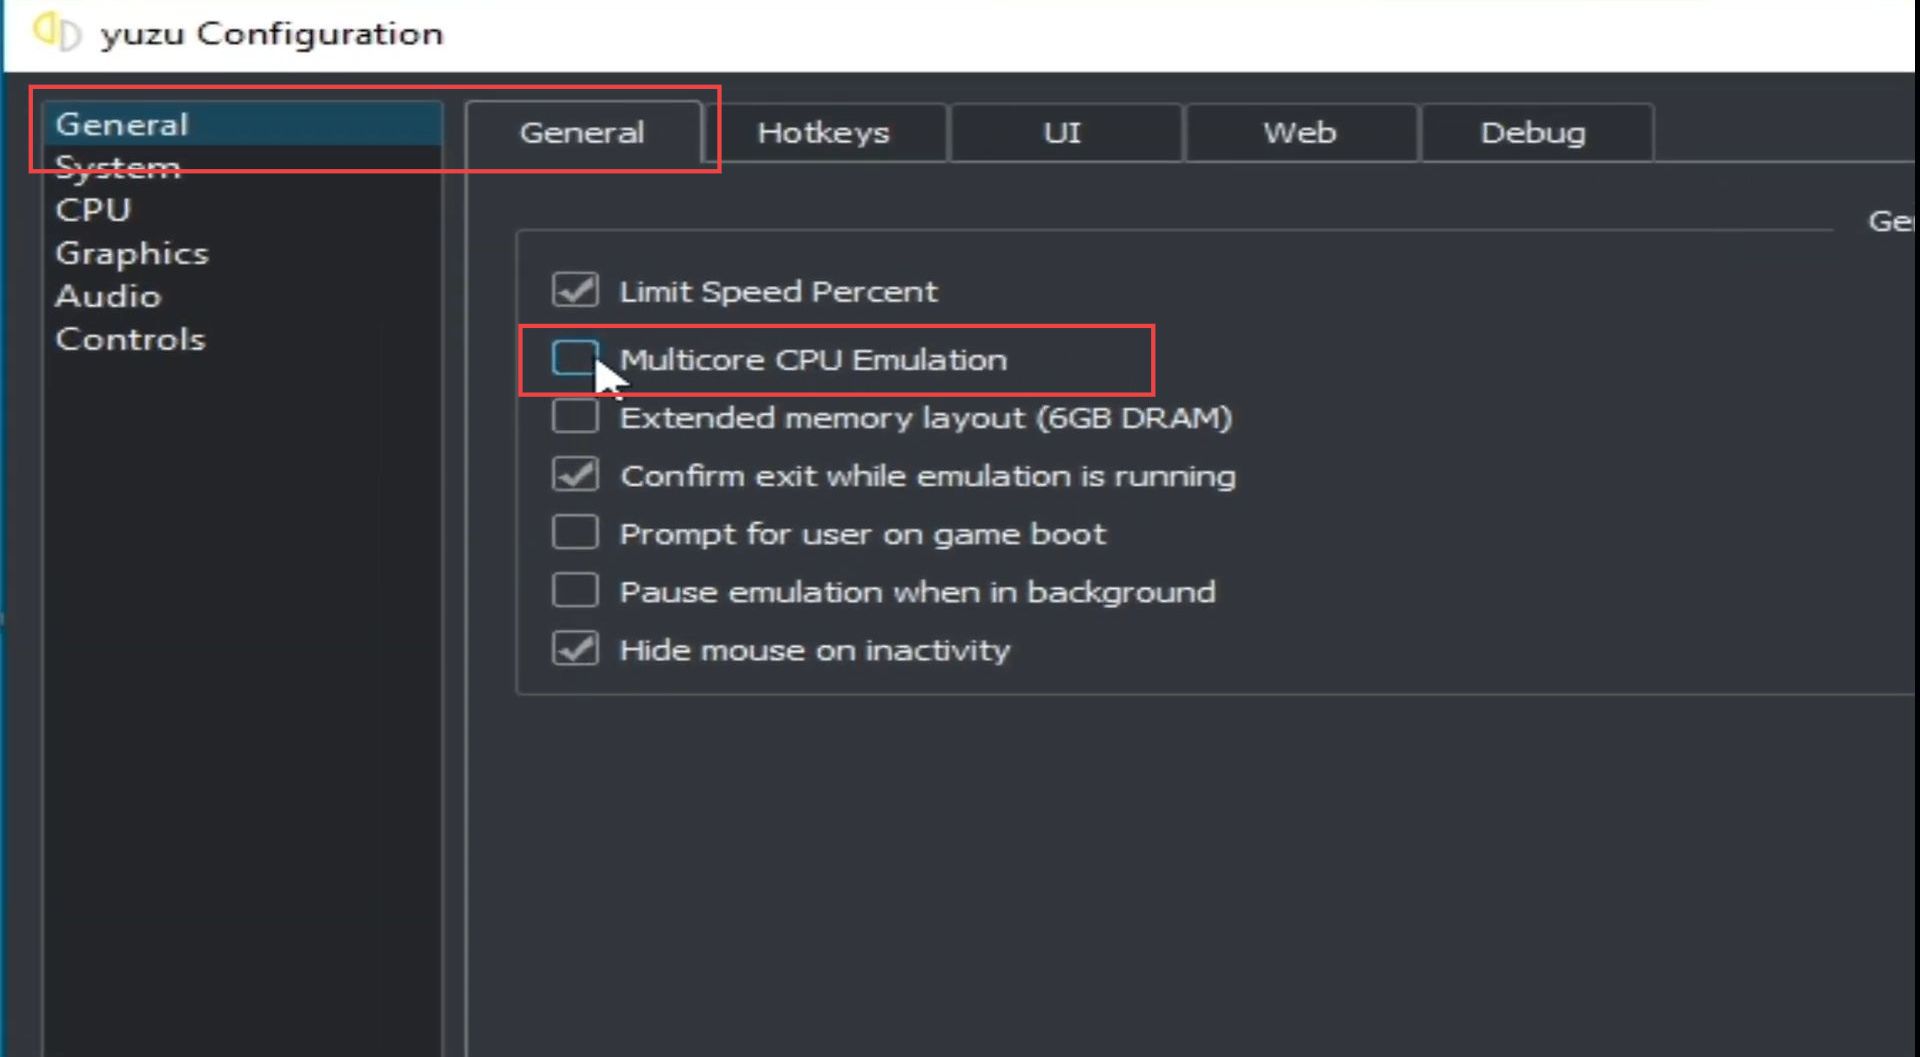
This section explains how to change CPU and graphic settings to solve the problem. You have to configure the CPU emulation option and change the CPU general settings.
- First, open your Yuzu emulator and click on the emulation tab from the quick access toolbar.
- Select the configure option from the drop-down menu.
- Upon reaching the configuration window, checkmark the Multicore CPU emulation option from the section of the General tab.
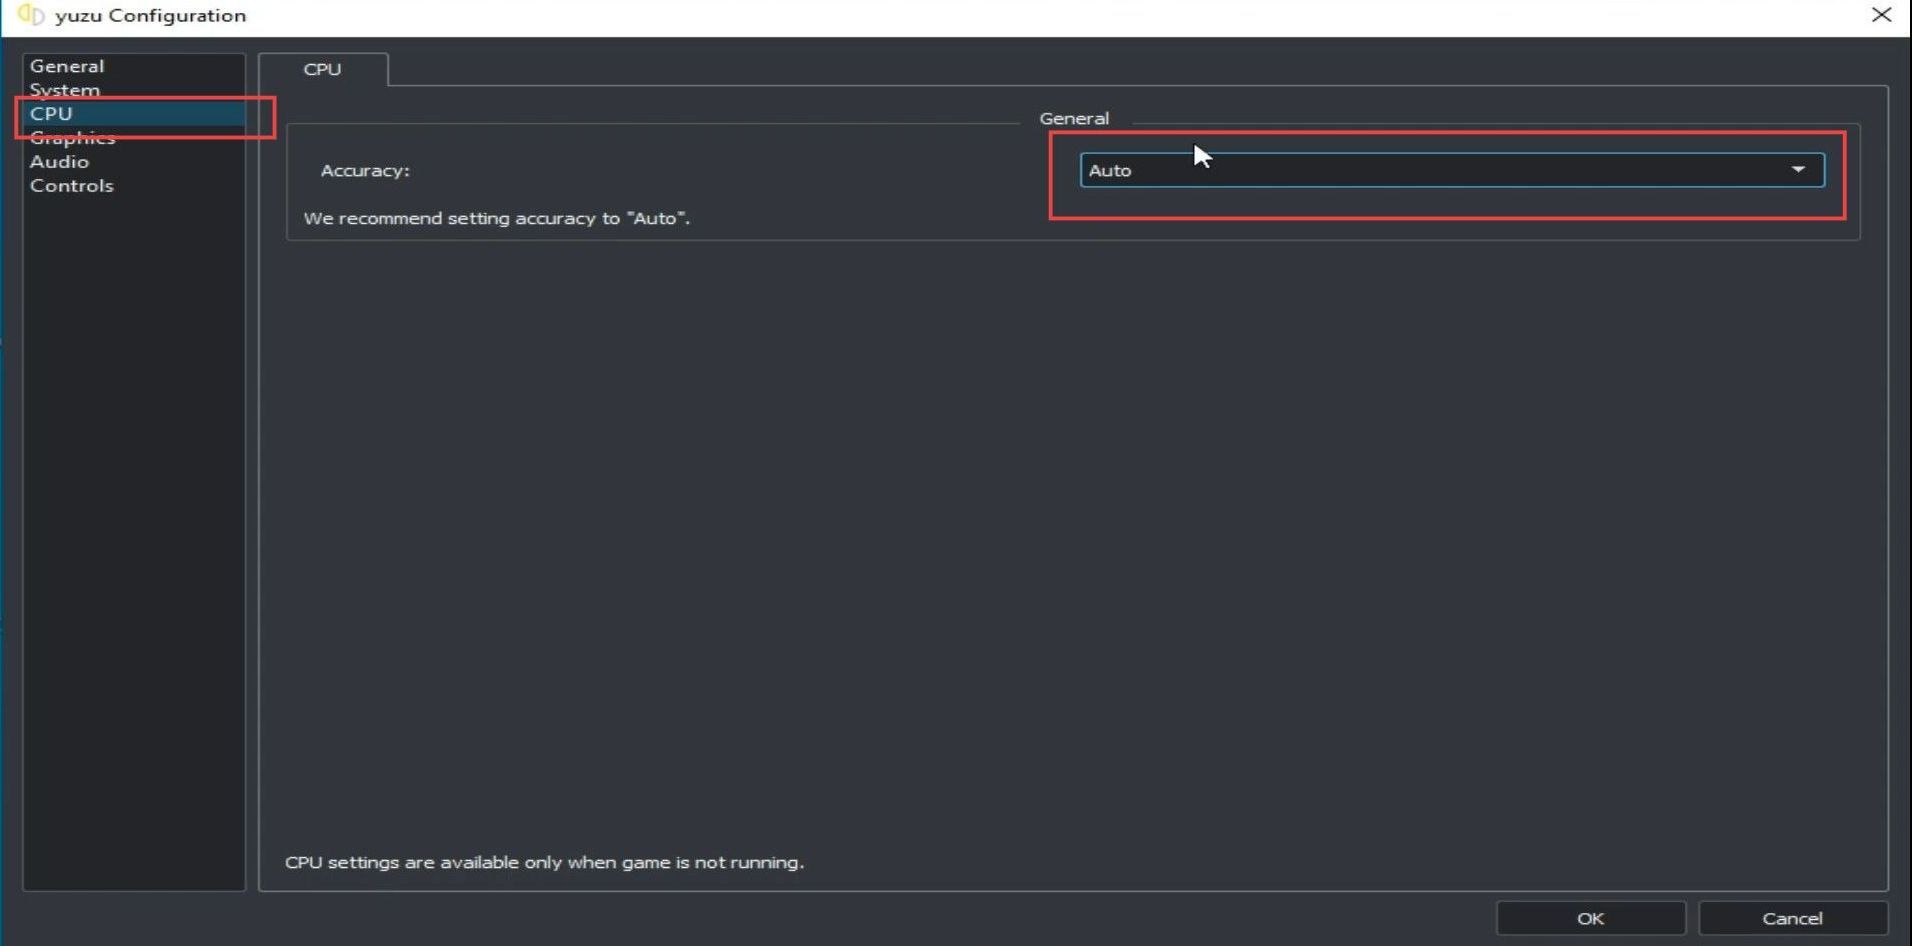
- After that, click the CPU tab from the left side panel.
- You need to set the accuracy to auto from the drop-down menu.
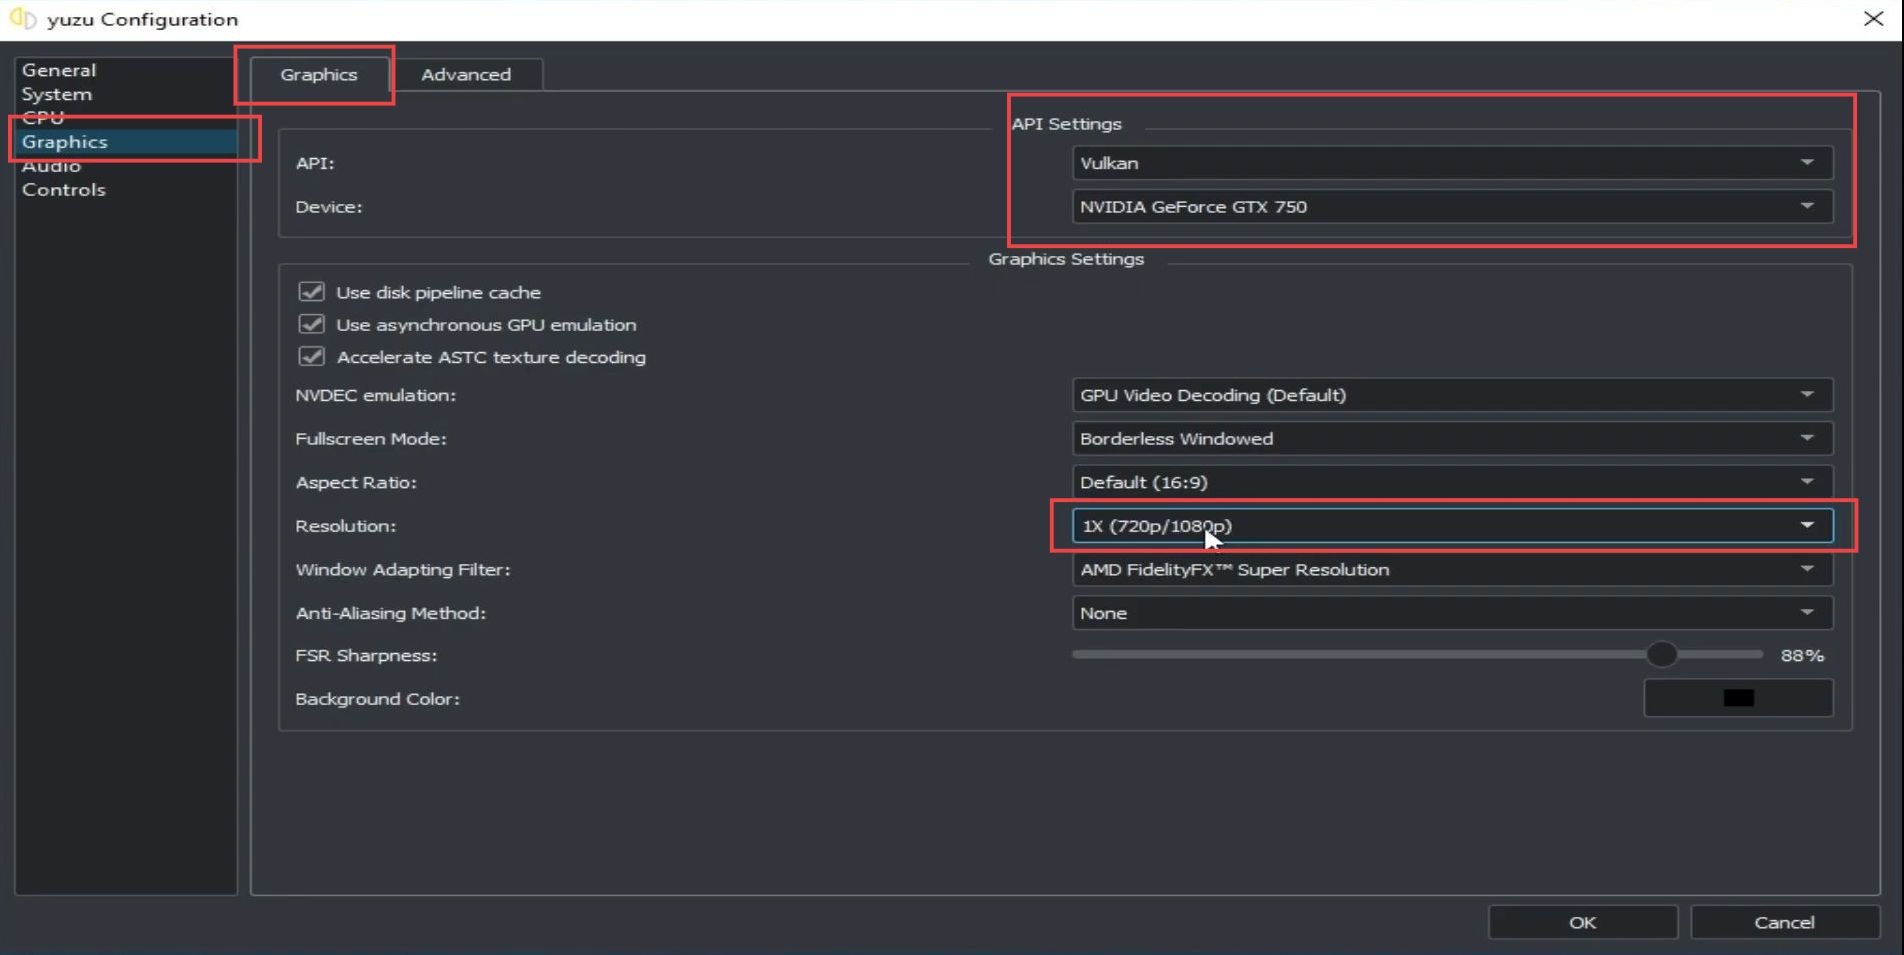
- Now click the Graphics tab from the left side panel and set the resolution to 1x (720/1080p) from the drop-down menu.
- After that, set the API to Vulkan from the extended listings.
- You also have to select your powerful GPU from the section under API settings. Moreover, checkmark all the options from the section of graphic settings.
- After that, click the advanced tab from the section of graphics.
- Upon reaching the window, checkmark these options from the accuracy level section.
- If your GPU is powerful, then select the advanced graphic settings to High.
Otherwise set these advanced graphic settings to normal.

Update your prod keys
This section describes how to update your prod keys to resolve the issue. You have to change the file type from the Yuzu application. Then you need to open the Yuzu folder, delete the previous prod keys and update the latest prod keys to fix the error.
- If you are using xci files in a user emulator for your switch games, then it is recommended to use NSP files.
It has lower issues and provides better performance compared to xci files.

- However, if you are using updated firmware files, then you need to have the latest prod keys for the user emulator.
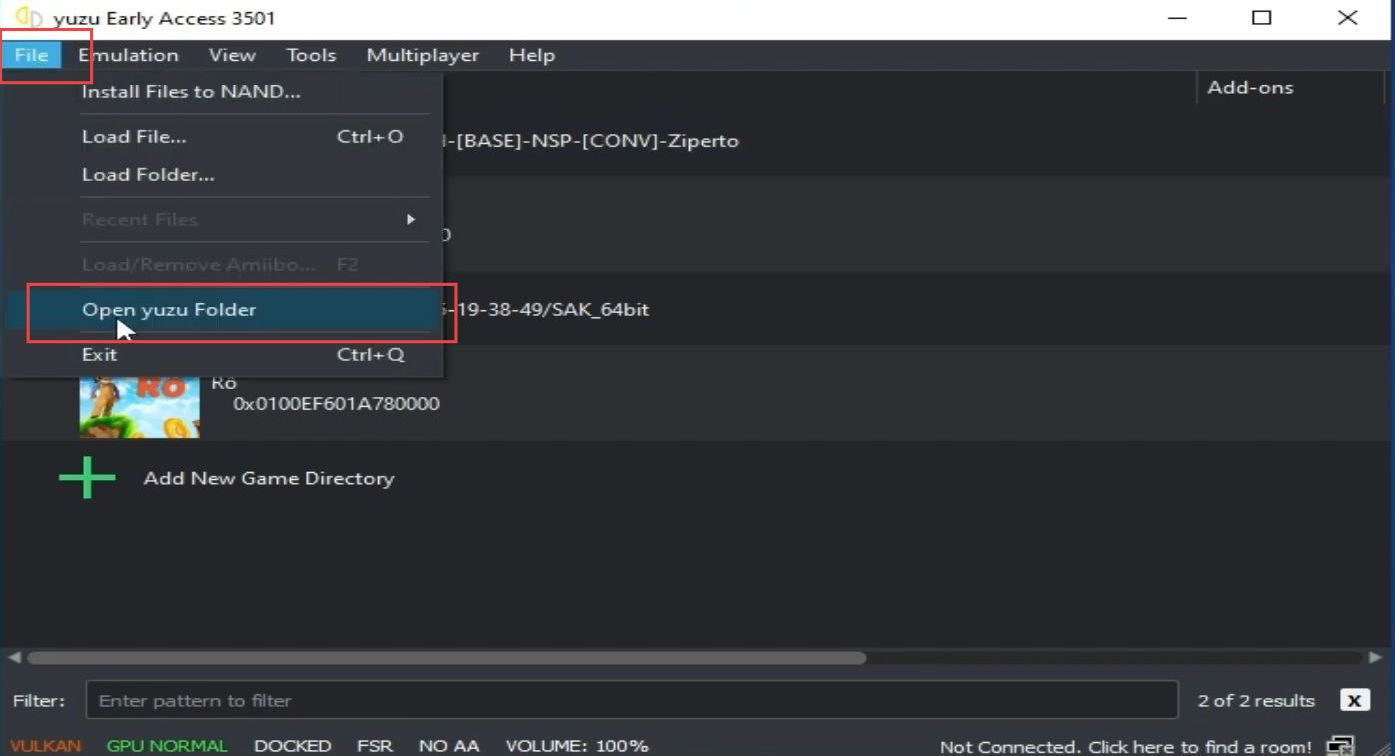
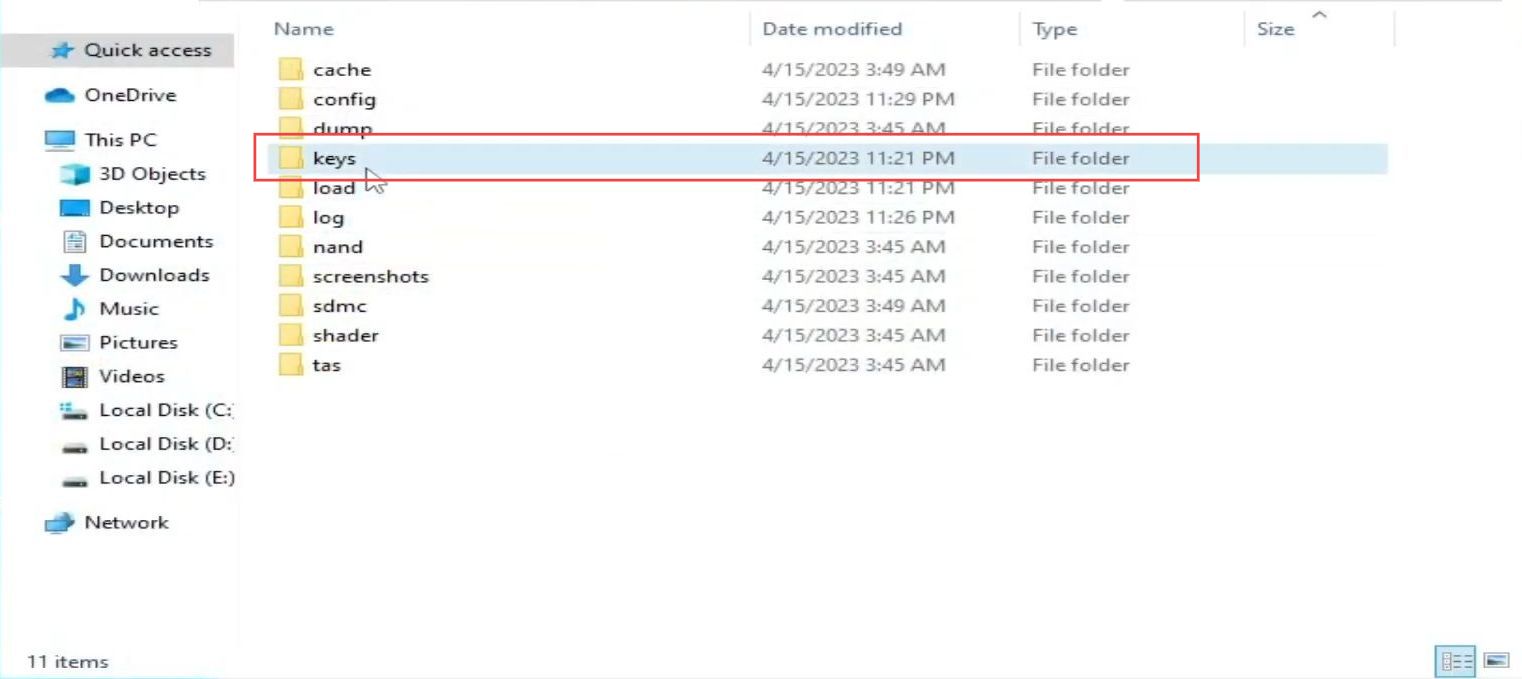
- Now click the file tab from the quick access toolbar and select open yuzu folder option from the listings.
- Upon reaching this window, click the keys folder from the listings.
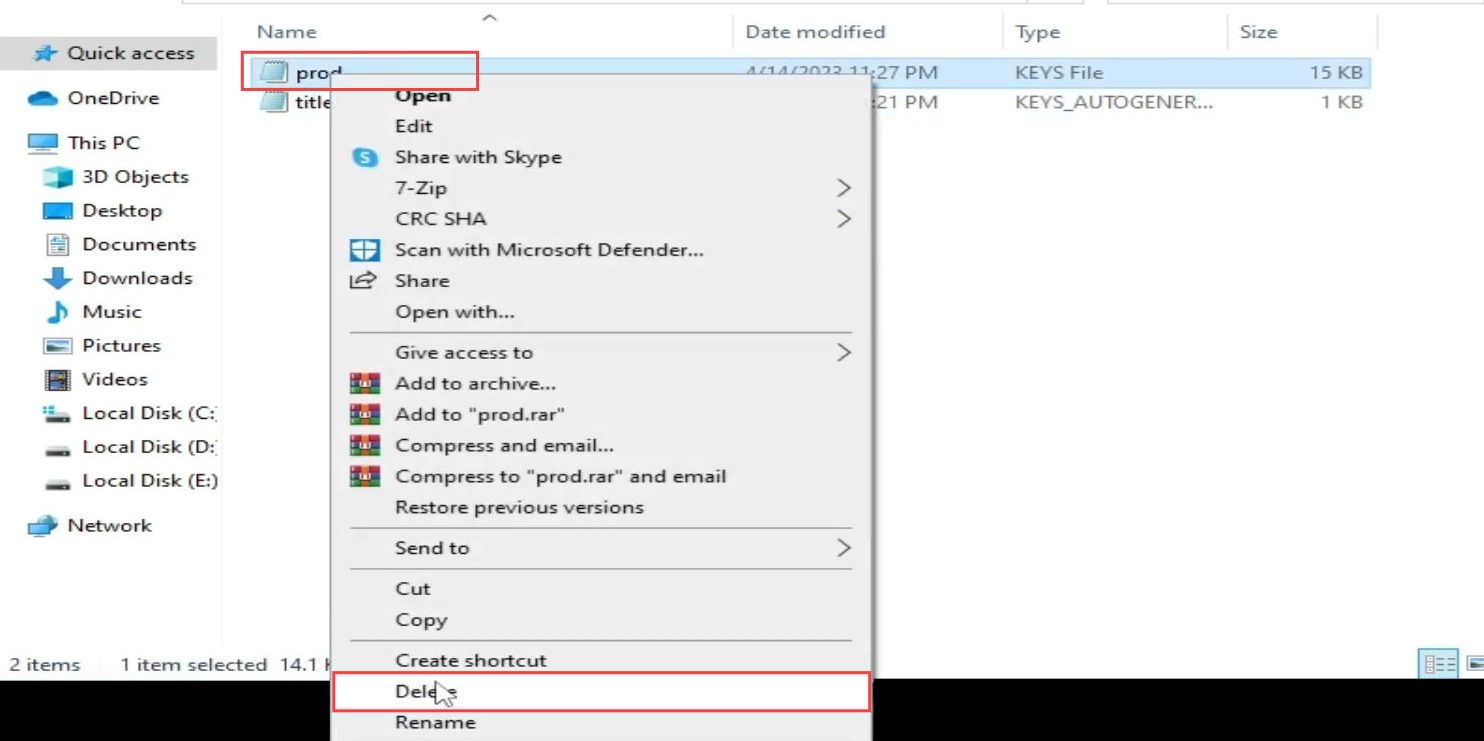
- You need to update your prod keys if you are using an older version.
- Right-click the prod key file and select the delete option from the drop-down menu.
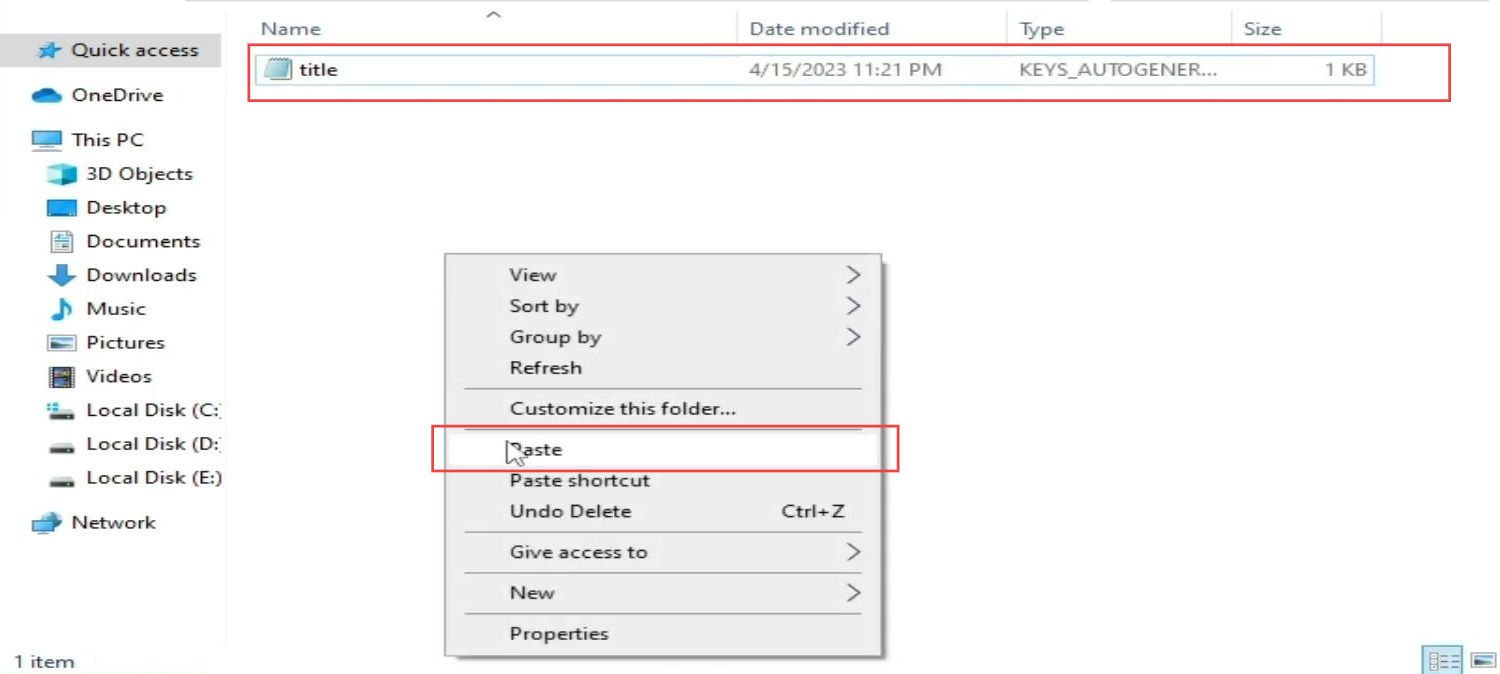
- Once you have downloaded the new prod key, then you need to copy the key from the downloaded location and paste it into the keys folder.
- After that, close all the windows and restart your user emulator once the updated keys are added.
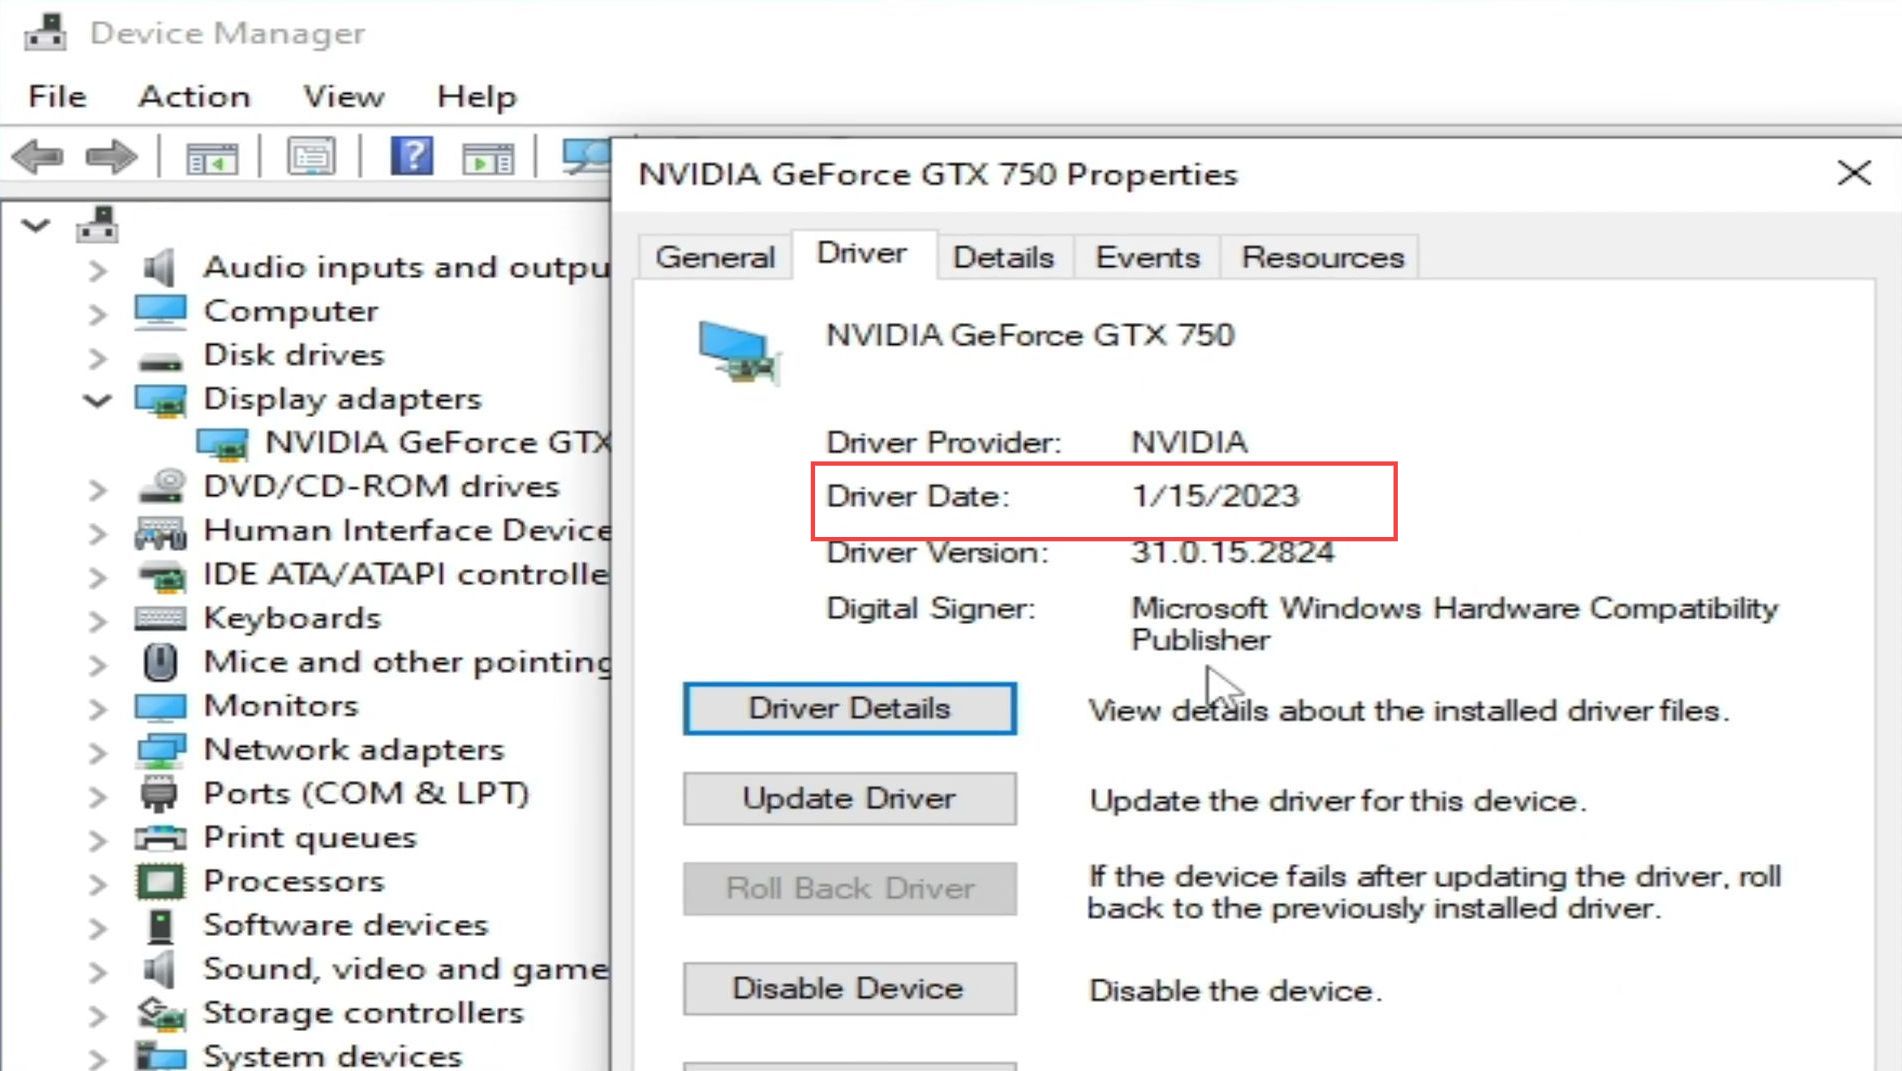
Check if you have updated graphic drivers
This section explains how to check if you have updated graphic drivers to fix the error.
- First, click the Windows button from the tasks bar, and search the device manager from the start menu.
- Click the device manager from the listings.
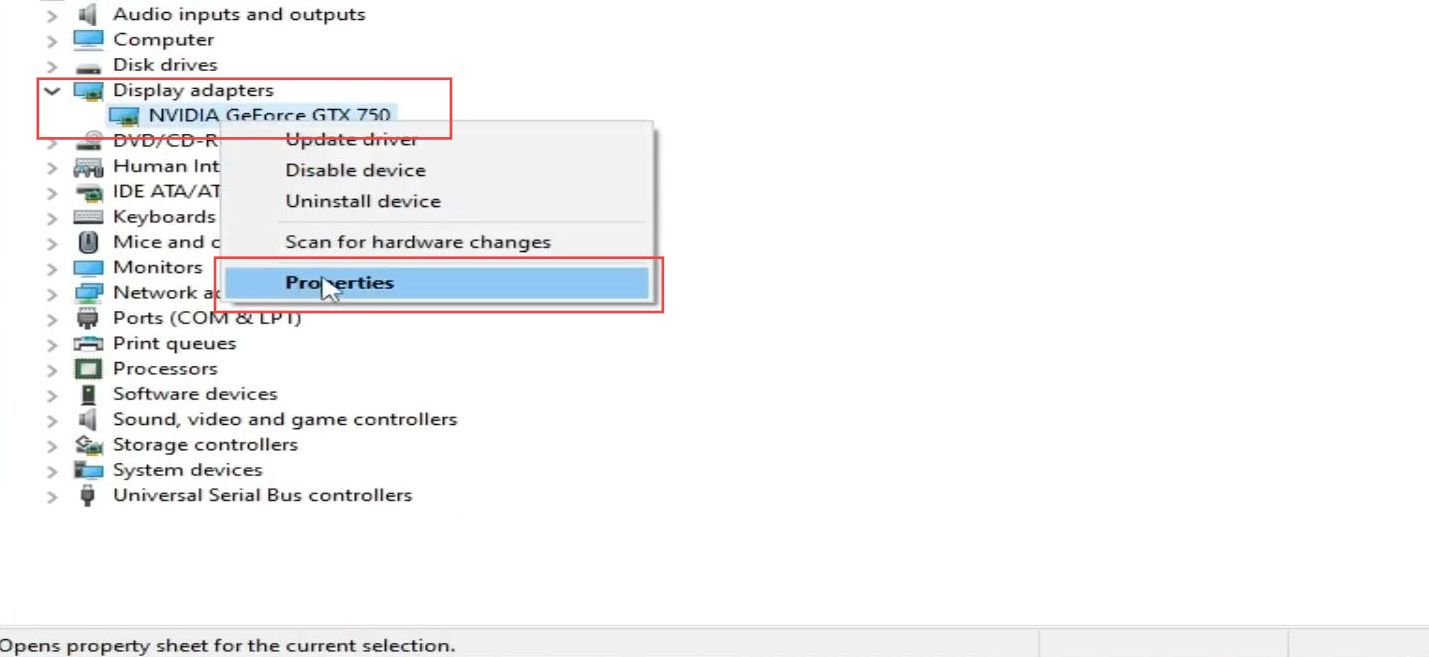
- Once the device manager is opened, tap on the display adapters tab to expand it.
- Right-click the installed adapter driver and select the properties from the listings.
- Once this window appears, click the driver tab from the quick access toolbar.
- You need to ensure that you have the latest drivers installed on your computer.
If you have the older driver version, then install the latest driver to resolve the problem.
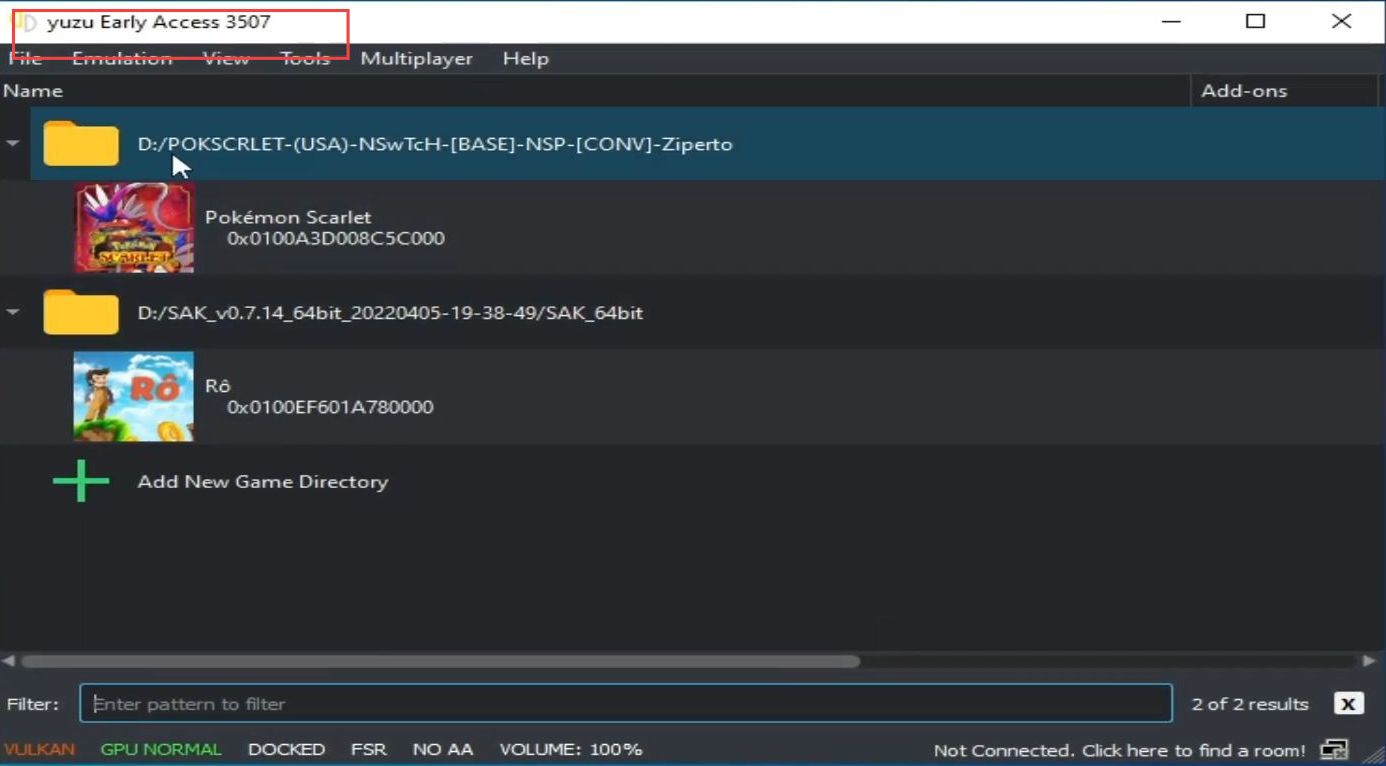
Update the User Emulator
This guide describes updating the user emulator to resolve the issue conveniently.
- First, you need to ensure that your user emulator is updated with the latest version.
You should have the recent version of yuzu, which is yuzu early access 3507 besides the older one.
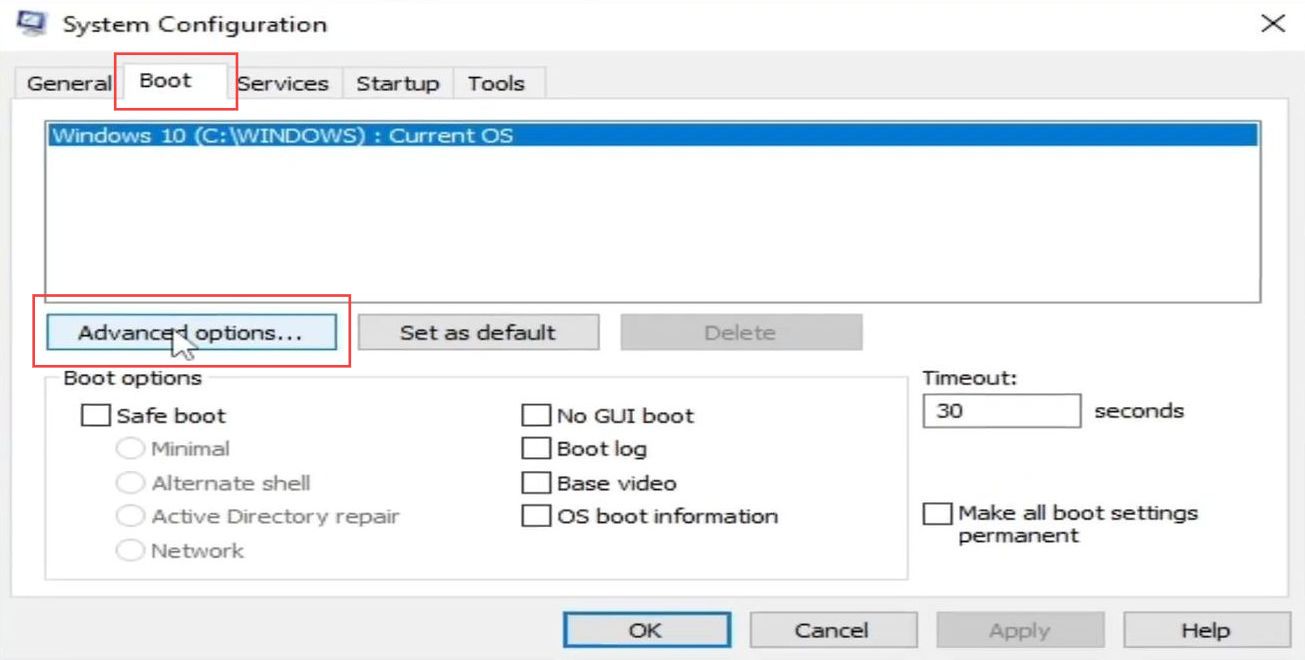
Disable all the Boot advances options
This section explains how to disable all the Boot advances options to resolve the issue. You have to open the system configuration app from the start menu and go to the advanced options of the boot tab. Disable all the Boot advances options and check whether the error is fixed.
- First, click the Windows button from the taskbar and search ms config in the search box to open the system configuration app.
- Upon reaching the new window, click the boot tab from the quick access toolbar.
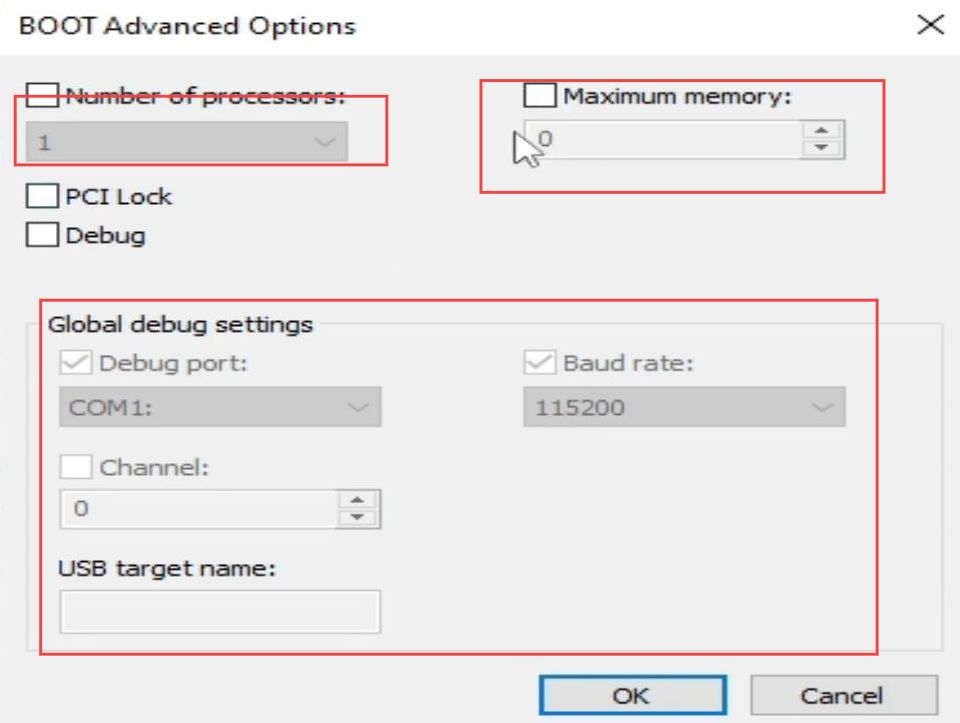
- After that, select the Advanced Options button from the menu.
- You have to ensure that these options are disabled from the menu of Boot advances options.
- After that, click the Apply button and restart your computer.
Change advanced image settings
This section describes how to change advanced image settings to resolve the issue.
- After restarting the process is done, ensure that your GPU settings are accomplished.
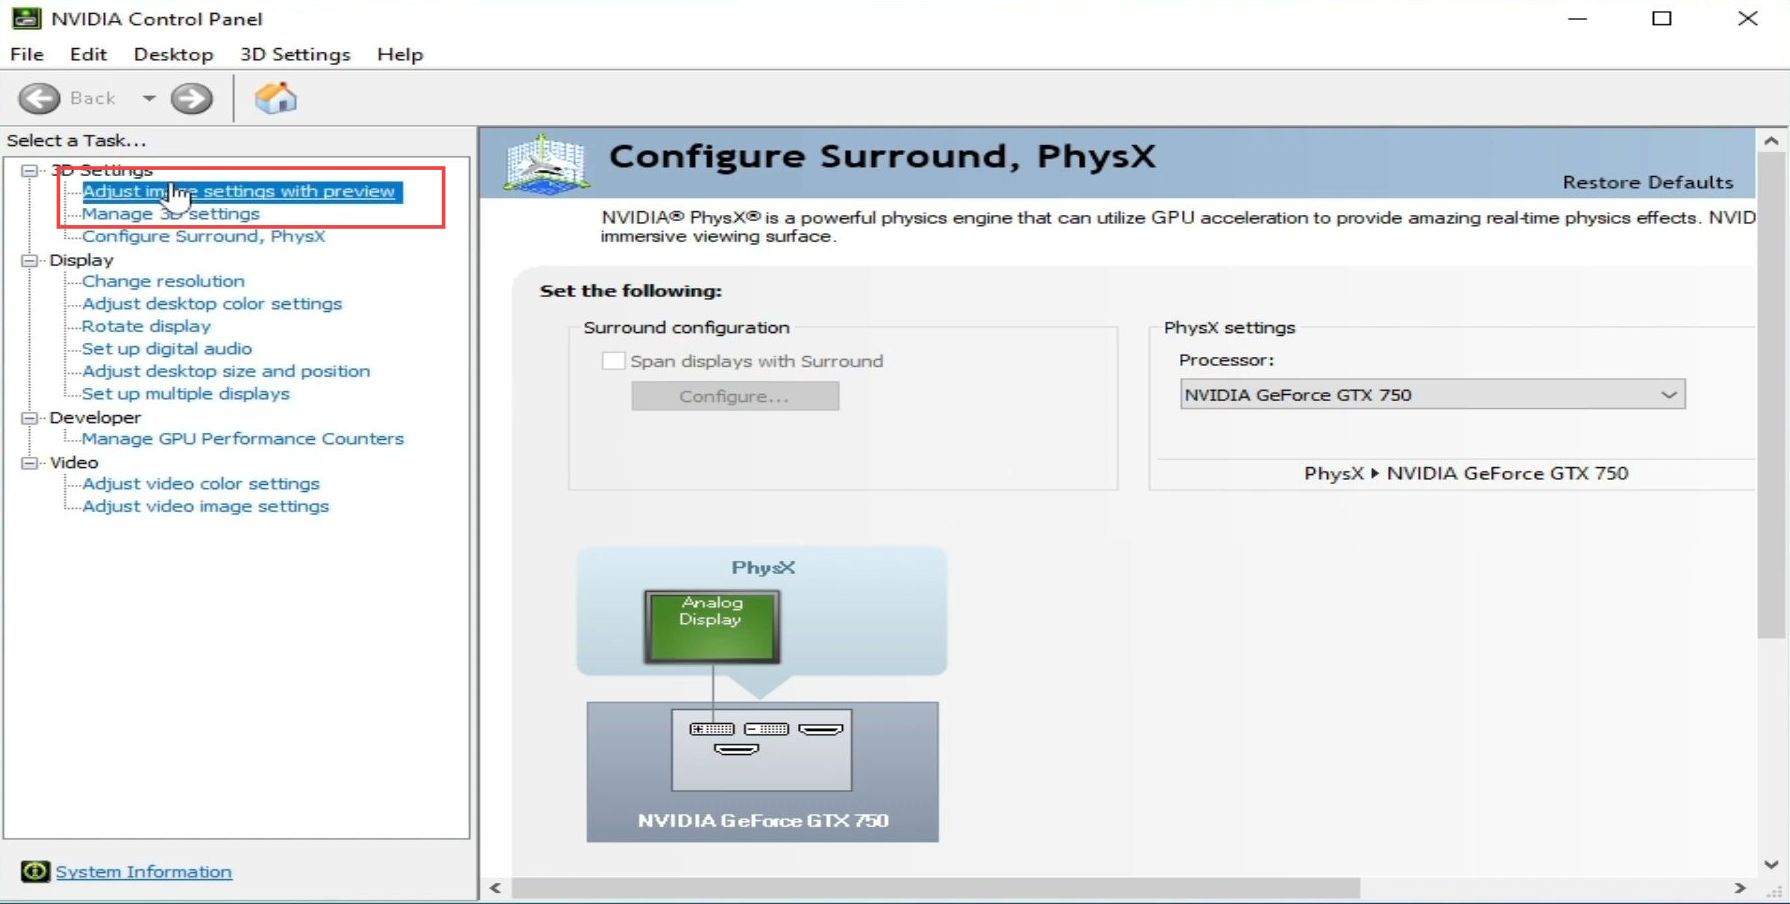
- If you are using NVIDIA drivers then right-click on the desktop and select the NVIDIA control panel to open it.
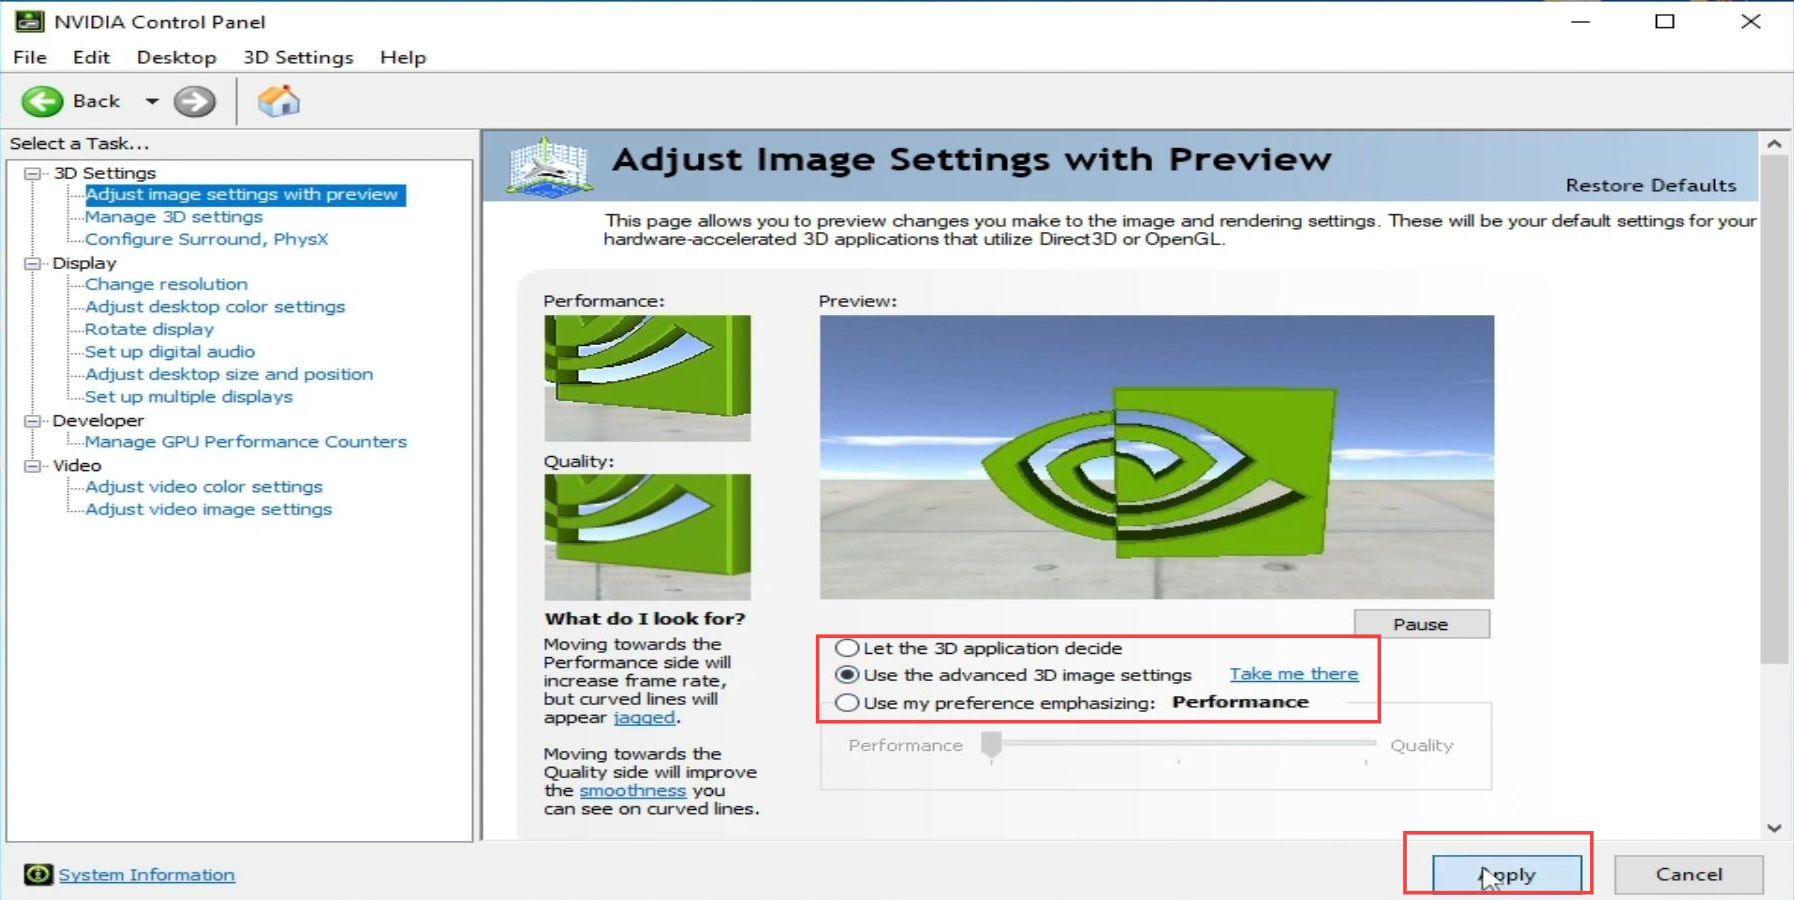
- Upon reaching this window, click the adjust image settings with the preview option from the left side panel.
- After that, checkmark the option named use my preference emphasizing and move the toggle to the performance side.
- Checkmark the option named use the advanced 3D image settings and click the apply button.
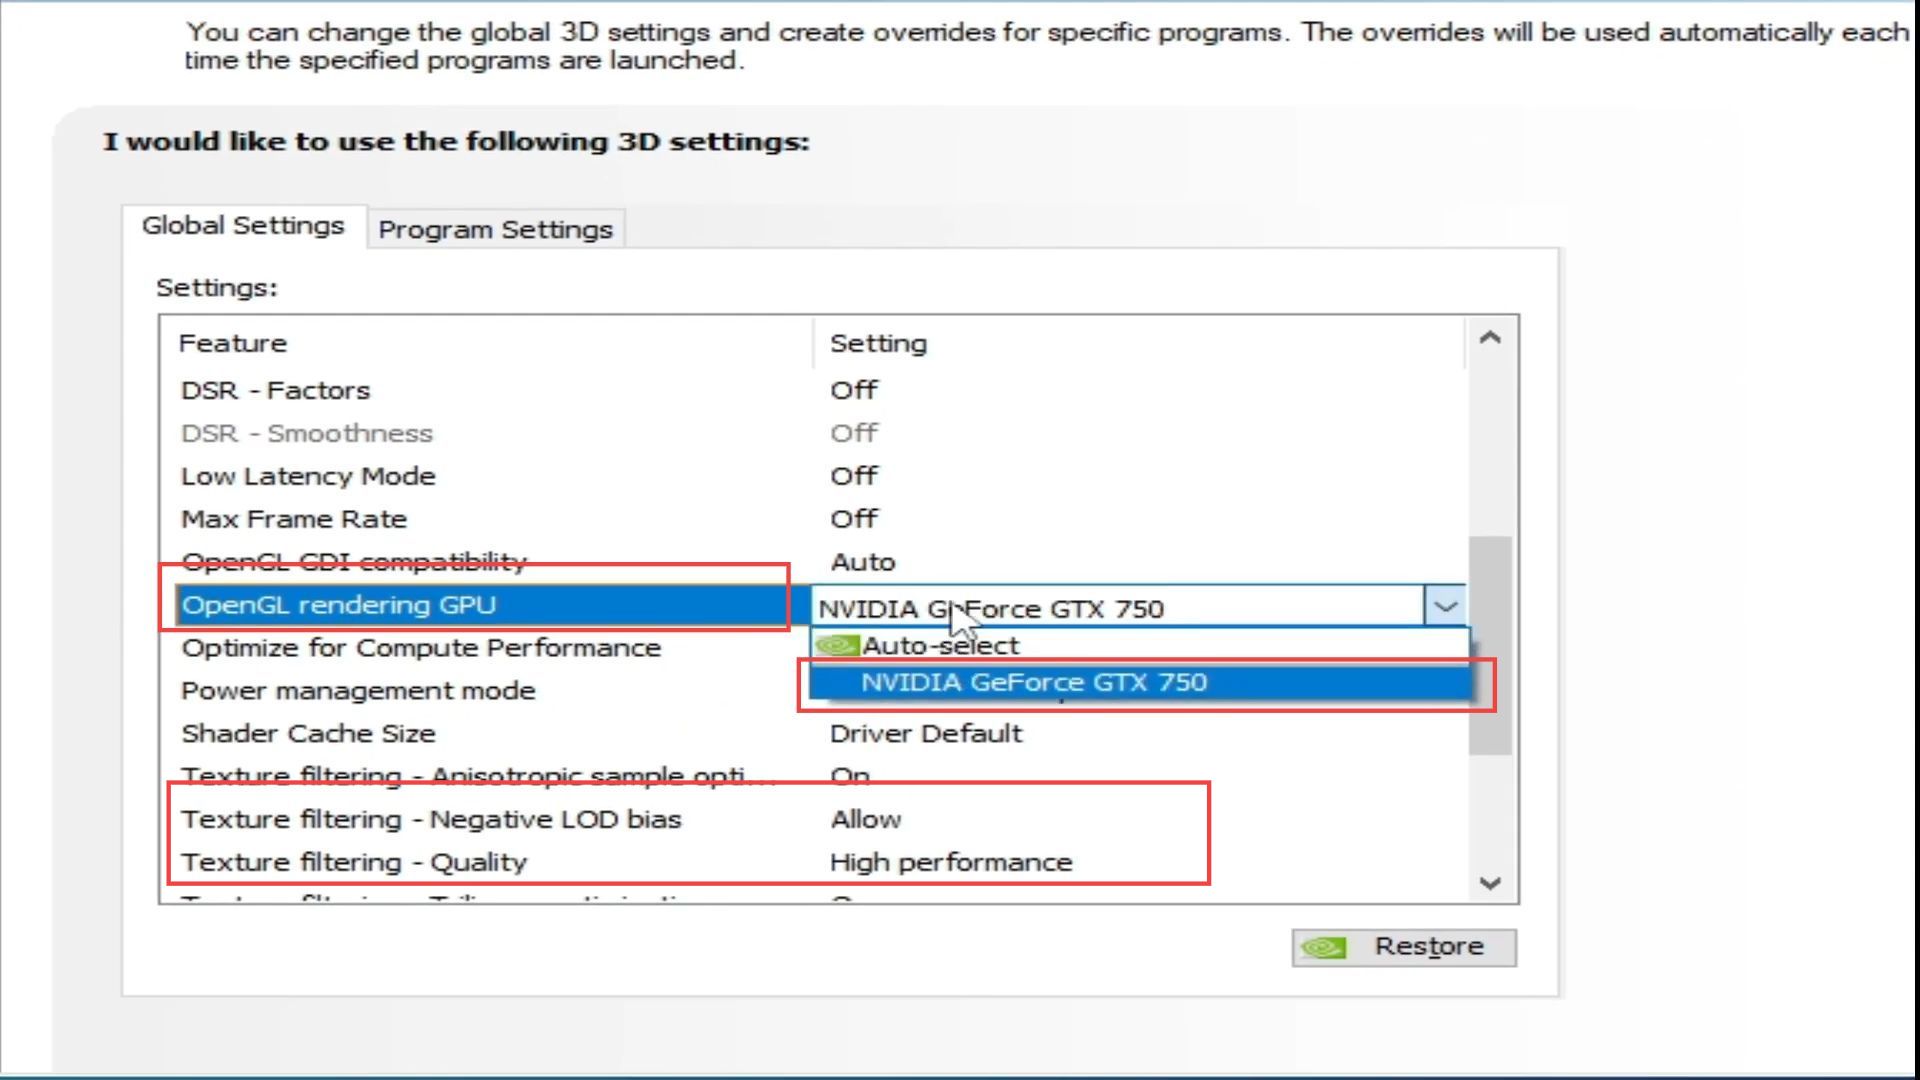
- Now click the manage 3D settings from the left side panel.
- Once the window is opened, scroll down and select the Open FL rendering GPU option from the listings.
- Choose your GPU device from this drop-down menu and set the power management mode to prefer maximum performance.
- You have to set the texture filtering quality to high performance and then click the apply button from the menu.
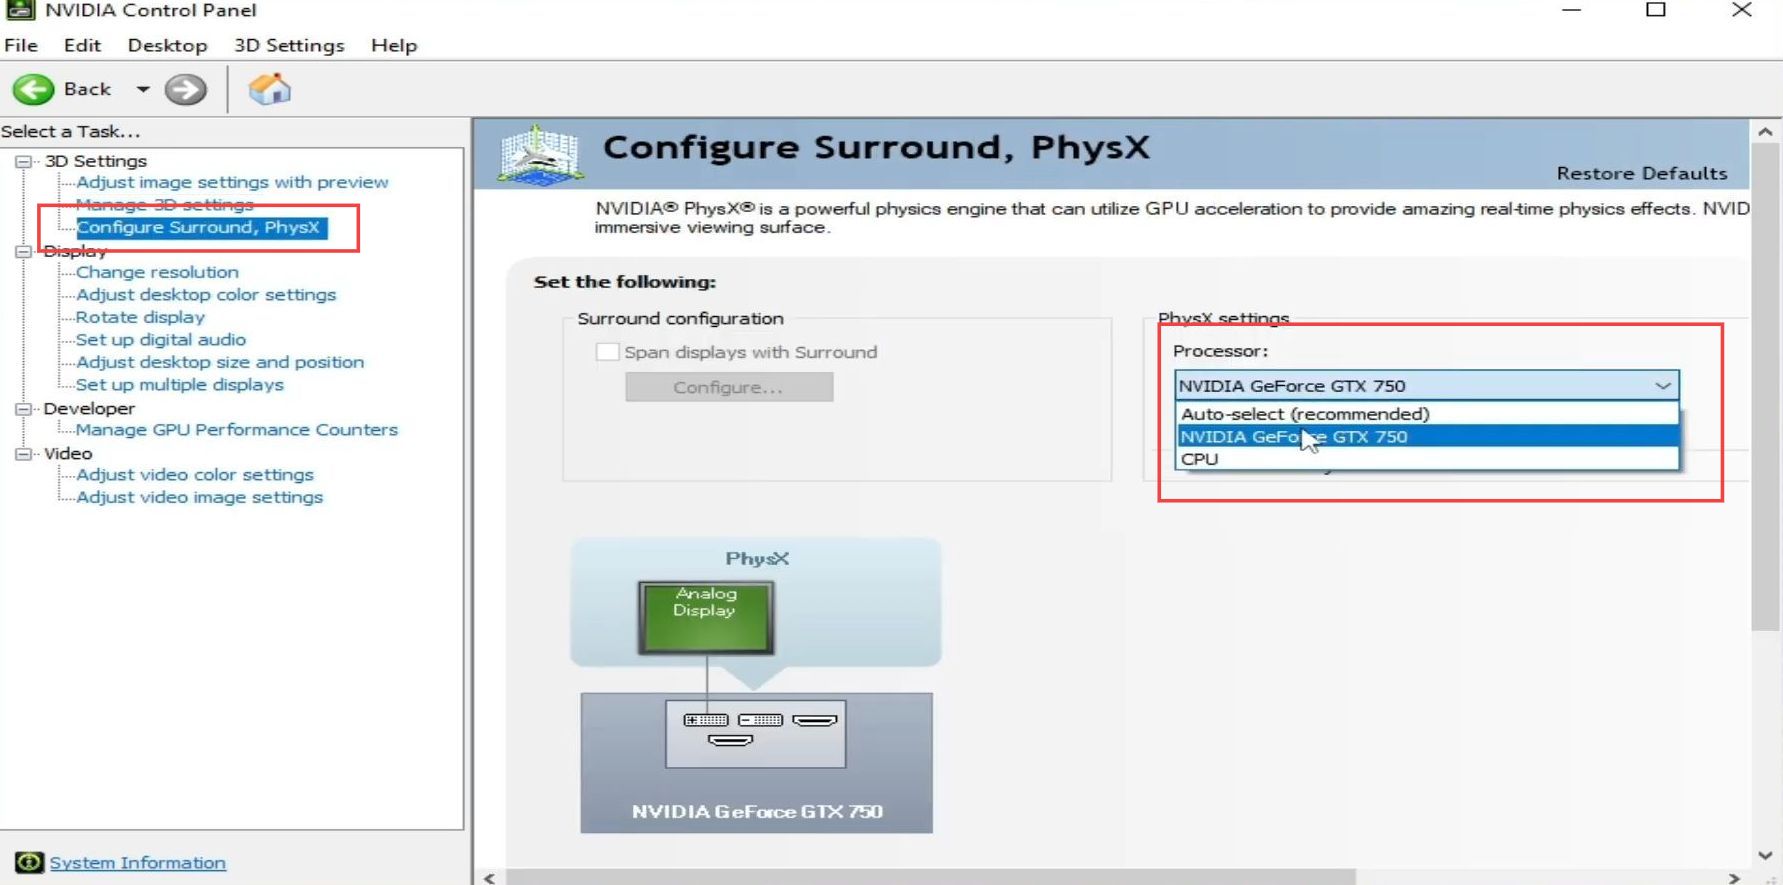
- Now click the configure surround and PhysX option from the left side panel.
- Select the processor as NVIDIA GeForce GTX 750 from the section of PhysX settings. After that, click the apply button from the menu.
- Now right-click on the desktop again and select the display settings option from the listings.
- Upon reaching the window, scroll down and select the option named Graphic Settings.
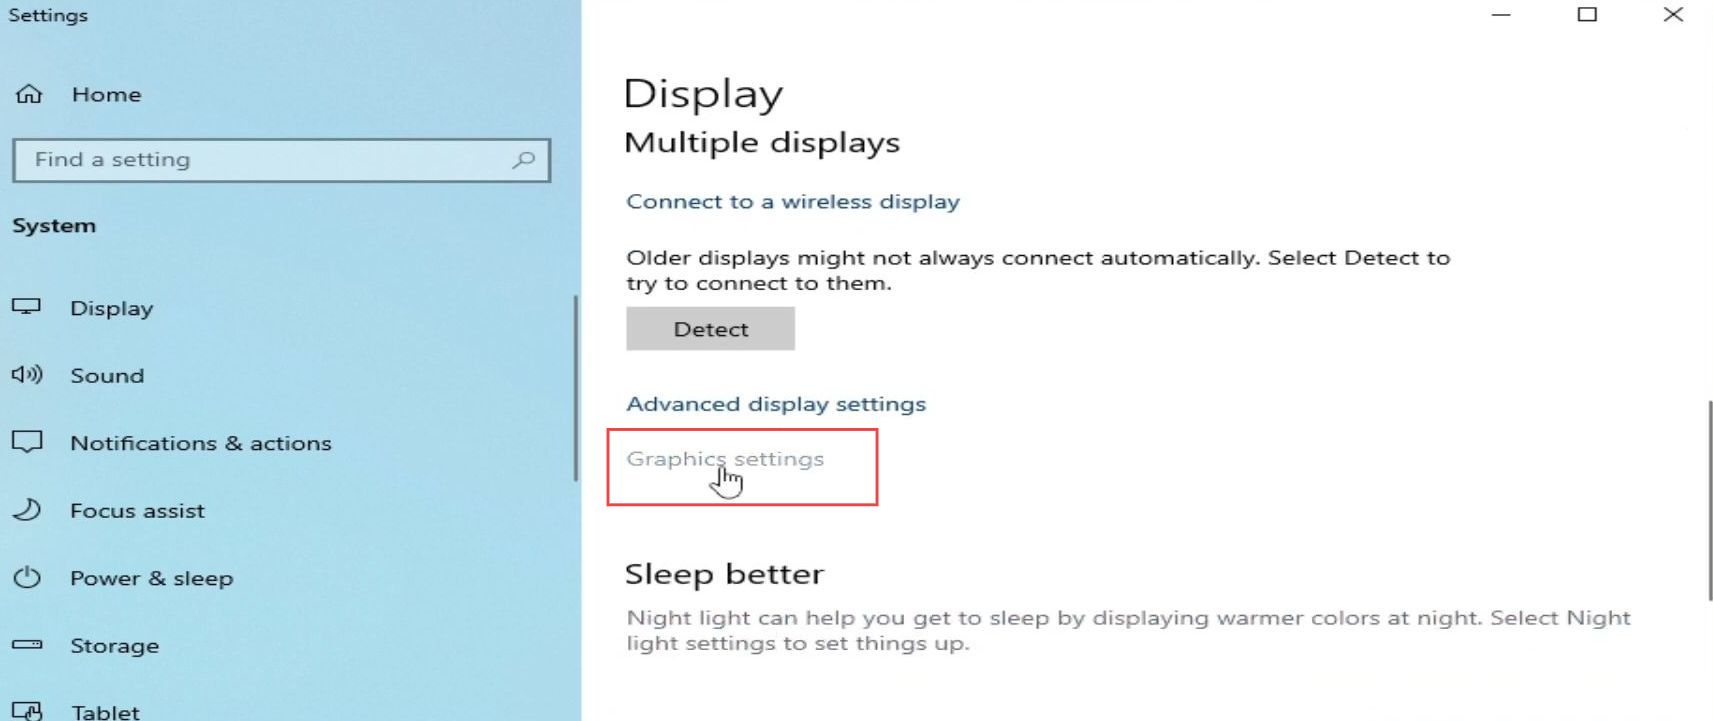
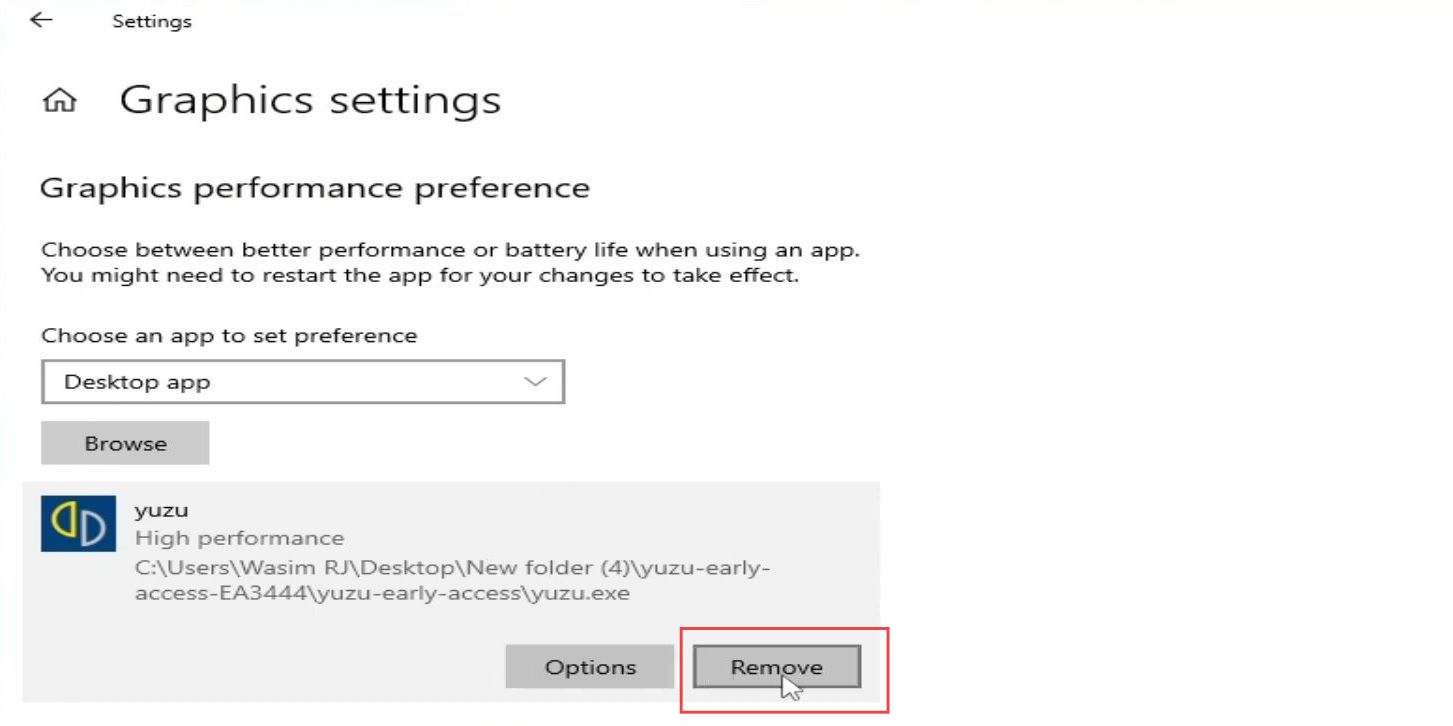
- You need to click the remove button to delete your old Yuzu user emulator.
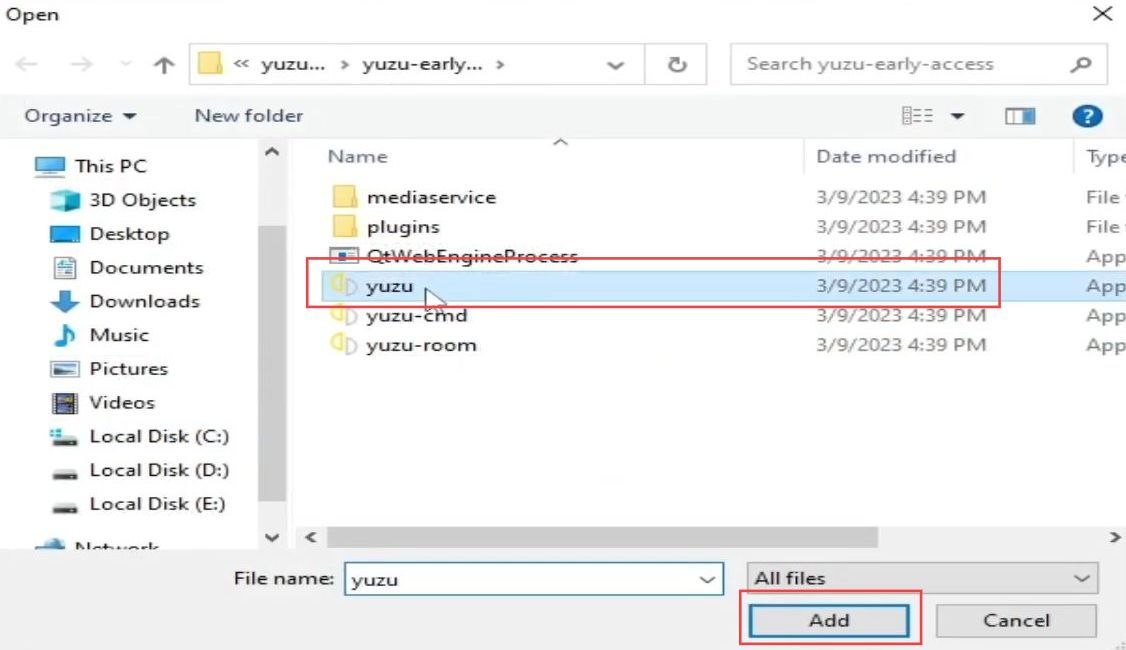
- After that, click the browse button from the menu.
- Once this window is opened, click the recently downloaded Yuzu user emulator from the listings.
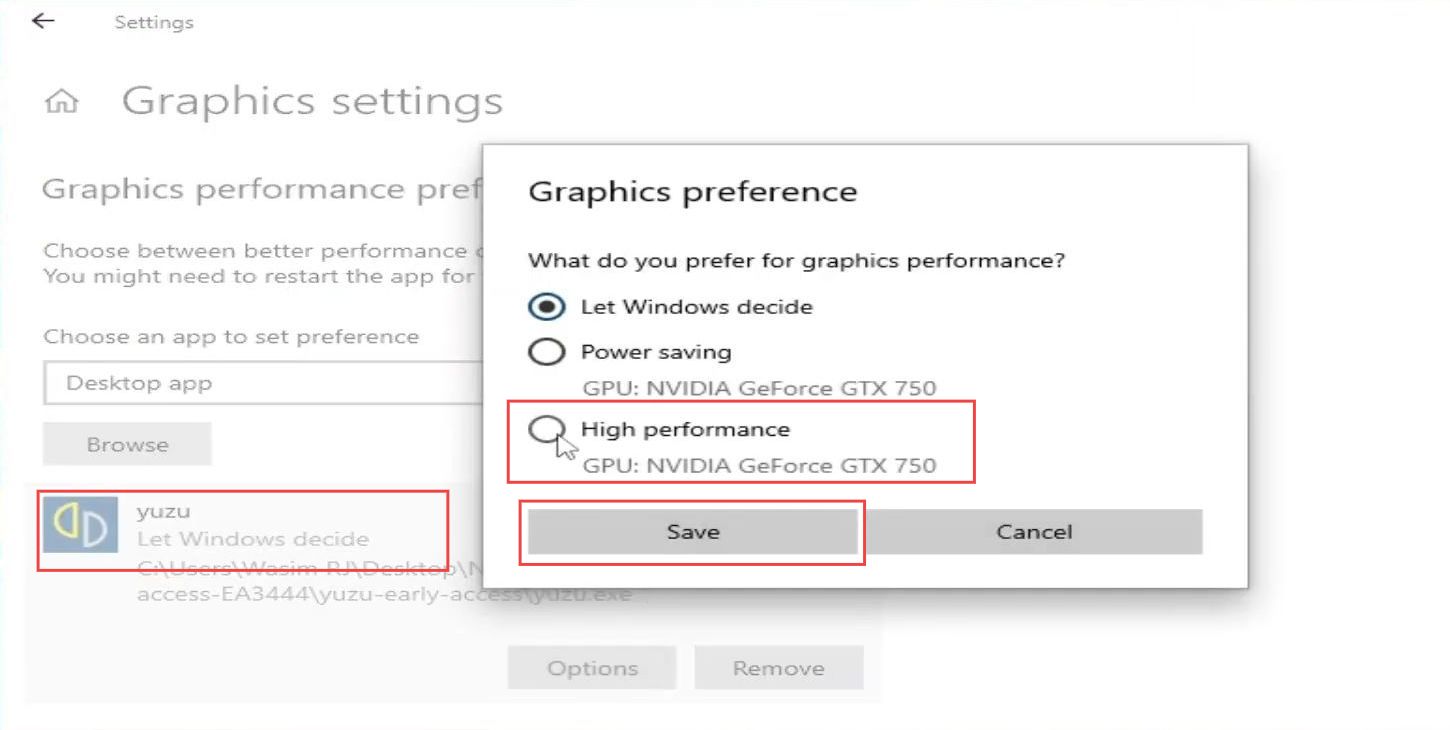
- After adding the latest version, click the options button and select the high-performance option from the graphic preference menu.
- Click the save button from the menu.
- Now restart your user emulator and each time you want to play a game, open the task manager from the start menu.
- Right-click the Yuzu application from the menu. After that, select the go-to details option from the listings.
- You need to scroll down and right-click the yuzu.exe file from the listings. Select the set priority option from the drop-down menu.
- After that, click the High option from the extended listings and select the Configure settings button.
Now you can play any game with no issues.