This guide will help you to set up a Project Zomboid Server on Linux using the most convenient method. You have to first log into sudo still, then allow your ports, and install Steam CMD. After that, run the script, check the status of the firewall, and configure your UDP ports.
Logging in
In this section, we will take you through the steps to log into sudo still to set up Project Zomboid Server on Linux. By following the steps below, you will be able to input specific commands in the command prompt to log into the sudo still.
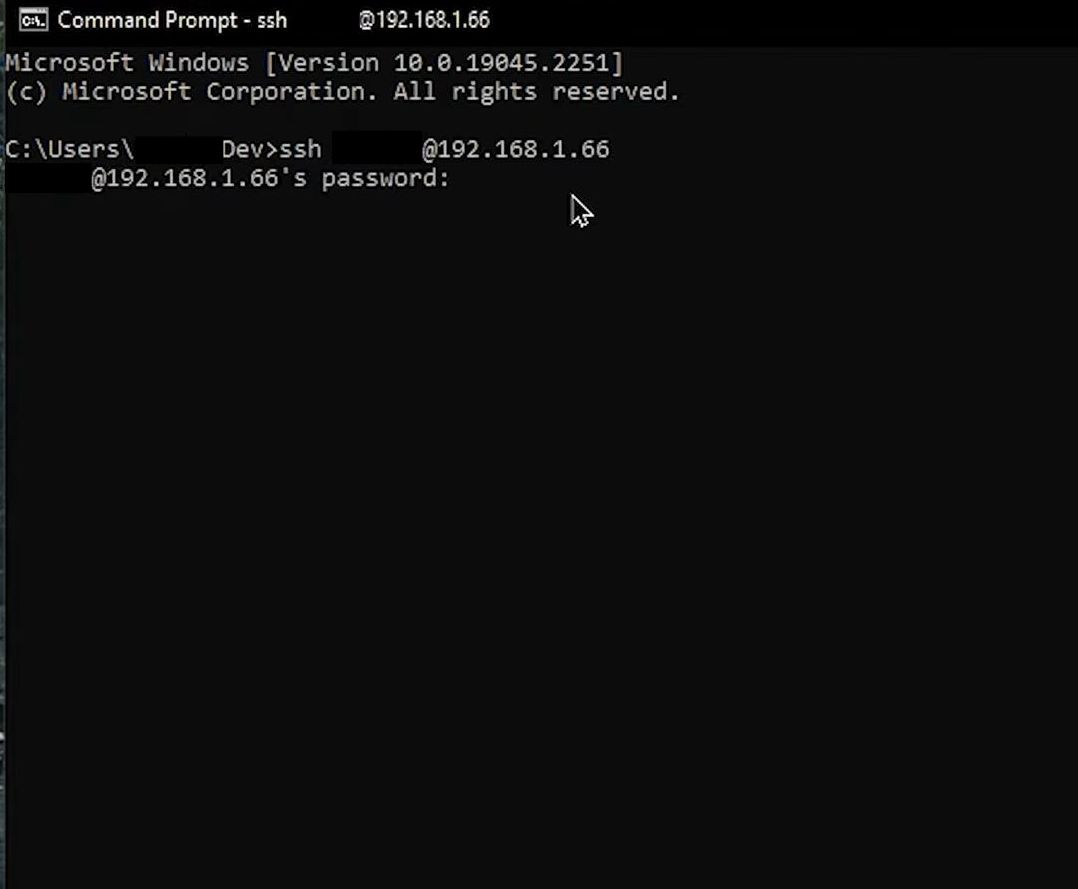
- Open the terminal and enter the following command. Replace your IP address with your IP.
ssh your server name@your IP address
It will initiate an SSH (Secure Shell) connection to a remote server specified by its name and IP address, enabling secure remote access and management.
- Next, input this command into the command prompt.
clear
It allows you to clear all the content from the screen with administrative privileges.
- After that, input your sudo password.
sudo dpkg --add-architecture i386
This command is used with administrative privileges to open the file in the Nano text editor, allowing for system-wide kernel parameter configuration.
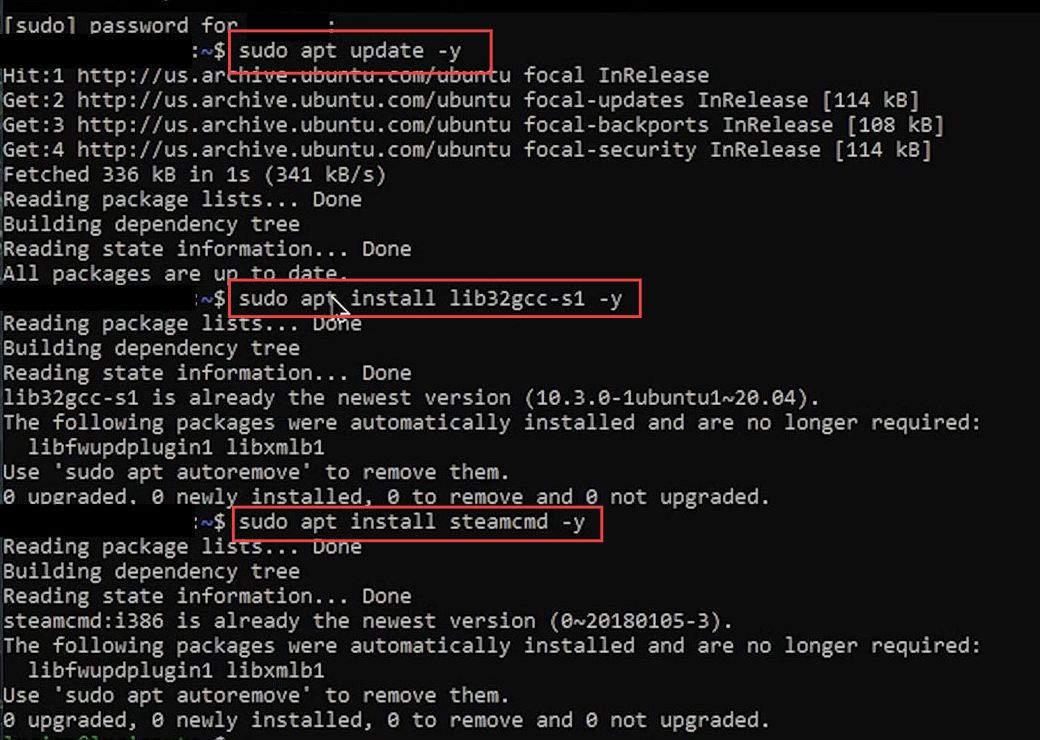
sudo apt update -y
It is used with administrative privileges to automatically update the package lists without requiring user confirmation.
sudo apt install lib32gcc-s1 -y
In Linux, “sudo apt install lib32gcc-s1 -y” is a command used with administrative privileges to install the package “lib32gcc-s1” without requiring user confirmation.
sudo apt install steamcmd -y
You will be given administrative privileges to automatically install the “steamcmd” package without requiring user confirmation.
- Now you have to input this command.
clear
It allows you to clear all the content from the screen with administrative privileges.
Allowing your Ports
This section describes how to allow your ports to set up Project Zomboid Server on Linux.
- Now you have to install Steam CMD along with all the required Steam CMD dependencies by using the following code.
- Again retype your password and these codes to go to the satisfactory user server.
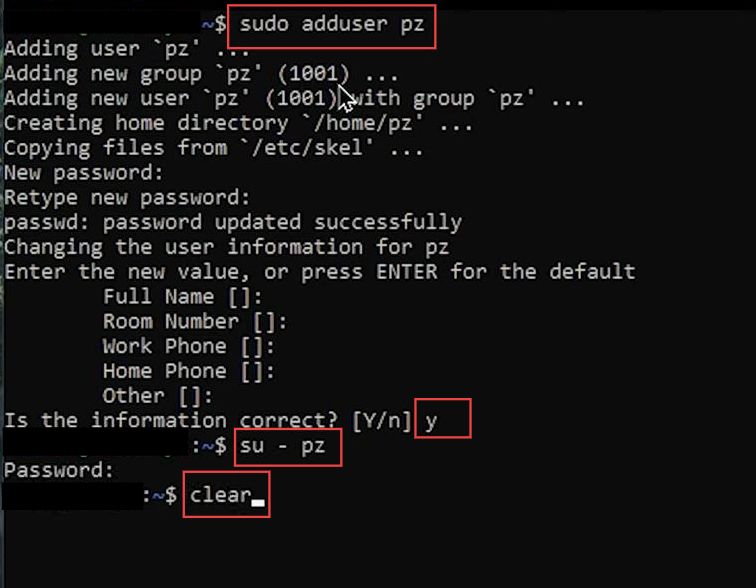
sudo adduser pz
In Linux, “sudo adduser pz” is a command used with administrative privileges to create a new user account named “sfserver” on the system.
su - pzserver
This command is used to switch the current user to the user account “pzserver” and open a new shell session with that user’s environment.
- After that, input the following command to clear your screen.
clear
It is a command used to clear the terminal screen, removing previous command outputs and displaying a blank shell prompt.
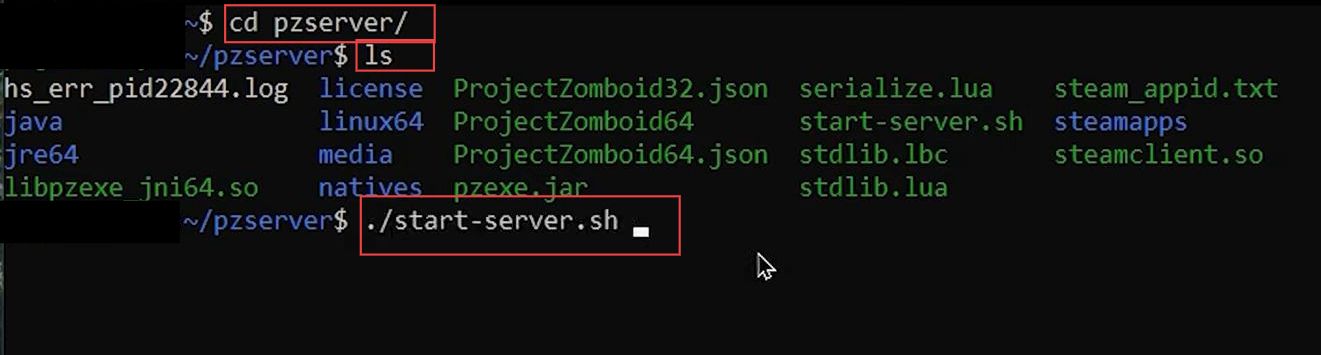
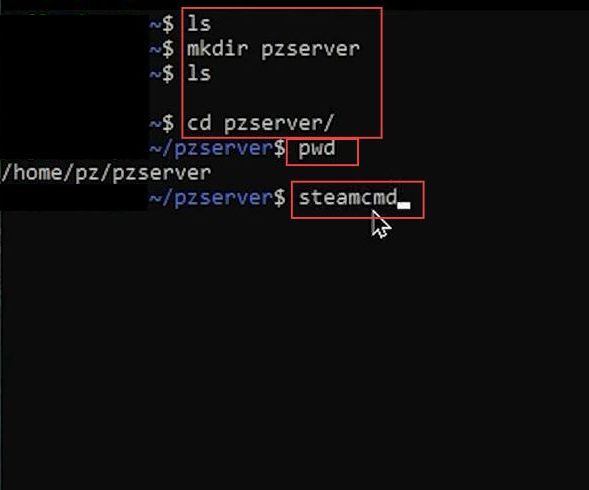
- If you want to see all your server files in the command prompt, use the following command.
It will open all the server files on the command prompt box. It is used to list the files and directories in the current working directory.
ls
- You have to input the following command to make a new directory.
mkdir pzserver
You can change the current working directory to a directory named “pzserver” within the current location or path.
- Next, use the following command to change the directory.
cd pzserver/
It is used to change the current working directory to a directory named “pzserver” within the current location or path.
- Input the following command to put your password in the directory.
pwd
It will add a password to the current working directory.
Install Steam CMD
This section explains how to install Steam CMD to set up Project Zomboid Server on Linux. You must write specific commands in the command prompt to install your Steam CMD.
- You will need to remember your home path where you have saved your Linux file.
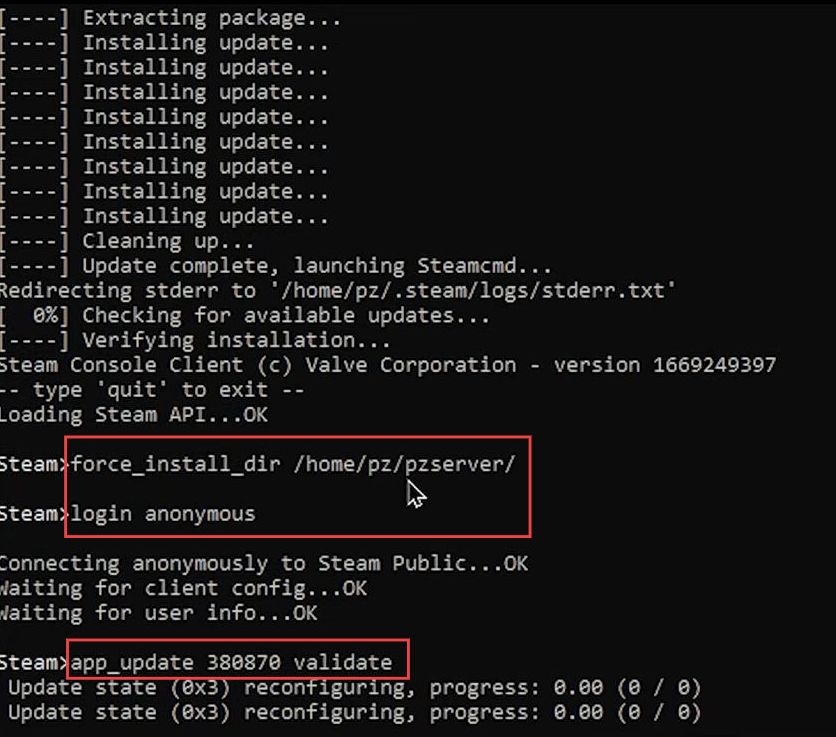
- Input the following command in the command prompt box to start the steam CMD process.
steamcmd
This command-line tool is used to install, update, and manage games and dedicated servers on the Steam platform.
- Once the steam CMD process is done, then input the following command to install the server forcefully.
force_install_dir (your home path)
It will start your server’s directory forcefully.
- Input the following command to log into your server anonymously.
login anonymous
It will log you into a system or server anonymously, without requiring a username or password.
- After that, use this command in the command prompt box.
- You have to wait for the files to process as it depends on the speed of your internet connection.
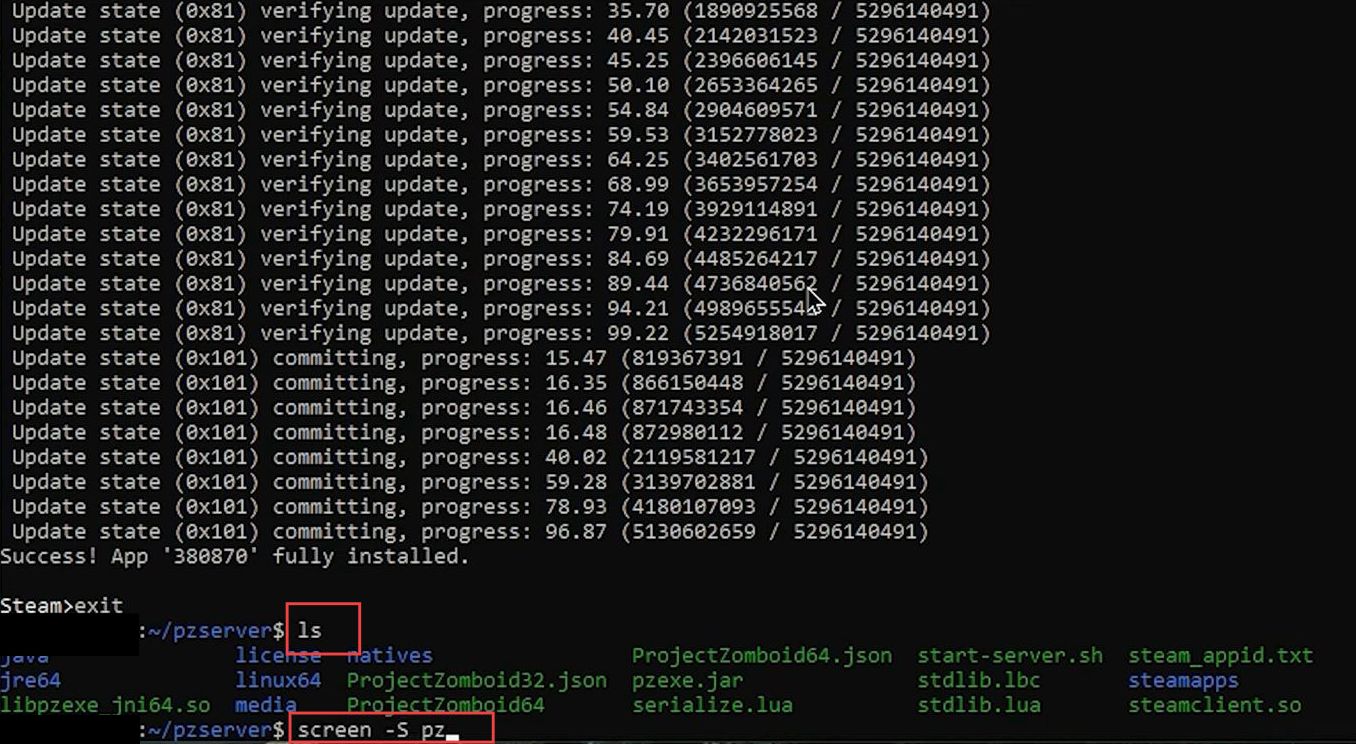
app_update 380870 validate
In Linux, “app_update 380870 validate” is a command used to update and validate the game or application with the ID number 380870.
- Once the game is downloaded, input the following command to close the command prompt and quit the server.
exit
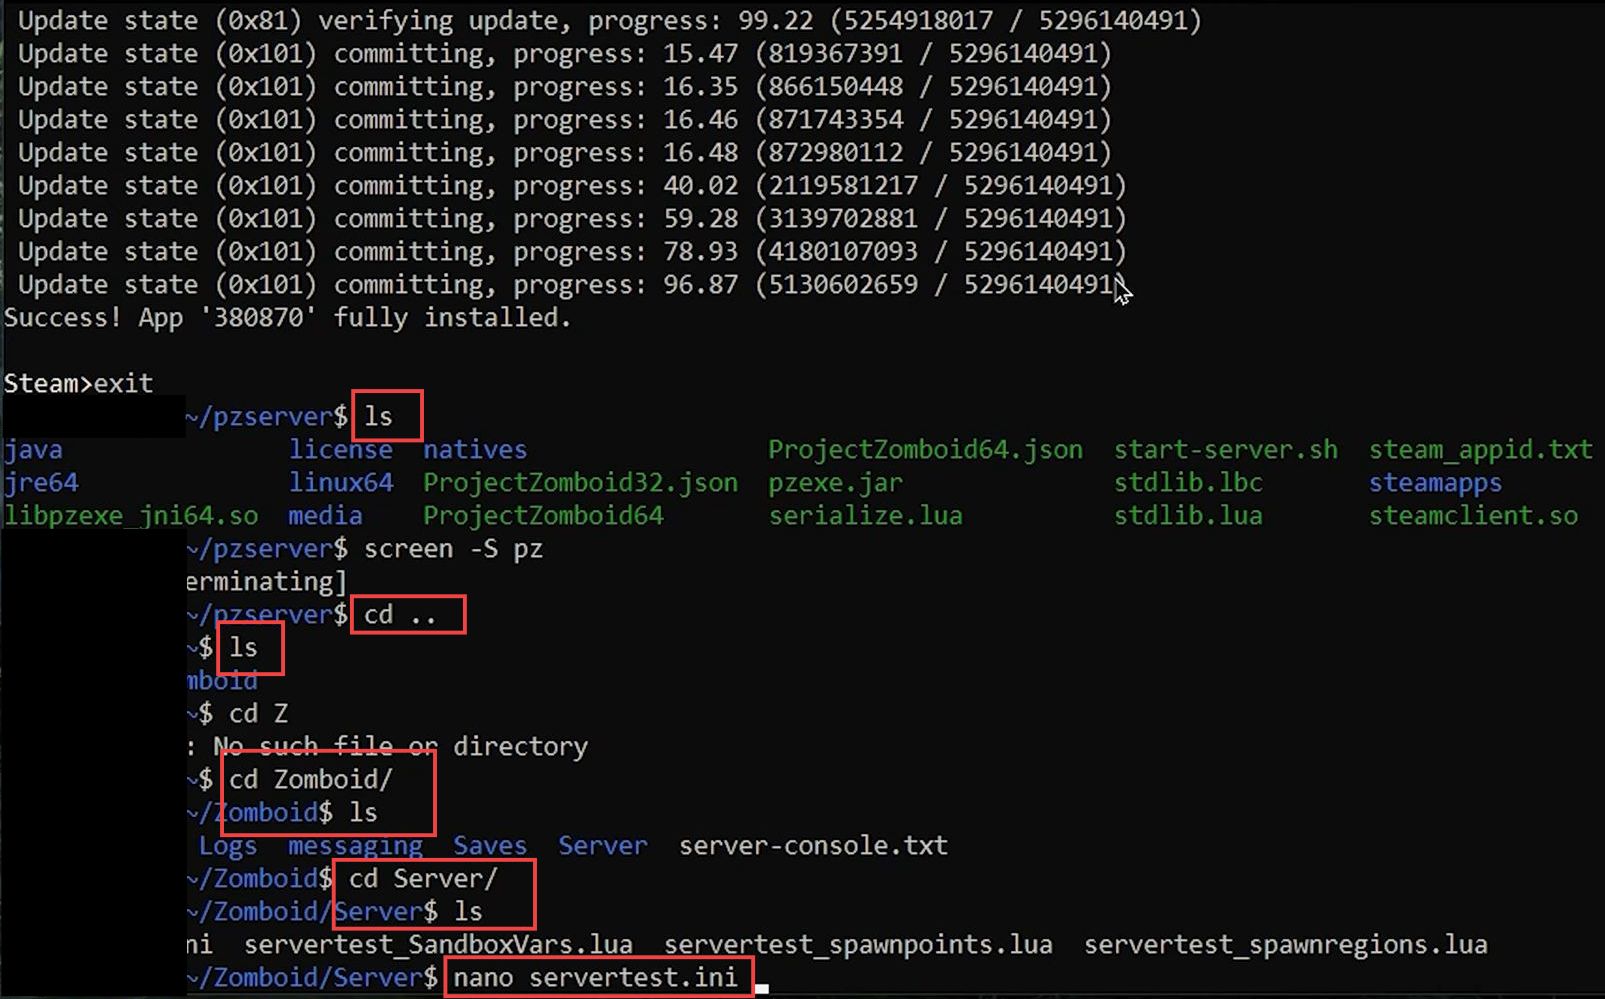
Running the script
This section will take you through the steps to run the script to set up a Project Zomboid Server on Linux.
- You will need to input the following command.
ls
It will list the files and directories in the current working directory.
- After that, write this command in the command prompt box to create a new session on the screen with the specified name.
screen -S (You server name)
It will allow you to identify and reconnect to the session later.
- Once the new screen session has been created, input the following command to generate the config files.
./ServerHelper.sh
It can be executed to perform various server-related tasks or functions.
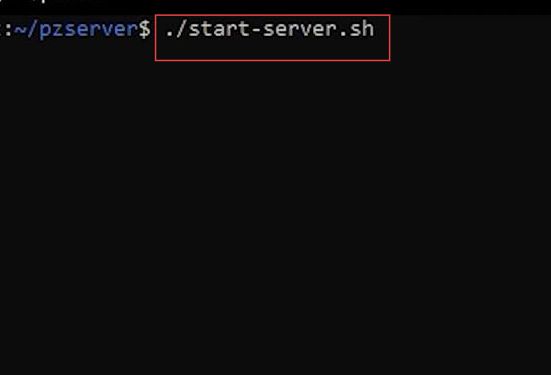
You will get a notification of the server started.
- Once you are on the next window, press the Ctrl+ A buttons from your keyboard and then hit the K button to kill the screen.
- After that, use this code for confirmation.
Y
This command represents yes to allow the confirmation to run the script.

Now you can see the server has been started and running.
- Next, input the following command.
cd-
It allows you to switch to the previous working directory (the directory you were in before the current one).
- You have to input the following commands.
ls
It is used to list the files and directories in the current working directory.
cd Z
It will change the current working directory to a directory named “z” within the current location or path.
- Now input the following commands.
cd Zomboid/
It will allow you to alternate the current working directory to a directory named “Zomboid” within the current location or path.
ls
It is used to list the files and directories in the current working directory.
- Enter the following command to change the directory.
cd server/
It will change the current working directory to a directory named “server” within the current location or path. Now you will get the game user settings.ini file in the listings.
- Next, input the following code.
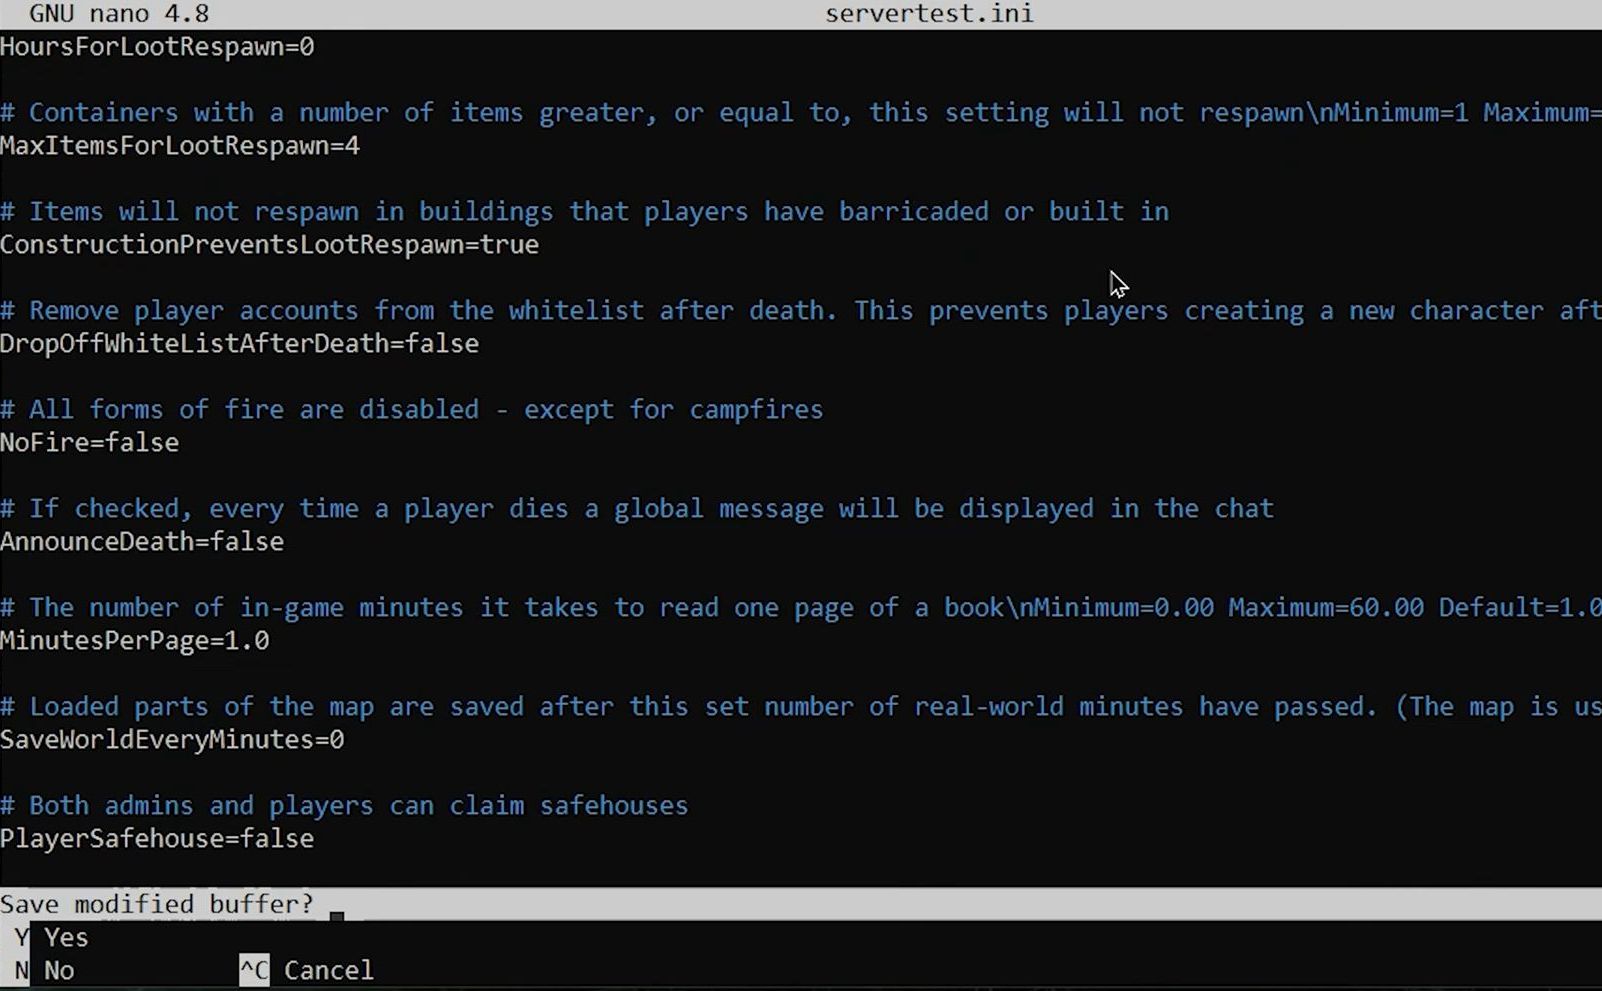
nano servertest.ini
This command is used to open the file named “servertest.ini” in the Nano text editor, allowing for editing or viewing its content.
Once the next window is opened, you can adjust any settings.
- Press the Ctrl+ X keys on your keyboard and hit the Y button to save the modified buffer.
Checking the status of the firewall
This section explains how to check the status of your firewall to set up a Project Zomboid Server on Linux.
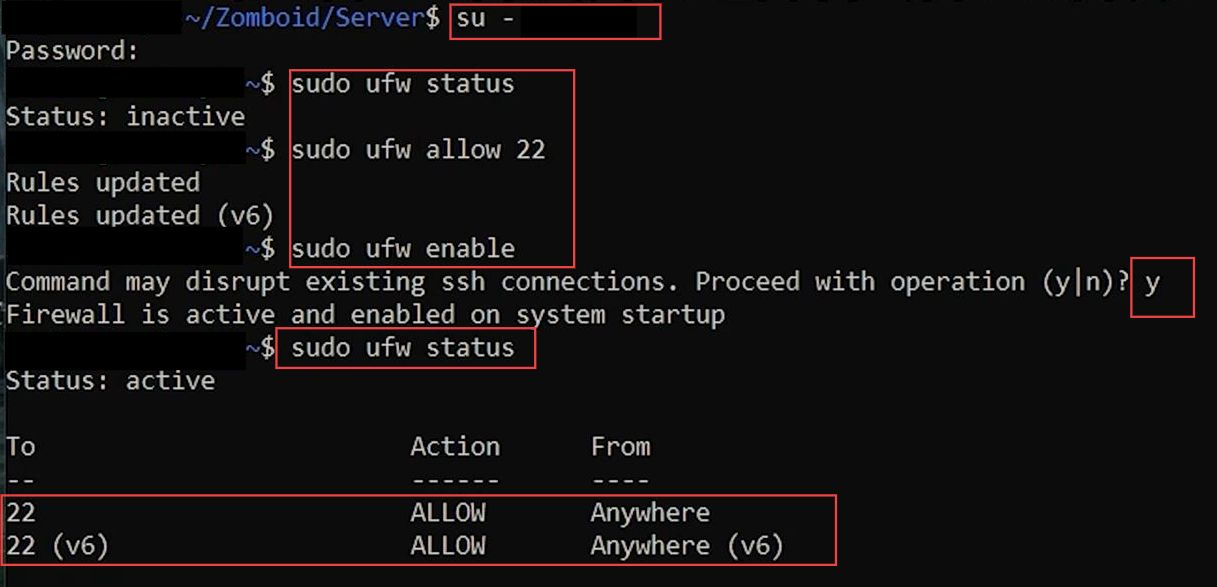
- You will need to input the following command.
su - (your server name)
This command is used with administrative privileges to display the current server and rules of the Uncomplicated Firewall (UFW) configuration.
- To make your server more protected and secure, check your firewall in Linux. Input the following command and then write your sudo password.
sudo ufw status
This command is used with administrative privileges to check the status of the Uncomplicated Firewall (UFW) and display the current firewall rules and settings.
- If your firewall is inactive, then you have to activate it by using the following code.
sudo ufw allow 22
It gives you administrative privileges to allow incoming network traffic on port 22, which is the default port for SSH (Secure Shell) connections.
- After that, input your sudo password and this command.
sudo ufw enable
It will allow you to secure the socket shell into the server.
- You need to check your firewall again by writing this code.
sudo ufw status
This command is used with administrative privileges to check the status of the Uncomplicated Firewall (UFW) and display the current firewall rules and settings.
Configuring your UDP ports
This section explains how to configure your UDP ports to set up a Project Zomboid Server on Linux. You must write specific commands in the command prompt to configure your UDP ports.
- You will need to write the following codes in the recently opened window.
sudo ufw allow 16261/udp
It is used with administrative privileges to allow incoming network traffic on UDP port 16261.
sudo ufw allow 16262/udp
It provides you with administrative privileges to allow incoming network traffic on UDP port 16262.
sudo ufw status
This command is used with administrative privileges to check the status of the Uncomplicated Firewall (UFW) and display the current firewall rules and settings.
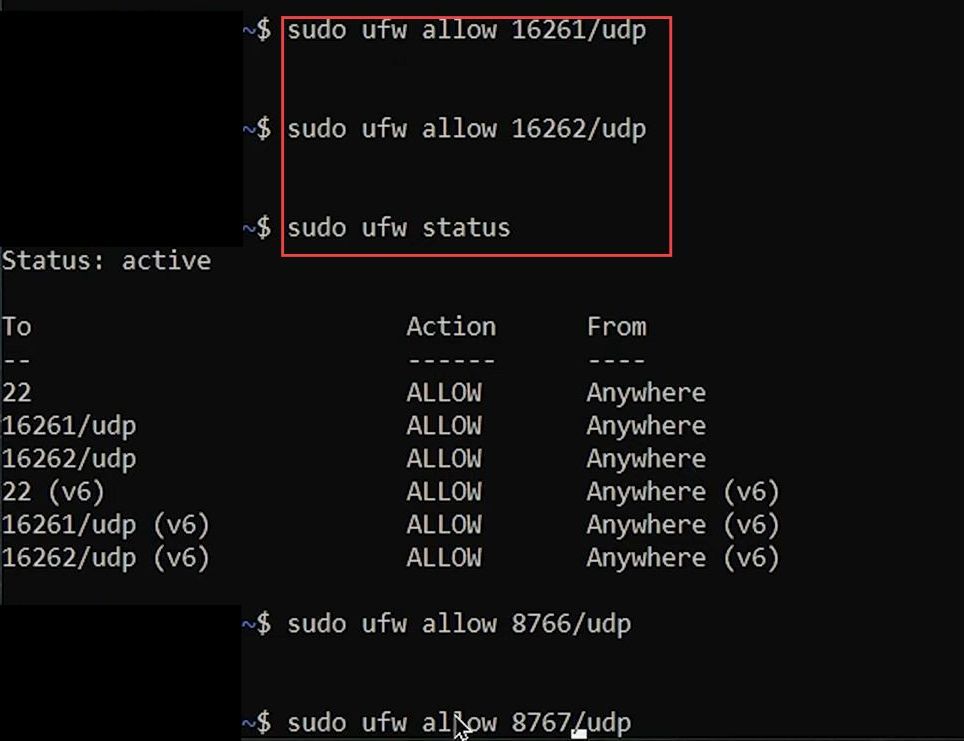
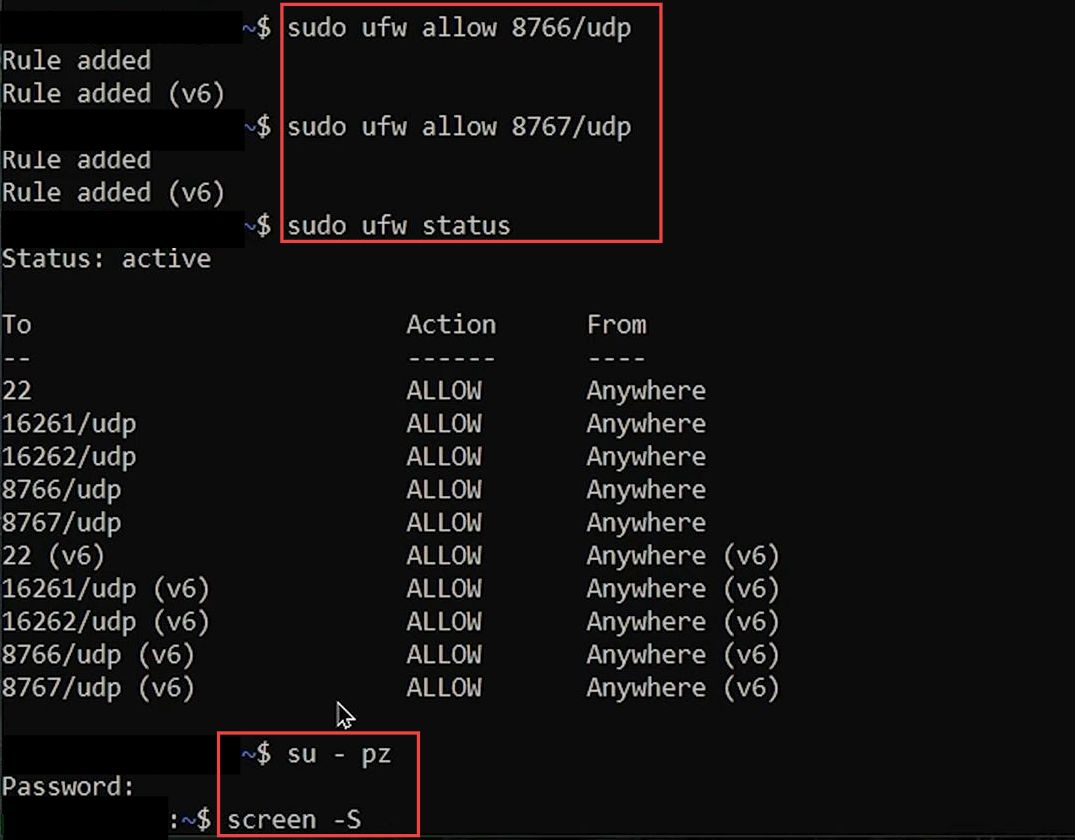
sudo ufw allow 8766/udp
It is used with administrative privileges to allow incoming network traffic on UDP port 8766.
sudo ufw allow 8767/udp
It provides you with administrative privileges to allow incoming network traffic on UDP port 8767.
sudo ufw status
This command is used with administrative privileges to check the status of the Uncomplicated Firewall (UFW) and display the current firewall rules and settings.
- You have to write the following command.
su - (your server name)
This command is used with administrative privileges to display the current server and rules of the Uncomplicated Firewall (UFW) configuration.
- After that, write this command in the command prompt box to create a new session on the screen with the specified name.
screen -S (You server name)
It allows you to identify and reconnect to the session later.
- Once the new screen session has been created, input the following command to generate the config files.
sd pzserver/
It is used to change the current working directory to a directory named “pzserver” within the current location or path.
ls
It is used to list the files and directories in the current working directory.
./ServerHelper.sh
It can be executed to perform various server-related tasks or functions.