The ADVANCED SKIN CUSTOMIZATION MOD provides a wide range of customization options for Minecraft. You can modify your character’s appearance and enjoy a realistic first-person view that mirrors your actions.
Steps to install Advanced Skin Customization Mod in Minecraft 1.15.2:
- Download Minecraft Forge for 1.15.2.

- Download the Advanced Skin Customization Mod.

- Launch the Minecraft Launcher → Select Minecraft Java Edition → Latest Release → Click PLAY.

- Press Quit Game after Minecraft loads.

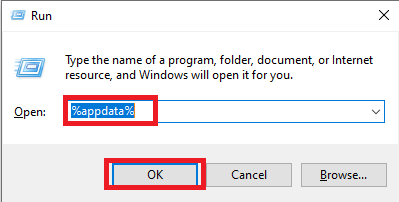
- Press Windows + R, type
%appdata%, and click OK.
- Navigate to
appdata\roaming\.minecraft\versions.

- Double-click the Forge installer → Click Install Client.

- Click OK. A new folder named Forge will appear in the versions folder.

- Run the Minecraft Launcher → Select Forge → Click PLAY.

- Click on Mods → Check that Advanced Skin Customization Mod is installed → Click Done.

- Click Singleplayer → Click Create New World.

- Click More World Options… → Turn on Allow Cheats and Bonus Chest → Click Done.

- Enter the world → Go to Options → Controls → Look for Advanced Skin Customization keys.

- Go to Advanced Skin Customization → GUI Settings → Toggle options as desired → Click Done.

- Explore further settings → Adjust dressing and appearance → Click Done → Start enjoying the mod!.
