In this guide, you will come to know how to fix in-game voice chat in DESTINY 2 Crossplay. Go through the guide and follow all the steps carefully to fix it.
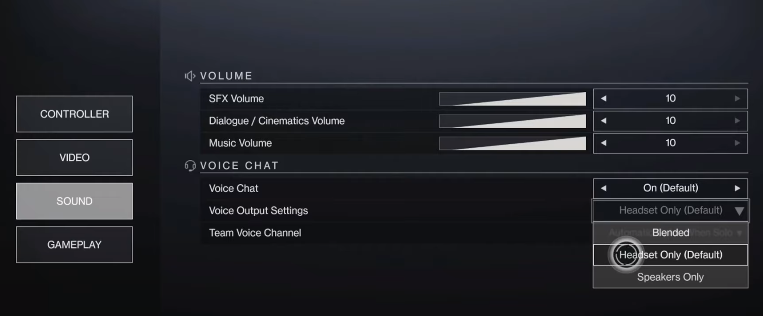
First, you will need to press the options button and tap on the Settings option from the top menu. Then you have to click on the sound menu option on the left side of the screen. In the voice chat section, you need to check that all options are selected correctly. If you are using a PC, you have to make sure to check voice output settings and select the output device you are using for the system.
For the team voice chat, you have to choose an automatic option. After that, you have to verify your input and output settings, go to the settings menu, scroll down and open sound settings. You need to go to the microphone option from the left menu and then go to the input device from the left menu. There, you will need to verify your headset microphone is selected correctly.
Now you need to go back and tap over to adjust the headphone level option. Make sure that your microphone is indicated in the good section, and if it is not in the good section, you need to make it in the good section so that the microphone will work properly.
After that, tap on the audio output option and choose your headset again in this category. If you are playing on a PC, you have to tap over to the search option from the Start menu, type sound settings, and then tap to the sound settings option from the list.
In the system sound settings, you will need to tap over to the output device option, and there you have to select the headset you want to use in the game. In the input section, you need to choose the microphone you will be using in the game. After that, tap over to the advanced sound settings and find the Destiny 2 microphone and then increase or decrease the volume if you want to.
Now you need to head back, go to the sound control panel, and then navigate to your playback device, your speakers, and then set your speakers as your default device. After that, you have to tap over to the recording section and do the same process as playback. Set your microphone as your default device and click on the OK button to save the changes. It will fix the error on your PC.


