In this guide, you will find how to save past Broadcasts permanently on Twitch. You will also learn how to save your past Twitch broadcasts.
How to save your past Twitch broadcasts?
In this section, we will take you through the steps to save your past Twitch broadcasts. By following the steps below, you will be able to enable two settings in VOD (Video on Demand) settings to save future broadcasts.
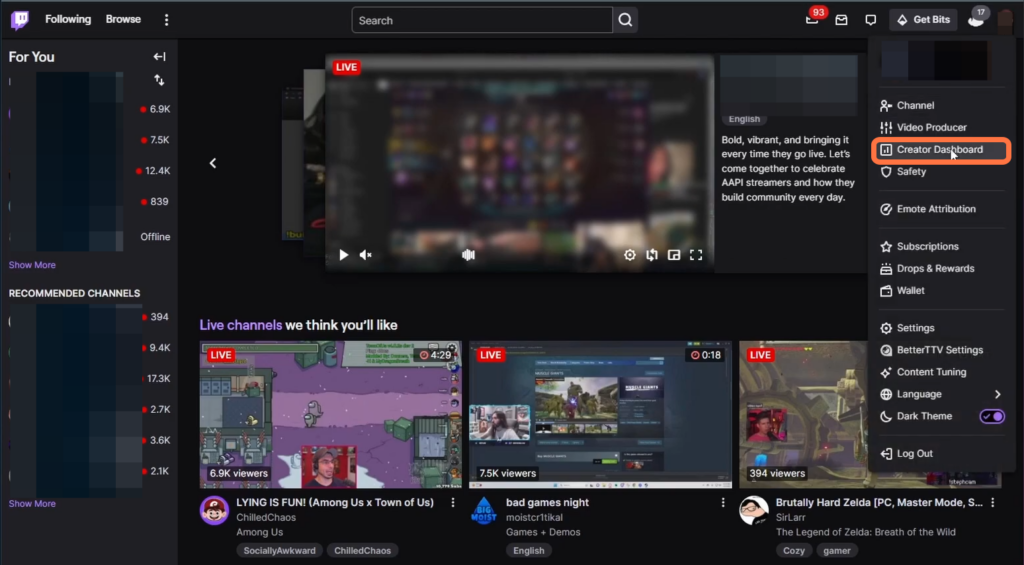
- First, you need to go to the Twitch Homepage and look for your profile picture at the top right corner of the page. Click on your profile picture
It will open up a drop-down menu.
- In the drop-down menu, locate and select the option labelled “Creator Dashboard“
- On the Twitch Creator Dashboard page, locate the left-side menu. Look for and click on the option labelled “Settings.”
It will open up the settings menu. - In the settings menu, select the option labelled “Stream” and then scroll down to a section related to VOD (Video on Demand) settings.
- You need to enable the Store past broadcasts and the Always Publish VODs option.
Now all of your future broadcasts will be saved for up to 14 days or up to 60.

How to save your Twitch streams permanently?
This section describes how to save your Twitch streams permanently. There are two ways that you can save one of your broadcasts permanently before it gets deleted.
Download the video
This section will take you through the steps to download the video and save it permanently on your computer.
- Look for the “Content” section, and click on it to enter the content management area.
- After that, click on “Video Producer“
This will redirect you to the section where your videos are stored. - Find the specific video you wish to download, select it and click on the three dots buttons.
A drop-down menu will appear with several options. - From the drop-down menu, select the option labelled “Download” to download the video.

Highlight the video
You can also save it by highlighting it. In this section, we will take you through the steps to highlight the video.
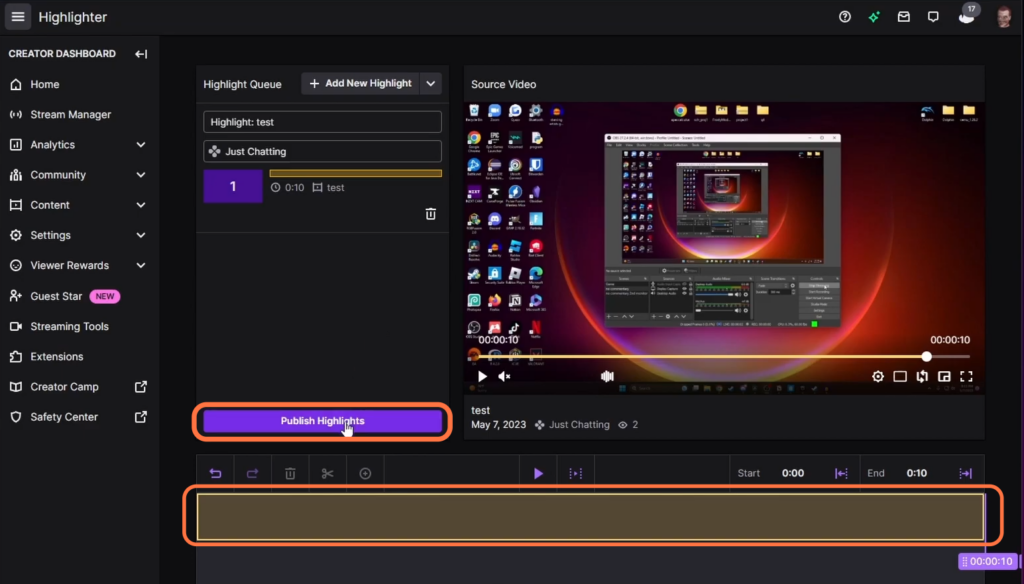
- Find the video that you want to create a highlight from and click on the “Highlight” button.
It will redirect you to Twitch’s video editor and you will see a yellow box at the bottom. This yellow box represents the portion of the video that will be saved as a highlight. - If you want to save the entire stream, drag the yellow box to the beginning of the video and then drag it to the end.
- Adjust the yellow box accordingly to select the desired segment of the video that you want to save as a highlight.
- After that, hit the “Publish Highlights” button.
Now you can change the Highlight title, description, and language and add a thumbnail to your highlight.
- Once you’re done, hit the Save Changes button.

- Go to your Twitch channel and click on the “Videos” tab to access your video content.
- On the Videos page, scroll down to find the section labelled “Recent Broadcasts“
You will find the recent highlights and Uploads there.