You may be facing a problem playing Minecraft as your system is not compatible with the game. You can use OPTIFINE 1.16.5, an optimization mod that will let your game run faster and smoother. OPTIFINE 1.16.5 will provide you with many configuration options and full sported HD visuals. Follow the following steps to install OPTIFINEin Minecraft 1.16.5:
Go to the website below and download the latest minecraft forge by clicking on the installer button.
After that, download the Optifine software from the website below.
https://optifine.net/downloads
Now launch the minecraft game and click on java edition. Select the latest release and then click on the PLAY button.
As the Minecraft game interface appears, you have to click on “Quit Game”.
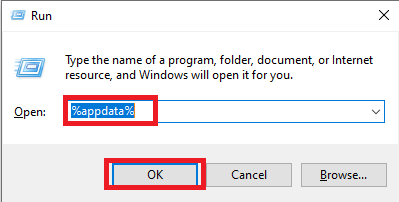
After that, press windows+R to open the run dialog box, type %appdata% here and hit enter.
Navigate to “.minecraft” then to the versions folder.
Now double click on the downloaded Minecraft forge folder, select “Install client” and hit OK.
Click on Ok.
A new folder with the name of forge will be created in the version folder.
Now run the Minecraft launcher, select forge, and strike the PLAY button.
Check the checkbox and then hit the Play button.
The setup file will start downloading.
As the Minecraft interface appears, you will need to click on Mods.
After that, click on forge and hit Done.
Then click on Quit Game.
Open the appdata folder again by typing %appdata% into the run dialog box.
After that, go to the Minecraft folder, then to mods and paste the pre-downloaded Optifine file.
Launch the Minecraft launcher once again, make sure that forge is selected, and hit the PLAY button.
Click on Mods.
After that, you need to press Done.
Navigate to “Options…”.
Click on Video Settings…
As you can see OptiFine HD G6 Ultra in the left bottom side of your screen, change the “graphics” to fast, “max framerate” to unlimited, “smooth lights” to minimum, “smooth lighting level” to 04 percent, “brightness” to +86 percent. After making all these changes, click on “Detail…”.
Turn Clouds and Fog to Off and then press Done.
Click on others.
Turn on the “Show FPS” and press Done.
Again press the Done button twice.
After that, click on Single player.
Turn on “Allow Cheats” and then press More World Options…
Turn on “Bonus Chest” and then press Done.
Click on Create New World.
As the Minecraft game interface shows, navigate to the game menu and click on Options…
After that, click on Control…
Make sure to look for the zoom key then press Done.
Click the Done button again.
Now you will need to click on “Back to game”.
In the gameplay, as you press c, it will zoom in at the “plus” sign.