This guide will let you know how to Increase Performance / FPS with any setup in Apex Legends. It will also reduce any micro stuttering you may be experiencing inside of the game as it is going to optimize the game so you will also have low input latency. You have to make sure that Apex Legends is correctly installed on your PC. If the game is not correctly installed, then it may cause some issues. Make sure that your game is installed in your local disk C if it is installed somewhere else then delete it and reinstall the game in the C drive. For this, you have to make changes in the windows setting, in Graphics settings, in steam, and also you have to make changes in the launcher options, at last, you have to make a few changes in the in-game settings to achieve the best FPS possible.
1. Windows Update
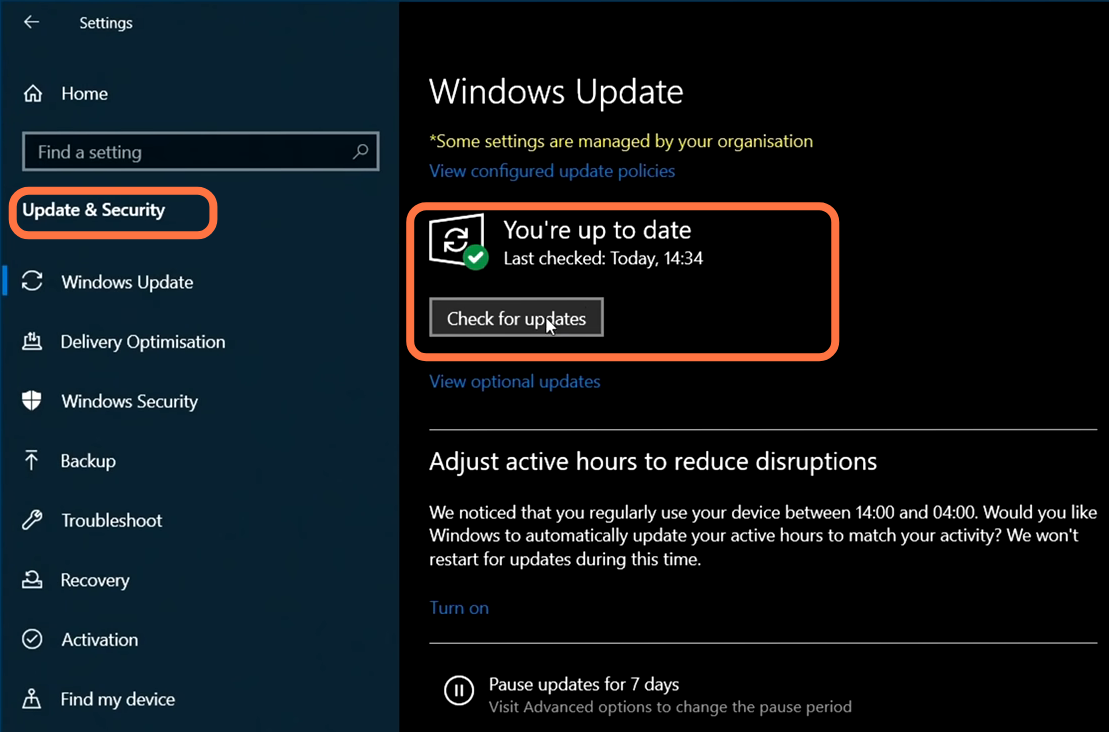
You have to make sure that your Windows is running on its latest version, navigate down to the bottom left-hand side of your screen, and click on the Windows button. Then go to settings and click on Update on the bottom left side of the screen. Then click on the “Check for update” button.
Back-up Game Settings
You have to do this setting as it will prevent you from losing any valuable data/information such as your keybinds and mouse sensitivity options.
2.1- Game Config Settings
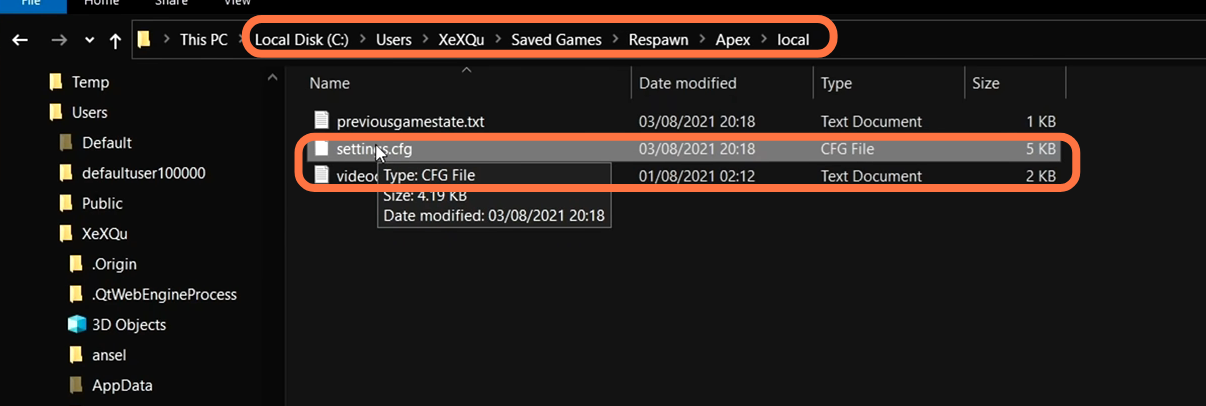
You need to go to the bottom left-hand side, type %user% then press enter. A new folder will pop up and you have to click on the name which you are currently using as your profile name. After that, navigate down to the save game folder, go to the Respawn and then to apex, then to local. You will find two files which are only your setting files.
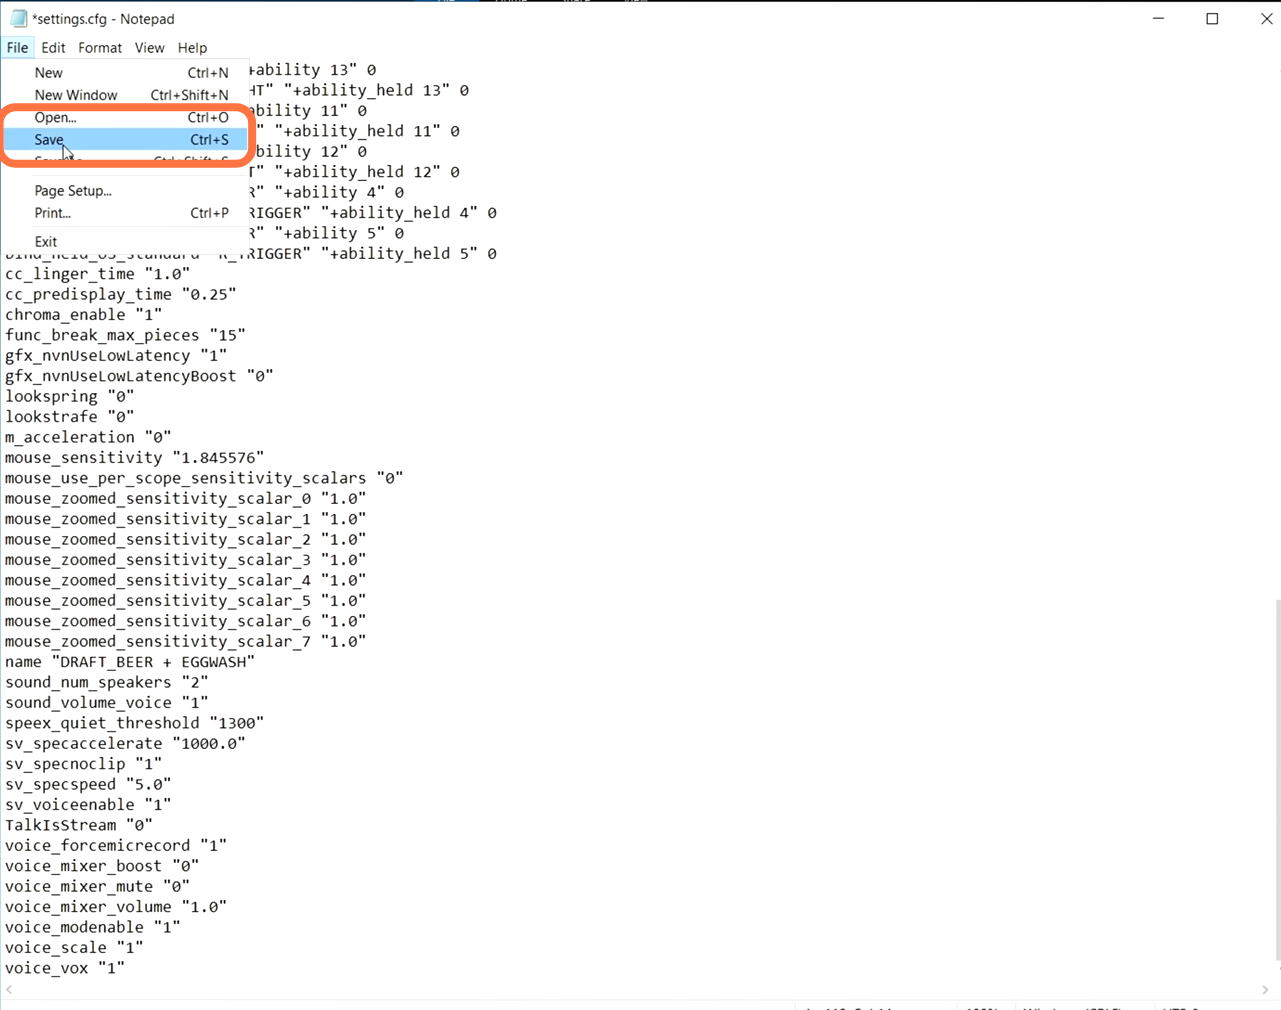
Open the notepad, and drag the settings.cfg file to notepad and you will be able to see all of the information inside of it. After that, go to a link: https://drive.google.com/file/d/1rGxl…, copy all the information inside this link and then paste it into the notepad file by removing all the information from the notepad. After doing this, you have to navigate to the file button and then click on Save.
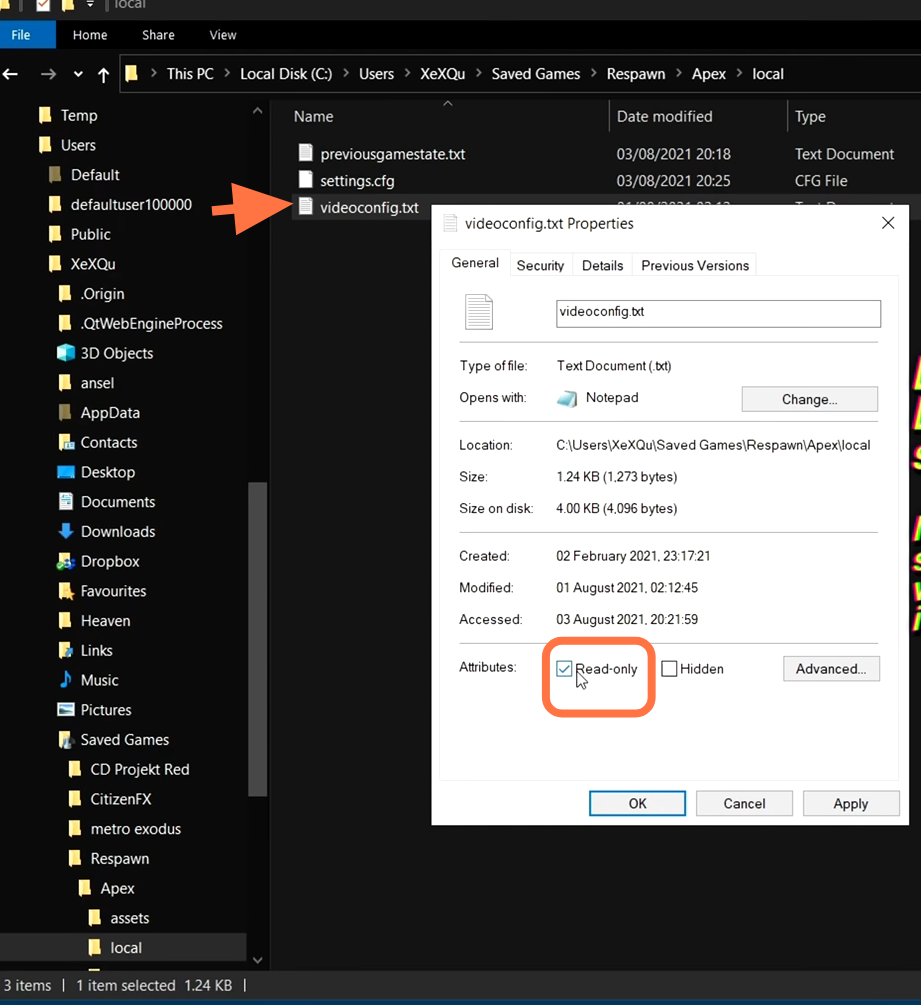
2.2- Now you have to go back to the folder, open the videoconfig.txt file and make changes according to the picture given below.

After that, navigate to the file and then click on Save. These settings will give you the best balance of performance and clear visuals. Lastly, you have to lock these settings, so the game cannot change them automatically. You can do it by right-clicking on the videoconfig.txt file, going to properties, and making sure that read-only is selected. If you don’t do this, then every time you boot up the game, the settings will be changed. So make sure that you have done that.
2.3- Now you have to set Autoexec of the game as it is an additional file that contains all the custom settings which you can load instantly whenever the game is booted. Navigate inside of Steam, right-click on the game and then navigate down to the properties. Then go to local files and click on Browse.

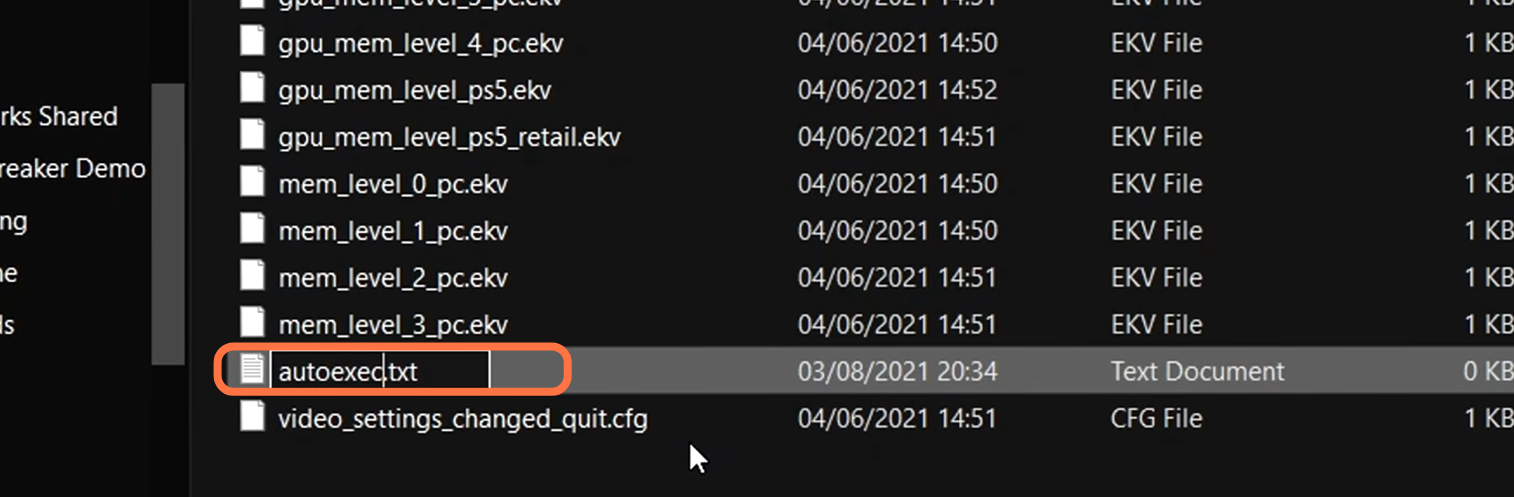
A window will pop, you have to go inside the cfg folder and right-click on the blank save. A drop-down menu will appear, you have to select New and then click on a text file. You need to name this text file Autoexec.
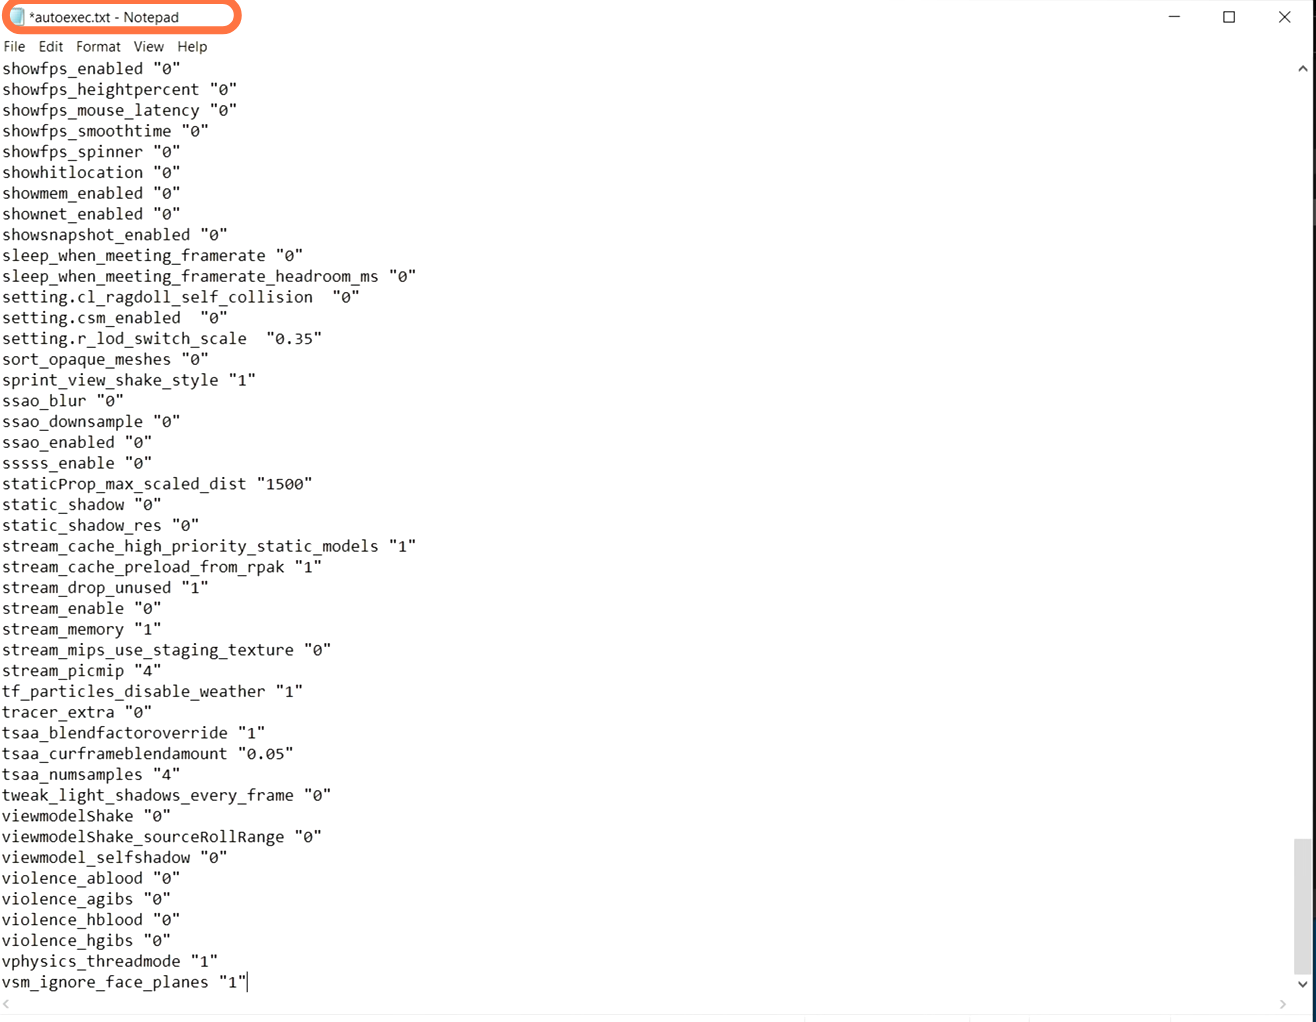
After this, go to this link: https://drive.google.com/file/d/1wCqu… and you will find Autoexec google Docs there. You have to copy all the information inside this doc and then paste it into the Autoexec.txt folder.
Then you have to go to file and click on save. Change autoexec.txt into Autoexec.cfg and select “Save as type” to “All files” then click on Save.

You will find the file in the folder, you need to right-click on the file and then click on copy. Go inside the client folder and paste this file there

Launch Options And Steam
Launch options will help you to load all your new settings.
3.1- For this, you have to go inside Steam, then go to the Apex game icon right click on it, and select properties. After that, go to General and under the launch option, you have to write “exec autoexec.cfg -dev -preload -high +fps_max 0 -novid -fullscreen -dxlevel95”.

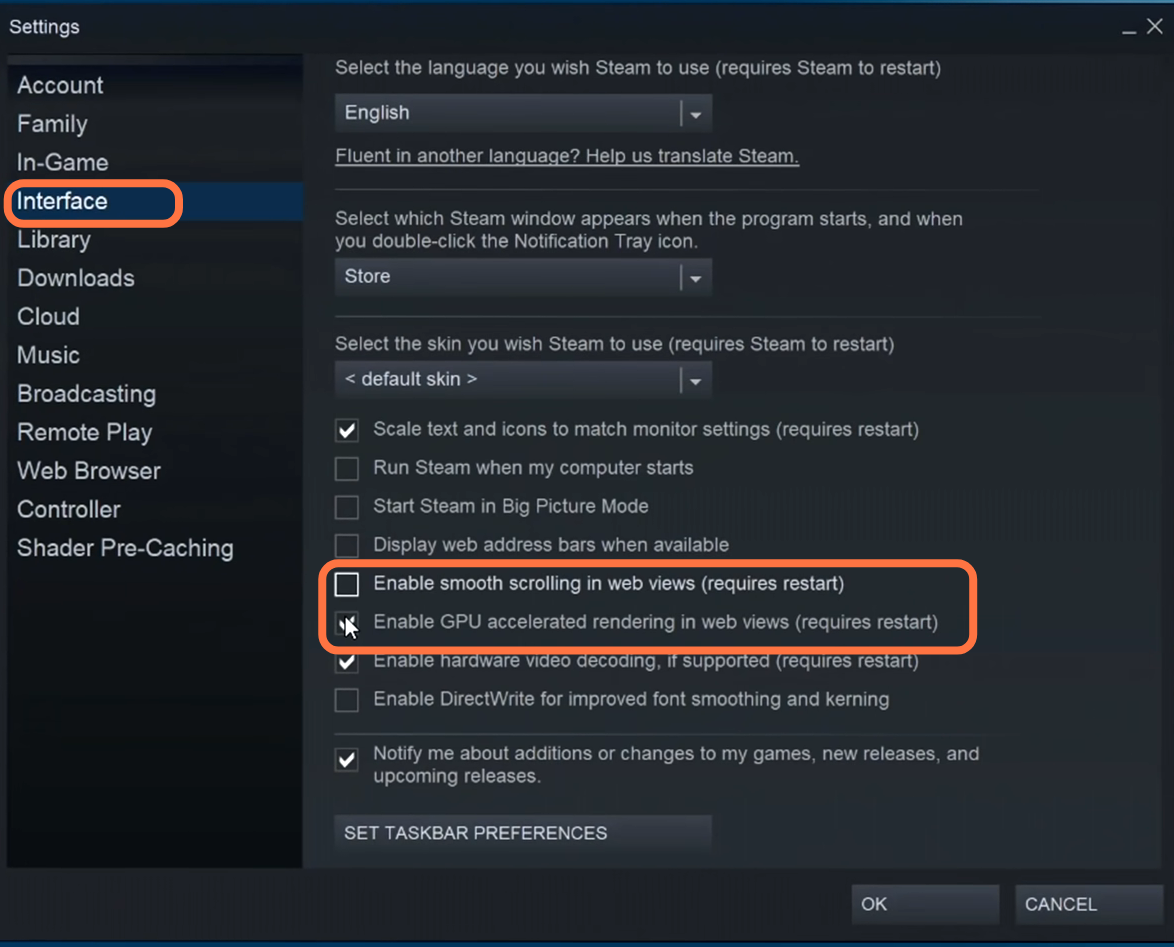
3.2- You need to make a few changes in Steam, go to the top left side of your screen and right-click on Steam. After that, go to settings, navigate down to the Interface tab and make sure that you uncheck “Smooth scrolling” and “GPU acceleration rendering”.
After that, go to the library and make sure that the low bandwidth mode and low-performance mode has been selected.

3.3- Then you have to go back to the Apex Legends icon, right-click on it and then click on properties. After that, go to local files and click on Browse.
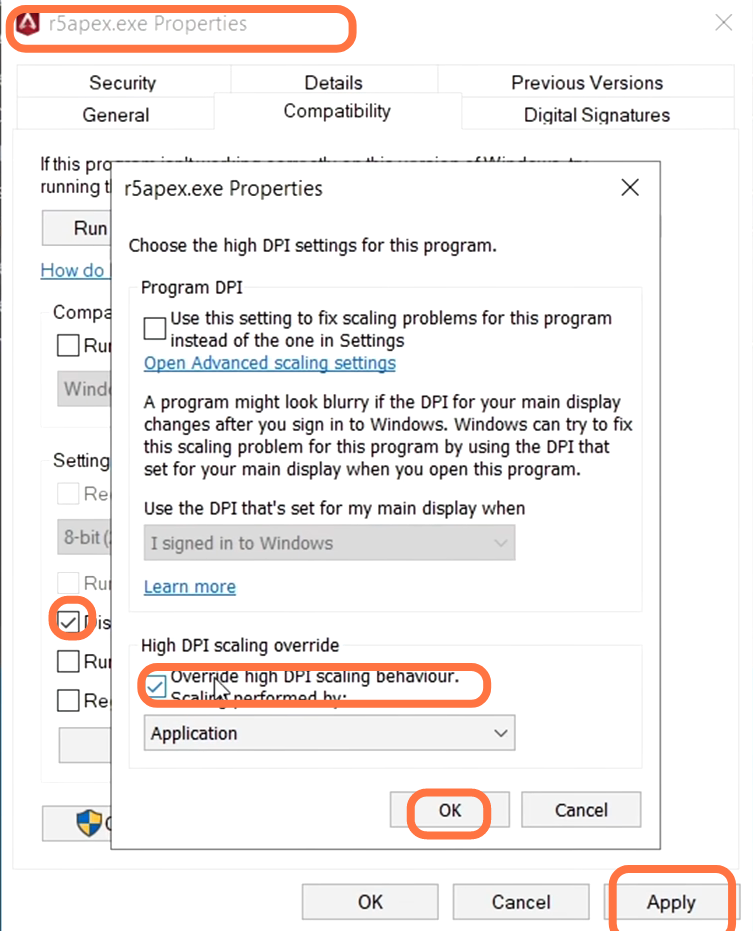
Inside this folder, you need to navigate down to the r5apex.exe, right-click on it and then go to properties. Go to the compatibility tab and you have to disable full-screen optimization. After that, go to change dpi settings make sure that override high dpi setting is selected, then click on OK and Apply.
Windows Settings
This will help you in getting the lowest input latency possible and the highest FPS.
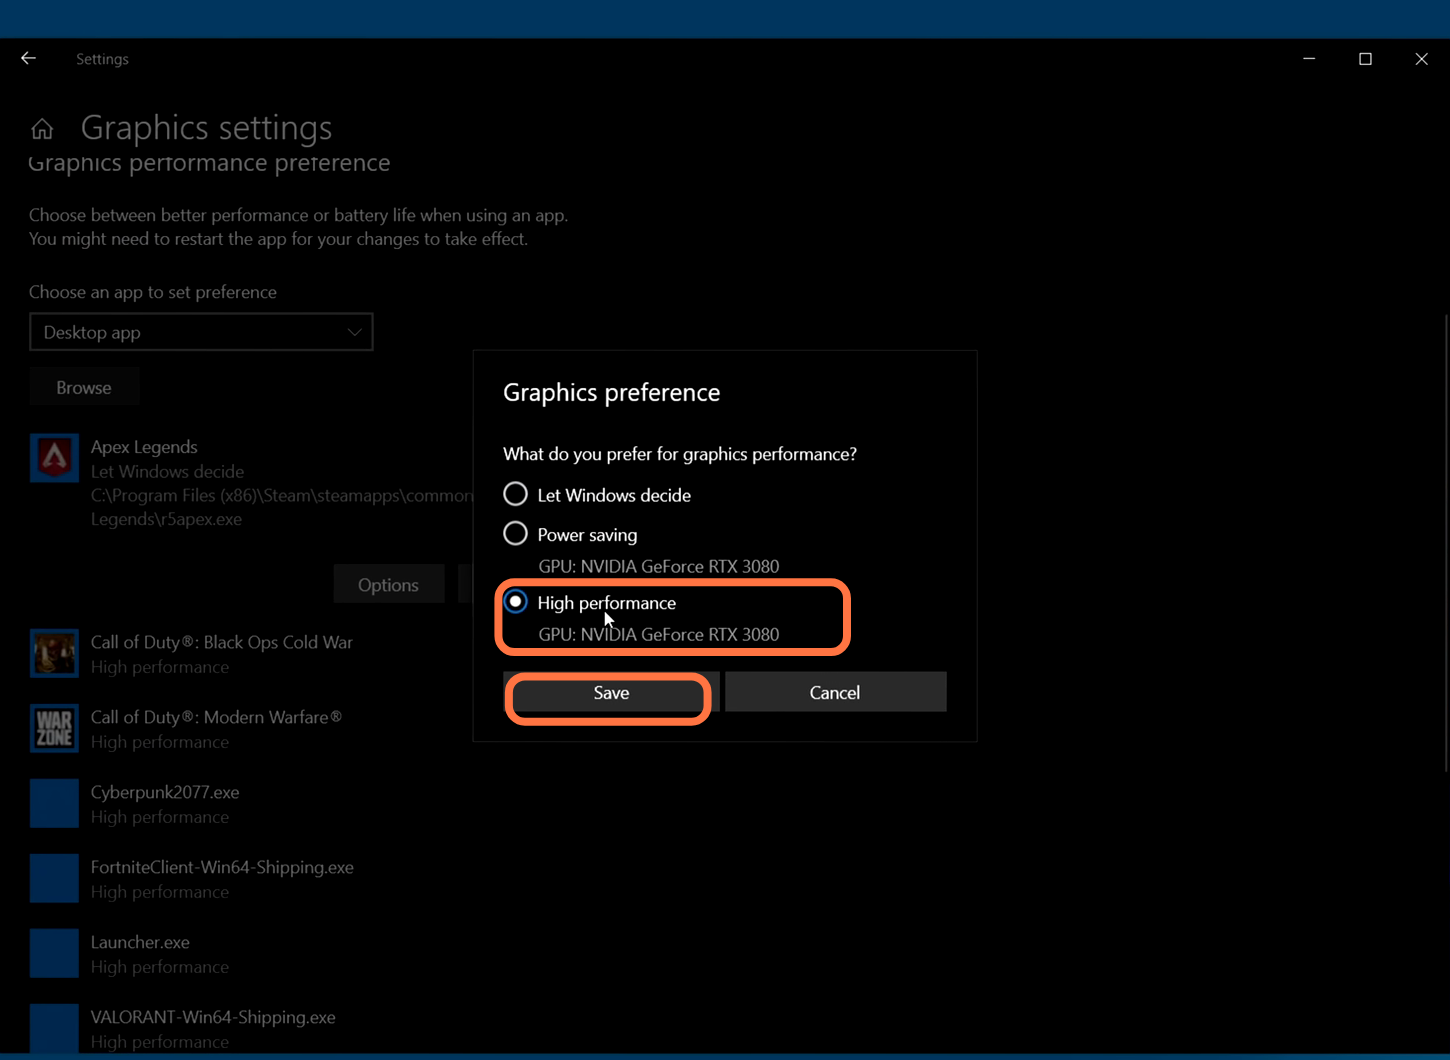
4.1- You will need to make sure that the auto-upgraded GPU setting is turned on. You will need an NVidia card of the 1000 series, it will really help with bottlenecks and you can expect a 2 to 5 percent boost in the FPS.

After this, click on the Browse button under graphic performance preference and then find r5apex.exe. Click on Add, then navigate down to it and click on the option. You have to select high-performance, select Save, and exit out.
4.2- Now you have to open up your web browser, click on the three dots on the top right-hand side of your screen and go to settings. Then go to the three bars on the left side, click on them and scroll down to find Advance. Then scroll down again to find the System and make sure that the first option is switched off. If it is turned on, then all your plug-ins and extensions will still run in the background even when you close the browser.

4.3- It is a very important step, you have to make sure that you are running on the latest GPU driver. If you want to check it, you need to press the control shift and escape buttons on your keyboard to open up the Task Manager and then head over to the Performance tab. Scroll all the way down to GPU 0 and you will find the name of your GPU on the top right side of this panel.

4.4- After that, right-click on the desktop and open the NVidia control panel. On the top left side, you need to click on the “Adjust image settings with preview”, use the advanced 3D image settings that have been selected and then click on apply.

4.5- Now head to Manage 3D settings, scroll all the way down to Power management mod, and set it to maximum performance. It will raise your idle clock slightly and also can help to solve the stuttering issues inside of the game. You have to set Open Render GPU to your GPU and the Preferred refresh rate to the highest. Now scroll down to anisotropic optimization and enable it. Set Negative lod Bois to allow and set the Texture filtering quality to high performance. Try linear optimization to threaded optimization and then click on Apply.

Advance Tweaks
Now if you want more FPS increase, you have to fulfill these advanced tweaks.
5.1- First, you have to go to the Device Manager, then scroll down to System devices and find the high precision event timer. Right-click on it and disable it.

It will help to reduce input latency and will give you better performance in games.
Capping Game FPS
Now you have to set an FPS cap inside your game as close to your monitor refresh rate as there is still a slight bug inside of Apex Legends. If you go above 190 frames per second, the engine actually starts bugging out. So you need to cap your FPS to 190 or below this, regardless of how good your frames per second are. If you keep the FPS cap close to your monitor refresh rate, it will keep your frame rate pacing exactly with your monitor’s refresh rate. You can do this by using the rtss app that is already installed in your system and setting the application detection level to medium or low. After that, go down to the frame rate limit and put the number you want to cap for your FPS which is 190.

Now you can go inside your game and you will see your FPS cap fixed at 190 and your frame time graph will be incredibly stable.

BIOS Settings
If you haven’t set these manually before, then you are running on your stock ram settings, auto-tuning, and more. First of all, you have to make sure that your Ram is correctly installed in your system. Rams can be installed at any slot available in your motherboard. you have to make sure that your ram is running on X.M.P/D.O.C.P to use these they will be using your windows default settings. in CPU you have to apply all core overclock as this will enhance the multi-core performance of your CPU allowing for much more consistent performance which games prefer. Alongside that, you have a GPU that is capable of running resizeable bars make sure that you enable this in the bios for further FPS performance.
In-Game Settings
For Apex Legends, you do not need to touch any graphics settings inside of the game, it will give you the best performance, highest FPS possible, and the lowest input latency. But if you want to enhance your texture, then you have to fine-tune your settings.
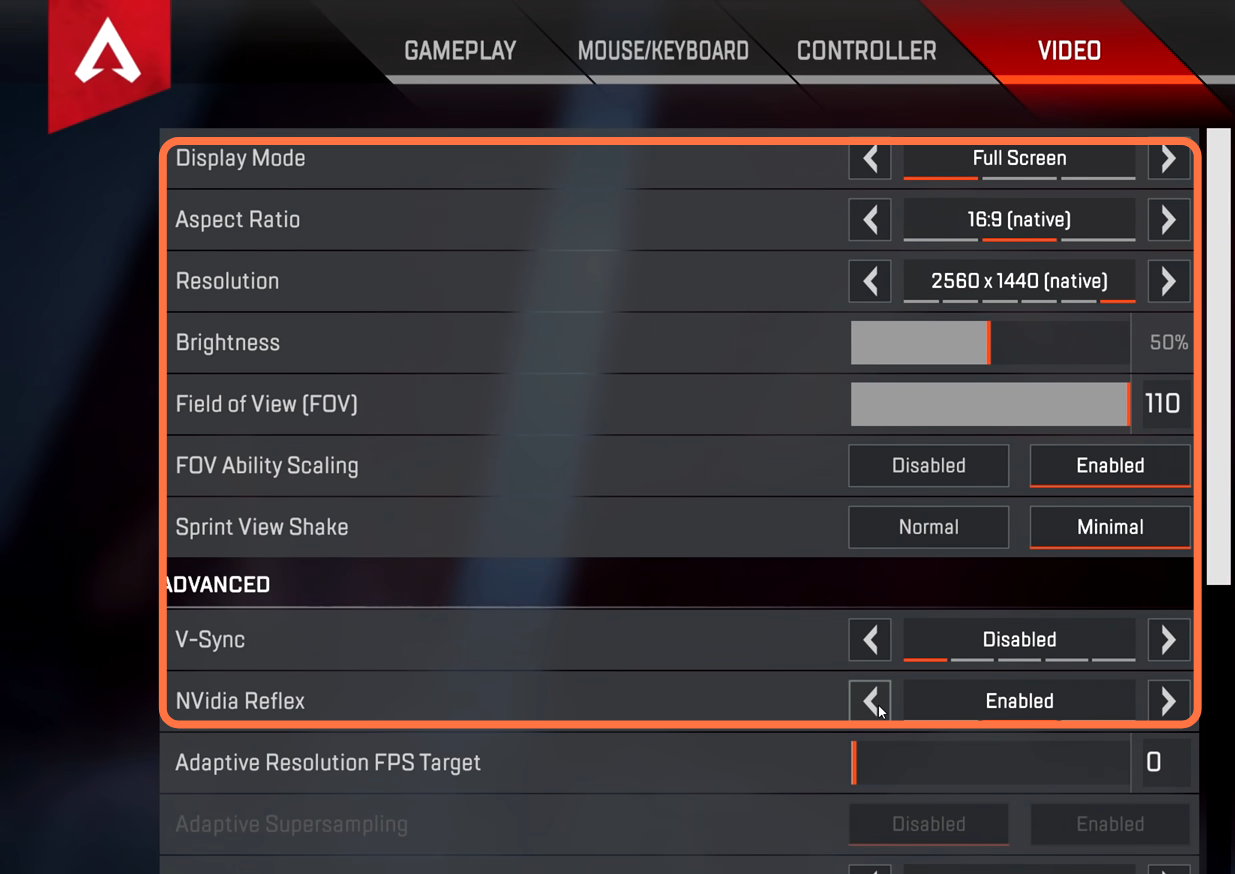
8.1- First of all you have to make sure that your mouse and keyboard settings are still applied. After this, navigate to the video tab and set the Display mode to full screen. Make sure that your resolution is set to your native resolution, and you can set the brightness and FOV to your personal preference. Set Sprint shake to minimal and make sure that V-sync is disabled. If NVidia reflex is available to you and you are running on NVidia gtx-based graphics card, then you can enable+boost.
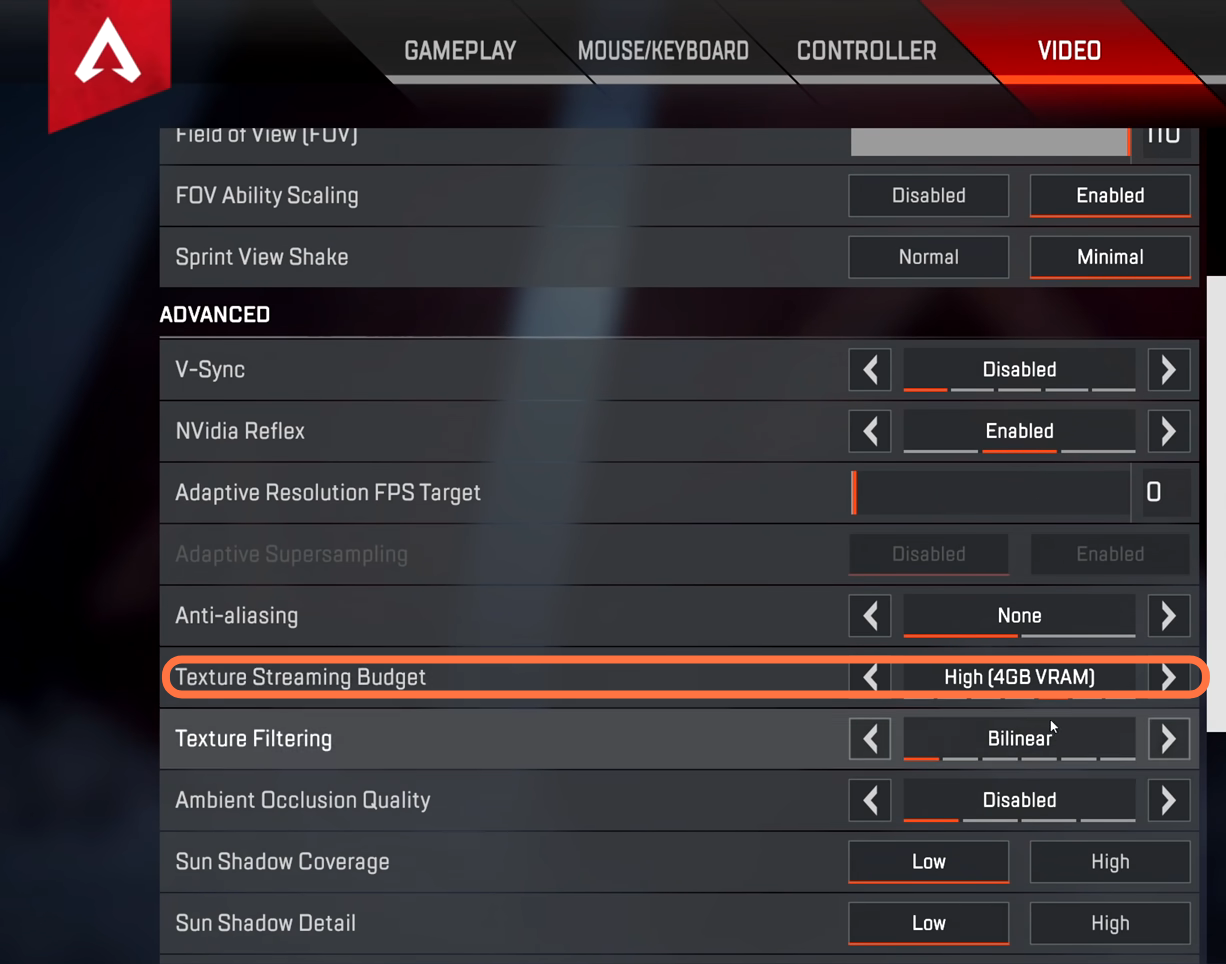
After this, go to the texture streaming budget, it is the option that will change the textures of the game and you can set this according to the specs of your graphics card. If you have an extraordinary graphics card, then you can set it to 8GB Vram. If you have a medium-end graphics card then you can set it to high(4GB Vram).