This guide will let you know how to Increase performance / FPS with any setup in New World. In this, you will be choosing the best input latency and getting the best FPS possible while maintaining a good level of fidelity. You have to make changes in Windows settings and also in the window power plan. You have to do some changes in the steam properties, then you have to optimize your GPU and graphic card. You also need to make changes in the in-game visual settings and in bios to achieve the best FPS possible.
Windows Update/Settings
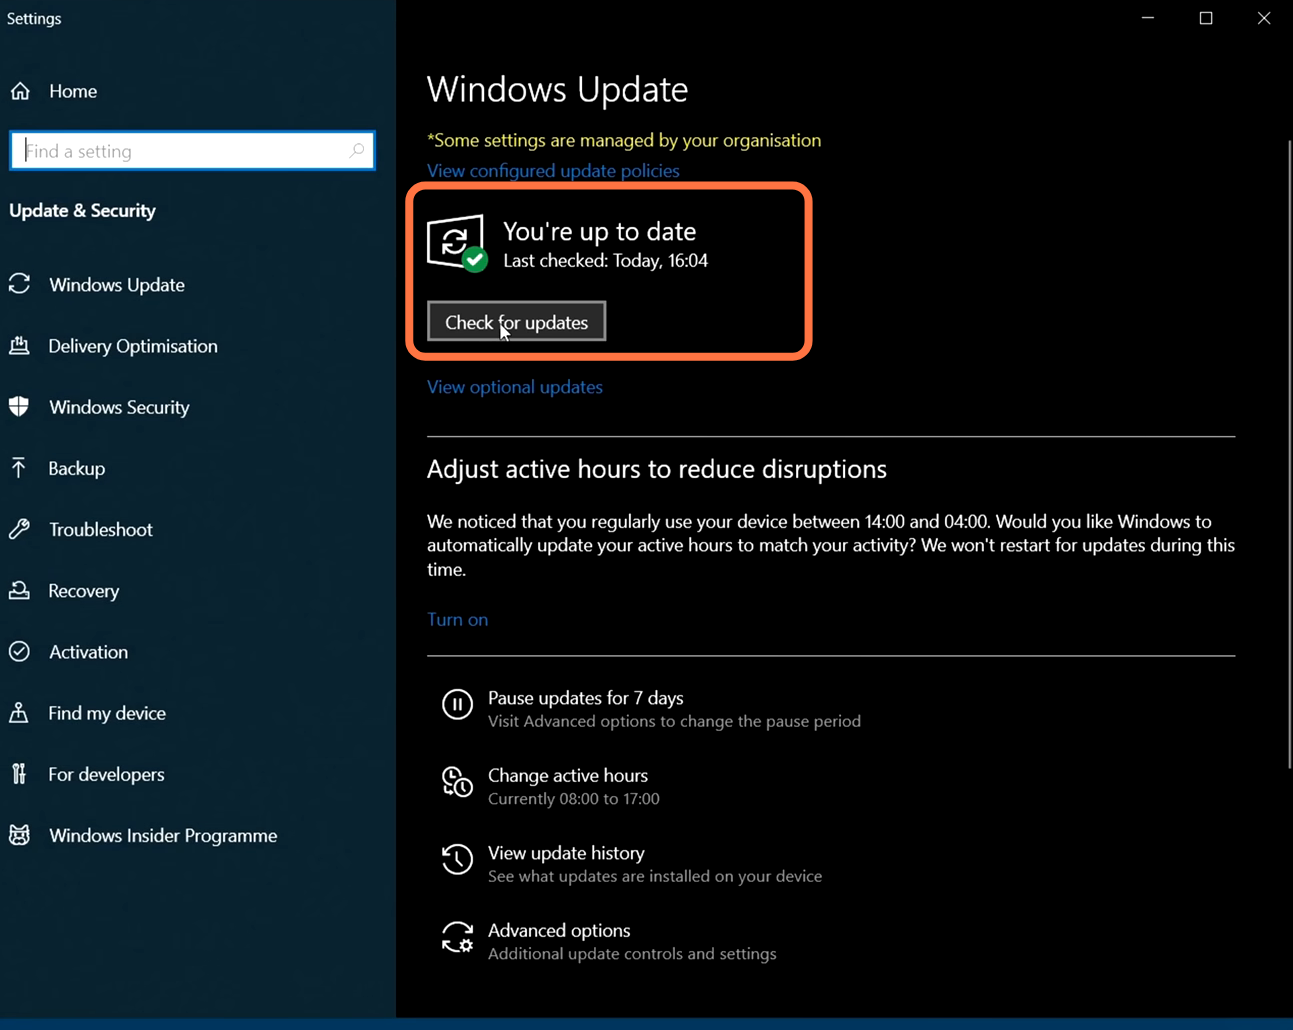
First of all, you have to make sure that your Windows is fully up to date. It is a very important step, especially for the New World as it will give you a phenomenal increase in your game performance.
1.1- For this, you need to go to the bottom left side of your screen to the search bar, type “update” in it, and click on “Check for Update”. A new window will pop up, navigate down and then click on “check for updates”. It will scan your machine if there are any updates available.
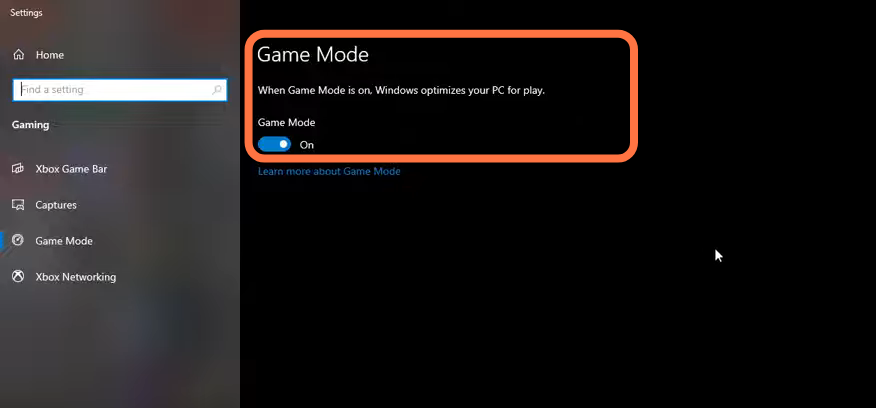
1.2- After that, search game mode in the search bar, press enter, and make sure that the game mode is activated. By this, you will get decent performance, you have to make sure that all your resources are focused on the game that you are playing.
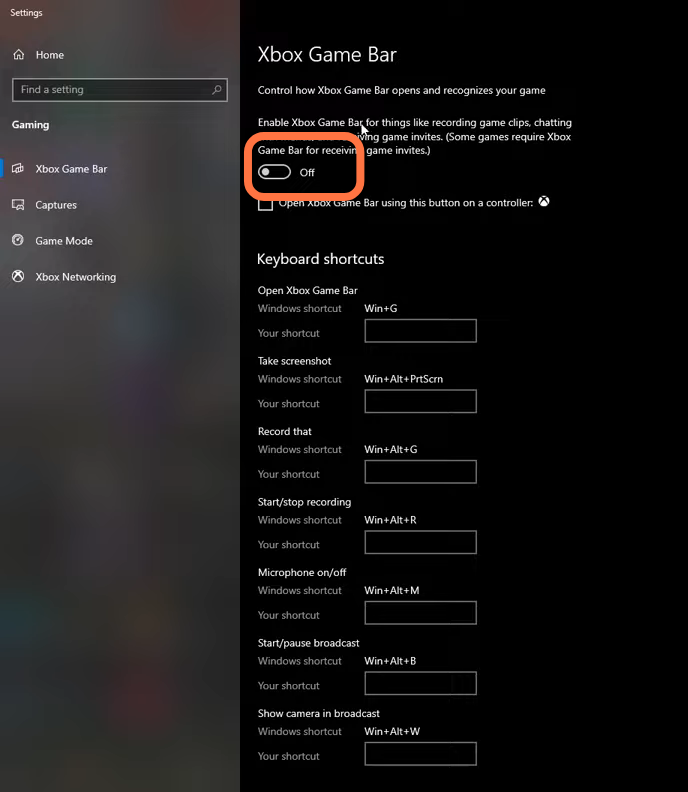
1.3- Then you have to go to the Xbox game bar under Gaming and deactivate this one as it is causing stuttering and crashing in some games.
1.4- Make sure that the auto-upgraded GPU setting is turned on. You will need an NVidia card of the 1000 series, it will really help with bottlenecks and you can expect a 2 to 5 percent boost in the FPS.

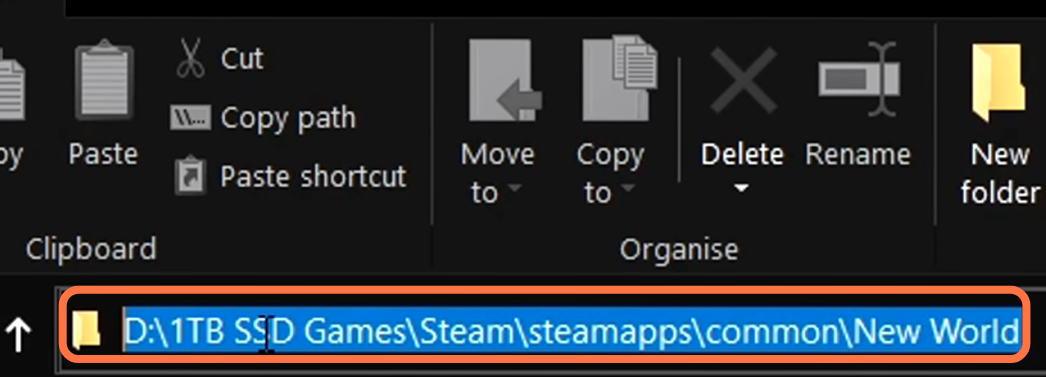
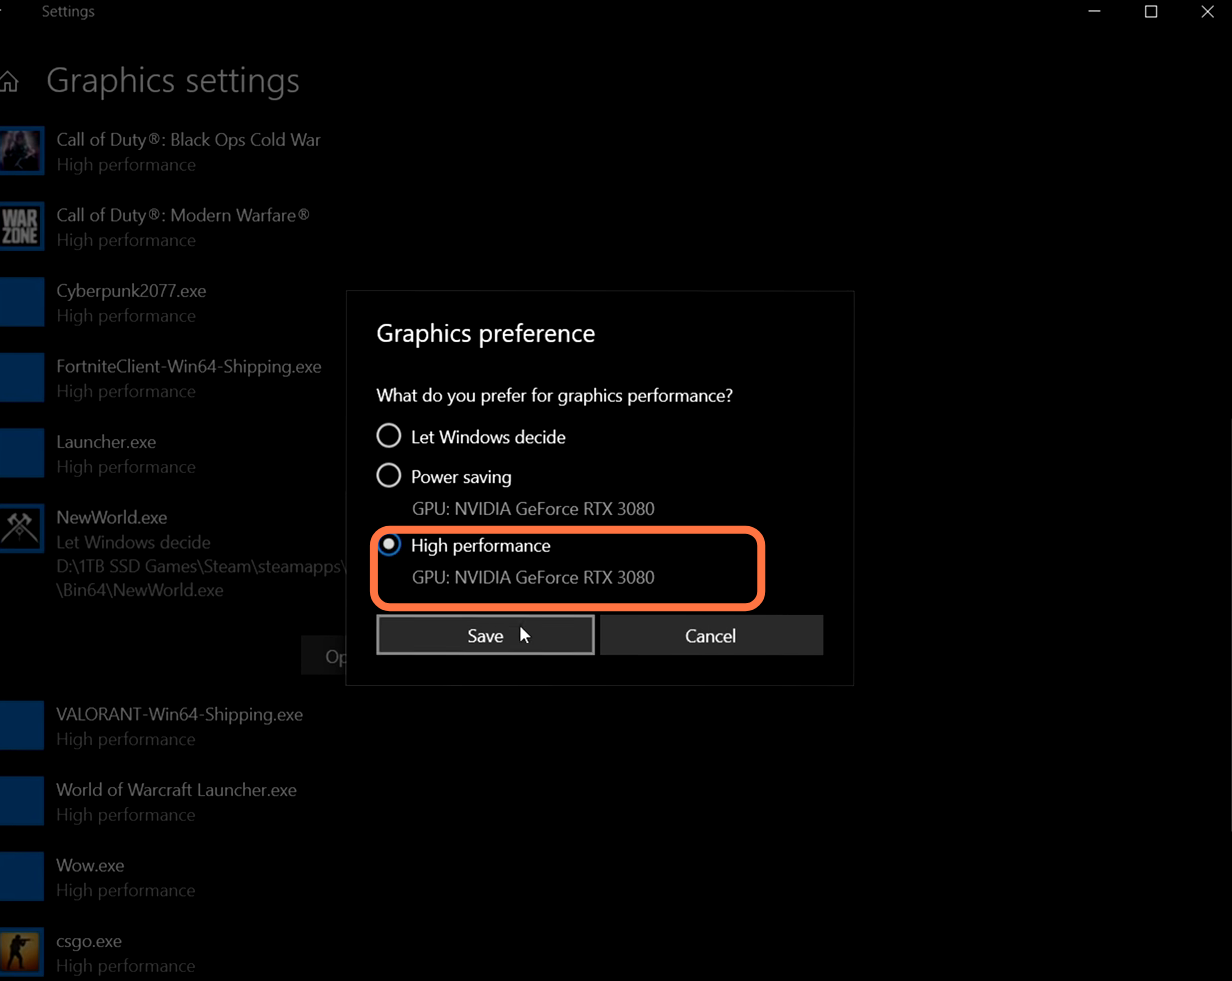
After this, click on the Browse button under graphic performance preference. A new window will open up and you have to go inside the Steam. Once you are inside Steam, you have to find the New World, right-click on it, and then select properties. After this, select local files and then tap on “Browse”.

Now you need to go to the top of the navigation bar and double-click on the blank space. You have to copy this directory and then head back to the browse setting of the GPU page. Go to the navigation bar and delete any other director from there and paste that directory which you just copied then press enter.
It will take you inside the New World folder, go to the bin64 folder, select new world.exe, and then click on Add.

Now new world.exe is added in the Graphics settings, you need to go down to the new world.exe, select option, and select High performance.
Windows Power Plan
It is a great and an easy way to enhance the performance of your system, as they are highly customizable and effective for disabling some sleep and low-power modes.
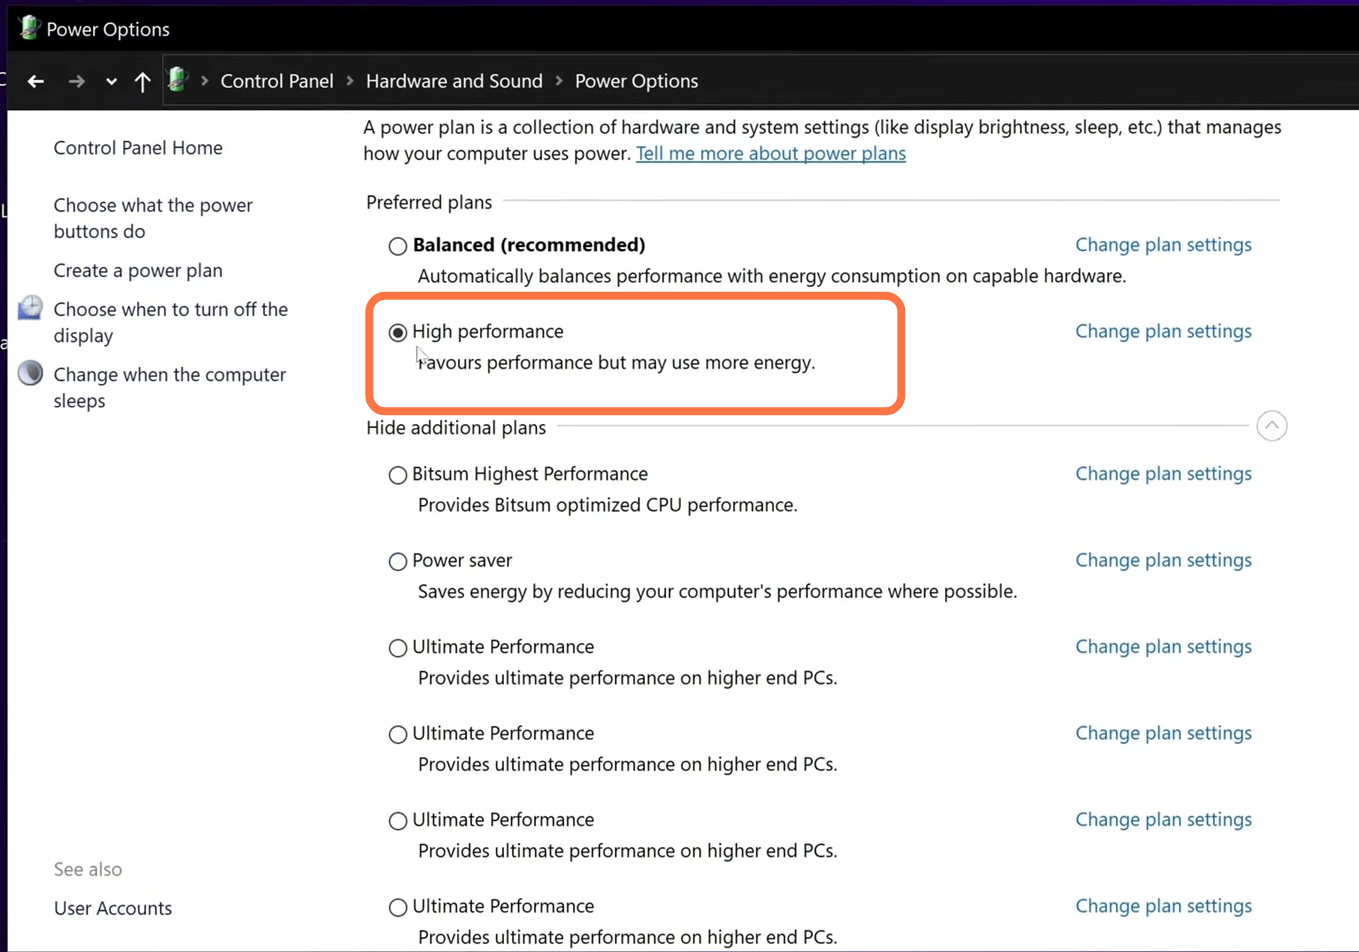
2.1- You have to type “edit power plan” in the search column and press enter. Once inside this menu, you need to go to the power option on the top, click on show additional plans and scroll down to select the high-performance power plan.
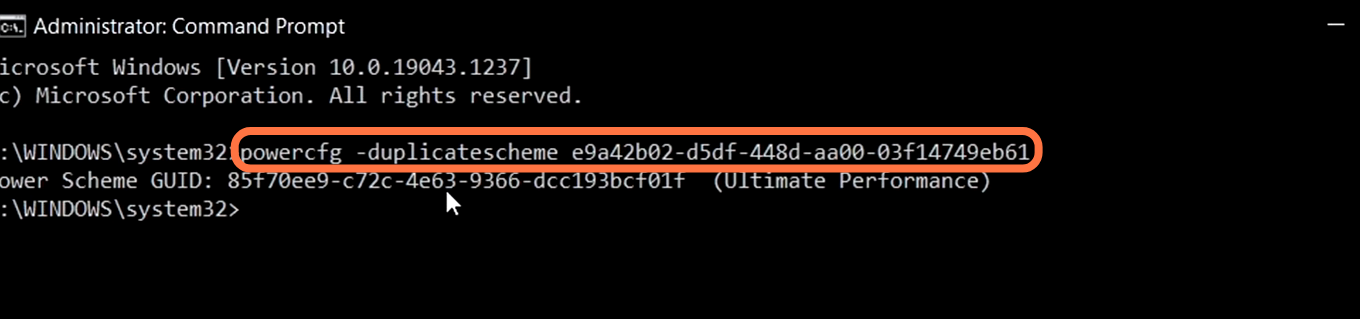
After this, go to the bottom left-handed side of your screen to the search bar and input “Command prompt” and run it as an administrator. Then you have to paste this command “powercfg -duplicatescheme e9a42b02-d5df-448d-aa00-03f14749eb61”. Press enter and then exit.
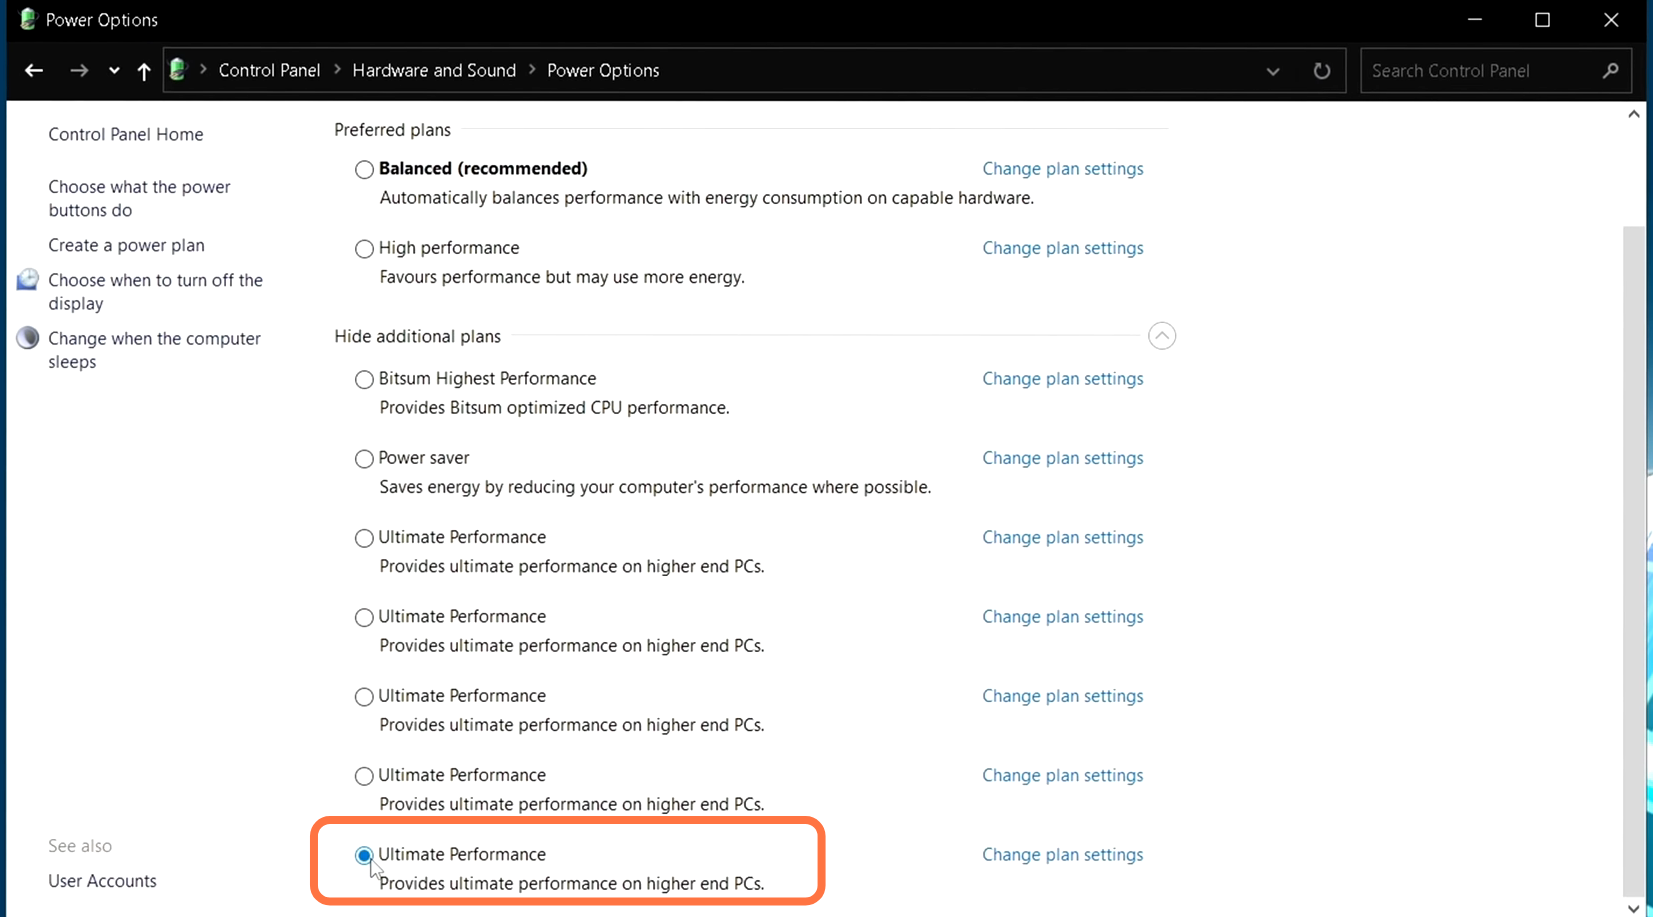
Now again go to the power play menu and press the Refresh button on the top right corner. You will find the ultimate performance power plan, you have to select this option.
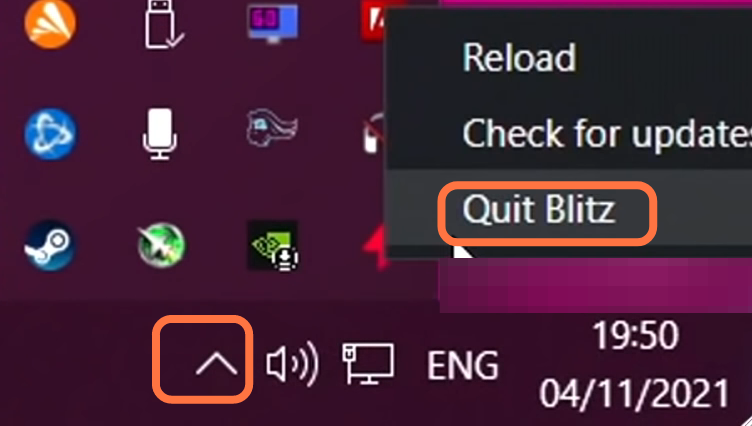
2.2- Once you are done, you need to turn off all the programs running in the background. Go to the taskbar, click on the small arrow and start right-clicking on the programs that you don’t want to run in the background. After that, click on Quit Blitz.
Steam Settings
In Steam, you have to make changes in the library section.
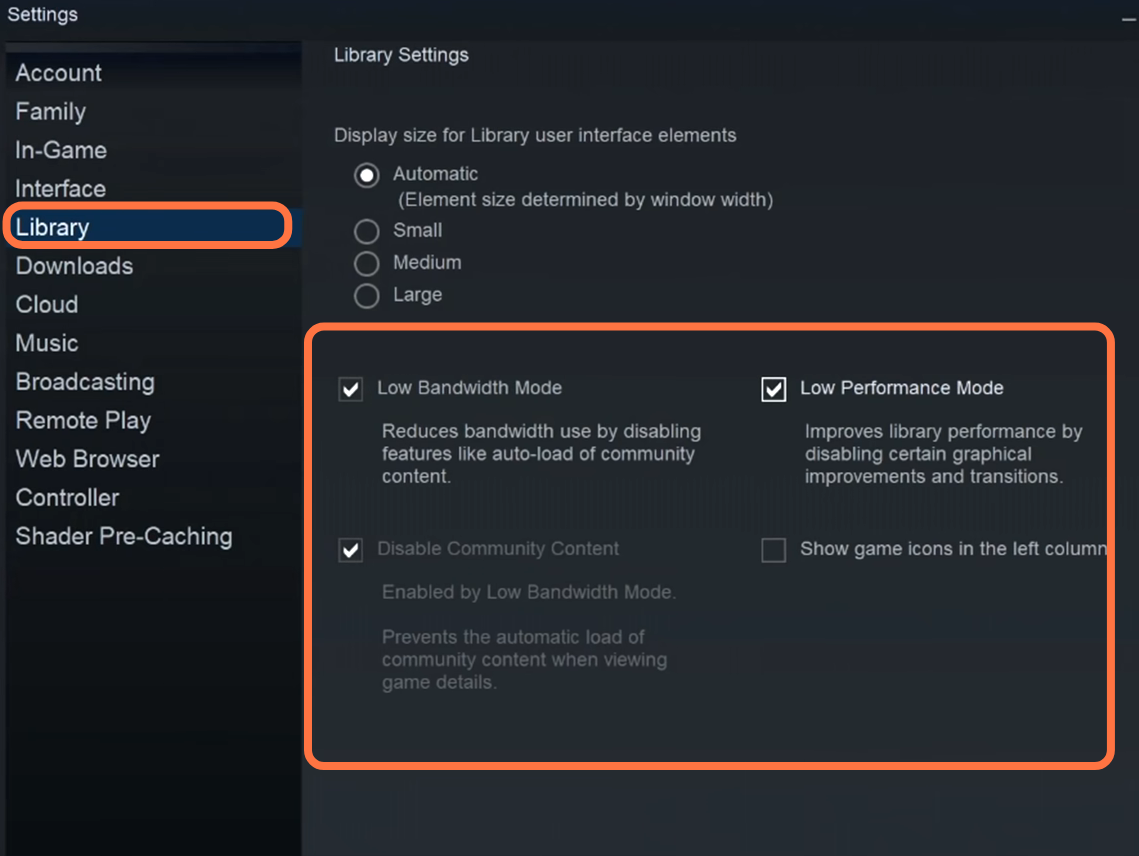
3.1- First, you have to go to Steam, then navigate to the left top corner of the screen, and click on Steam. A pop-down menu will appear, you need to go to settings and navigate down to the Library. In the library menu, you have to make sure that “low bandwidth mode”, “low-performance mode”, and “disabled community content” are enabled. After that, press OK. By doing this, your Steam will feel a little lighter because all these things are taking up some space in the background in Steam.
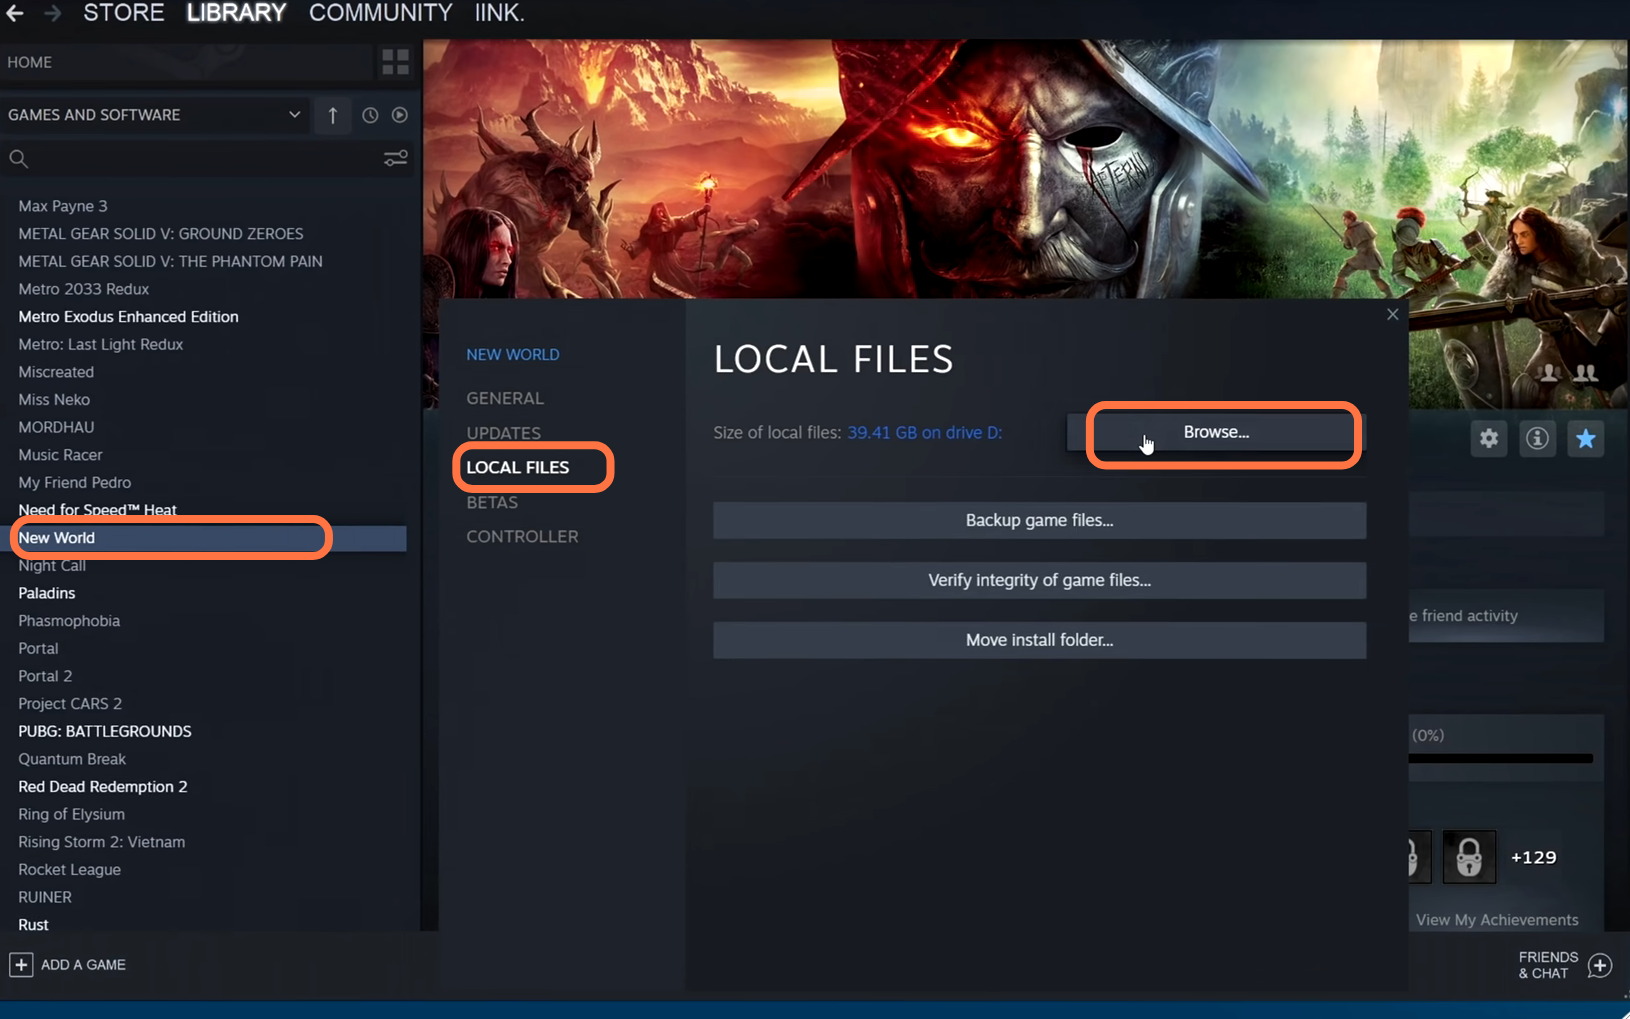
3.2- Now you need to navigate down to New World in Steam, right-click on it, and select properties. Then go to local files on the left-hand side and click on “Browse”.
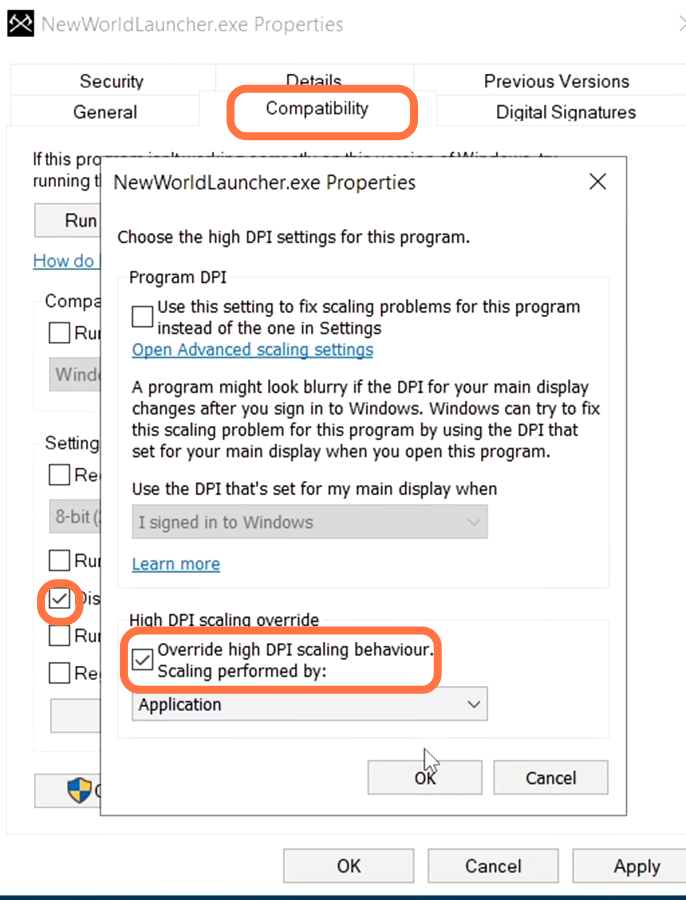
A new window will pop up and you have to navigate down to newworldlauncher.exe. Right-click on it, go to properties and then go to the Compatibility tab. You have to make sure that disable full-screen optimization is selected. Then click on change high Dpi and make sure that override high Dpi scaling is selected.
After that, repeat the optimization process by going inside the bin64 folder. Scroll down to the new world.exe, right-click on it and go to properties. Then go to the Compatibility tab and make sure that “disable full-screen optimization” is selected. After that, click on change high Dpi and make sure that override high Dpi scaling is selected.
GPU/Graphics Card Optimization
You have to make sure that you are running the latest graphic card drivers regardless of how old, or new your graphics card is.
4.1- It is a very important step, you have to make sure that you are running on the latest GPU driver. In case you want to check this, you need to press the control shift and escape buttons on your keyboard to open up the Task Manager and then head over to the Performance tab. Scroll all the way down to GPU 0 and you will find the name of your GPU on the top right side of this panel.

4.2- Now right-click on the desktop and open the NVidia control panel. Click on the “Adjust image settings with preview” on the top left side, use the advanced 3D image settings that have been selected and click on Apply.

4.3- After that, head to manage 3D settings, scroll all the way down to power management mod, and set it to maximum performance. It will raise your idle clock slightly and also can help to solve the stuttering issues inside of the game. You have to set Open Render GPU to your GPU, and the preferred refresh rate to the highest value. Now scroll down to Anisotropic optimization and enable this. Set Negative lod Bois to allow, Texture filtering quality to high performance and try linear optimization to threaded optimization. After that, click on Apply.

4.4- At last to optimize your GPU, look into overclocking your GPU. Graphics card overclocking is very simple and easy to do, it will avoid instability and also crashing of your games.
In-Game Settings
You have to make changes in your game graphics settings to achieve the best FPS possible.
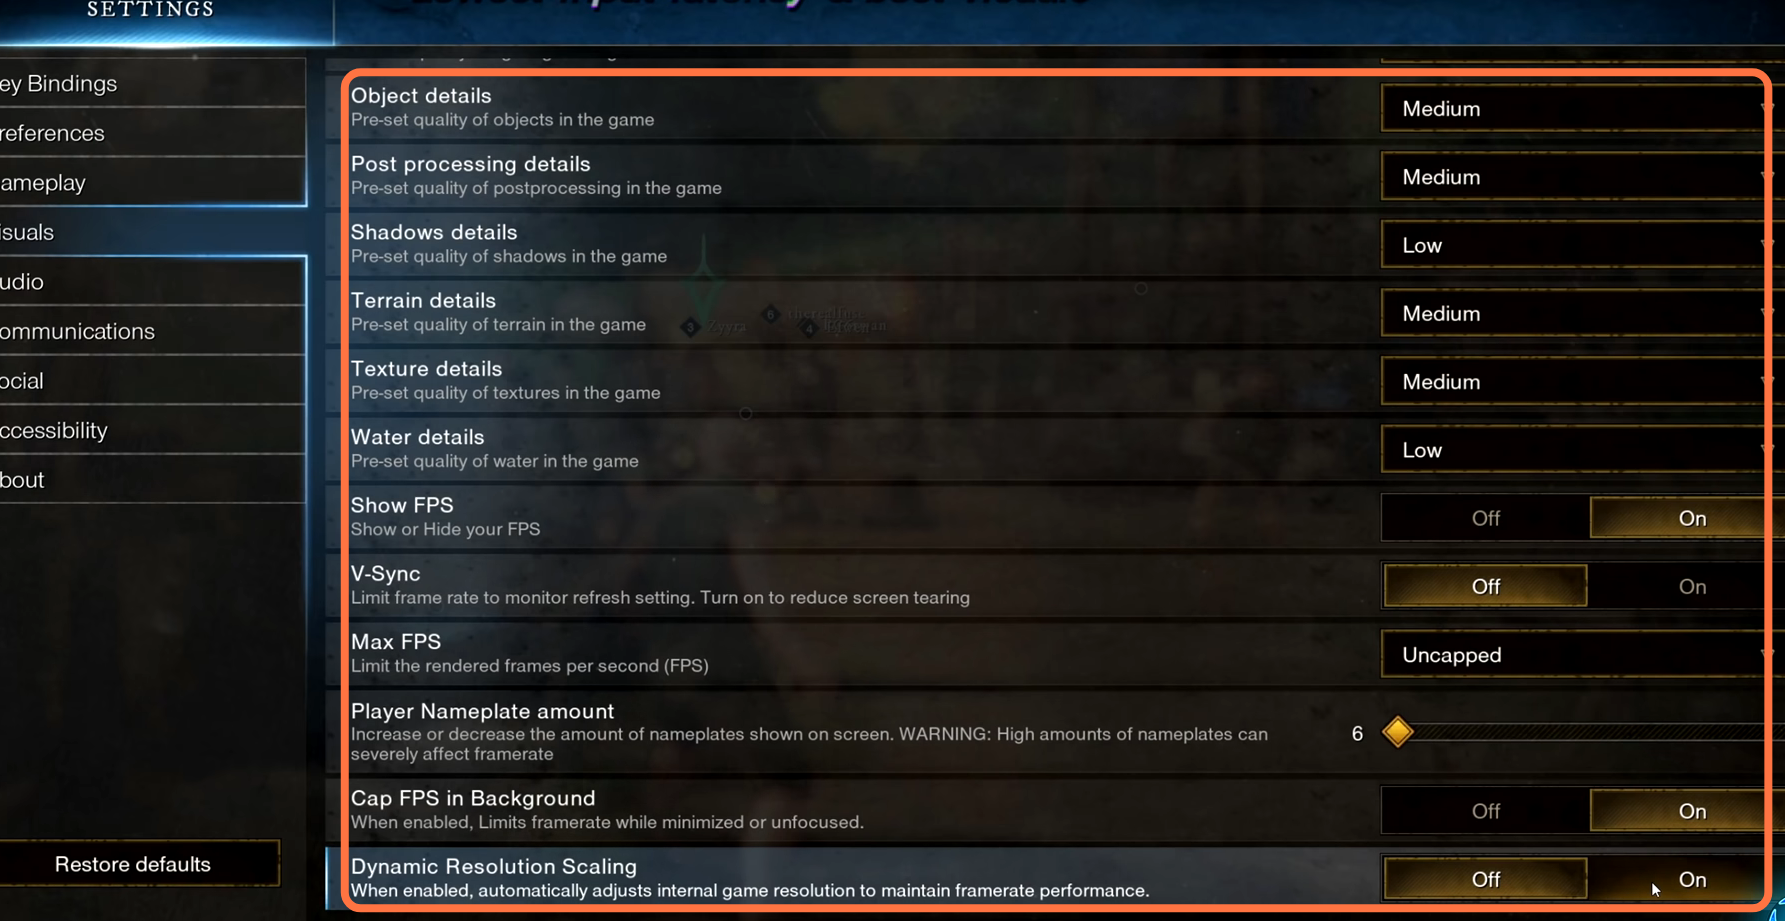
5.1- Once you are in the game, you need to take yourself to the top right side, click on settings, and then click on visuals on the left side. Starting with window mode, you have to keep it on full-screen mode as it will give you the best FPS and a very low level of input latency. After that, go to “Resolution” and set it to the maximum resolution possible on your system. Set the Brightness and Contrast according to your wish. The Video quality must be set to high. Effect details to get the best performance in high-end systems, you need to set it to high but for the low-end system, you can set it to low or medium. Lighting details should be set according to your system specs.

5.2- For object details, you have to keep this to the medium position. Set Post Processing details to medium and set Shadow details to low, as it will give you a pretty nice increase in your FPS. After that, set Terrain details set to medium. Texture detail is also a setting that will increase the usage of Ram, you have to set it to medium. Set Water details to low and turn on Show FPS as it will give you important information about your input latency, and about your FPS on the left top of your screen. V-sync should be disabled as it will give you the best frames possible and the lowest input latency. Keep max FPA to uncapped. For player name plate amount you can set this according to your personal preference. Turn On the cap FPS in the background. At last, the dynamic resolution scaling as this will dynamically increase your in-game resolution, so turn it on.
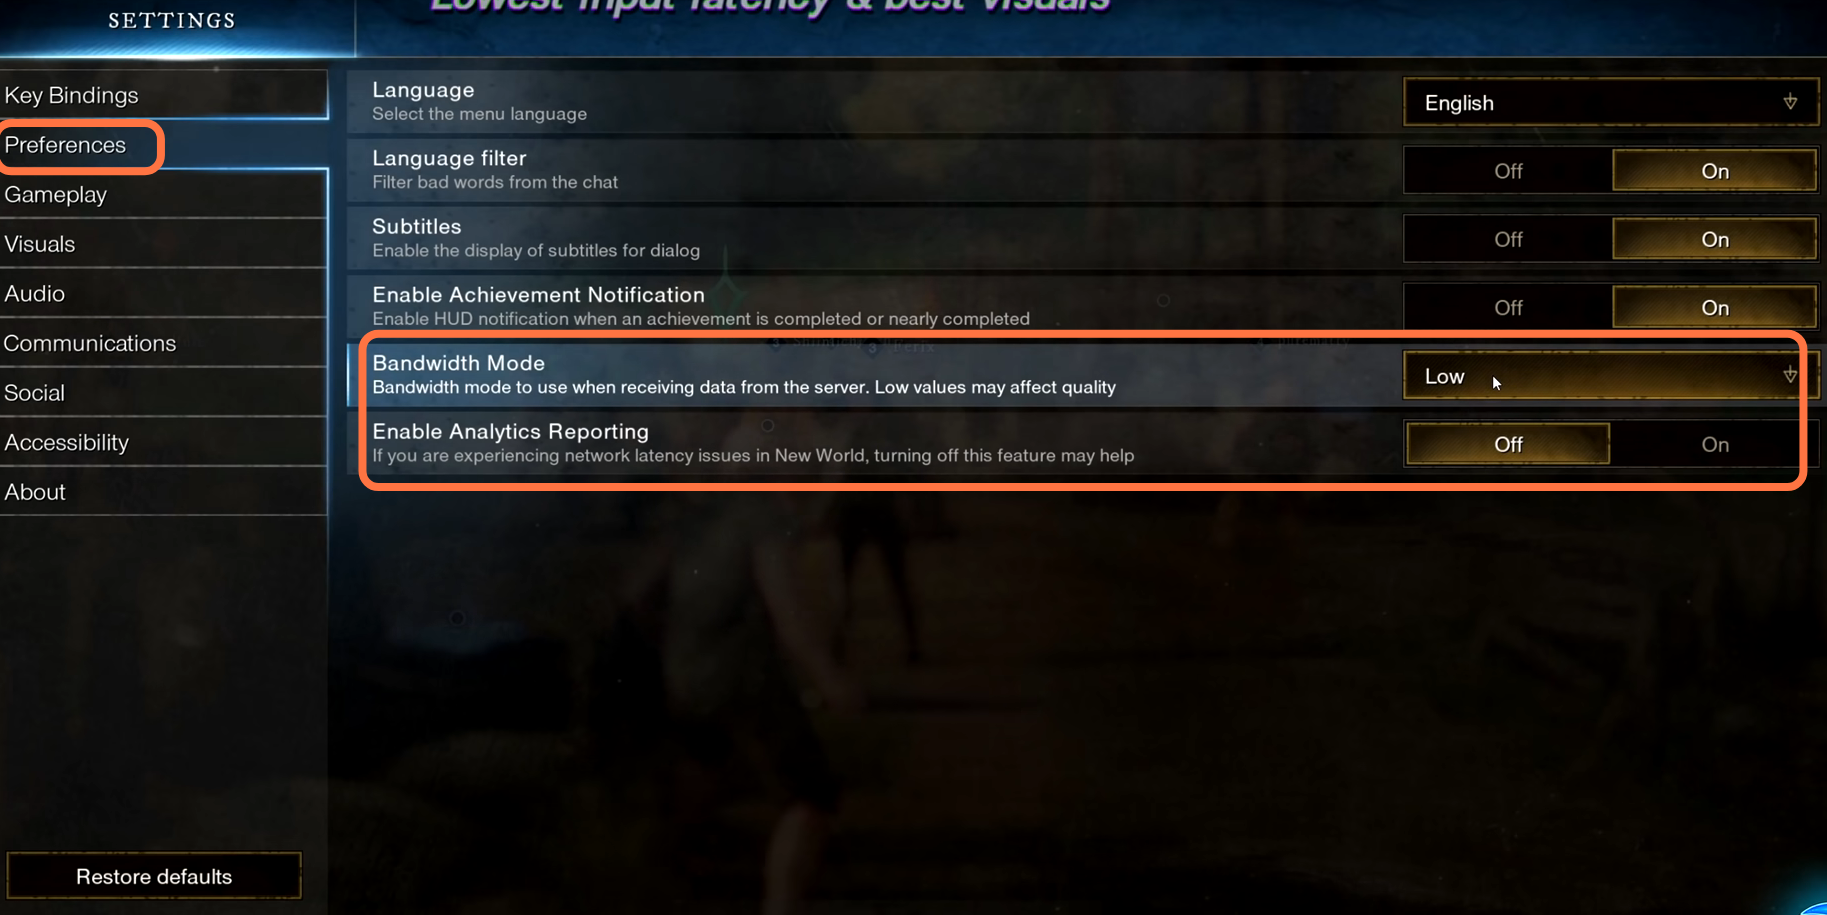
5.3- Once you are done with the visual settings, go to the preferences tab on the left-hand side. In this, you have to lower your bandwidth mode. keep this to a low position and also you have to disable analytical reporting.
Advance Tweaks
Now if you want more FPS increase you have to fulfill these advanced tweaks.
6.1- First, you have to go to the device manager then scroll down to the s section then go to system devices then find the high precision event timer. Right-click on it and disable it.

As it will help to reduce input latency and will give you better performance in games.
BIOS Settings
If you haven’t set these manually before then you are running on your stock ram settings, auto-tuning, and more. First of all, you have to make sure that your Ram is correctly installed in your system. Rams can be installed at any slot available in your motherboard. you have to make sure that your Ram is running on X.M.P/D.O.C.P to use these they will be using your windows default settings. in CPU you have to apply all core overclock as this will enhance the multi-core performance of your CPU allowing for much more consistent performance which games prefer. Alongside that, you have a GPU that is capable of running resizeable bars, make sure that you enable this in the bios for further FPS performance.