In this guide, you will find out how to improve your computer’s performance in Rust. You need to complete certain Windows settings, and make changes in the web browser settings and also in the device manager setting. You also need to optimize the Steam app and make changes in the BIOS settings. After following these simple steps, you should be able to increase your game’s performance.
Basic Windows Settings
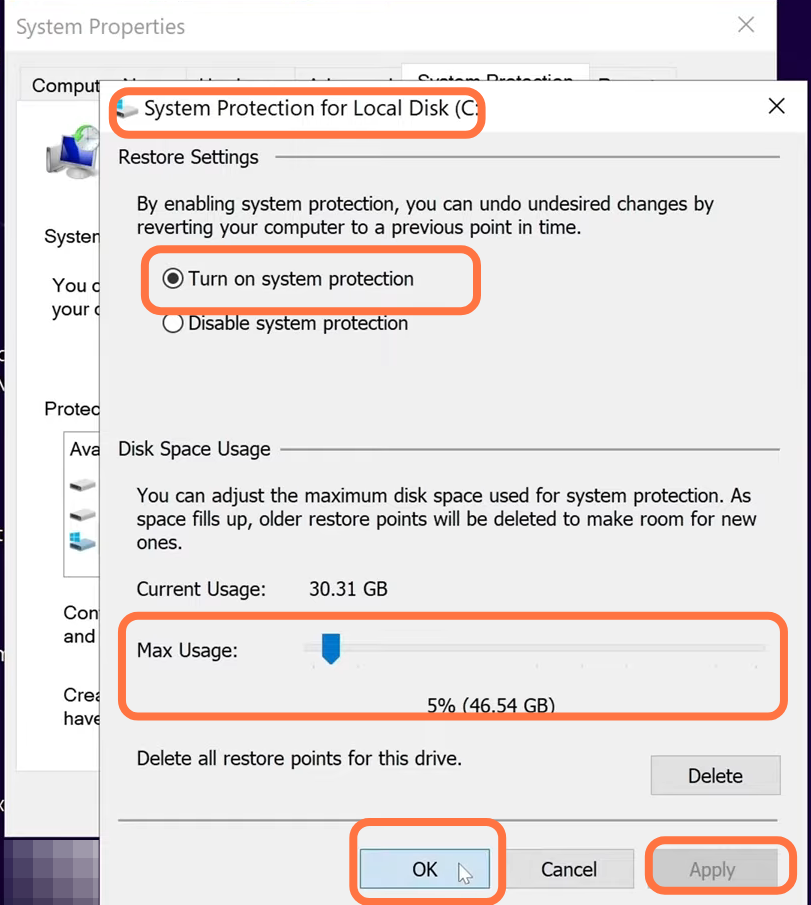
1.1- You will need to set up a quick window settings restore. First, you have to go to the Search button on the bottom left of your screen, type restore and select to create a restore. Go to system protection, select your local disk C and click on Configure. Turn on the system protection, set the max usage bar to 5%, then click on Apply and then on OK.
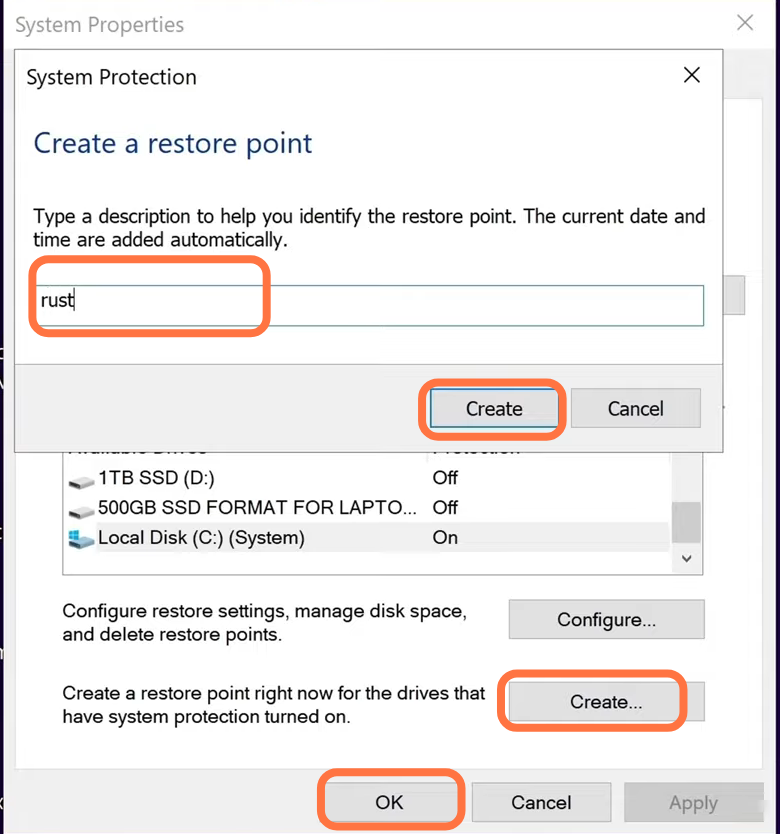
After that, click on Create, and a new small box will appear, you need to give a name to the restore point and then click on Create. Now the Windows restore point is created which can be used at any time.
1.2- Before booting the game, you have to make some changes to the Windows settings. Go to the left-hand side of your screen, type game mode settings in the search column, and press enter. A new window will appear and you have to make sure that game mode is turned on.

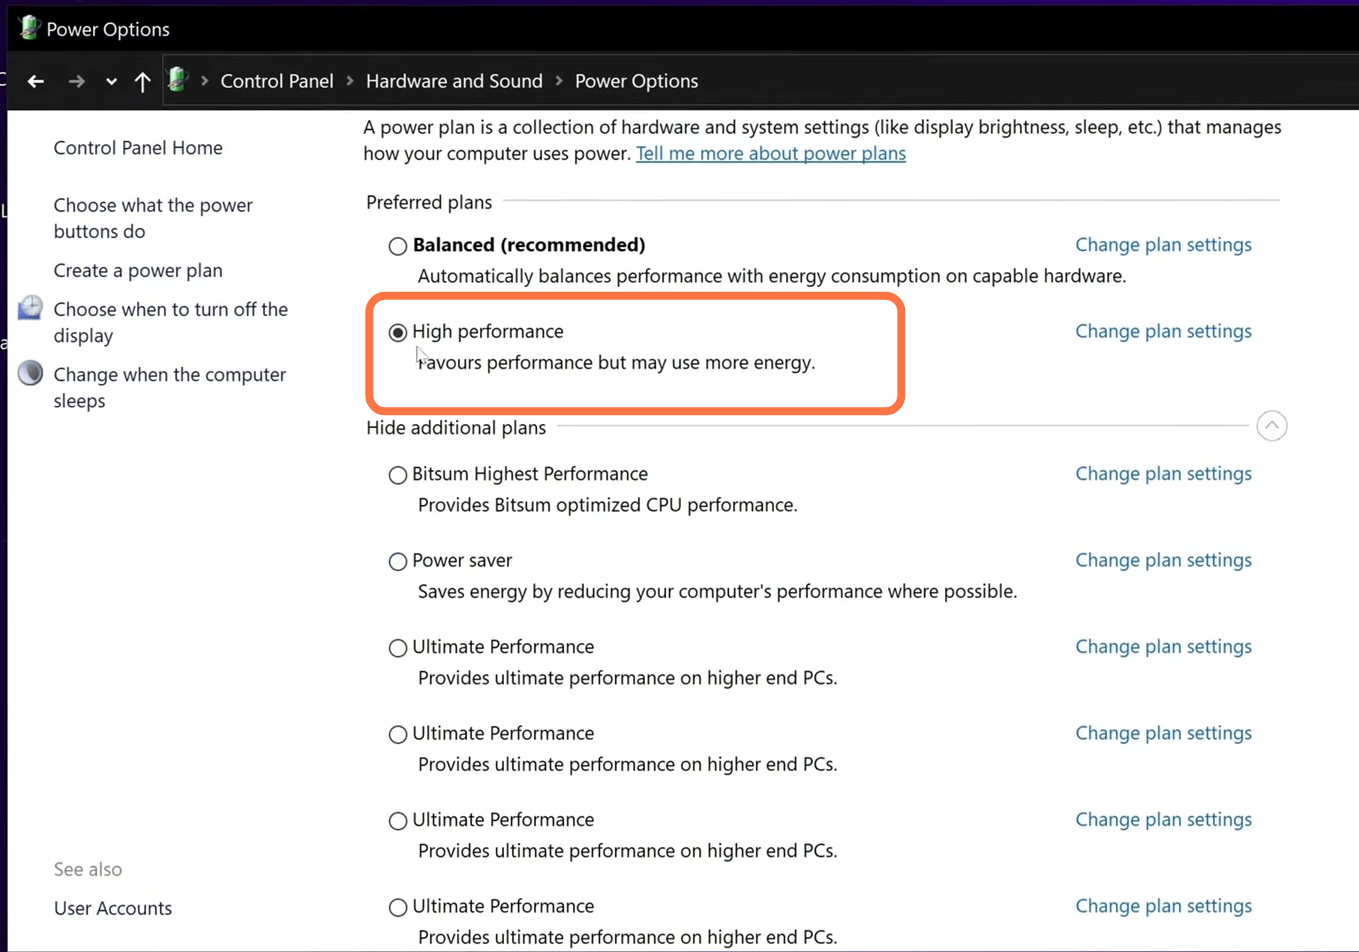
1.3- Now you have to input Edit Power plan in the search column and press enter. Inside this menu, go to the power option on the top, and click on Show Additional Plans. After that, scroll down to select the high-performance power plan.
Web Browser Settings
Now you need to go to your web browser and open it up. Click on the three dots on the top right-hand side of your screen and then go to settings. After that, click on the three bars on the left side and scroll down to find Advance. Then scroll down again to find the system and make sure that the first option is switched off. If it is turned on then all your plug-ins, and extensions will still run in the background even when you close the browser.

Device Manager Settings
You will need to go to the search column, type “device manager” and press enter. Now scroll down to the S section to find system devices, click on the arrow next to it to go to the drop-down menu. Go to the h section and find the high precision event timer, right-click on it and enable this option.

Steam Application Optimization
4.1- For this, you will first need to open the Steam app, go to the top left-hand side and then go down to settings. Head down to the library and you will find four options in the middle which all are turned on.

4.2- After that, scroll down to find rust, right-click on it and then click on properties. After that, move down and click on local files, then click on Browse.

Now inside the game files, you have to navigate to rustclient.exe, right-click on it, and go to properties. Go to Compatibility and if you are running on a low PC or on an older version of Windows, then you have to disable the full-screen option. After that, go to dpi settings, and check the options for override high dpi, select OK and then click on Apply.

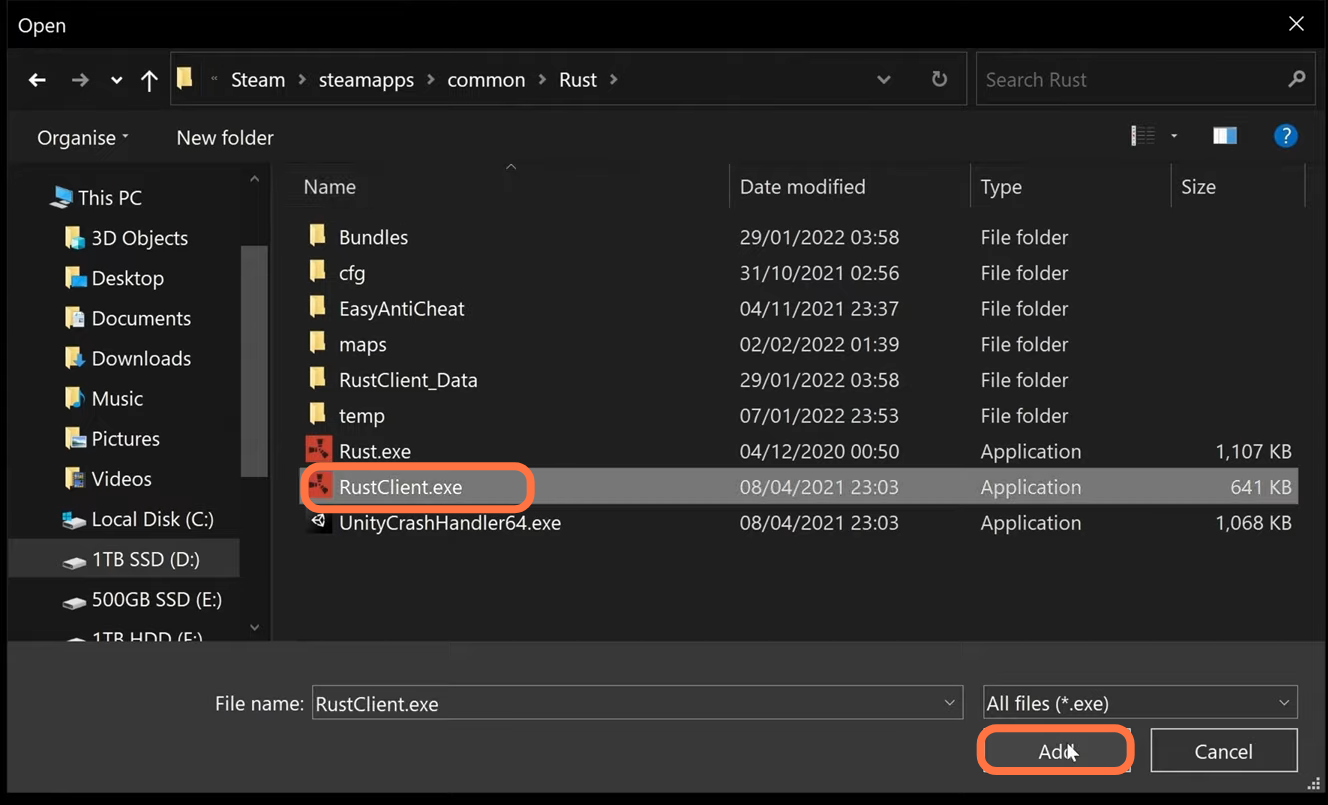
4.3- Now you have to go to the directory part and click on the blank space, you will find the full directory in the navigation bar. You need to copy that directory. After that, head down to the search column and input “Graphics settings”, navigate down to the graphics performance preference and select Browse. Go to the navigation bar once again, paste that directory and then press enter.

After that, select rustclient.exe and then press add.
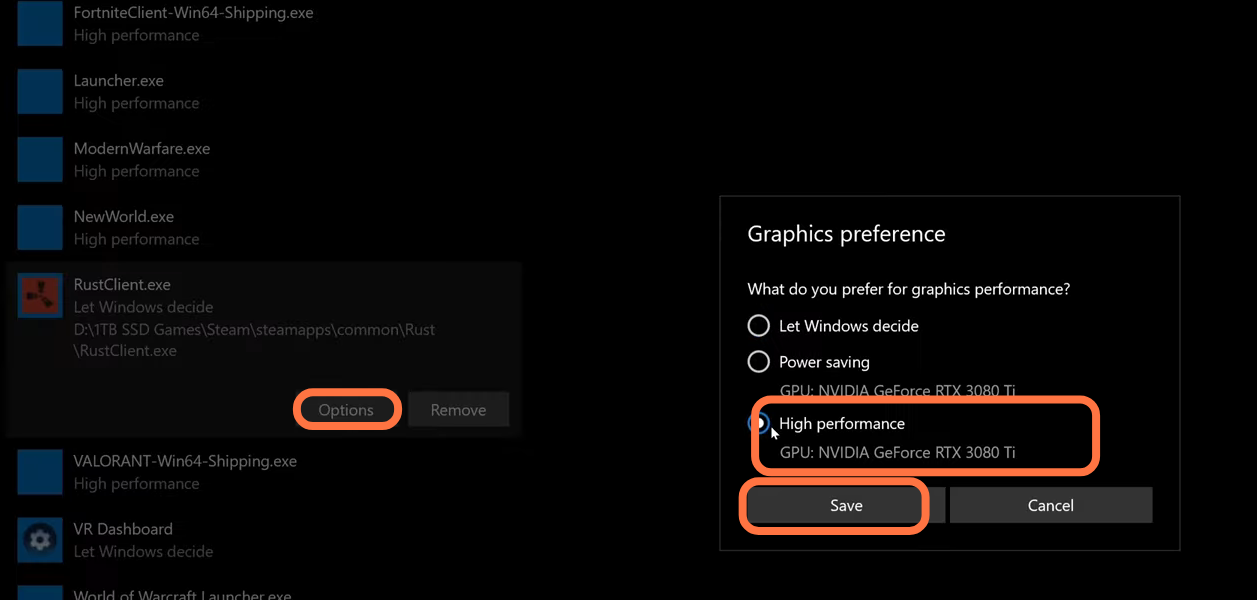
Now you will see that rustclient.exe is added to your graphics settings. Right-click on it and then click on options. You need to set it to high performance and select save and exit out.
You also have to make sure that the rust is installed in SSD.
Bios Settings
This is a very advanced setting. You have to run your memory into XMP mode. You need to apply all-core CPU overclock rather than using something like ryzen PBO as it will optimize your PC towards multi-threaded performance where CPU-bound games really come alive. You can also experience by turning ON or OFF the cppc preferred cores options inside of ryzen biases, especially for ryzen 3 or 5000 series. As it will give you the best performance possible. These features will optimize your bios and ensure that you are getting the most out of the hardware as you will see a 30% increase in your performance.
Windows Optimizations
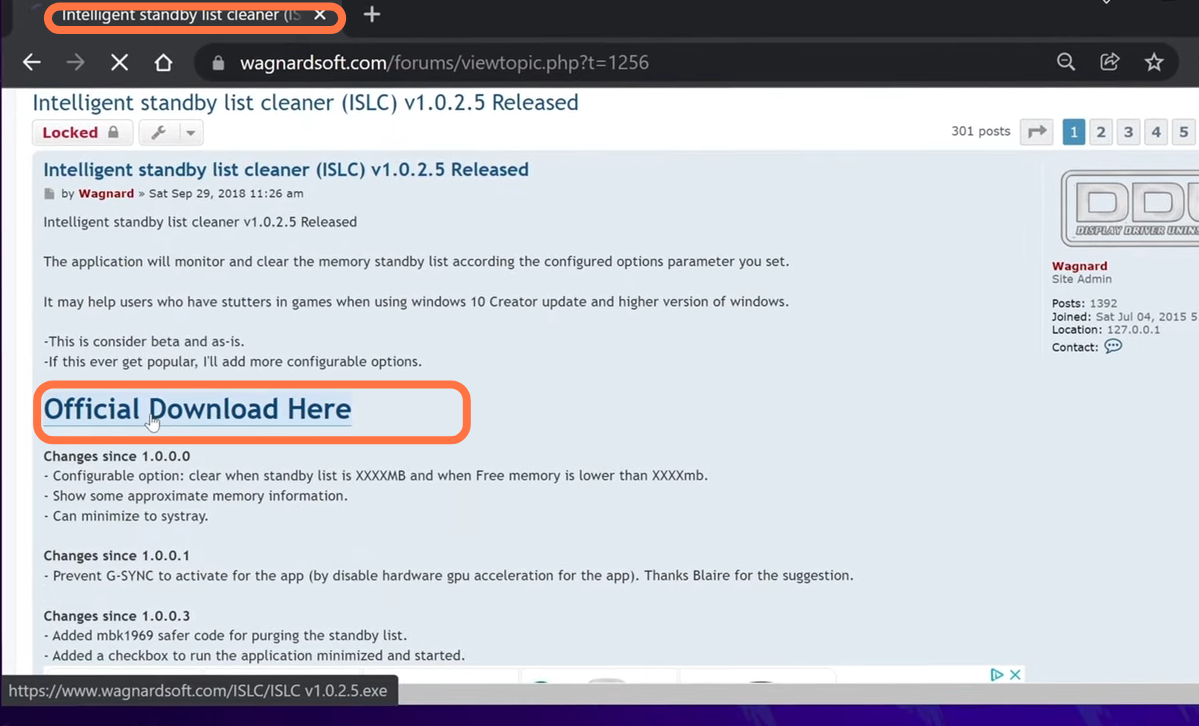
6.1- You have to go to islc or intelligence standby list cleanup once you are on the web page go down to find the official download.
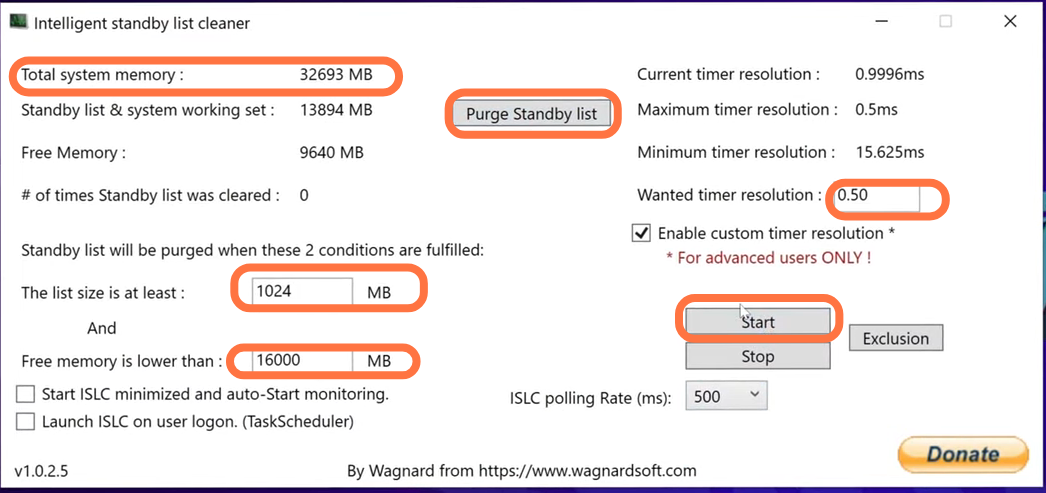
Once the downloading finishes, you need to open that file and click on the three dots, then select desktop, and click on Extract. After that, open the folder, double click on the intelligence file, and after that is opened then “List size” should be set to 1024 and the second box should be set to the half of your system memory that you will see on your pc on the top left-hand side. Now head to the right side and set the value of time resolution to 0.50. Use the delete key to remove the other values. You need to enable the custom time resolution and set the polling rate to 1000. After that, hit the purge standby list and start.
6.2- Now head to the search column and open up the command prompt. You have to enter the following commands in a sequence manner.
1: bcdedit /set useplatformtick yes
2: bcdedit /set disabledynamictick yes
3: bcdedit /deletevalue useplatformclock
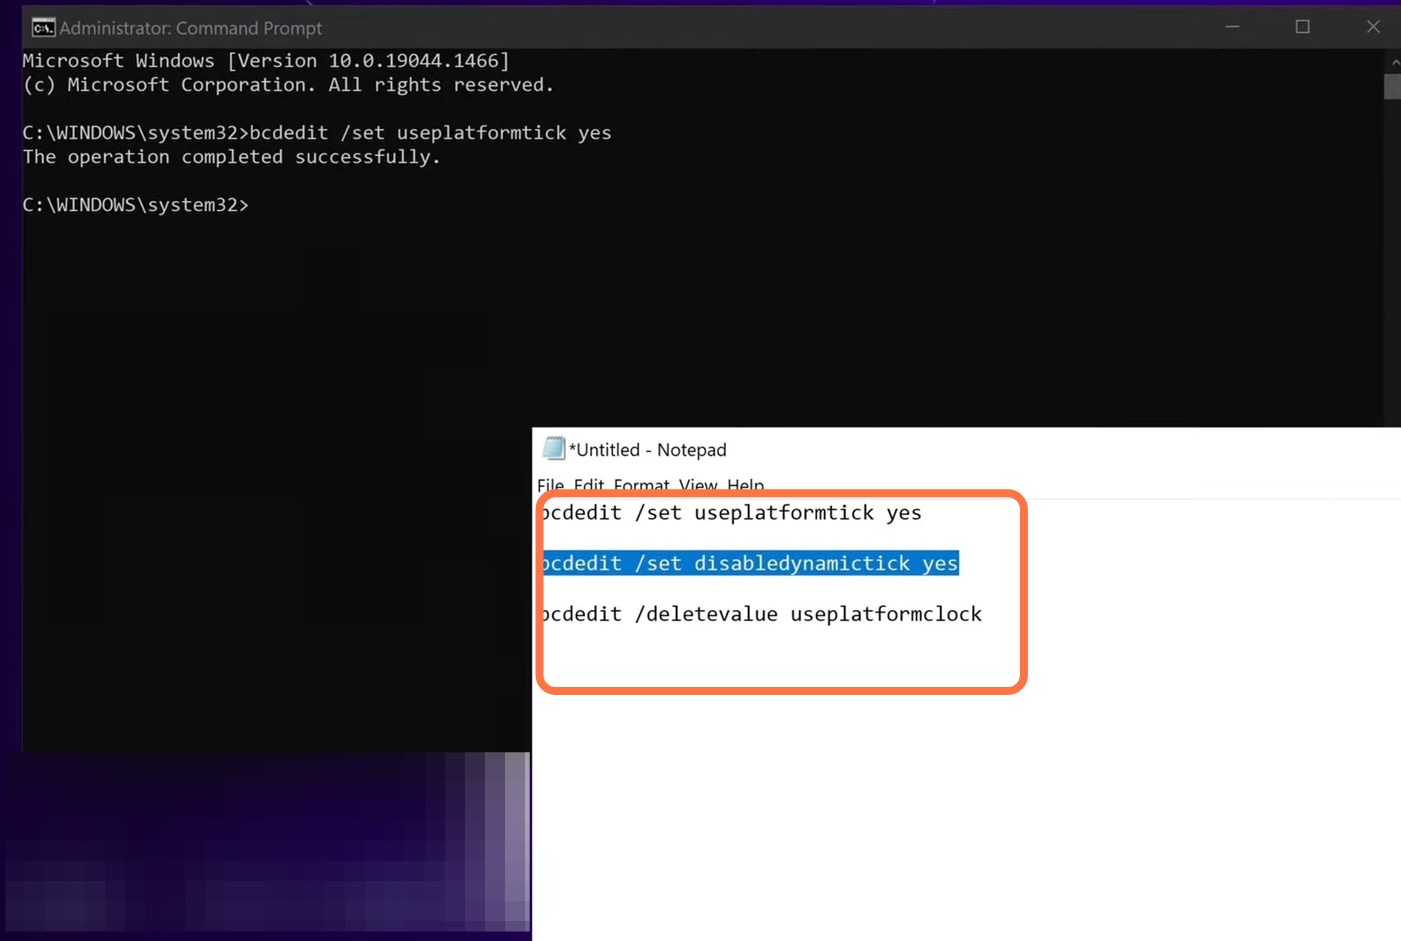
There is a chance that the last command might spit an error but it is completely normal. Now you have to restart your system to feel the change.
GPU Settings
You will need to update and optimize your GPU as it will give you the best performance possible. First, you have to make sure that all your GPU drivers are fully updated which is totally free as it will remove any errors and boost FPS.
7.1- After that, right-click on the desktop and open the NVidia control panel. On the top left side, you need to click on “Adjust image settings with preview”, use the advanced 3D image settings that have been selected, and then click on Apply.

Now you have to head to Manage 3D settings, scroll all the way down to Power Management mod, and set it to maximum performance. It will raise your idle clock slightly and also can help to solve the stuttering issues inside of the game. You need to set Open Render GPU to your GPU and set the preferred refresh rate to the highest. After that, scroll down to anisotropic optimization and enable it. You have to set Negative lod to allow, the texture filtering quality to high performance. Try linear optimization to threaded optimization and then click on Apply.

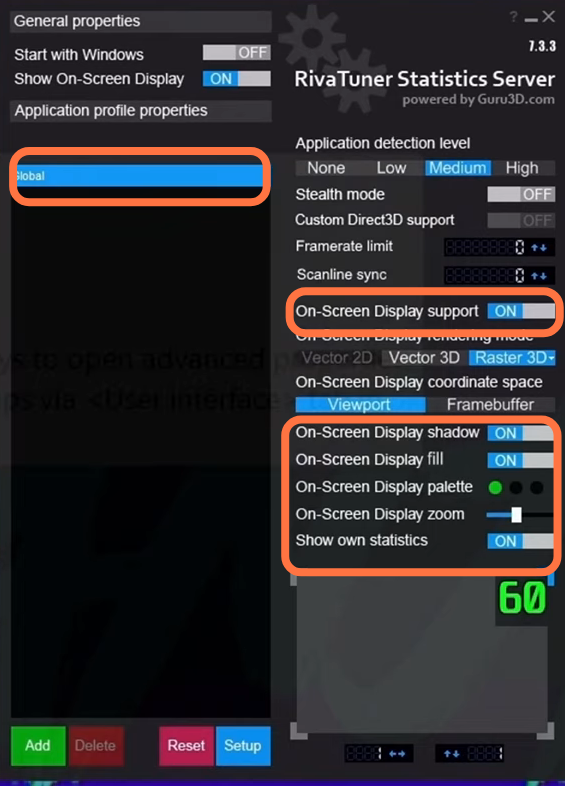
7.2- Now you have to download the rivertune statistics server or rtss program, as it will tell you how much GPU are you using while playing the game and most importantly how much VRAM are you using. You need to open up MSI burner, go to the taskbar, and click on the arrow on the right bottom corner of your screen. A pop-up window will appear, and you need to click on the Blue monitor. In rtss, you have to make sure that the option to show your own statistics is switched ON. Then you can set where the overlay should appear and set the application detection level to medium.
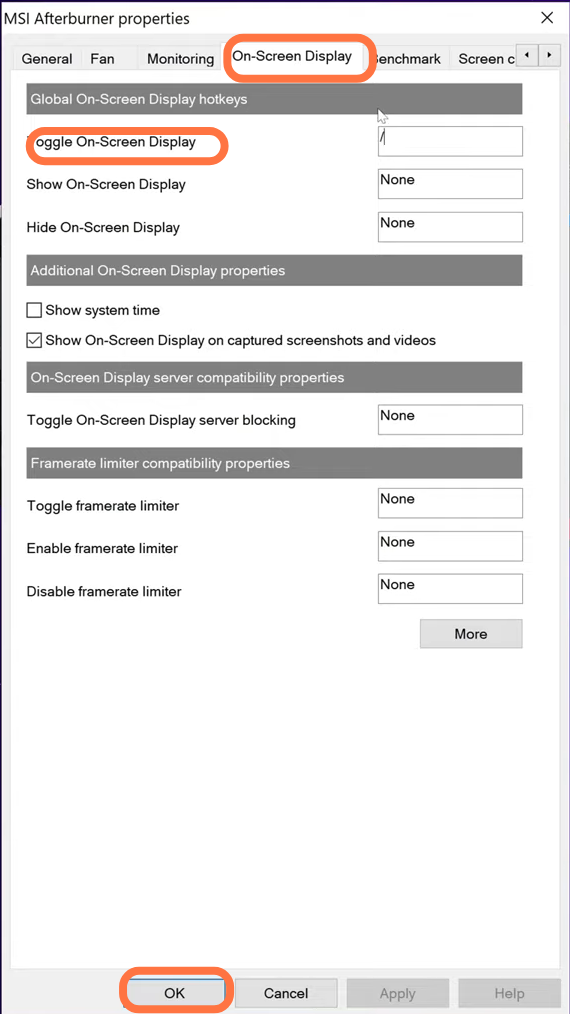
7.3- After that, open up the MSI control panel and click on settings. Go to the Monitoring tab and you will find all of the options which you want to see inside of the game. To enable the option first click on the left side of the option then select the option and then click on the show on-screen button. Now you also have to change another setting in the MSI control panel. Go to the on-screen display, then go to the toggle on-screen display on the top and set this to any key on your keyboard. And then tap on the Apply button.
In-Game Settings
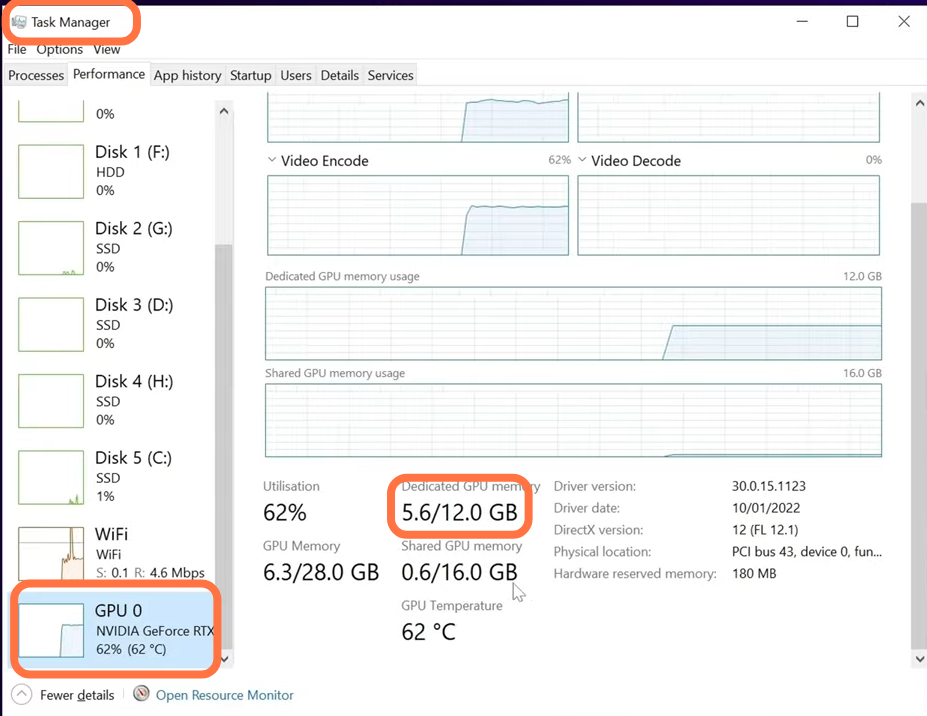
You first have to boot up your game, and once you are inside the game, press ctrl+shift+escape on the keyboard to open the task manager. Then you will see all the information in the top right corner. To see the maximum VRAM of your Graphics card come to steam and then press control+ shift+escape to open up the task manager. Head over to the performance tab now and scroll all the way down to the GPU there you will see the dedicated GPU memory.
Now you can make in-game changes for both visual fidelity and competitive advantage which gives you the most FPS.
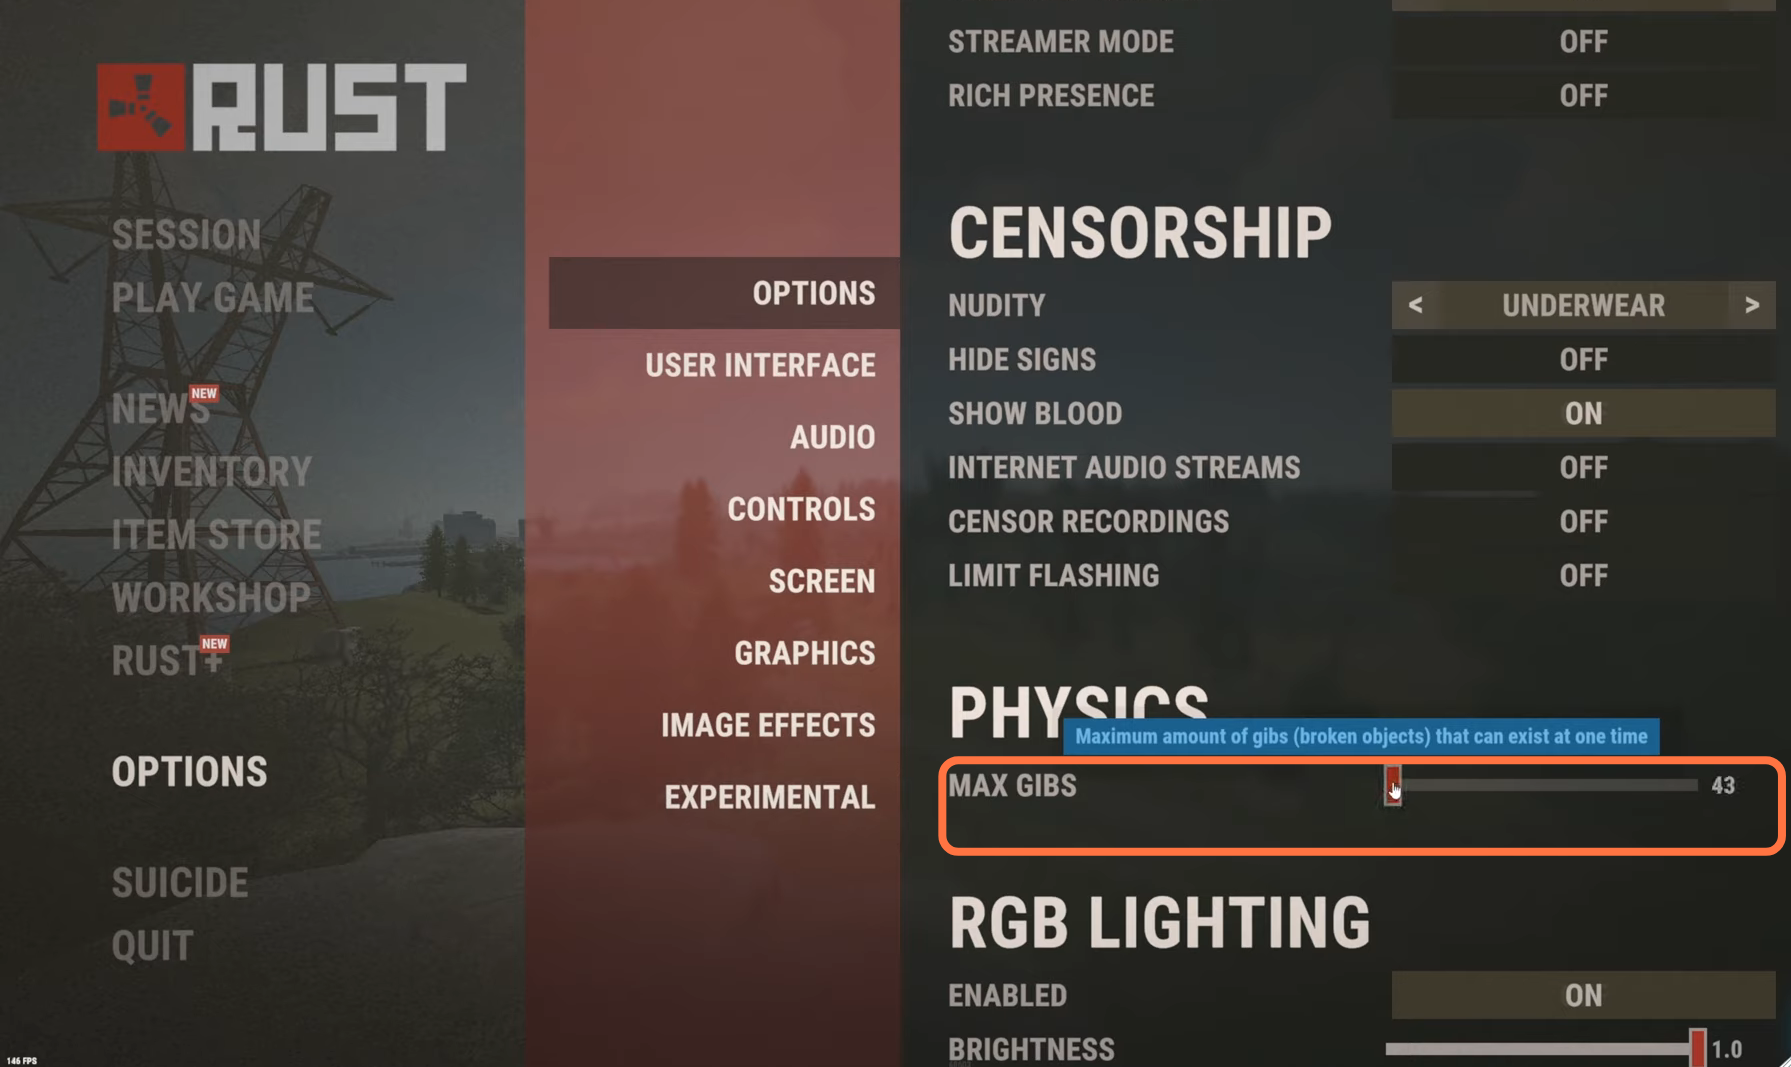
8.1- After booting your game, you need to go to the options menu, and set the field of view according to your choice in the gameplay. The only option that you need to change here is maxed gibs, you have to set it to zero position.
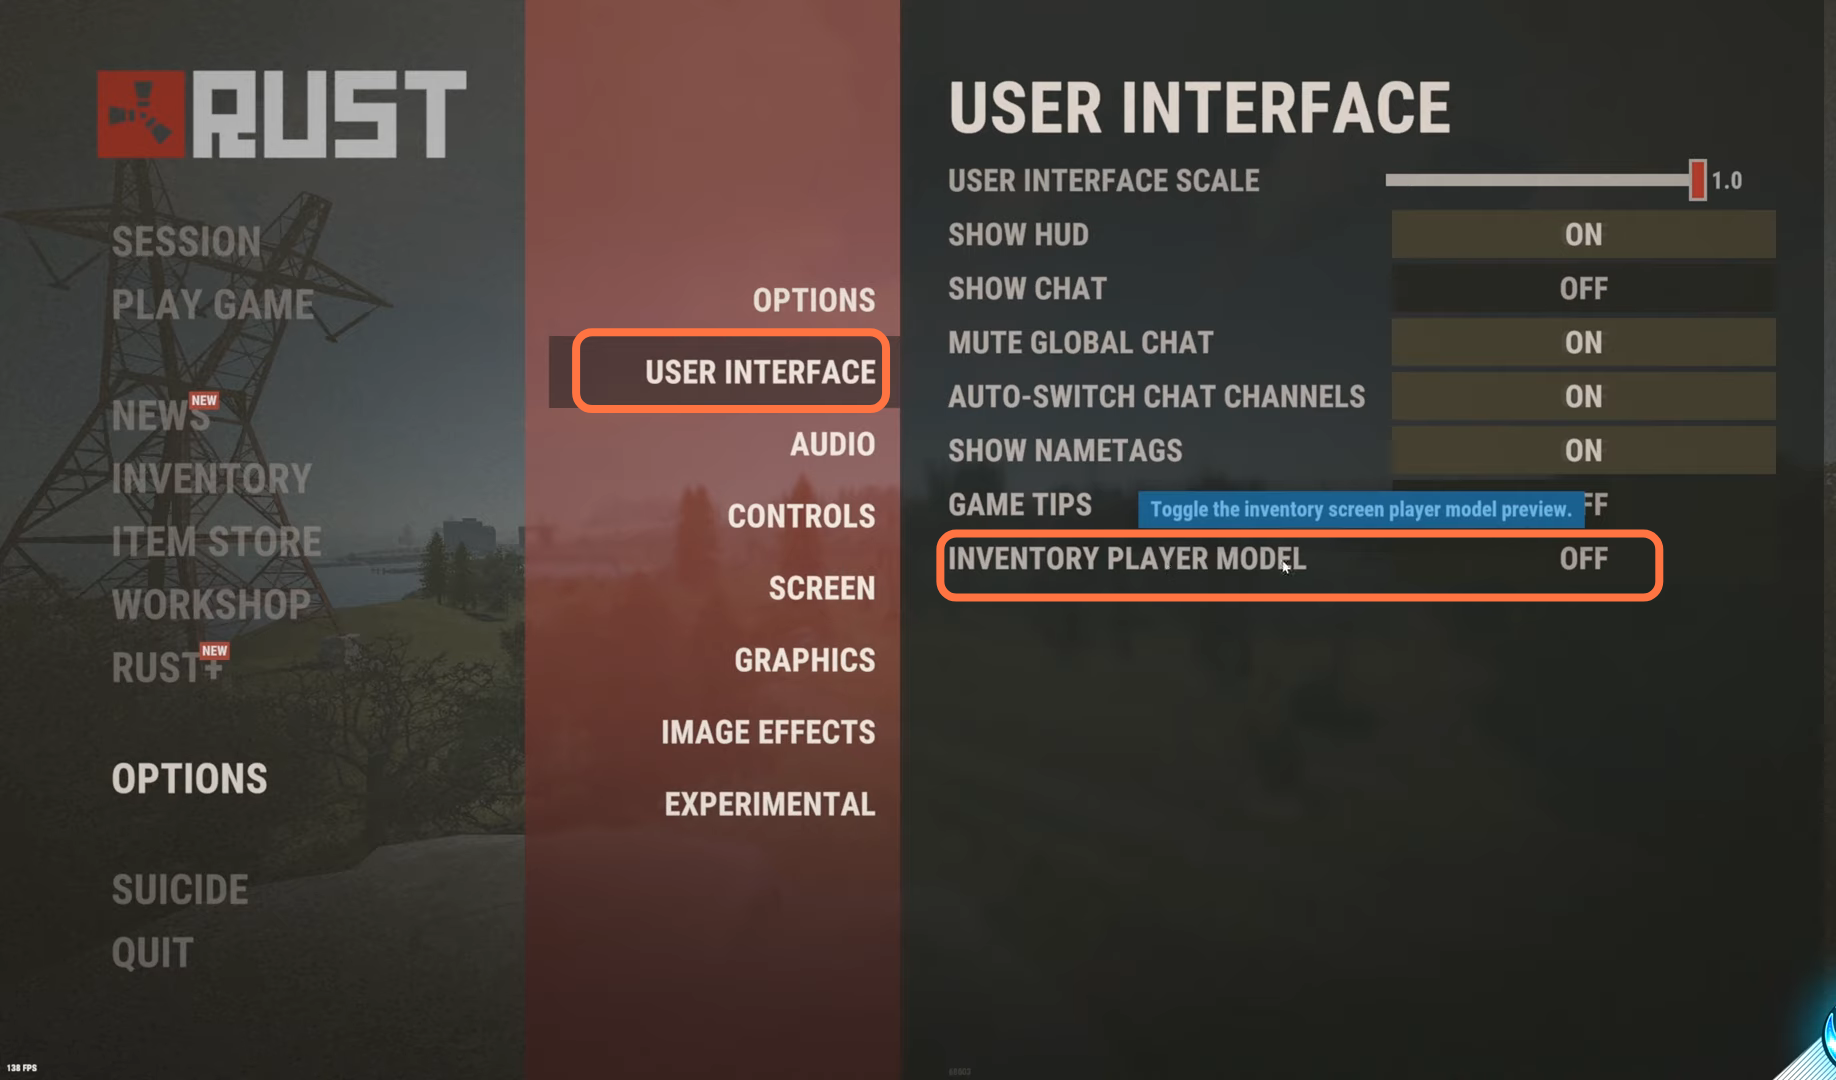
8.2- After doing this, go to the User Interface menu and you have to turn off the Inventory Player Model.
8.3- Now go to the Screen option, and set the resolution to your monitor’s native resolution. Set your screen mode to exclusive as it will improve performance. As vsync should be switched off and your FPS limit should be set to zero.

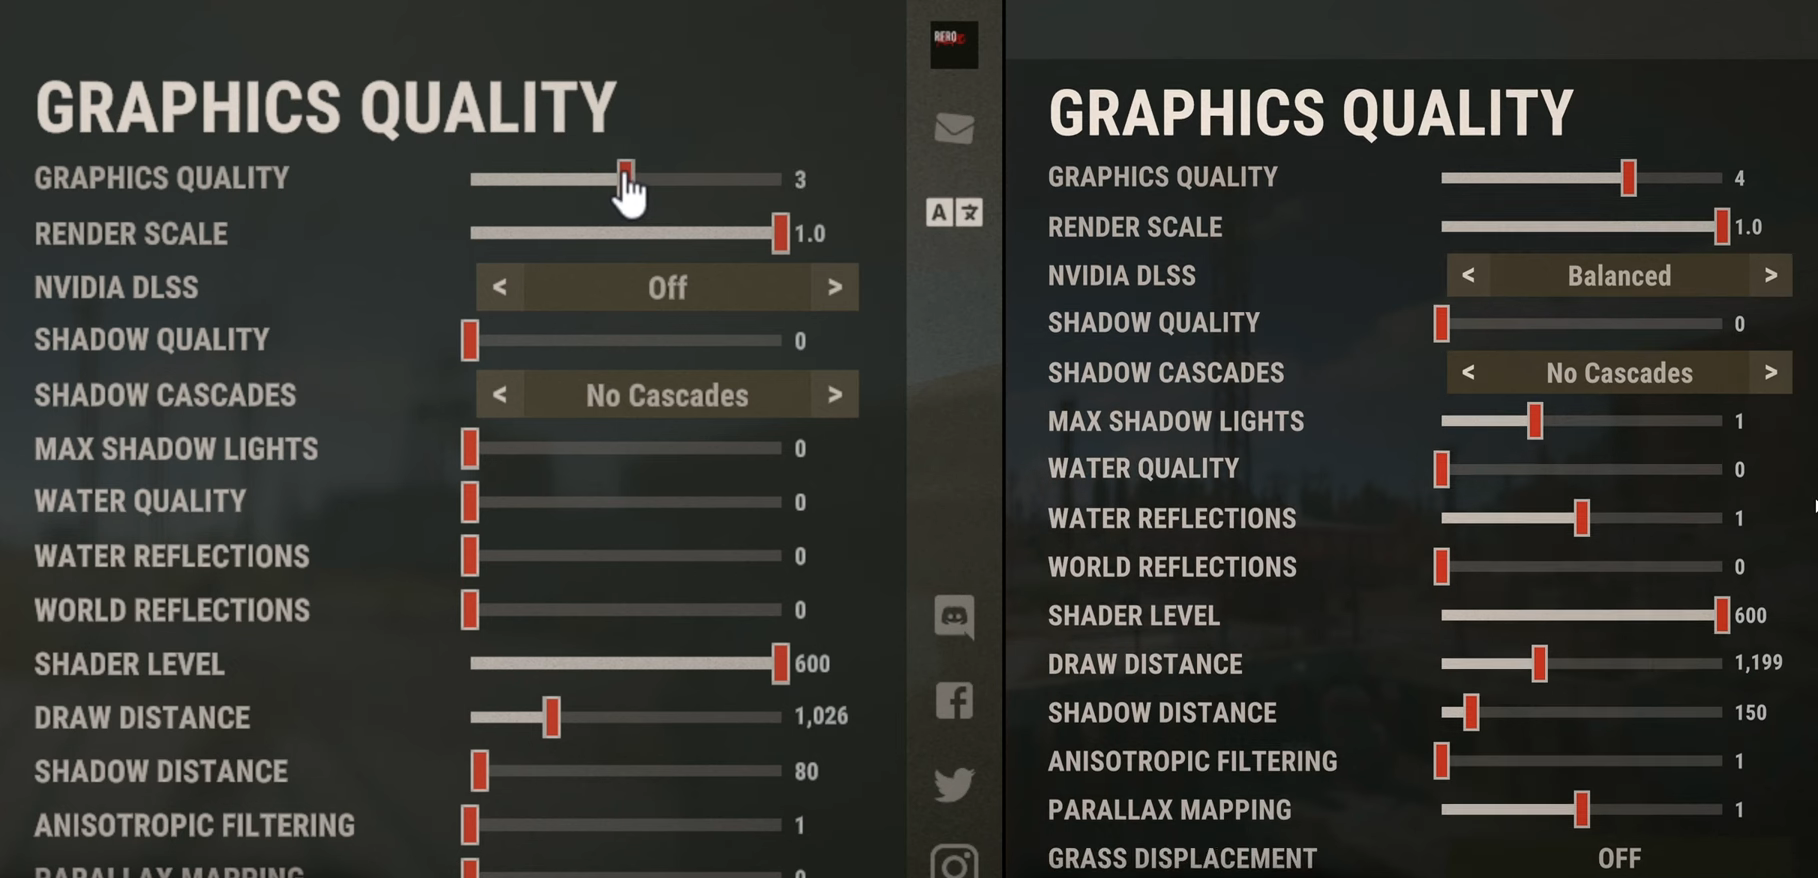
8.4- After doing all this, go to Graphics Quality settings and you will find two options there. The picture on the left-hand side is for a High-end PC and the picture on the right-Hand side is for a low or medium-end PC.
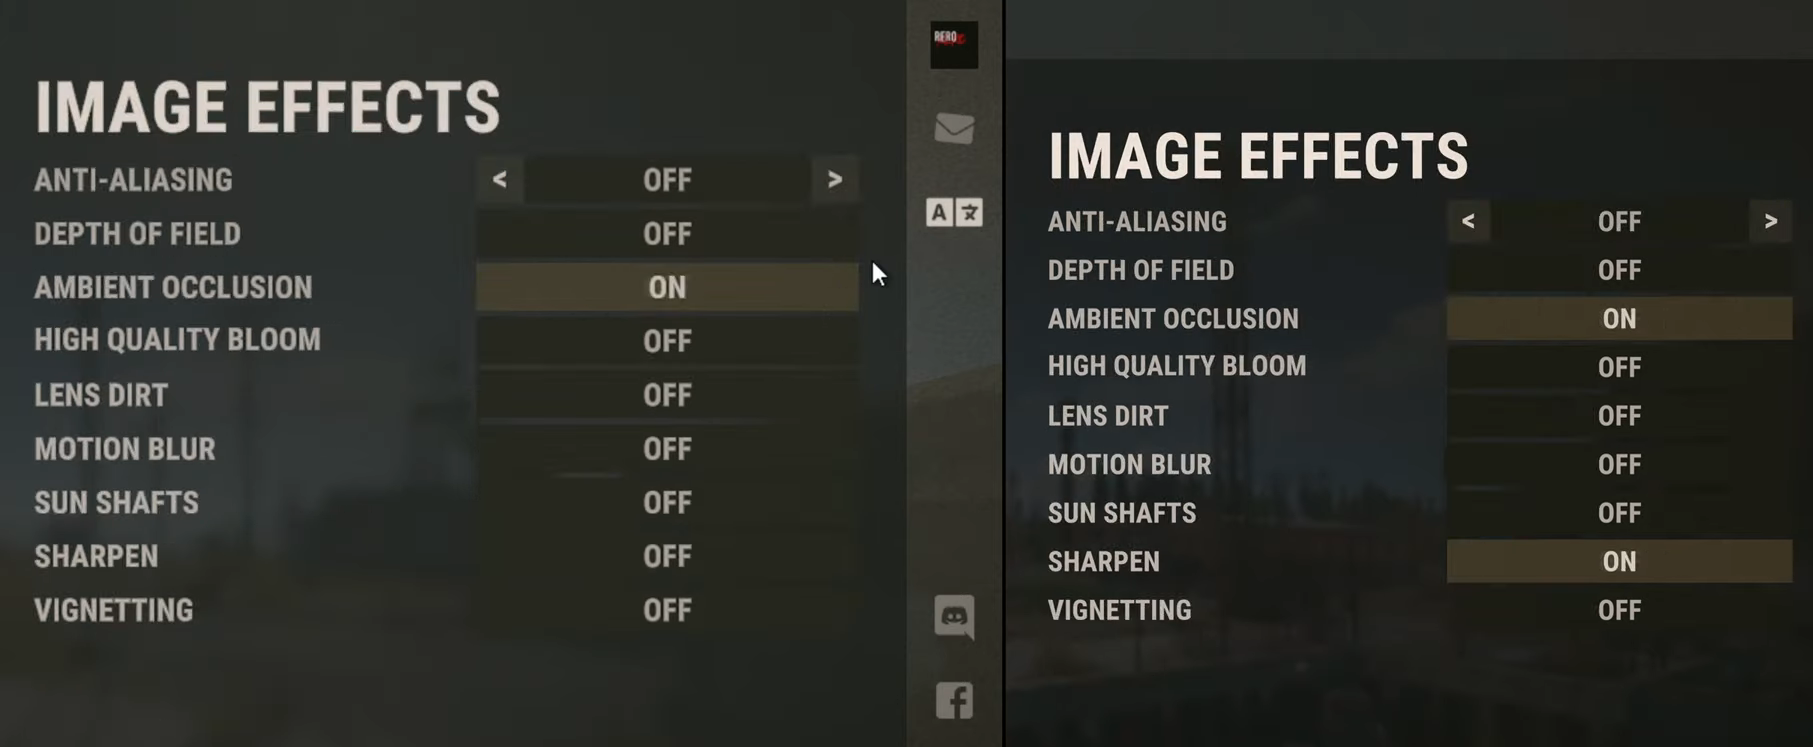
8.5- After doing the Graphics Quality settings, you have to do Image Effects Settings. You will have two options there, the picture on the left-hand side is for a High-end PC and the picture on the right-Hand side is for a low or medium-end PC.
Now go back inside the game and you will see immense change in the picture quality, and you don’t need to use rtss right now. To lower the game resolution and to improve performance, you will be using the AMD rsr or NVidia nis screen scaling technology as these upscaling technologies can provide you with a fantastic-looking image with great performance improvement. If you are looking for the best visual performance possible and you are running on a NVidia rts GPU, you can enable the brand new dldsr technology which will upscale your render resolution. It uses the rts tensors cores to apply an incredibly good-looking upscaling technique.
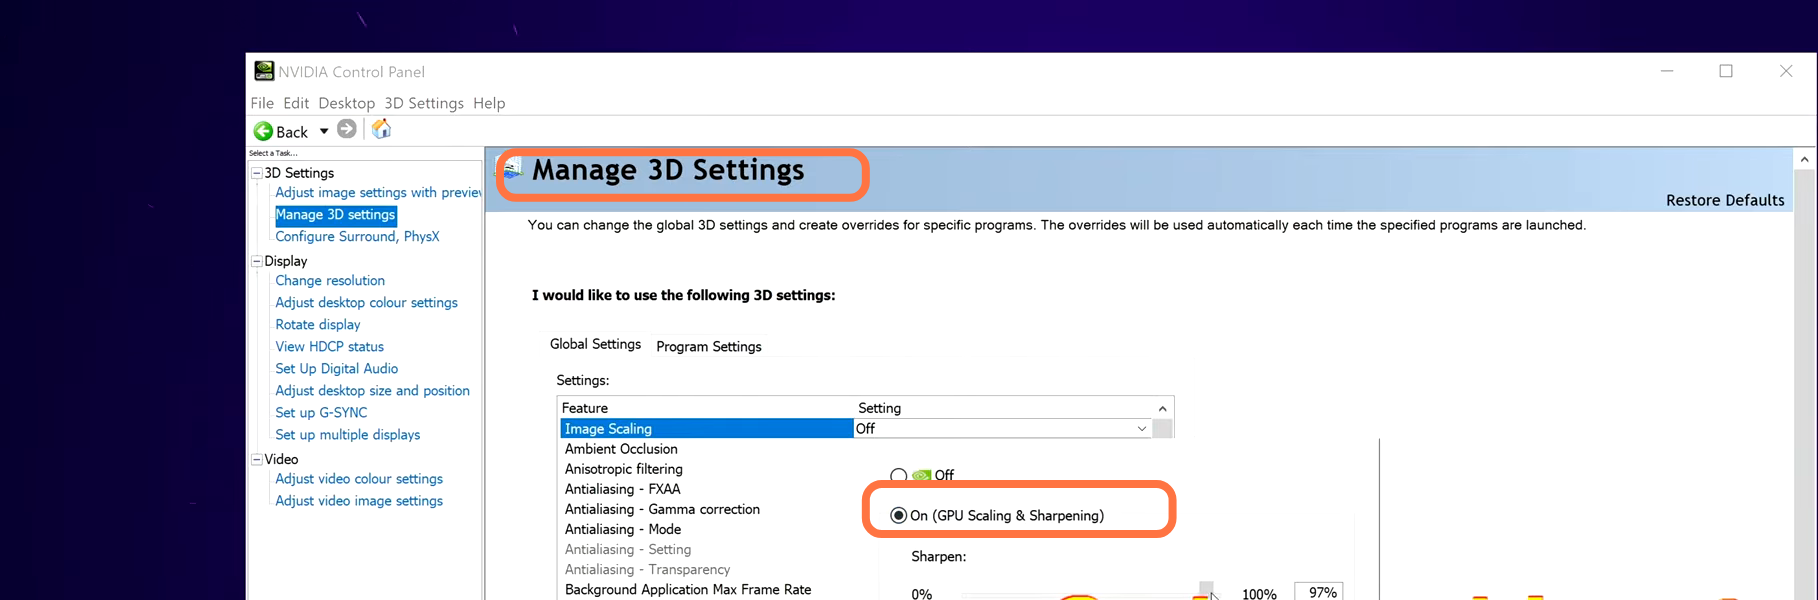
8.6- Now if you are looking for further performance improvement with the same technology, you can also pair this with using dlss inside the game. To enable this setting, you have to head to NVidia’s Control Panel and go to Manage 3D settings. You have to make sure that you have GPU sharpening and Scaling turned on. Set this to 15%, then click on apply and close it.
8.7- After that, head back into the game, go to the Screen option and then navigate to resolution. A drop-down menu will appear, and you will find a few more new options there. You need to set this two times lower than your native resolution. Then head back into the game you will see a performance increase. Now if you are wanting to use Nvidia’s dldsr technology on an RTX-based GPU for a fantastic improvement to visual fidelity, jump into the Nvidia control panel head to manage 3D settings and now scroll down to DSR factors if you are running on the latest GPU then you will have dl options. Enable both of the dl options and press OK.

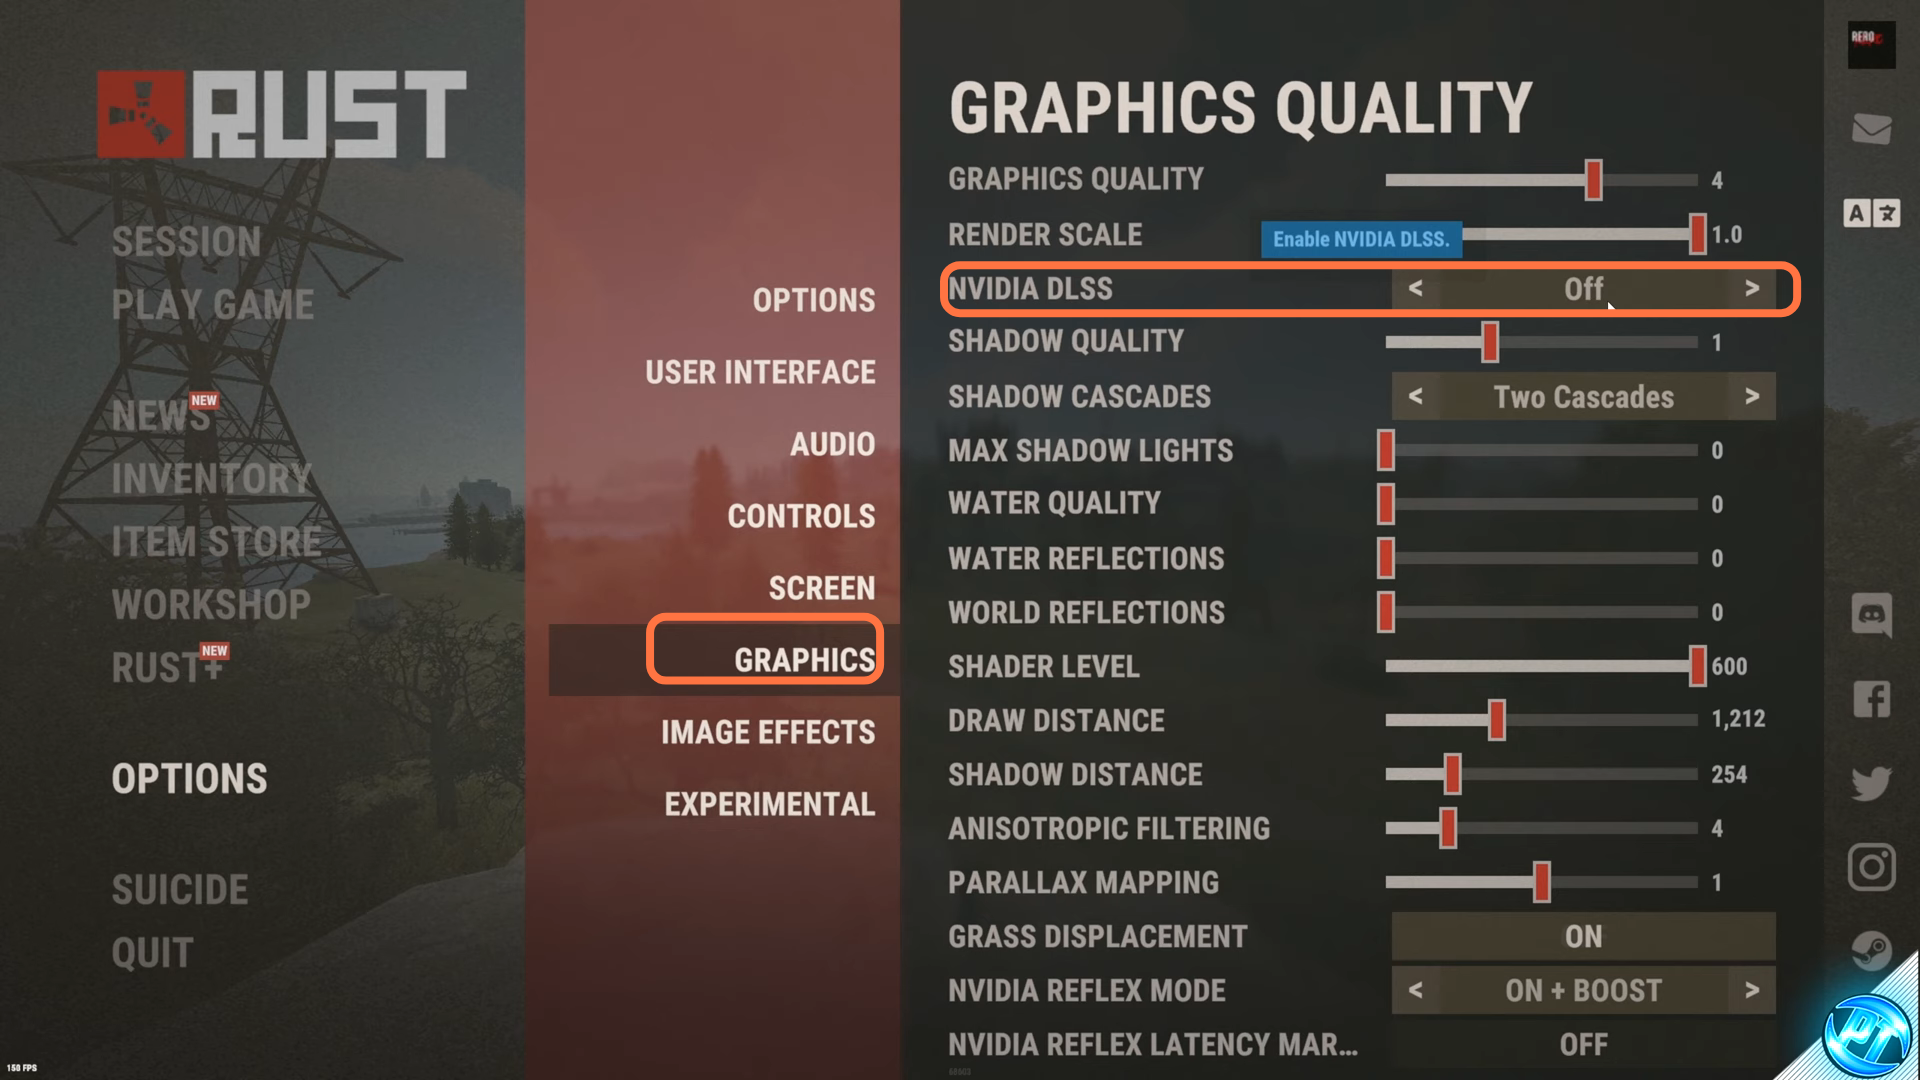
After this, go back inside of your game, then to the screen setting, and navigate to the resolution. You can set this to higher than your native resolution. Then head to the Graphics settings, enable the NVidia DLSS setting and pair this up with the deep learning super-resolution which you enabled earlier.
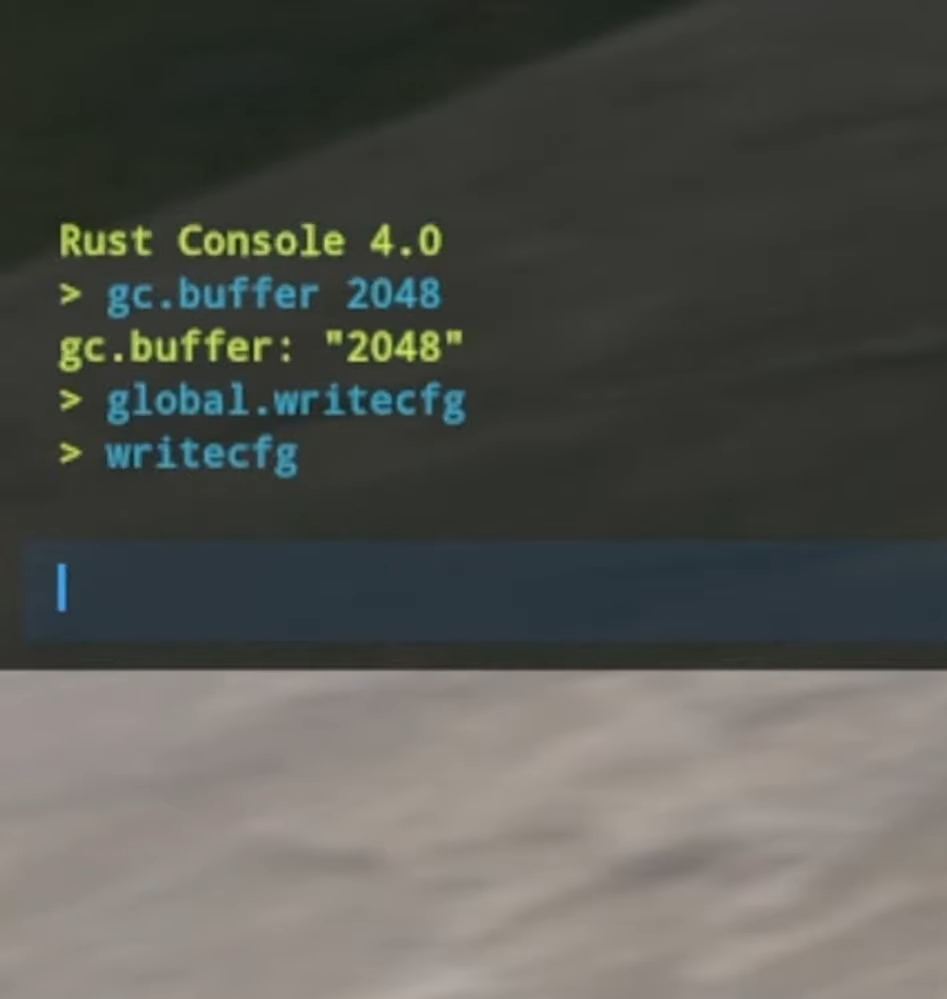
If you experience microstructures inside rust fantastic. Then the easy solution is that inside of the game, you need to press f1 in this console and input “gc.buffer 2048” and press enter. You have to enter this command every time you enter the game.