In this guide, you will find out how to Increase performance / FPS with any setup In Valorant. It will also reduce the input latency. You have to make a few changes in the in-game settings and do a few fixes for game optimization. Then you need to make changes for Windows, GPU optimization, and the browser setting. Following the steps below, you will achieve the best FPS possible.
Compatibility Settings
First of all, you have to go to this PC and you will find a search bar in the right top corner. Input Valorant in this bar and press enter. Valorant.exe file will come in front of you, right-click on it and then click on the open file location.

After opening the file location, go inside of shooter game folder, navigate to the binaries folder and then go to win64. Scroll down to find valorant-win64-shipping.exe, right-click on it and then click on properties. After this, go to the Compatibility tab and you have to disable full-screen optimization, then click on change dpi setting and make sure that override high dpi scaling is enabled.

In-Game Settings
In this, you have to set up some tweaks and optimizations inside of the game.
2.1- You need to be in the play section and then boot into the practice shooting mode. You are now ready to set up your game, press the escape button and then go to the General tab. In this, most of the options will be set up according to your personal preference. You have to set Rotation to rotate and turn OFF the keep players centered option. Keep the size of the mini-map to the max position and set the Mini-map zoom to one. Mini-map cones should be turned ON.

After this scroll down to the “other” section and turn the mature content and bullet traces to the OFF position. It will reduce your FPS, so it is better to turn them OFF.

2.2- Now you have to go to the Video tab, click on the general tab then on the left-hand side. You have to set the Display Mode to full-screen mode and keep the resolution according to your monitor’s native resolution. After this, turn off all the FPS caps. If you have NVidia’s reflex low latency option available to you and you are running on GeForce gtx-based graphic cards, you have to use the Nvidia reflex on ON+boost.

2.3- After this, go to the Graphics tab, and it is the place where most of the optimization settings are going to take place. You need to turn on Multi-threaded rendering. Material quality is a setting that is going to affect the visual fidelity especially textures for the best competitive advantage, you need to set it to a Low position. Texture, UI, and details quality should be set to low. Turn off the Vignette and V-sync both and set Anti-aliasing to none, it will give you the best FPS possible. Anisotropic filtration should be set to 1 time. Improve quality and experimental sharpening should be set to ON position. Bloom, distortion, and cast shadows should be set to the OFF position.

2.4- After this, go to the stats tab, this is very important to get the best FPS. Set all the stats to the hide position as this will increase your FPS.

2.5- After this move on to the audio tab, here you have to make sure that the HRTF is enabled as this will help you to identify the enemies better.

Windows Settings
You have to make a few changes in the window settings to achieve the best FPS possible.
3.1- Make sure that the auto-upgraded GPU setting is turned on. You will need an NVidia card of 1000 series, it will really help with bottlenecks and you can expect a 2 to 5 percent boost in the FPS.

After this, click on the browse button under graphic performance preference, tap on This PC on the right top corner, and you will find a search bar. Input Valorant in this bar and then press enter. Valorant.exe and the valorant-win64-shipping file will appear in front of you, select valorant-win64-shipping then click on Add. After adding this, navigate down to the options menu and select high performance and click on save.

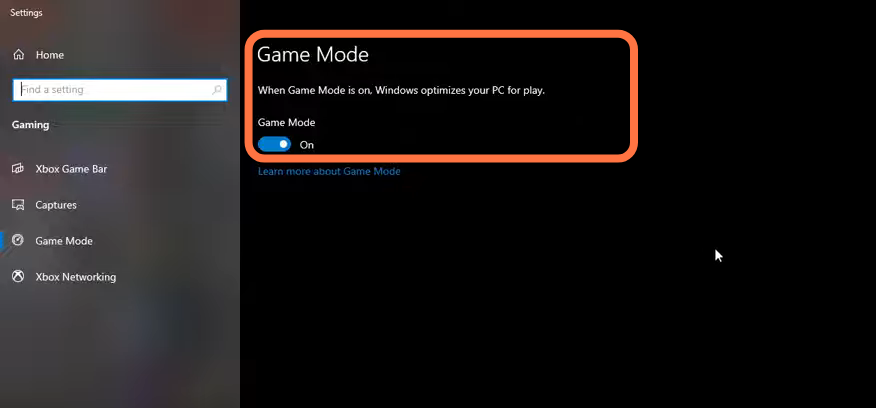
3.2- First, you have to search game mode in the search bar and press enter. Make sure that the game mode is activated and you will get decent performance. You have to make sure that all your resources are focused on the game that you are playing.
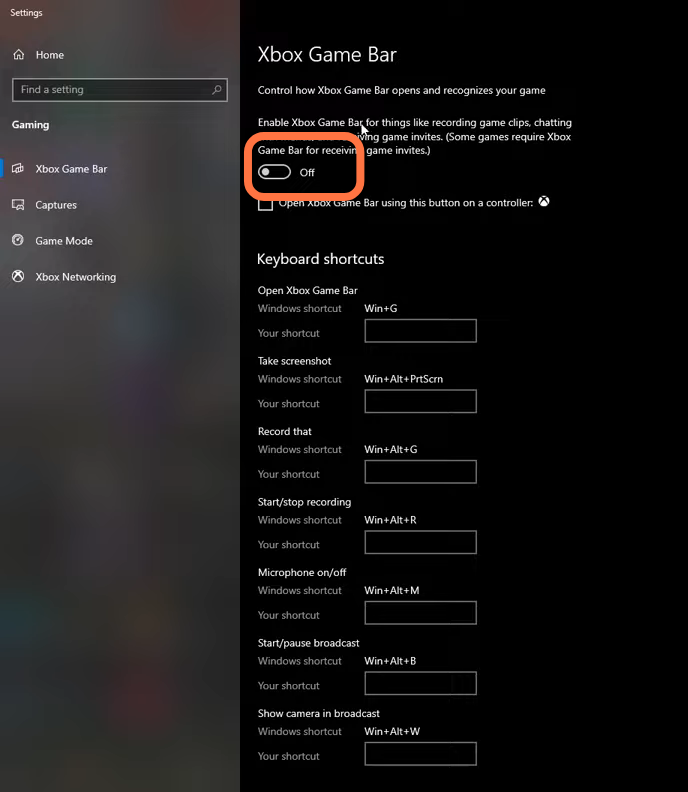
3.3- Now go to the Xbox game bar under Gaming and deactivate this one as it is causing stuttering and crashing in some games.
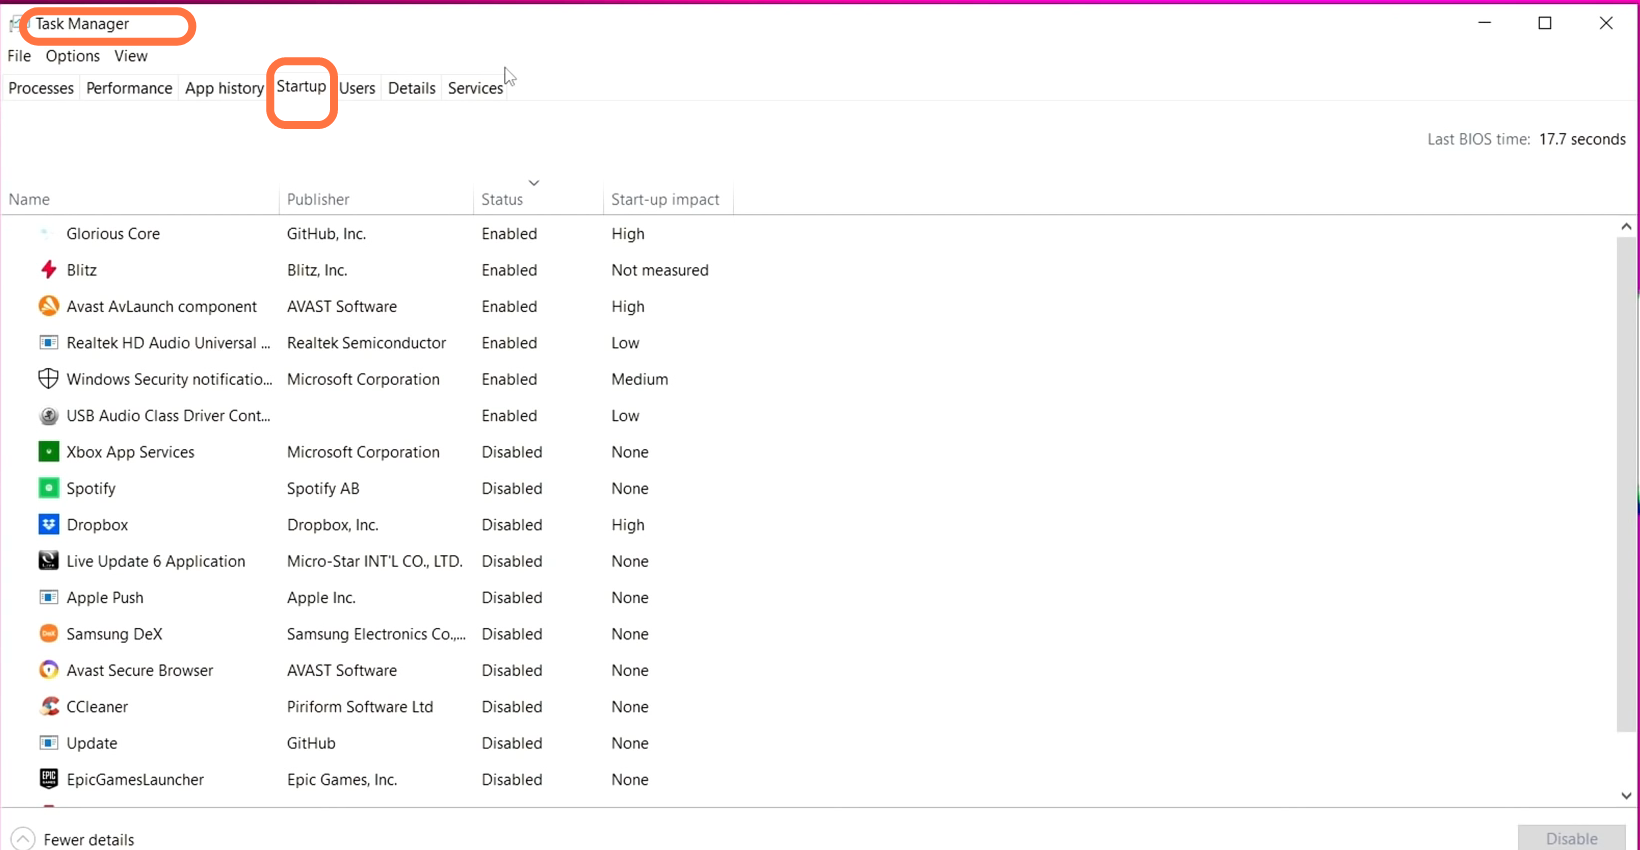
3.4- Now open your Task Manager by right-clicking on the taskbar, then go to startup inside of this and you will find all those programs that will boot up automatically. When you turn on your PC, you have to turn off as many programs as you can. It does not mean that you are deleting the programs but just it will stop them from booting up automatically. As when they boot up they are taking CPU cycles which will reduce your performance.
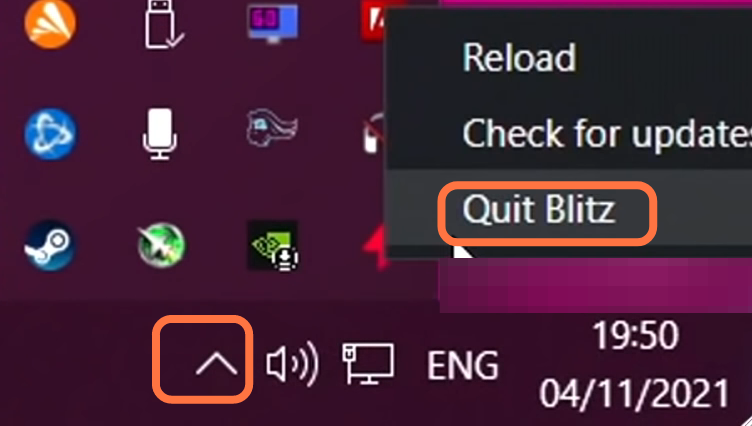
3.5- Once you are done, you need to turn off all the programs running in the background. Go to the taskbar, then click on the small arrow, and now start right-clicking on the programs that you don’t want to run in the background. After that, click on Quit.
3.6- Now you have to delete temporary files from your PC. For this, you have to write %temp% and press enter. Now select all the files in that folder and then delete all the files.

3.7- You will need to make sure that not even a single external device that can be a USB, hard drive, etc should not be plugged-in into your PC.
3.8- Now for mouse setting, input “mouse setting” in the search bar on the bottom left side of your window and right-hand side on the Additional mouse options. After this, navigate to the pointer options and make sure that the enhanced pointer precision is unchecked. Keep the slider speed to 6 out of 11. After this click on apply and then on OK.

3.9- Now again go to the search bar and write keyboard and press enter. Now in this, you have to make sure that the repeat delay and repeat mode should be set to the highest position possible. After this click on apply and then on OK.

Browser Settings
You have to go to your web browser and open it, now click on the three dots on the top right-hand side of your screen and then go to settings. Now go to the three bars on the left side and click on them, scroll down to find advance, and scroll down again to find the system. You have to make sure that the first option is switched off. If it is turned on then when you close the browser all your plug-ins, and extensions will still run in the background.

GPU/Graphics Card Optimization
Before going in you have to make sure that you are running the latest graphic card drivers regardless of how old, or new your graphics card is.
5.1- It is a very important step, you have to make sure that you are running on the latest GPU driver. If you want to check it, you need to press the control shift and escape buttons on your keyboard, the task manager will open and you have to head over to the Performance tab. Scroll all the way down to GPU 0 and you will find the name of your GPU on the top right side of this panel.

5.2- Now right-click on the desktop and open the NVidia control panel. On the top left side, click on the “Adjust image settings with preview”, use the advanced 3D image settings that have been selected, and then click on Apply.

5.3- Now head to Manage 3D settings, scroll all the way down to Power Management mod, and set it to maximum performance. It will raise your idle clock slightly and also can help to solve the stuttering issues inside of the game. You have to set Open Render GPU to your GPU and the Preferred refresh rate to the highest. Scroll down to enable Anisotropic Optimization, set lod Bois to allow. Set the texture filtering quality to high performance, try linear optimization to threaded optimization and then click on Apply.

Installing GeForce Experience
To download the Geforce experience, you have to click on the link: https://www.nvidia.com/en-gb/geforce/, it will take you to the Geforce official download link and you need to click on the Download button. After downloading, click on the programs, then click on agree and install. Then it will bring you to the main page and you have to log in with your NVidia account.
6.1- First, go to the settings tab, navigate down to the Game overlay and turn it off. But if you are using the in-game features such as instant replay, shadow play or any of the game filters, you have to turn them on.

6.2- Press alt+z on your keyboard which will open up the in-game overlay. Inside of the Game overlay, you have to disable all the features as every feature you enable will slightly decrease your FPS. The two worst features of the Geforce experience for FPS decrease are instant replay and the game filter.

Device Manager Settings
7.1- Go to the search column, type device manager, and press enter. Now scroll down to the S section to find system devices click on the arrow next to it to go to the drop-down menu. Here you will need to find the high precision event timer, right-click on it and enable this option.

7.2- You also need to disable the HPET using the command prompt. First, go to the search bar and write the command prompt then press enter. Now in the command prompt write bcdedit /deletevalue useplatformclock.
