This guide will teach you how to increase your frame rate by tweaking a few windows settings, and browser settings. It will require reducing your input latency, alongside maintaining competitive settings. You have to make some changes in the windows setting, and web browser settings. At last, you have to make a few changes in BIOS setting to achieve the best FPS possible.
Window Settings
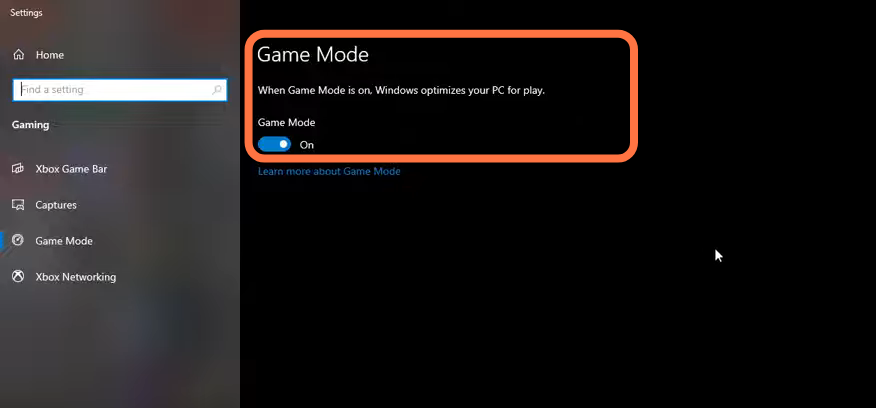
1.1- First, search game mode in the search bar and press enter. Make sure that the game mode is activated. By this you will be getting decent performance, you have to make sure that all your resources are focused on the game that you are playing.
1.2- Make sure that the auto upgraded GPU setting is turned on, for this search graphic setting you will need an NVidia card of 1000 series it will really help with bottlenecks you can expect a 2 to 5 percent boost in the FPS.

1.3- Now you have to go to intelligence list cleaner as this will help you if you don’t have a lot of ram in your PC as it will free memory and will optimize your stand-by list. Now write half of your total memory in the free memory column and then press start. It will run automatically so minimize it now.

Web Browser Settings
Now go to your web browser and open it, now click on the three dots on the top right-hand side of your screen and then go to settings. Now go to the three bars on the left side and click on them scroll down to find advance, and scroll down again to find the system. Here you have to make sure that the first option is switched off. If this is turned on then when you close the browser all your plug-ins, and extensions will still run in the background.

GPU Settings
3.1- This is a very important step, you have to make sure that you are running on the latest GPU driver in case you want to check this press the control shift and escape buttons on your keyboard, the task manager will open now head over to the performance tab and scroll all the way down to GPU 0. On the top right side of this panel, you will see the name of the GPU that you are using on your pc.

3.2- Now right-click on the desktop and open the NVidia control panel. Now on the top left side click on the adjust image settings with preview use the advanced 3D image settings that have been selected and then click on apply.

3.3- Now head to manage 3D settings, Now scroll all the way down to power management mod and set this to maximum performance this will raise your idle clock slightly and also can help to solve the stuttering issues inside of the game. Open Render GPU should be set to your GPU. The preferred refresh rate should be set to the highest. Now scroll down to anisotropic optimization and enable this. Negative lod Bois set this to allow. Set the texture filtering quality to high performance. try linear optimization to threaded optimization and then click on apply.

Optimization Settings
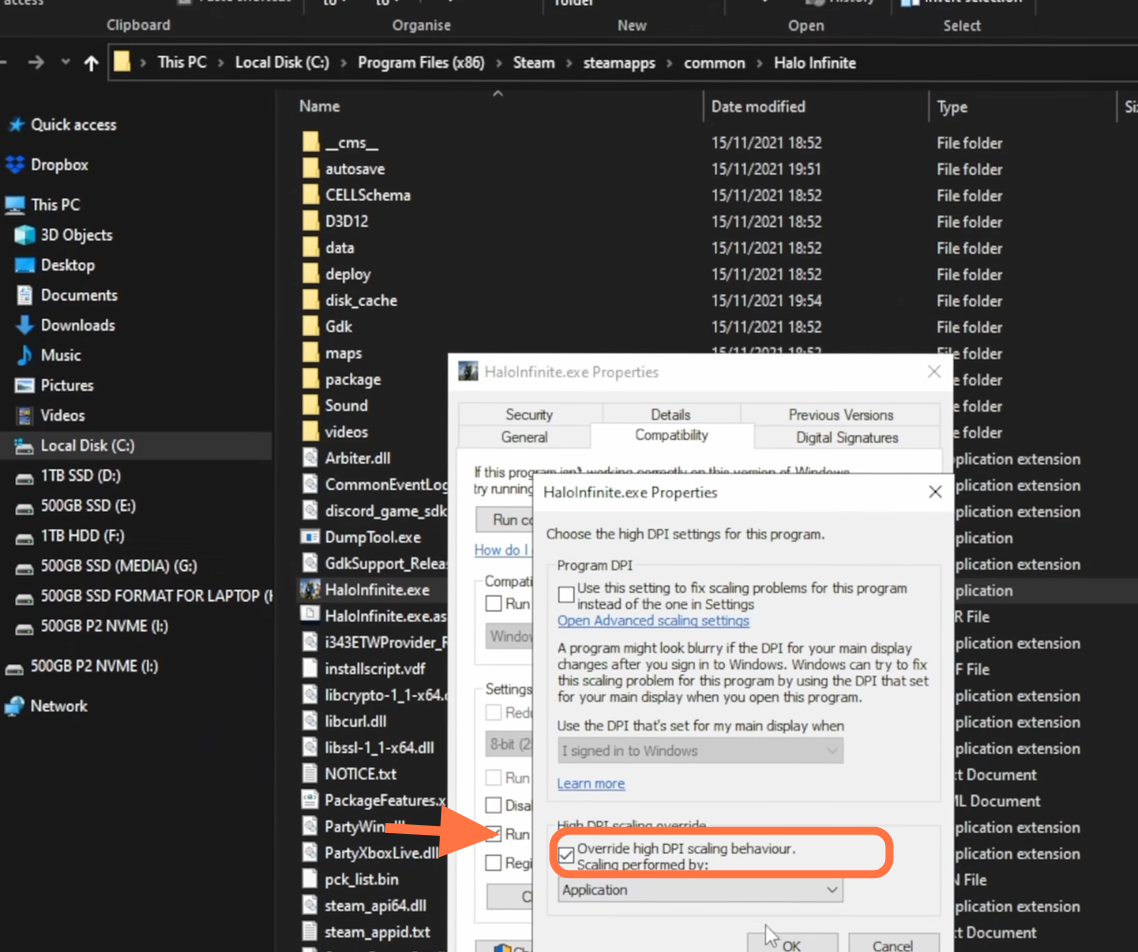
4.1- Before booting up the game you have to make a few optimization settings for this right click on the game and go to properties a new window will pop up now go to local files and then click on browse.

After this, it will take you to a folder now you have to find haloinfinite.exe right click on this file, and then go to properties then go to compatibility make sure that this is selected as run this as an administrator then go to change over dpi here you have to make sure that override high Dpi settings is check marked and this press ok.
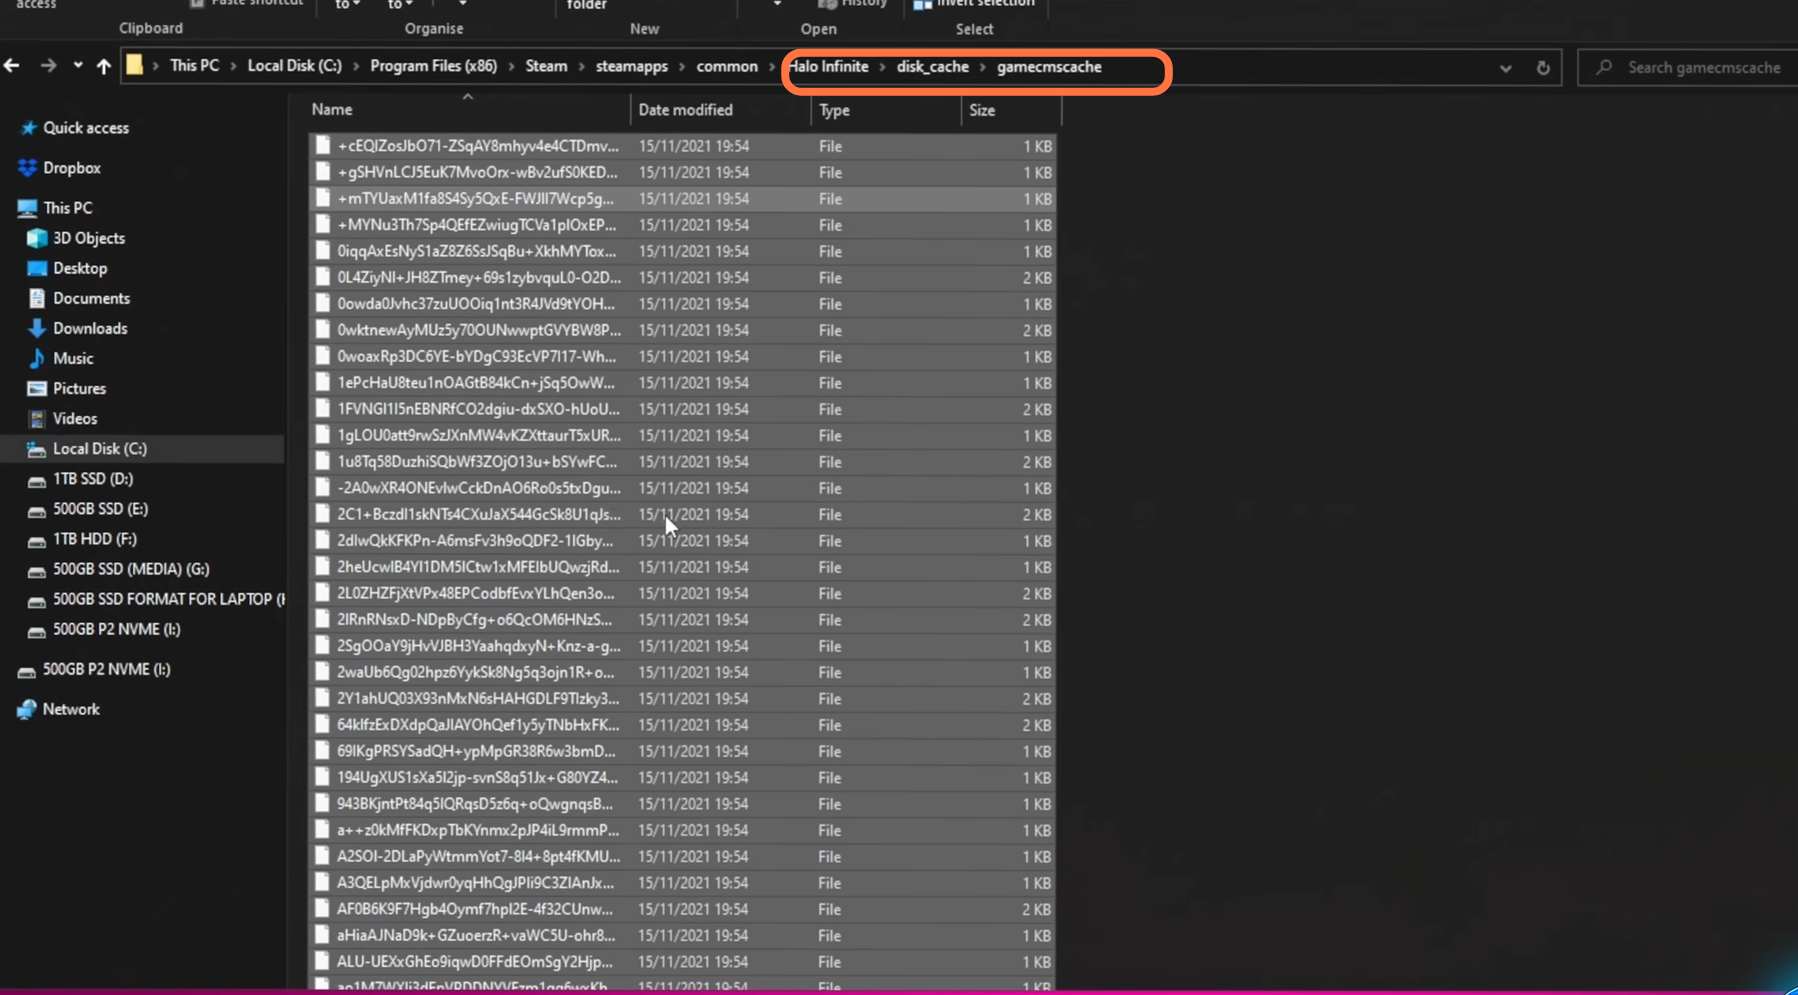
4.2- Now In case you feel that your game’s performance is going down or your game is lagging then you have to clear the cache for this go to the disk_cache folder then go to gamecsmcache folder now this folder select all the files and delete them.
4.3- Now again go to steam select the game and again go to properties by right-clicking on it. Now inside of this go-to DLC make sure that you have unchecked the high-resolution textures. After doing this update your game.
In-Game Settings
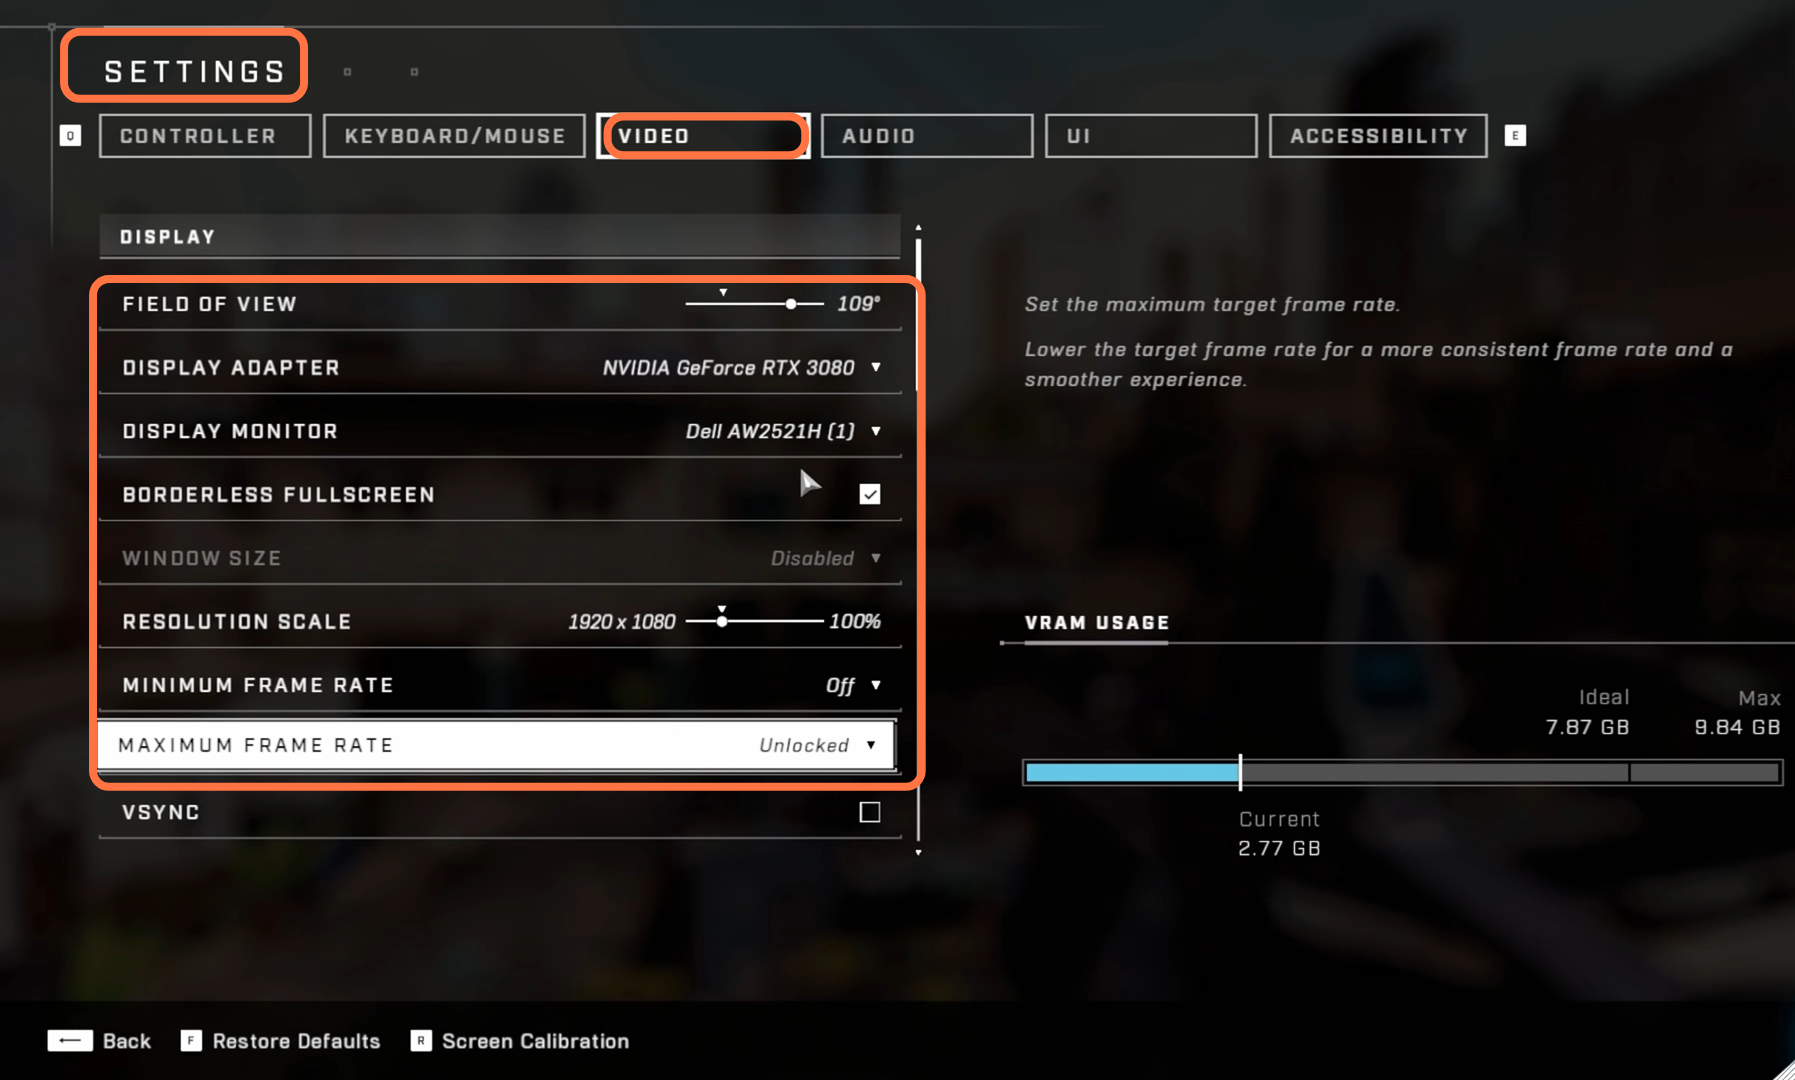
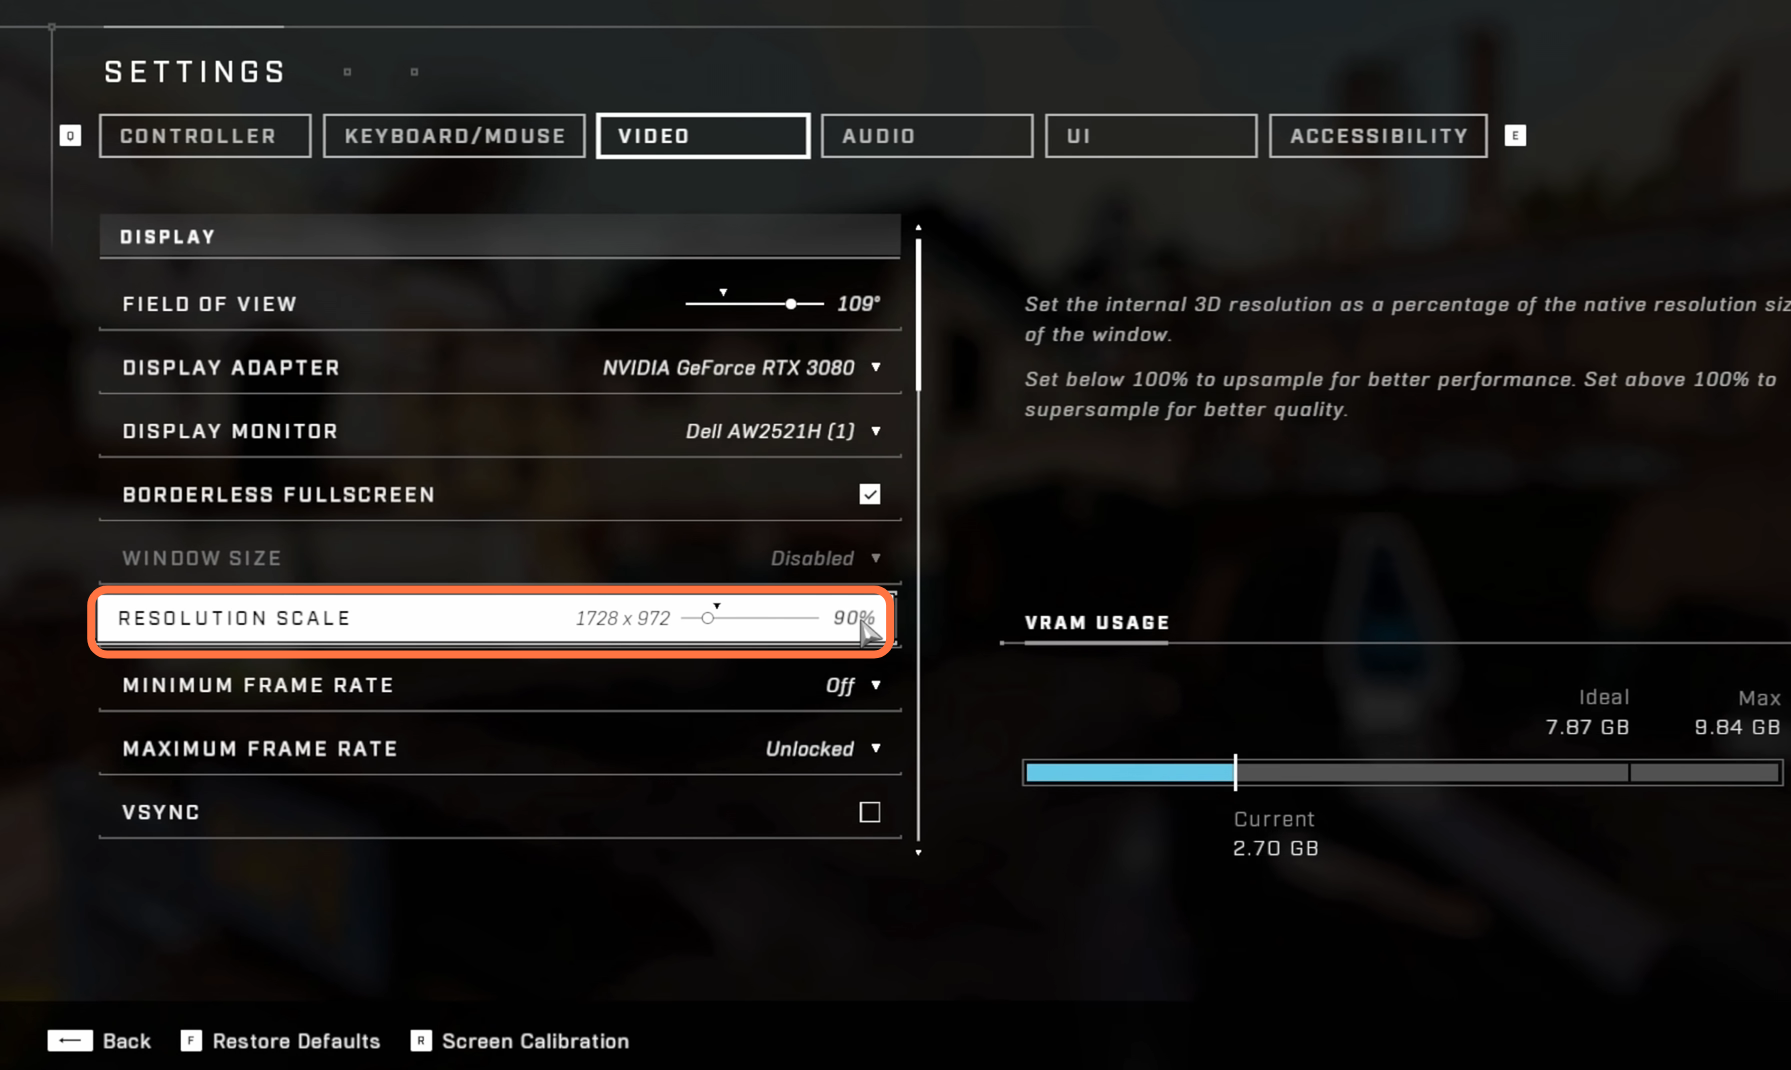
5.1- Now boot up the game, then go to the settings menu then go to the video tab. You can set the Field of View according to your personal preference but if you set it to 110, it will be much better for you. Set the display adapter to your graphics card and set the Display monitor to your monitor. Check mark the borderless fullscreen option. Resolution Scale is a very good option for achieving better FPS but you need to leave it now because you have to come back to this later. Set the minimum frame rate to Off, as it gives horrible dynamic scaling every single time you move the mouse. For maximum frame rate, you can set it to unlocked as this will keep your GPU quieter and cooler. Make sure that the vysnc is turned off.
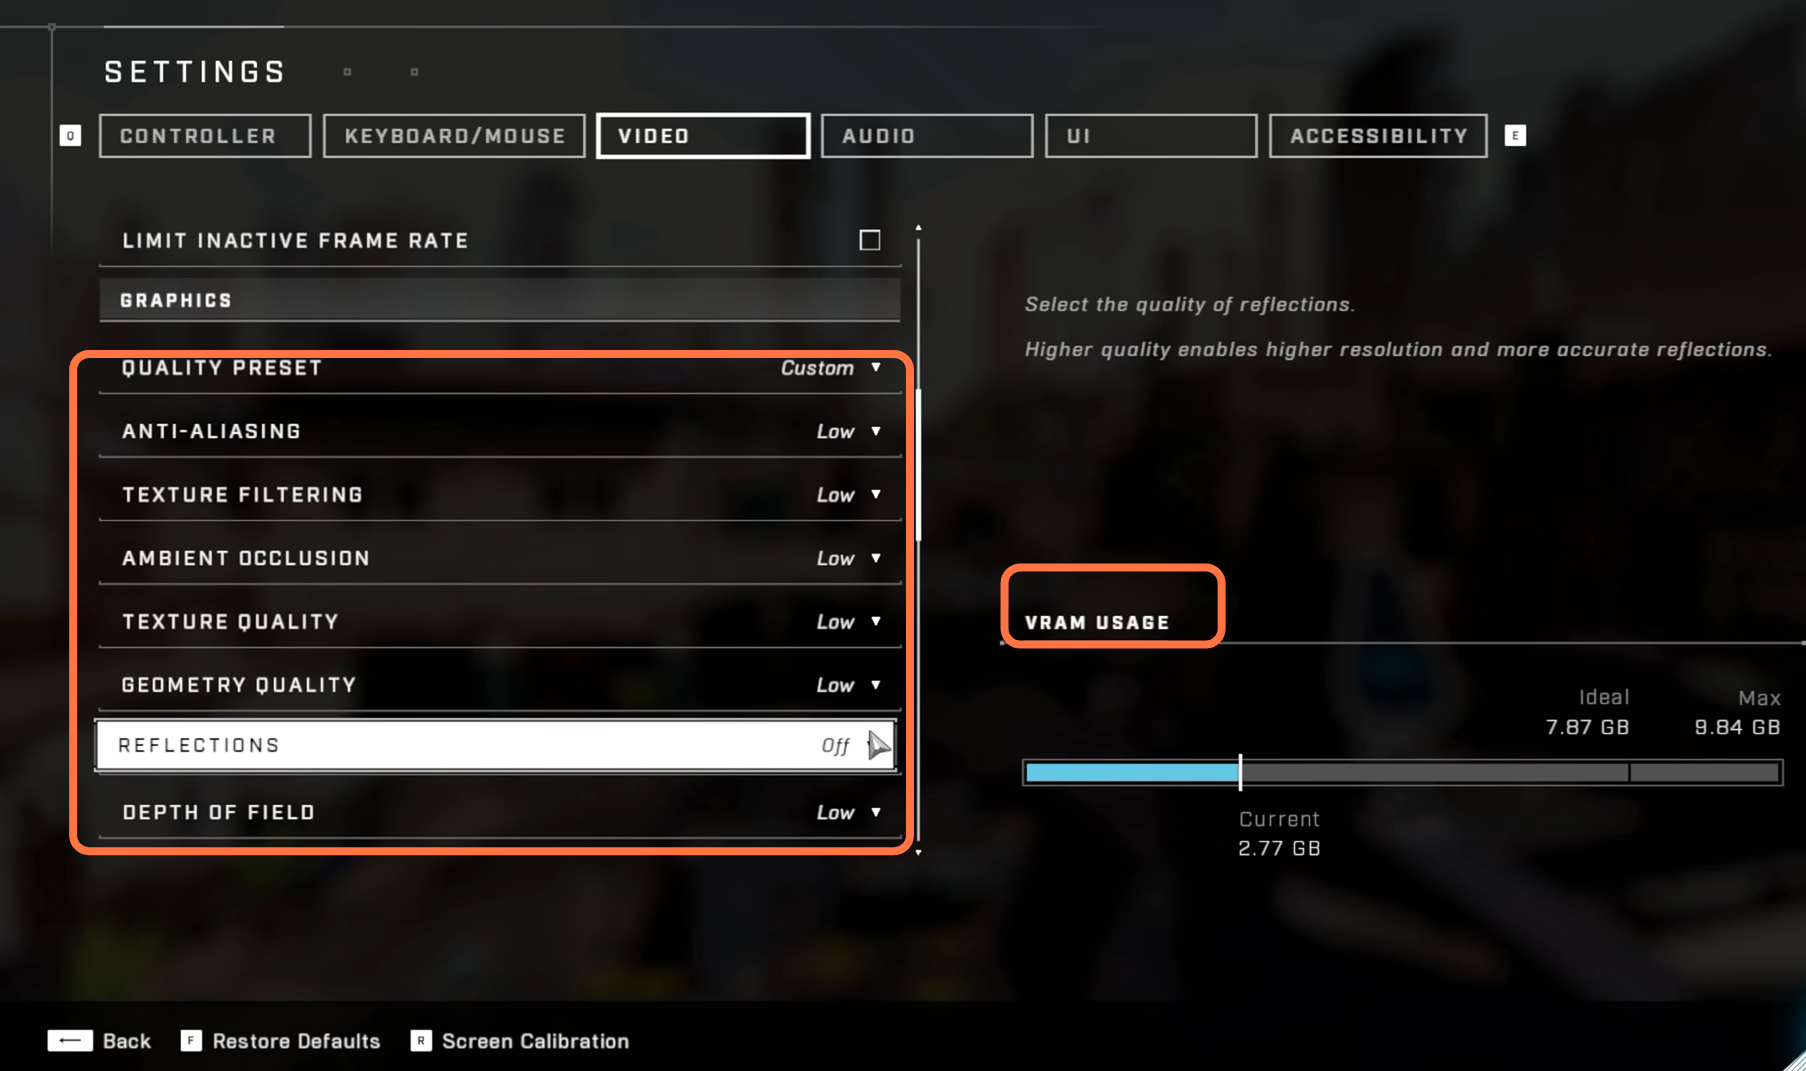
You have to turn off the Limit inactive frame rate. Set the quality preset to custom and Anti-aliasing to the low position. You can set the texture filter to a low position for the best FPS and set the ambient occlusion to low. If you want the best frame per second then you need to keep the texture quality to a low position. You can keep this high but make sure that you don’t go above the Ideal Vram usage. You need to set Geometry Quality to low as it will give you the best competitive advantage. Keep reflections option to OFF position and Depth of field to low.
Set the shadow quality and lighting quality to a low position. After that, keep volumetric fog quality to Off position and cloud quality to low. After that, set the Dynamic wind to OFF and keep the ground cover quality to a low position for the best performance. You need to set the effect and decal quality to a low position and set the animation quality to automatic. Keep the terrain quality low as it will give you the best FPS possible.

For Simulation quality, you have to match this to terrain quality which is by keeping this to a low position. Set the flocking quality to the off position. Asysn compute can increase FPS up to 20%, so you need to enable it. Set Bur, screen shake, and exposure to 0%. For full-screen effects, you have to keep it to 20% and keep speed lines uncheck marked. You can set Sharpening to your personal preference.

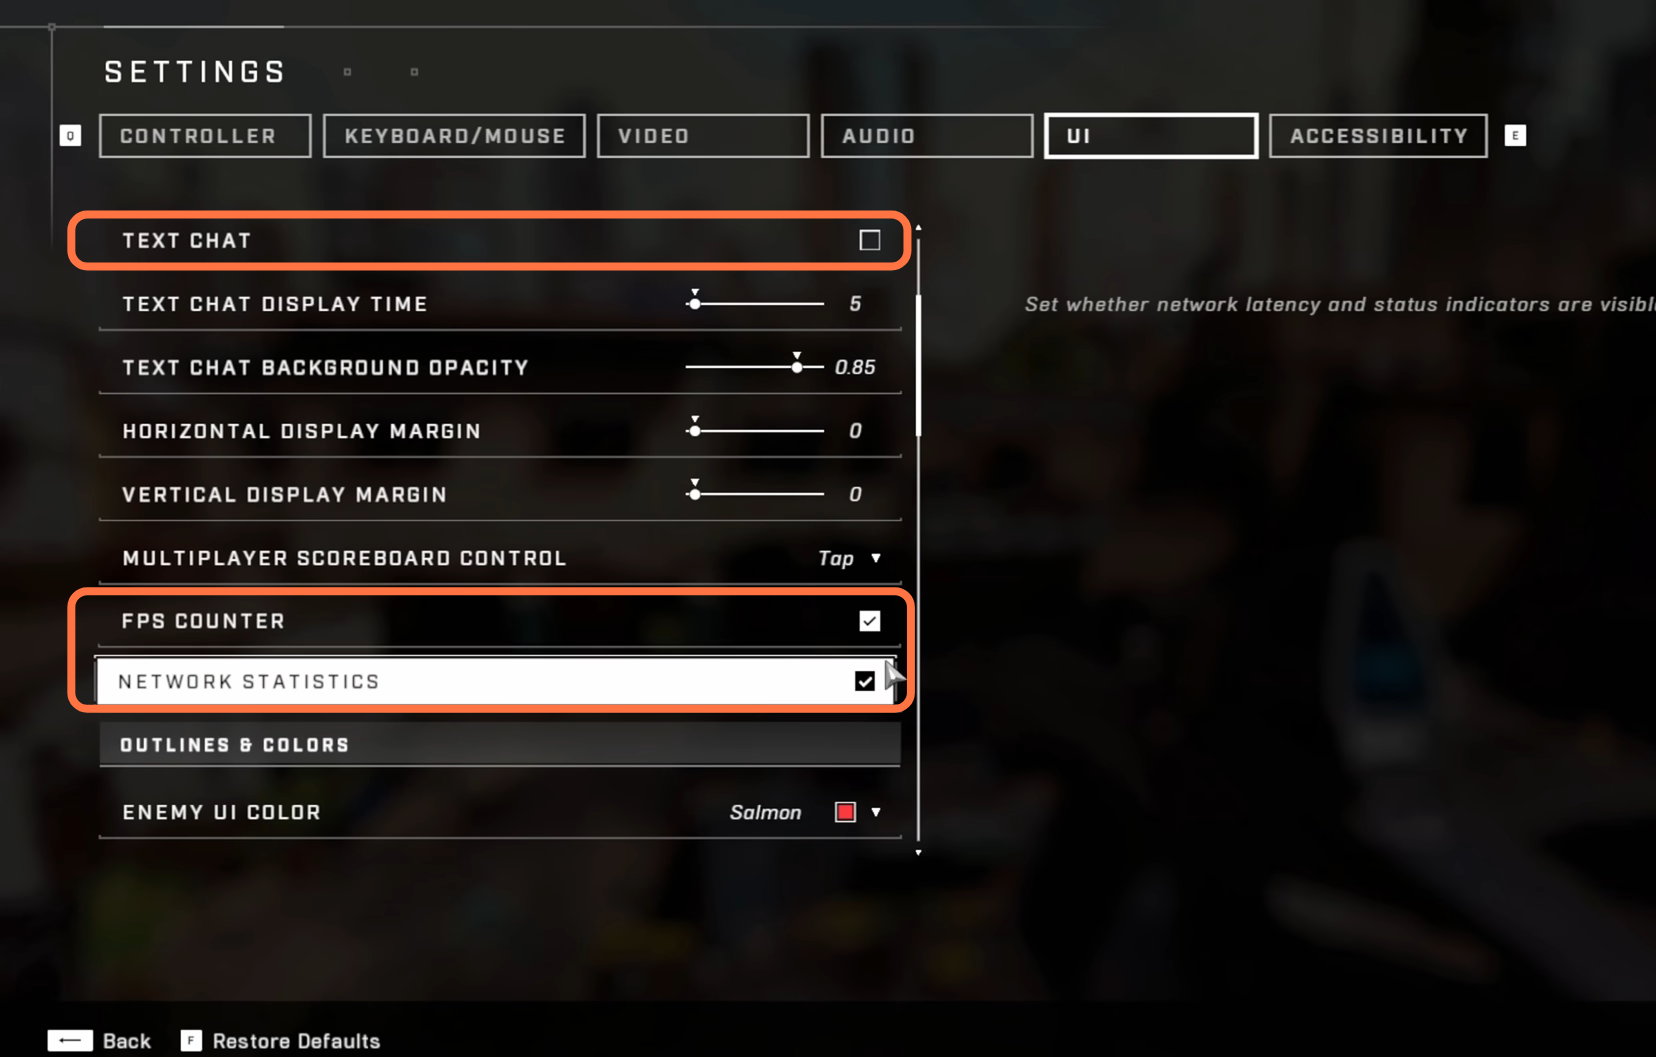
5.2- After that, go to the UI setting by clicking on the top and uncheck the Text Chat checkbox. Now scroll down to the Fps counter and keep it check marked. Also, checkmark the network statistics.
After that, scroll down further to UI visual effect and make sure Chromatic Aberration is turned off to get better visuals. You also need to turn off Bloom and Parallax.

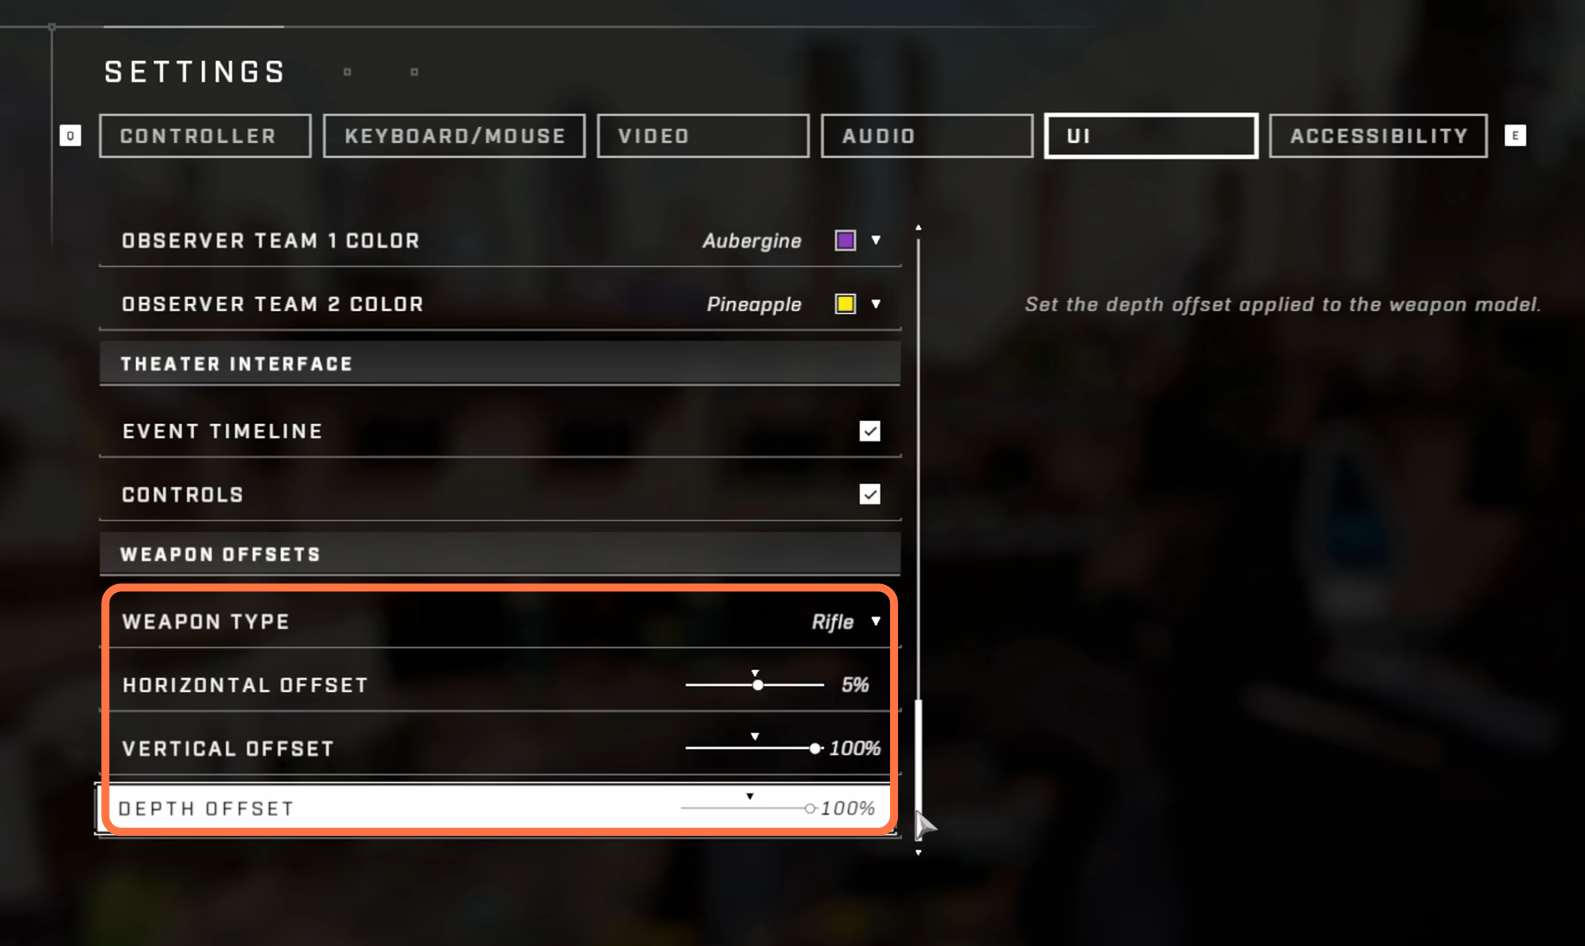
Scroll down to Weapon Offsets and keep the horizontal offset to 5%. You have to set the vertical offset and depth offset to 100%. You can also change the weapon type and change all these settings according to that weapon.
5.3- Now go to the Accessibility tab and scroll down to Subtitles. You have to turn off Visibility. After that, go back to the game, see your FPS, run around the map and see what your frames are like. If you notice that your frame rate is static and you are satisfied, then this is fantastic.
5.4- But in case you want a further increase in performance, you will need to press escape and go to setting. Then navigate to the Resolution scale and you can start by setting it to 10%. If you feel no lag in your game, then you can increase this. With this, you have to change your sharpening scale and give it the value same as the resolution scale.
Bios Settings
If you haven’t set these manually before, then you are running on your stock Ram settings, auto-tuning, and more. First of all, you have to make sure that your Ram is correctly installed in your system. Rams can be installed at any slot available in your motherboard. you have to make sure that your ram is running on X.M.P/D.O.C.P to use these they will be using your windows default settings. in CPU you have to apply all core overclock as this will enhance the multi-core performance of your CPU allowing for much more consistent performance which games prefer. Alongside that, you have a GPU that is capable of running resizeable bars make sure that you enable this in the bios for further FPS performance.