Valheim is still getting errors in its latest update, if you’re getting an error then don’t worry as we’re here to help you fix that error. Players have reported different errors like:
There are multiple solutions for the above-mentioned errors. Go through the guide and follow step-by-step instructions to counter the errors.
How to fix “Incompatible Version Server” error in Valheim ?
Follow the steps below to fix the error :
- First open steam CMDFiles.
- Find the steam.exe file and open it.
- In new prompted up cmd windows, type login anonymously and hit enter.

- Now type “app_update 896660” and hit enter.

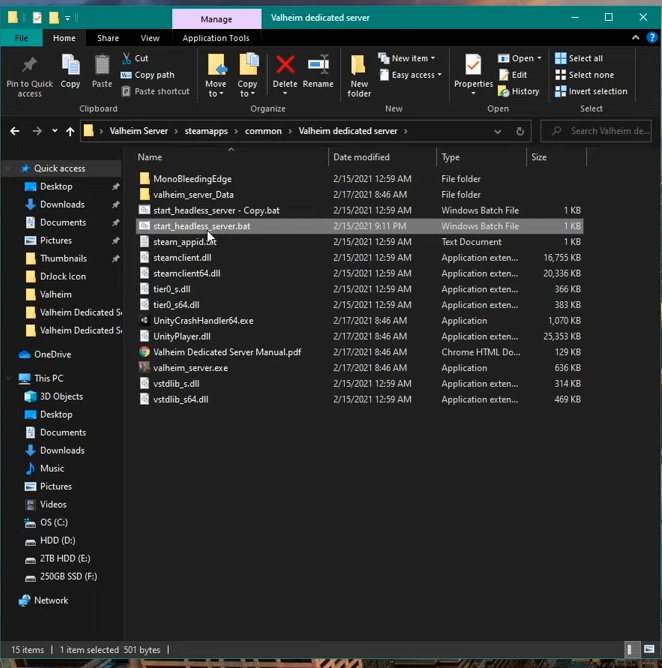
- Go back to the Valheim Server folder, open the steamapps folder and then open the common folder. Double click “start_headless_server”.
- Now play the game, type the name of the server and password. then click on connect. It’s done. Play and enjoy the game.
How to fix Server Not “Showing Up/Won’t Connect/Not Responding” in Valheim ?
There are seven methods to counter this error, if the first one doesn’t work well you can try the next one and so on. Following are the methods to fix the “Showing Up/Won’t Connect/Not Responding”:
- Check Ip Address.
- Check the server if it is joinable.
- Port Forwarding.
- Internal Ip Address.
- Windows Firewall with Advanced Security.
- Check the server if it is joinable.
- Static IP.
Fix # 01 – Check Ip Address:
- First give the public ip address to connect with people instead of the local ip address.
Fix # 02 – Check the server if it is joinable:
- Open the stream app, click on the view tab on the top left corner.
- Then click on Servers.

- Now click on favourites on the upper left corner.
- Then navigate to the “Add a new server”.
- Type your public ip address that you can get from whatismyipadress.com website and after typing your ip address, make an addition of .2456 in last. In case, it’s not working you can change it to .2457 or .2458.
- As you typed your ip address click on Find game at this address. If it says that “the server is not responding”, it means that there is a problem with your router’s port forwarding.

Fix # 03 – Port Forwarding:
- Set the external port range from 2546 to 2548. If your router has the option of port range, make sure to select that and if there is a single port option make sure to select that.
- Protocols should be set as both, i,e; tcp and udp.

Fix # 04 – Internal Ip Address:
- Do check that your internal ip address is the same as the ip address under the ip config. To check that open the command prompt and type ip config, hit enter
- Look for an IPv4 address the same as your router internal ip address.
Fix # 05 – Windows Firewall with Advanced Security:
- Type “windows firewall with advanced security” in the windows search bar and hit enter.
- Now in the newly popped up window, click on inbound rules on the left side.
- Then click on create a new rule on the right side.
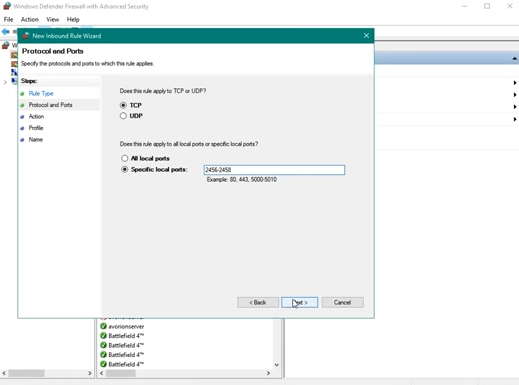
- Tap on port and press next.

- The rule is required for both tcp and udp, let just do with tcp and then udp with the same steps. So select tcp.
- Type 2456-2458 and click next.
- Now select “Allow all the connection” and press next.
- Do check all three (Domain, Private, Public) and click next.
- Name that rule and navigate to Finish.
- Now navigate to the outbound rule and the same procedure as creating the new rule.
- Close the Windows Firewall window.
Fix # 06 – Check the server if it is joinable:
- This method has been discussed already, click here to have a look. If the issue is not resolved yet move to the next step.
Fix # 07 – Static IP:
- If going through all the procedures didn’t help, get your internet static ip from the internet provider or may ask them to set the port setting by themselves.
How to fix multiplayer lag / desync on dedicated servers in Valheim ?
The steps to resolve this issue needed to be done at the user PC side and then server side and their steps are the same. So, let’s first change the setting at the user side.
- Download dmSpy from the internet and save it somewhere on your computer.
- Open the downloaded folder and double on the dnSpy.exe file.
- Now, there is a need to locate the Valheim files location. So, open the stream app and navigate to the game.
- Right click on the game and navigate to properties.
- In the new pop- up window, navigate to “Local Files” and then click browse.
- Then click on the address bar of the opened folder. Copy that.
- Navigate to the dnSpy app and click on “File” on the upper left side corner.
- Then navigate to “open”.
- Type the copied address into the address bar of the window.
- Now navigate to the file named as “assembly_valheim.dll” by following this directory “Valheim>valheim-Data>Managed” and click open.
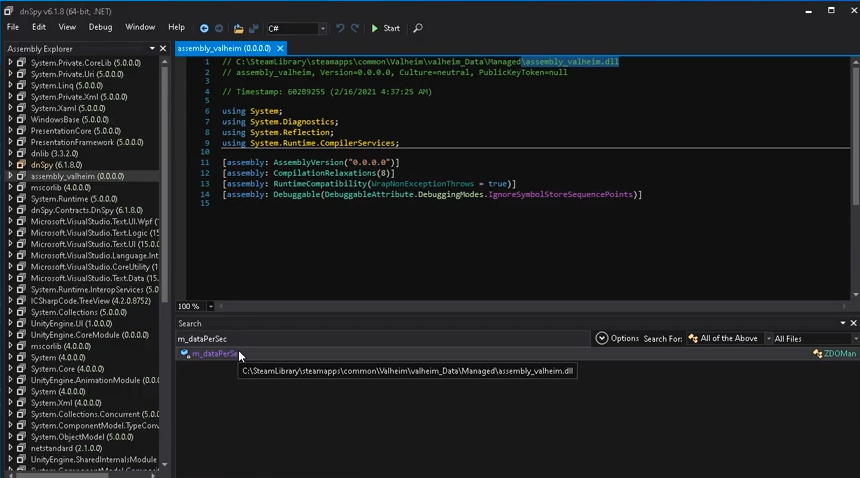
- After opening the “assembly_valheim.dll” as it will get back to the dnSpy interface, now search assemblies by pressing the shortcut key as “Ctrl+Shift+k”
- Type “m_dataPerSec”, a file with the same name will appear under the search bar. Its file location should be the same as the above file location, it can be checked by hovering over the file.
- Double click on the “m_dataPerSec”, it will appear above.
- Right click on the line and navigate to the “Edit Class”.
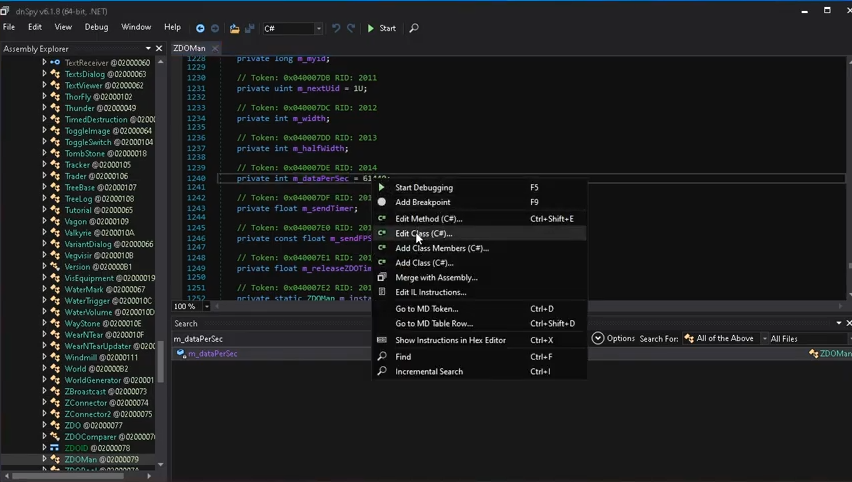
- Now select the number at last numbers to that line by dragging the cursor and then type these “245760” numbers.
- Then navigate to the compile at the bottom right side corner.
- Close that window, click on yes and then to save the settings.
Now move on to the dedicated server and follow the same steps as in pc/user with one change that type the number “368640” instead of “245760”.
How to fix Valheim Servers ?
Follow the method below to fix the Valheim Servers:
- Navigate to the file named as “assembly_valheim.dll” by following this directory “Valheim>valheim-Data>Managed”. Valheim folder location can be found by right clicking on valheim game stream app. Click on properties, then local files and last click on browse, it will take you to the Valheim folder’s location.
- After locating the file, copy that and pastes it within the same folder.
- Download dnSpy.exe software from the web and install it on your computer.
- Run the dnSpy application and click on “File” on the upper left side corner.
- Then navigate to “open”.
- Go to “assembly_valheim.dll” and open it.
- After opening the “assembly_valheim.dll” as it will get back to the dnSpy interface, search assemblies by pressing the shortcut key as “Ctrl+Shift+k”
- Now type “m_dataPerSec”, a file with the same name will appear under the search bar. Its file location should be the same as the above file location, it can be checked by hovering to the appeared file.
- Double click on “m_dataPerSec”, it will appear above.
- Right click on the line and navigate to “Edit Class”.
- Now select the number at last numbers to that line by dragging the cursor and then type “614400” numbers.
- Then navigate to the compile at the bottom right side corner.
- Close that window, click on Yes and then to save the module.