This guide will provide you with the best in-game settings for Modern Warfare II on the console and controller. You have to adjust these settings as mentioned in the guide to get the best performance and optimum in-game playing experience.
How do quick settings work?
In this section, we will take you through the steps of how quick settings work to get the best performance and optimum in-game experience.
- First, you have to start the Modern Warfare II game on your gaming console (e.g., PlayStation or Xbox).
While in the game, you can access various settings that affect your gameplay experience. - Look for the quick settings icon on the left-side panel of the screen, and click on it to open the selection of settings you can customize.
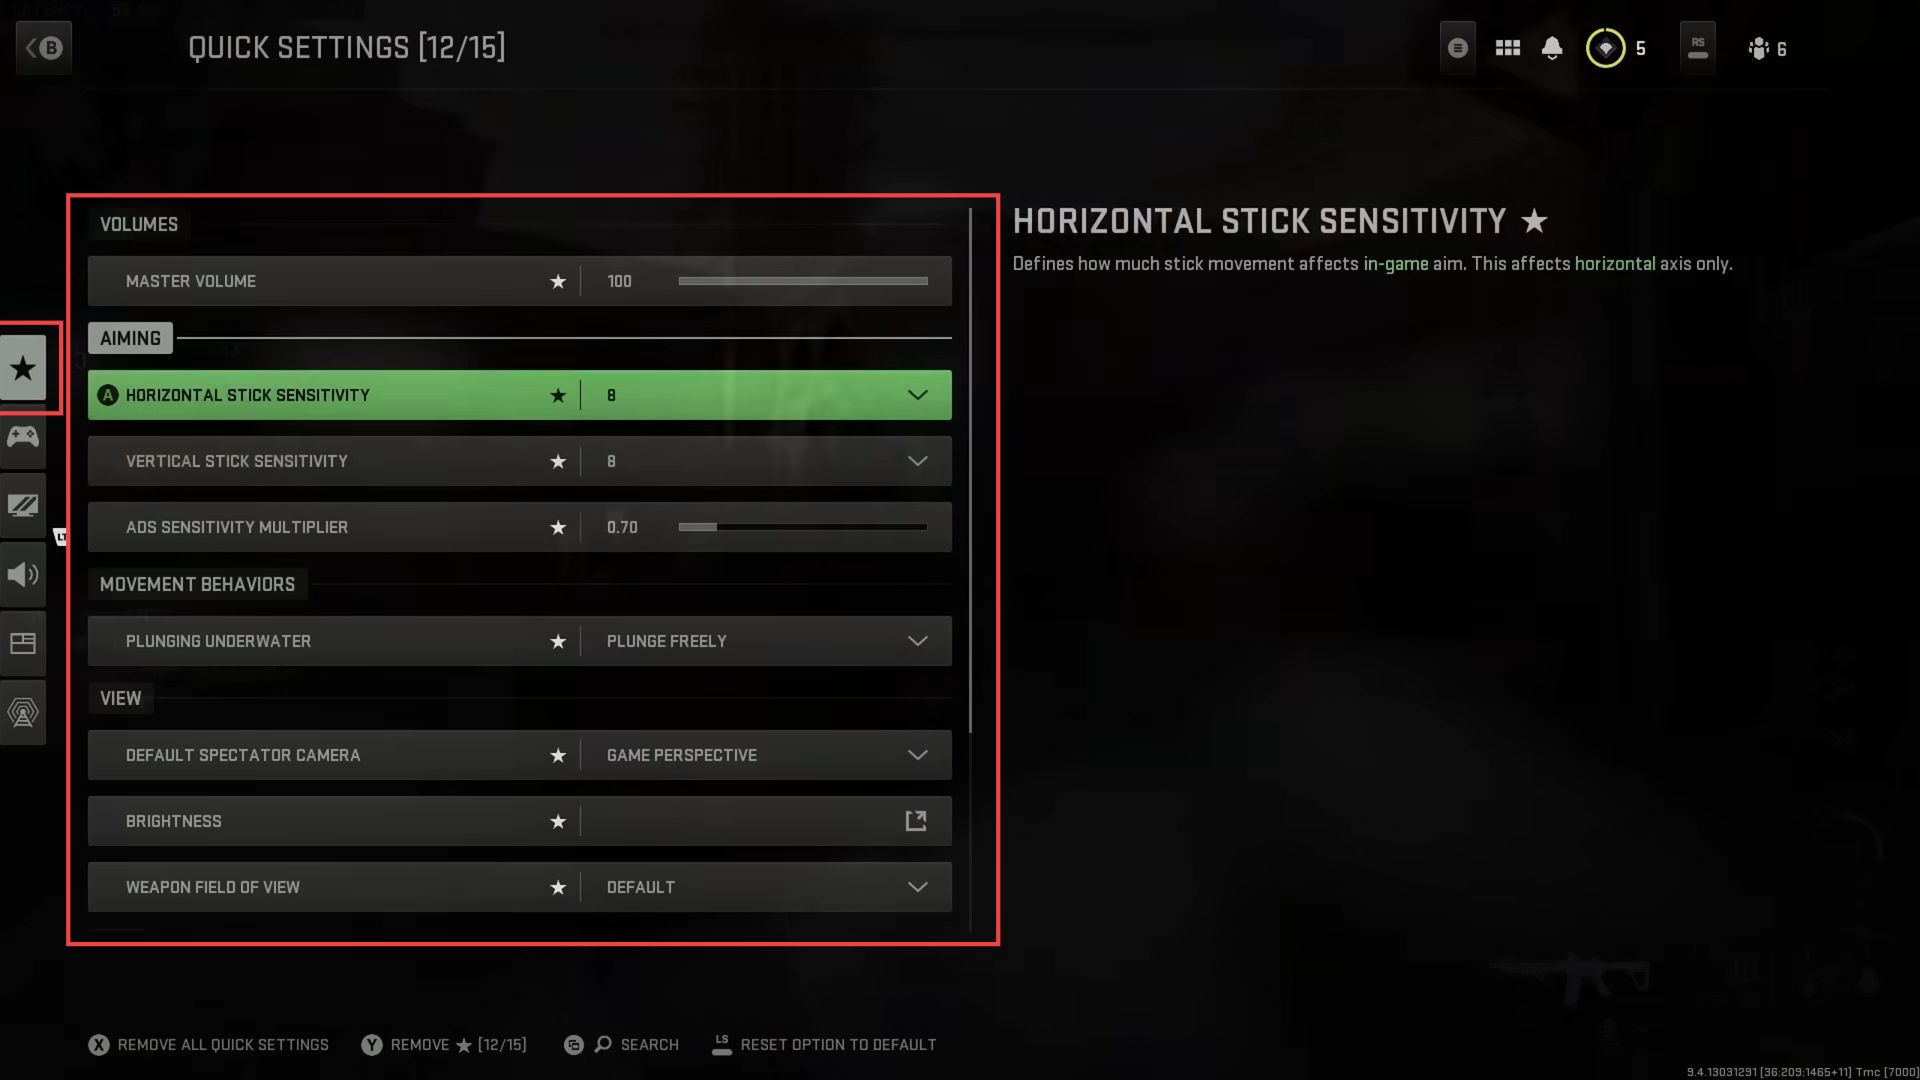
It will allow you to access up to 15 customizable settings. - Among the settings you can adjust are Master volume, horizontal and vertical stick sensitivities, and the Ads sensitivity multiplier. From the list of customizable settings, choose those that you frequently adjust during gameplay.
- Click on the setting to add it to the quick settings menu for easy access. Besides stick sensitivities and ad sensitivity, you can also adjust other settings.
Such as plunging underwater, default spectator camera, brightness, weapon field of view, Minimap shape, server latency, and packet loss. - Customize these settings based on your preferences and gameplay needs. Once you have set them up, make sure to save the changes so that they are applied during your gameplay.
Adding your preferred settings to the quick settings menu allows you to access and change them easily and quickly during gameplay.
Make adjustments to fit you
This section describes how to make adjustments to get the best performance.
- To begin customizing the controller settings, access the game’s settings menu and familiarize yourself with the different controller settings available in the game.
These settings may include sensitivity, button layout, dead zones, aim assist, and response curves, among others. - Many players find it helpful to start with sensitivity settings, as they significantly impact how the controller responds to their inputs.
Experiment with different sensitivity levels for both horizontal and vertical movement until you find a setting that feels comfortable and responsive to your gameplay style. - So you do not have to copy every single setting but adjust them as per your choice.
Controller Layouts
This section explains how to adjust the Controller Layouts to get the best performance and optimum in-game playing experience.
- From the left side panel, click on the Controller tab. Within the controller settings, locate the option for Button Layout.
- Choose the layout that suits your preferences. In this case, the recommendation is to adjust it to Tactical.
- Locate the option for Controller Vibration in the controller settings. Turn off controller vibration if it distracts you during gameplay or if you prefer a more streamlined experience without vibration feedback.
- Explore the Input menu within the controller settings.
If available, you may find an option for Flip Triggers. This setting allows you to customize how the triggers respond to your inputs. - Adjust this setting based on your preferences and playstyle. After making adjustments to the settings, make sure to save your changes within the game’s settings menu.

Sensitivity
This section will take you through the steps to adjust the Sensitivity to get the best performance and optimum in-game playing experience.
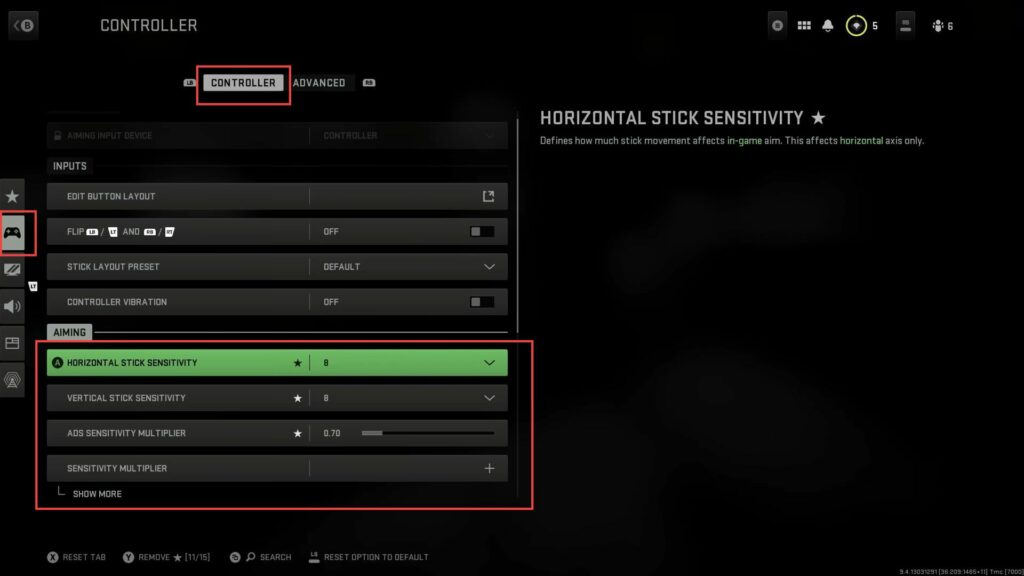
- From the Controller tab in the main settings menu, scroll down to find the Aiming section.
- Within the Aiming section, locate the settings for Horizontal Stick Sensitivity and Vertical Stick Sensitivity.
- Adjust both sensitivities to a level of 8 points.
This setting may be adjustable on a scale of 1 to 10, with 8 being the desired value in this case. - Look for the Aim ADS Sensitivity Multiplier setting and adjust it to 0.7.
This means that when you aim down sights (ADS), you will have more precise control over your aim, as the sensitivity will be reduced to 70% of the regular sensitivity. - After making these adjustments, ensure to save your changes within the game’s settings menu to apply your personalized aiming preferences during gameplay.
Interact/Reload
This section explains how to adjust the Interact/Reload to get the best performance.
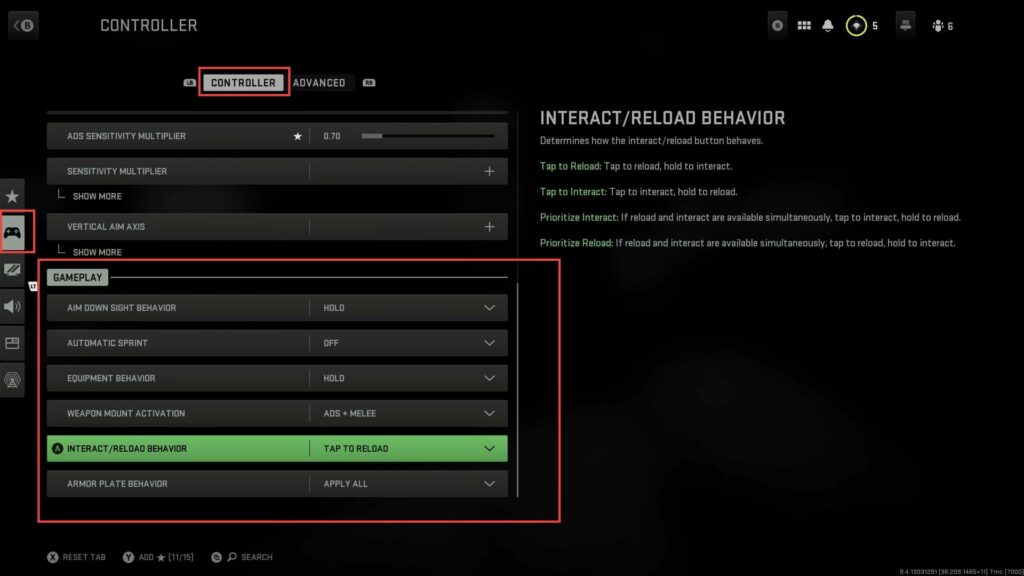
- From the main settings menu, navigate to the Controller tab and look for the Gameplay section within the controller settings.
- Within the Gameplay section, find the setting called Interact Reload Behavior.
For multiplayer gameplay:
- If you primarily play multiplayer modes, it is recommended to set the Interact Reload Behavior to Reload.
This means that when you press the interact button, the game will prioritize reloading your weapon.
For Warzone gameplay:
- If you play Warzone or other game modes where looting and interacting with the environment are crucial, set the Interact Reload Behavior to Interact.
This means that the game will prioritize interactions such as opening crates, picking up loot, and opening doors over reloading when you press the interact button. - In multiplayer modes, the focus is often on combat and engaging with other players.
Reloading quickly can be essential during intense firefights, so setting the behaviour to Reload makes sense. - After adjusting, save your changes within the game’s settings menu to apply the desired Interact Reload Behavior during gameplay.
Armor Settings
This section describes how to adjust the Armor Settings to get the best performance and optimum in-game playing experience.
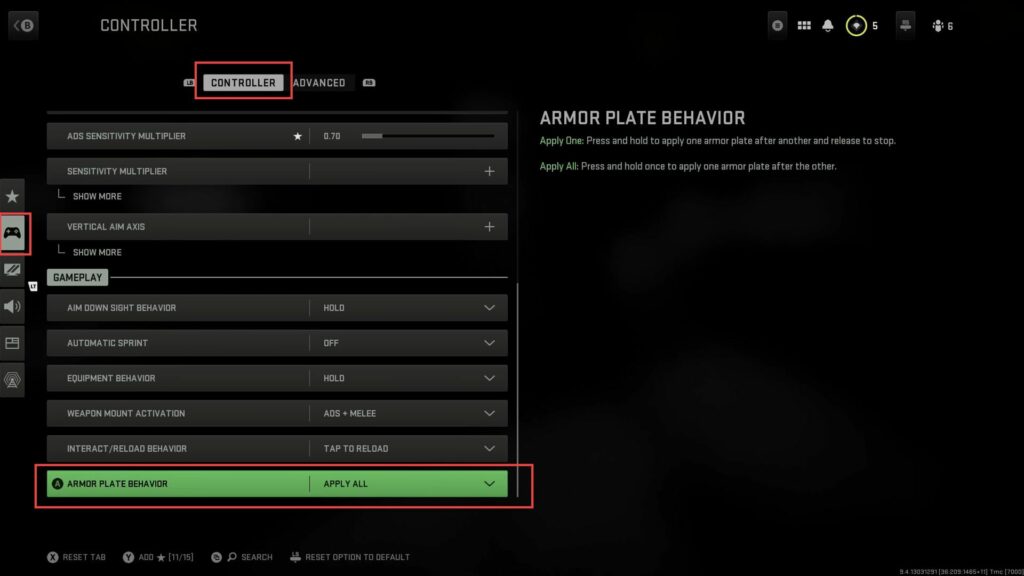
- From the main settings menu, navigate to the Controller tab and look for the Gameplay section within the controller settings.
- Within the Gameplay section, find the setting called Armor Plate Behavior, and its default setting might be Apply One.
This means that when you use an armour plate item, it will only apply for one plate at a time, leaving the rest of your available plates intact.
To change the behavior:
- You have to switch the Armor Plate Behavior setting to Apply All.
This means that when you use an armour plate item, it will apply all the available plates to your character simultaneously. - After adjusting, save your changes within the game’s settings menu to apply the desired Armor Plate Behavior during gameplay.
Best Aim Assist Settings
This section describes how to adjust the best Aim Assist Settings to get the best performance.
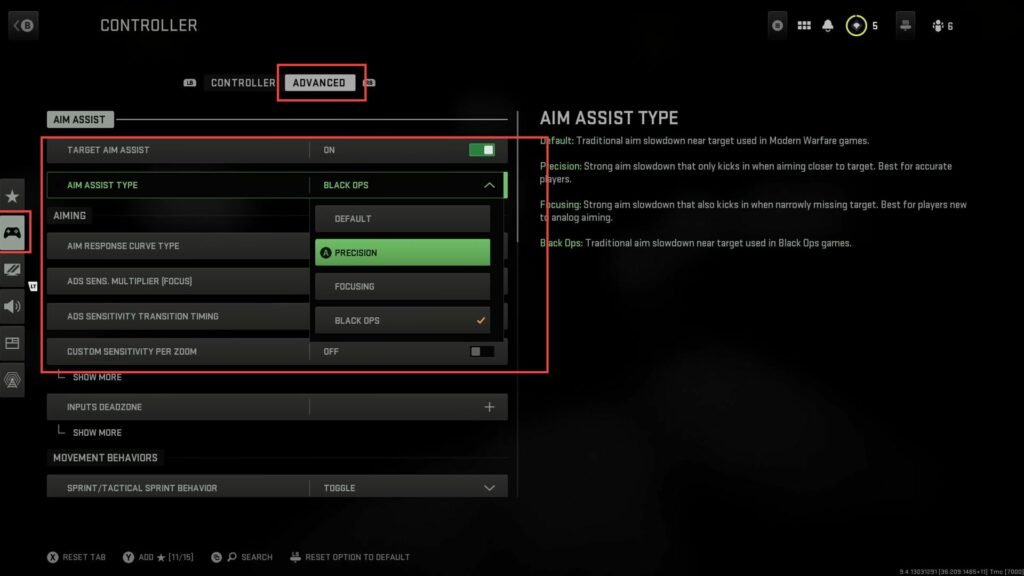
- From the main settings menu, navigate to the Controller tab and look for the Advanced section in the top-right corner of the controller settings.
- Within the Advanced section, find the setting called Aim Assist and make sure that it is turned on.
Enabling Aim Assist can significantly improve your aiming capabilities and precision during gameplay, especially when engaging in gunfights.
Depending on the game, you may have different Aim Assist types, such as Default, Black Ops, or others. - For most players, it is recommended to use either the Default or Black Ops Aim Assist types, as these are designed to provide effective assistance without being overly intrusive.
- Some games may offer additional options for adjusting the Aim Assist behavior, such as Precision and Focusing.
- After making the desired adjustments to the Aim Assist settings, save your changes within the game’s settings menu.
Response Curves
This section describes how to adjust the Response Curves to get the best performance and optimum in-game playing experience.
- In the Advanced section of the Controller settings, scroll down until you find the Aim Response Curve option.
The available options for the aim response curve are usually Standard, Dynamic, and Linear. - It is recommended to set the Aim Response Curve to Standard, as it provides a balanced and responsive aiming experience for most players.
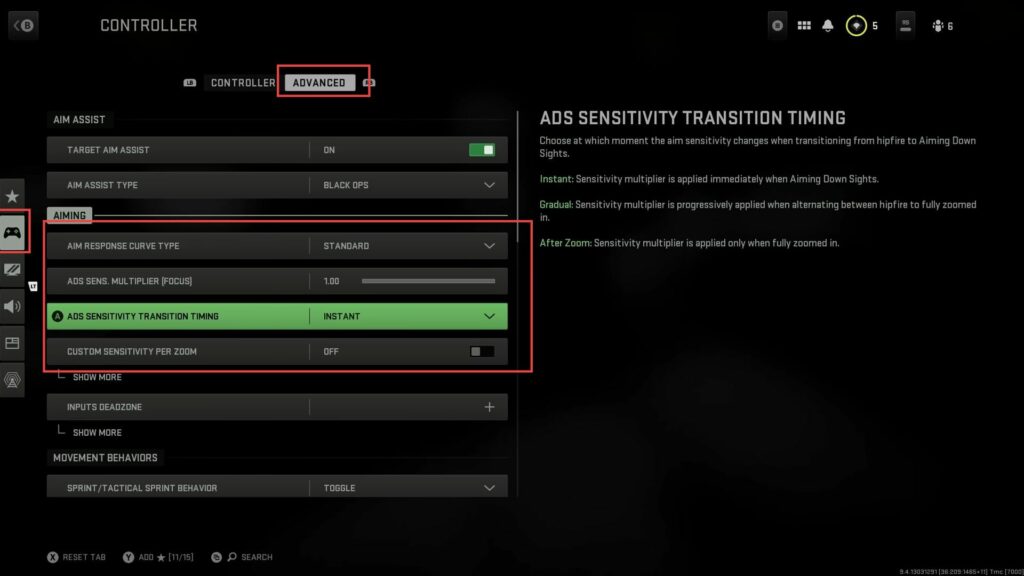
- Look for the Ads Sensitivity Transition Timing option, which controls how quickly your sensitivity changes when aiming down sight (ADS).
- To have a slower sensitivity when aiming down, you have to select Instant.
- Once you have adjusted the Aim Response Curve and ad Sensitivity Transition Timing to your preference, save the changes in the game’s settings menu.
Dead zones
This section will take you through the steps to adjust the Dead zones to get the best performance and optimum in-game playing experience.
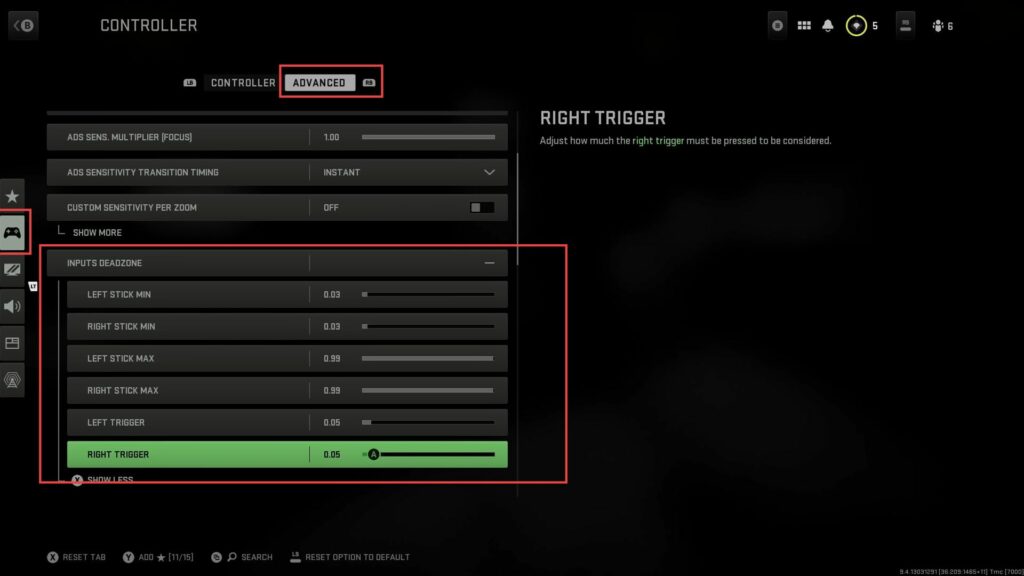
- Go to the Controller settings, locate the Dead Zone section, and click on the Show More button to reveal additional settings.
- Find the Left Stick Deadzone and Right Stick Deadzone options and set these values as low as possible without experiencing stick drift.
Stick drift refers to your controller’s analogue sticks moving on their own without any input from you.
If you notice stick drift, you’ll need to increase the dead zone slightly until the drift stops. - Locate the Trigger Deadzone option and set this value as low as possible without experiencing unwanted input.
If you want the trigger to be responsive, lowering the dead zone can help achieve that. - After adjusting the dead zones, save your changes in the game’s settings menu.
Movement
In this section, we will take you through the steps to adjust the movement to get the best performance.
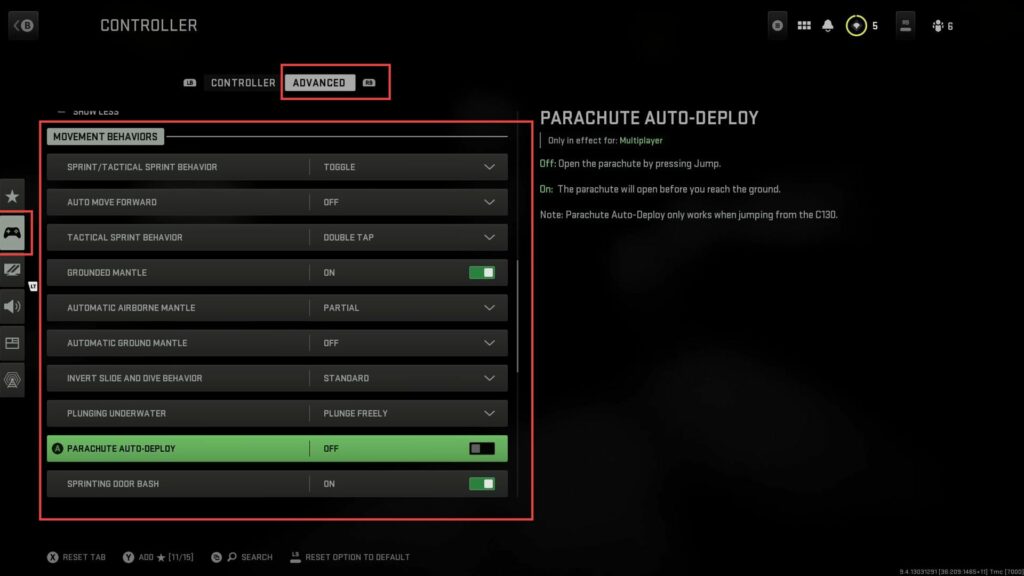
- Go to the Controller settings and navigate to the Movement Behavior section.
- For most of the settings in this section, such as Sprint, Auto Move Forwards, Tactical Sprint Behavior, Grounded Mantle, Automatic Airborne Mantle, Automatic Ground Mantle, and Invert Slide and Dive Behavior, it is recommended to leave them at their default settings.
- Scroll down to the Plunging Underwater setting and change this from Movement to Plunge Freely.
This option allows for more intuitive control when going underwater and surfacing from below the water. - Locate the Parachute Auto-Deploy option and turn this setting off.
Keeping it off allows you to have full control over when the parachute deploys, preventing premature deployments and potential vulnerability during the parachute animation. - After adjusting the movement behaviour settings, save your changes in the game’s settings menu.
Texture Streaming On or Off
This section explains how to adjust the Texture Streaming on or off to get the best performance.
- Click on the Graphics Settings tab from the left side panel in the game’s settings menu and locate the option for Demand Texture Streaming.
- Turn this setting on, and this is recommended for the best-looking graphics in the game.
Enabling Demand Texture Streaming allows the game to load high-resolution textures as needed, providing a visually impressive experience. - If you have limited internet bandwidth, it may be best to leave Demand Texture Streaming off.
Keeping it off can help prevent potential issues with lag and data overages. - If you’re experiencing packet loss in the game and Demand Texture Streaming is turned on, try turning it off.
For some players, this action has resolved packet loss issues. However, keep in mind that this solution may not work for everyone. - After making the adjustments to the graphics settings, make sure to save your changes in the game’s settings menu.
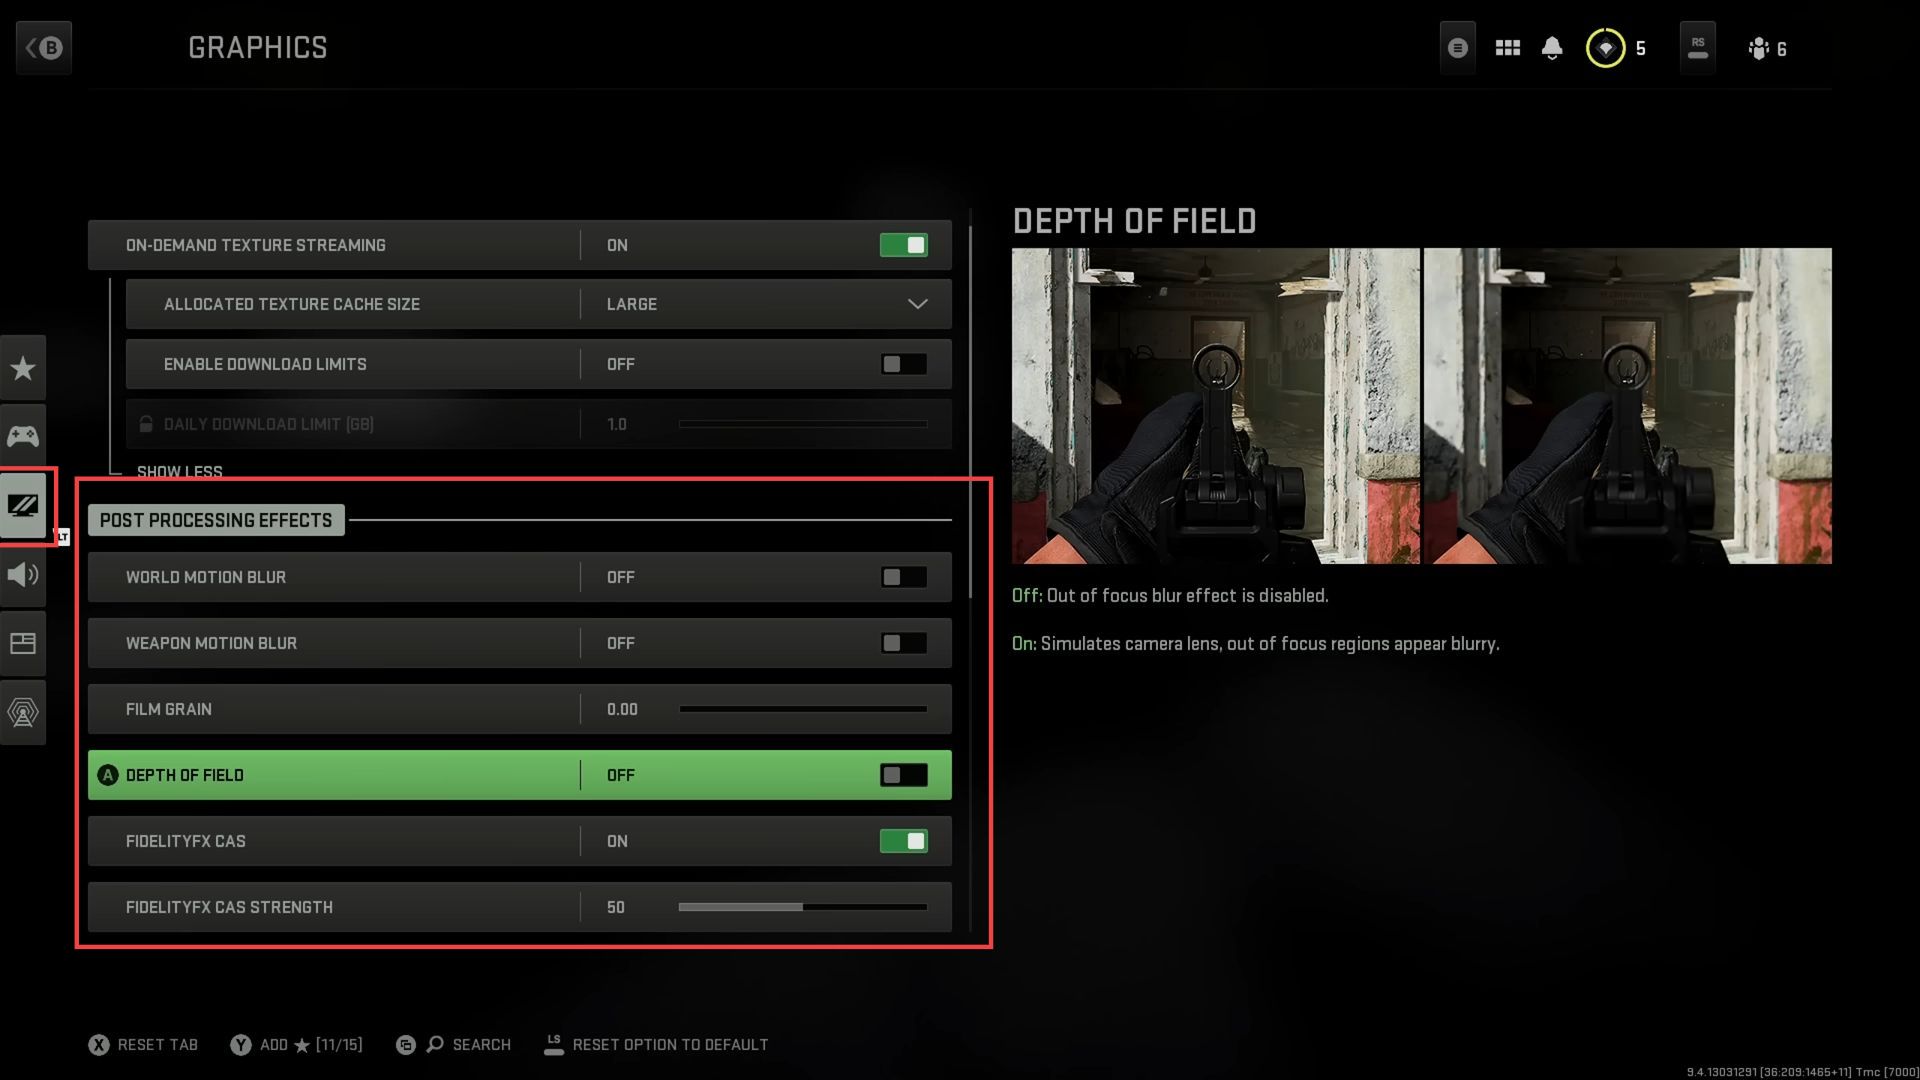
Blur, Film, Grain, Depth of Field
This section describes how to adjust the Blur, Film, Grain, and Depth of Field to get the best performance and optimum in-game experience.
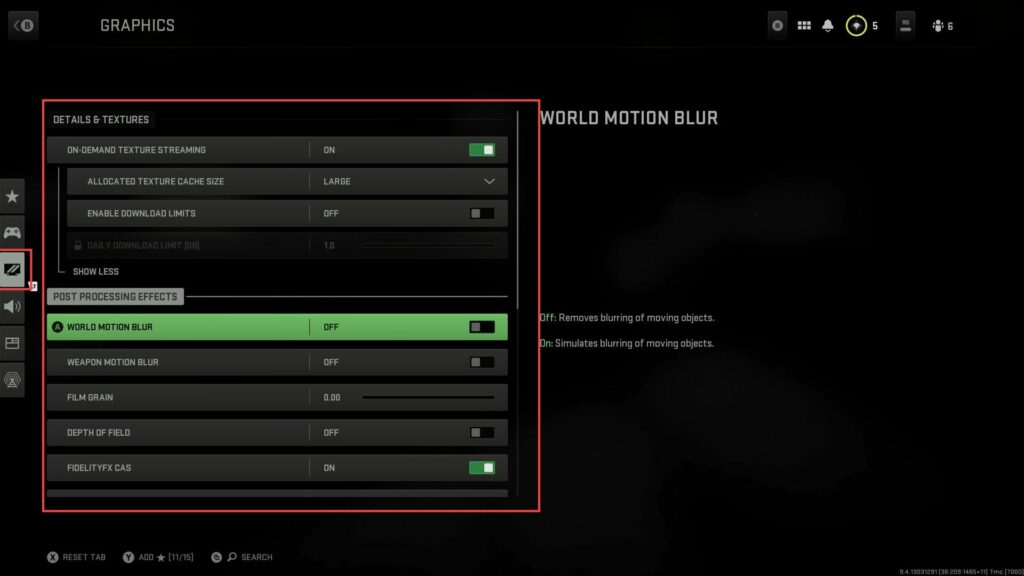
- From the Graphics Settings tab, scroll down until you find the section labelled Post-Processing Effects.
- Locate the settings for World Motion Blur, Weapon Motion Blur, and Depth of Field, and turn off each of these settings.
- However, keep the setting for Fidelity FXCAS enabled. This setting is recommended to be kept on, as it enhances image clarity and reduces jagged edges.
The reason for turning off World Motion Blur, Weapon Motion Blur, and Depth of Field is to prevent potential obstructions to your vision in certain gameplay situations. - After adjusting the post-processing effects, make sure to save your changes in the game’s settings menu.
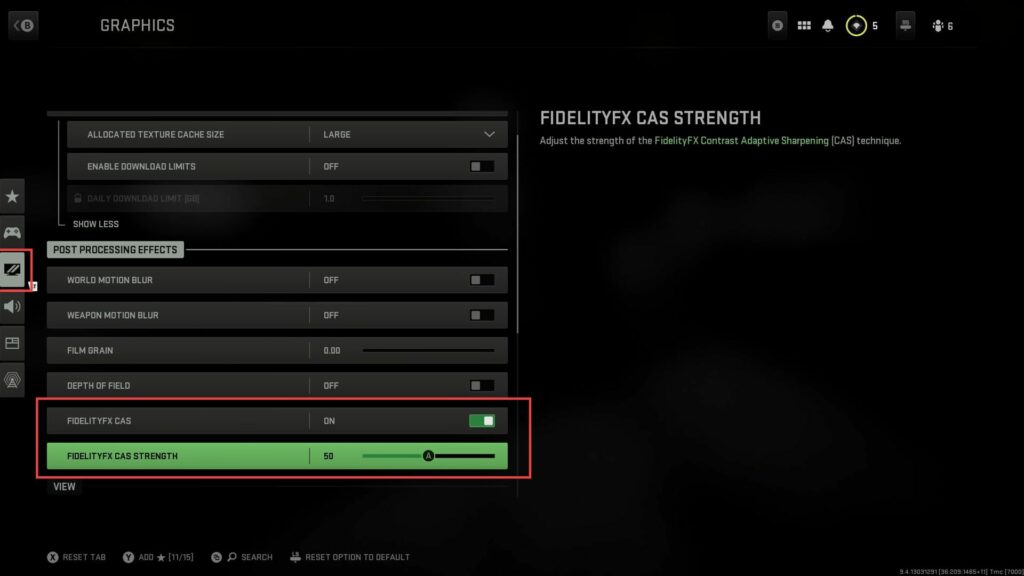
FidelityFX CAS (Sharpness)
This section explains how to adjust the FidelityFX CAS (Sharpness) to get the best performance.
- From the Graphics Settings tab, locate and click on the setting labelled Fidelity FX CAS. Toggle the Fidelity FX CAS setting to the On position.
This enables the sharpness enhancement feature in the game. - After turning on Fidelity FX CAS, you’ll notice a slider for Strength associated with it.
This value determines the level of sharpness applied to the game’s visuals. - Adjust the Strength setting to the middle point, around 50.
This allows for a balanced level of sharpness—not too soft or overwhelming. - After adjusting the Fidelity FX CAS settings, make sure to save your changes in the game’s settings menu.
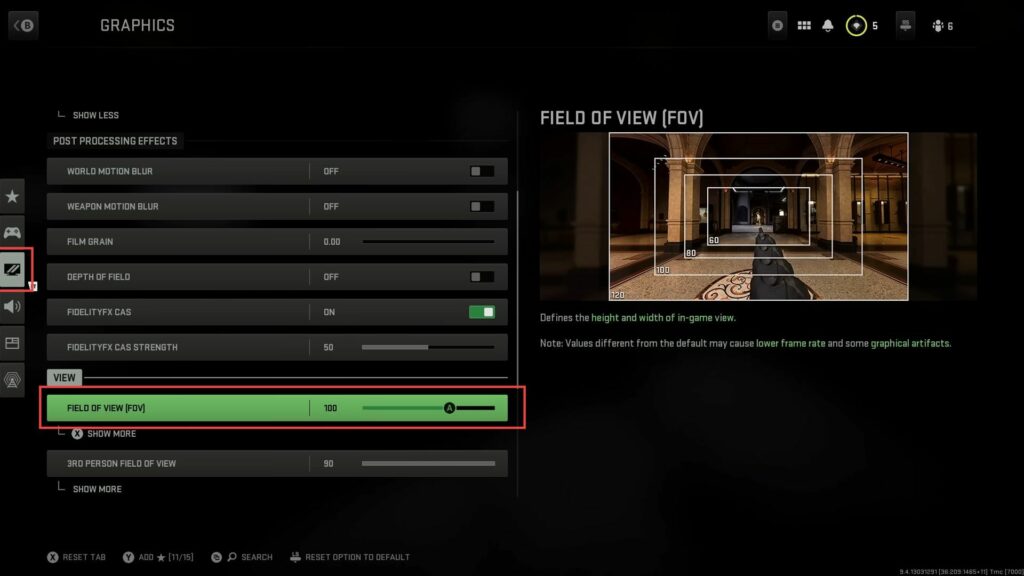
Field of View (Base)
This section describes how to adjust the Field of View (Base) to get the best performance.
- Navigate to the Graphics Settings tab and look for the setting labelled Field of View.
This setting controls the width of your in-game field of view. - Change the default Field of View value to somewhere between 90 and 110.
This adjustment will provide you with a wider viewing angle, allowing you to see more of the game’s environment at any given time. - However, increasing the Field of View too much can result in smaller targets appearing farther away, making it potentially harder to spot and hit distant enemies.
- You have to experiment with different Field of View values within the recommended range (90–110) to find the setting that works best for you.
Consider your playstyle, how much you value situational awareness, and your ability to hit targets at different distances. - Once you’ve adjusted the Field of View to your liking, make sure to save your changes in the game’s settings menu.
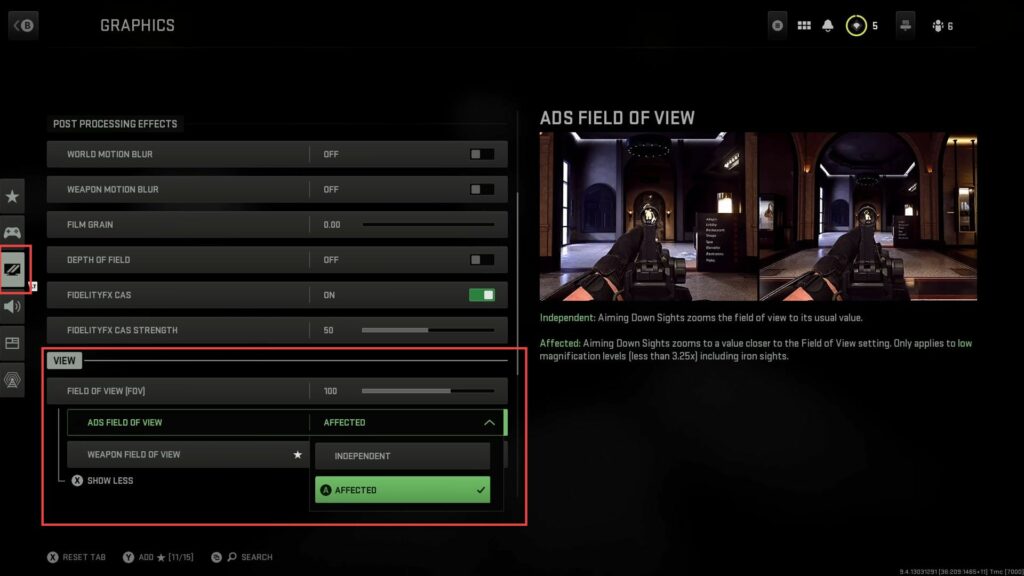
ADS FoV
In this section, we will take you through the steps to adjust the ADS FoV.
- Look for the setting labelled Aim Down Sight Field of View in the Graphics Settings tab.
- Select the FoV mode that aligns with your preferences. There are typically two options: Affected and Independent.
- If you choose the Affected mode, your aim-down-sight (ADS) field of view will be affected by your boosted base field of view setting.
This means that if you have increased your base field of view, your view while aiming down sights will also be wider than the default setting, providing you with more peripheral vision. - If you choose the Independent mode, your aim-down field of view will remain unchanged regardless of any adjustments you make to your base field of view.
Even if you max out your base field of view, your view while aiming down sights will look the same as the default setting. - Choose the FoV mode that best aligns with your gameplay style and preferences.
- Once you’ve made your choice, make sure to save your changes in the game’s settings menu.
Weapon FoV Comparison
This section describes how to adjust the Weapon FoV Comparison to get the best performance.
- Look for the setting labelled Weapon Field of View in the Graphics Settings tab.
- The narrower you set the Weapon Field of View, the closer the gun will appear to your face, and you will see less of your arm in the view.
- On the other hand, a wider setting will show more of your arm and stretch out the appearance of the gun slightly.
- After ensuring that the setting is now functional in the full build of the game, you can experiment with different Weapon Field of View settings.
Overlay the different settings to see how they affect the appearance of the gun and your arm on the screen. - While adjusting the Weapon Field of View can give a slight perspective change and stretch things slightly, it doesn’t significantly impact how much of the centre of your screen is blocked by your gun and arm.
It’s more about personal preference and finding a setting that feels comfortable to you. - After adjusting the Weapon Field of View, navigate to the Camera Movement section in the settings.
- Look for the setting labelled 1st Person Camera Movement and adjust it to the lowest value possible, such as Least (50%).
- Once you’ve made these adjustments, make sure to save your changes.
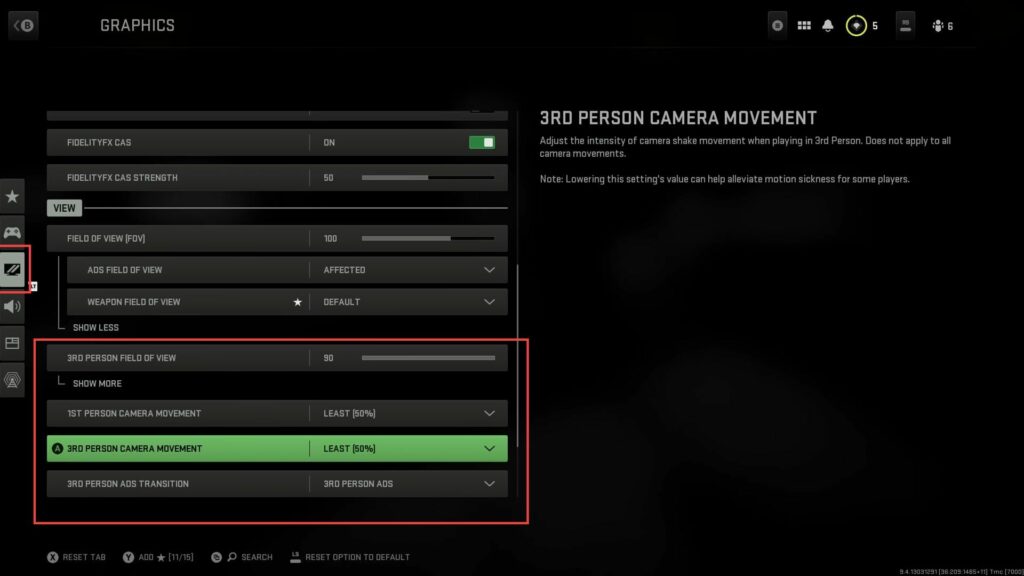
3D Person Settings
This section explains how to adjust the 3D Person settings.
- First, identify whether you are playing in first-person mode or third-person mode in the game.
- If you are playing in third-person mode and want to adjust the Aim Down Sight (ADS) settings, you can do so in the game’s settings menu.
- If you prefer the first-person perspective while aiming down sights, choose the First-Person ADS setting.
- However, if you find the third-person perspective more comfortable, opt for the Third-Person ADS setting.
- If you are playing third-person modes, it is recommended to stick with the Third-Person ADS setting consistently.
This will provide better continuity and familiarity in your gameplay. - After making your selection, remember to save the changes in the game’s settings menu.
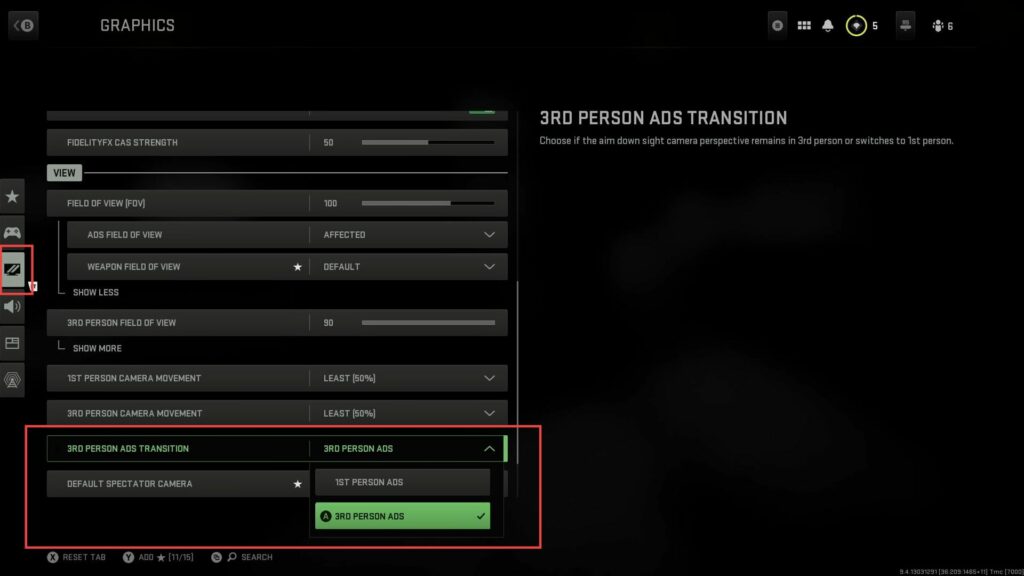
Spectator Camera
This section describes how to adjust the Spectator Camera to get the best performance.
- In the game’s settings menu, find the option for the Spectator Camera setting.
It allows you to choose between two perspectives: First-Person or Helmet View. - If you prefer a more immersive and realistic experience, opt for the First-Person perspective.
This will show you exactly what the other player is seeing on their end, providing a more authentic representation of their gameplay. - On the other hand, if you enjoy a cinematic view that adds flair and drama to the spectating experience, you can choose the Helmet View.
This view might have a more stylized presentation but may not accurately reflect the player’s point of view. - With your preferred Spectator Camera setting, you can now enjoy spectating other players in matches from your chosen perspective.
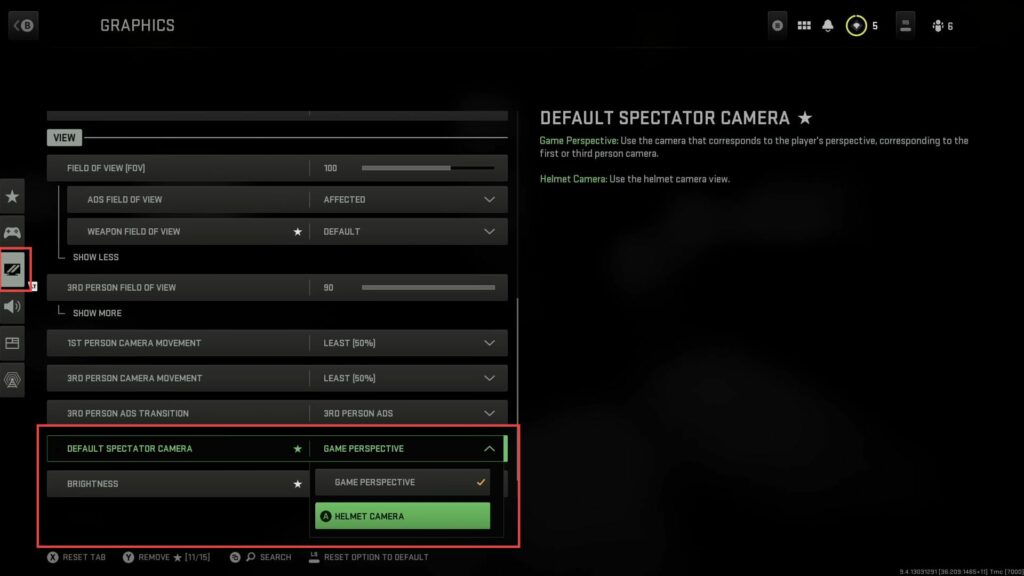
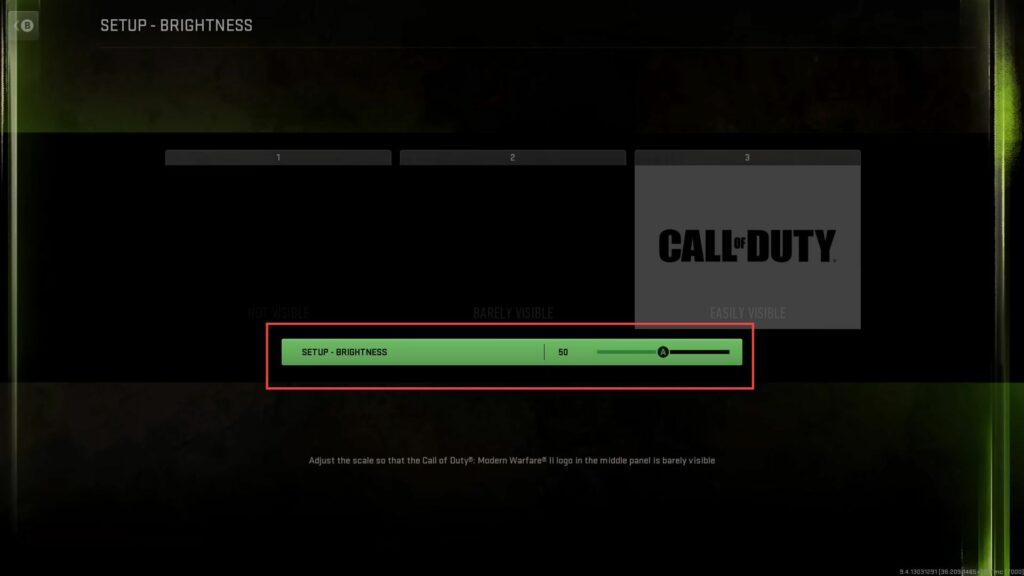
Brightness
This section explains how to adjust the Brightness to get the best performance and optimum in-game playing experience.
- In the game’s graphics settings, find the option for brightness, and it is recommended to set the brightness right around the 50 mark, which is the middle value.
This default setting is generally well-balanced for most players. - Instead of adjusting the in-game brightness, focus on optimizing the settings on your TV or monitor.
Use the built-in calibration tools to achieve the best picture quality and visibility. - Many players tend to increase the in-game brightness beyond the default, thinking it will improve visibility.
However, doing so may lead to washed-out colours and a loss of details in darker areas. - After setting the brightness to your preference, make sure to save your changes in the game’s graphics settings menu.
Audio
This section describes how to adjust the Audio to get the best performance and optimum in-game playing experience.
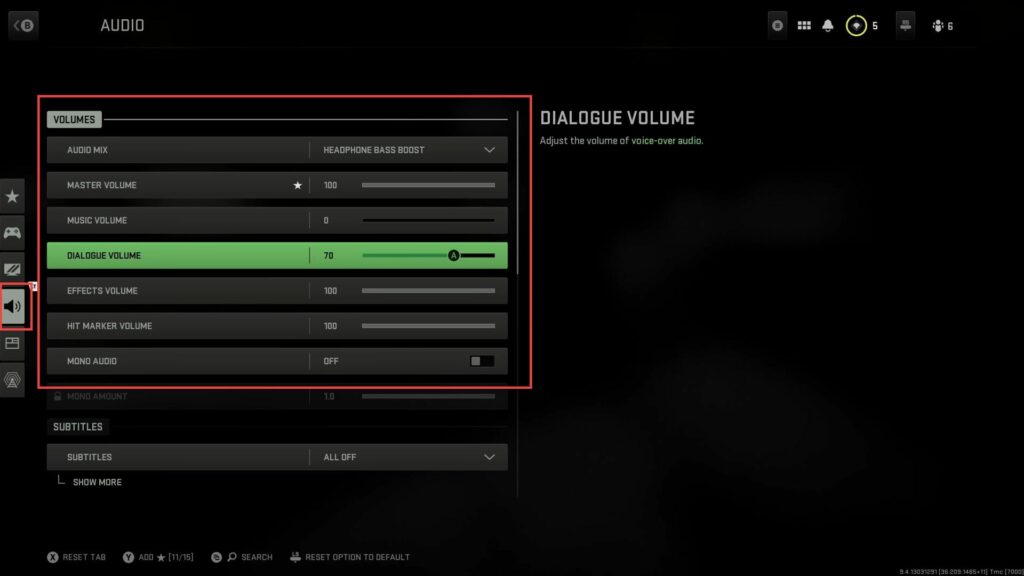
- In the game’s settings menu, click on the Audio tab from the left side panel and look for the option Headphone Bass Boost in the audio settings.
It is suggested to enable this setting as it may enhance the audio quality and make footsteps more audible, improving your overall gaming experience. - Find the option for Music Volume in the audio settings. While playing the game, it is recommended to turn the music off or set it to a very low volume.
This will reduce distractions and make important in-game sounds, like footsteps and enemy movements, more prominent. - After adjusting the headphone bass boost and music volume to your preference, make sure to save your changes in the game’s audio settings menu.
Voice Chat
This section will take you through the steps to adjust the Voice Chat to get the best performance and optimum in-game playing experience.
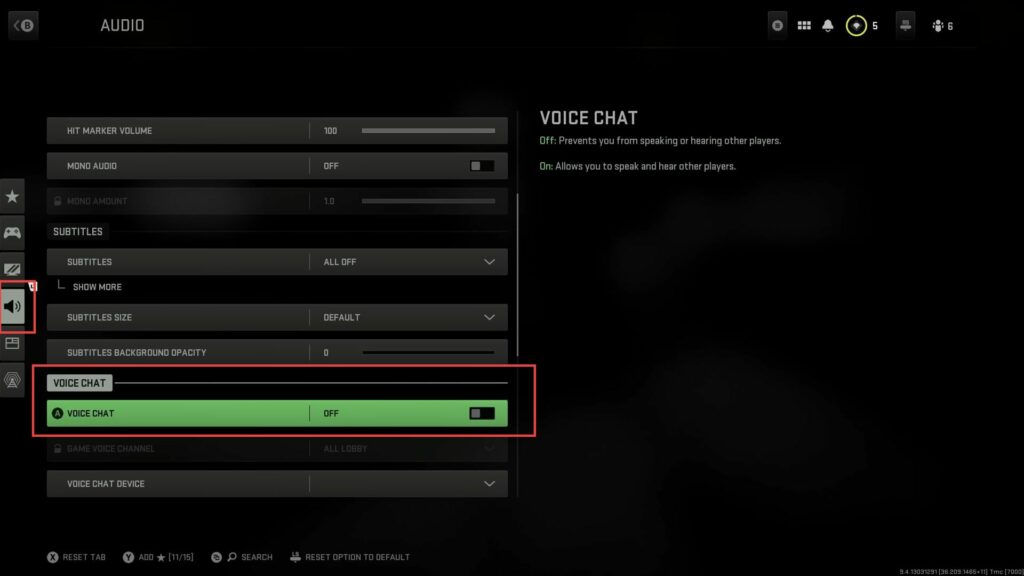
- In the game’s settings menu, click on the Audio tab from the left side panel and look for the option related to Voice Chat in the audio settings.
- If you prefer not to use voice chat during gameplay, you can disable this option and after making any changes to the voice chat settings, remember to save your preferences in the game’s audio settings menu.
HUD/Mini Map
This section describes how to adjust the HUD/Mini Map to get the best performance and optimum in-game playing experience.
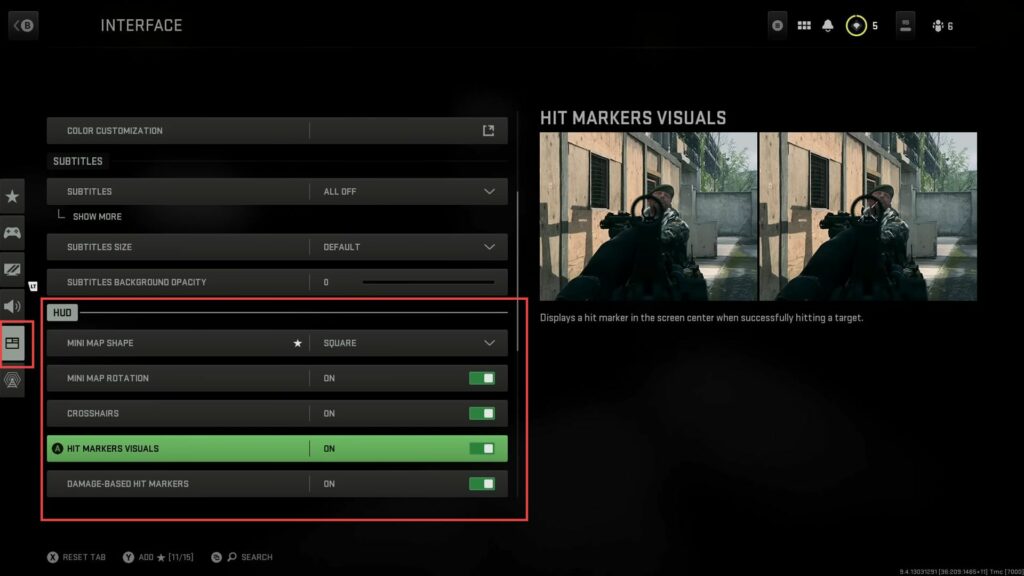
- In the game’s settings menu, click on the Interface tab from the left-side panel.
- Scroll down in the Interface settings until you find the Heads-Up Display section.
- In the Heads-Up Display section, locate the Minimap settings and change the Minimap shape to Square.
Using the square minimap provides you with a gameplay advantage, as it allows you to see 27% more of the map compared to other shapes. - For the rest of the Heads-Up Display section, it is recommended to leave the settings at their default values unless you have specific preferences for your gameplay experience.
- After making any changes to the interface settings, ensure that you save your preferences in the game’s settings menu.
Telemetry
This section explains how to adjust the Telemetry to get the best performance and optimum in-game playing experience.
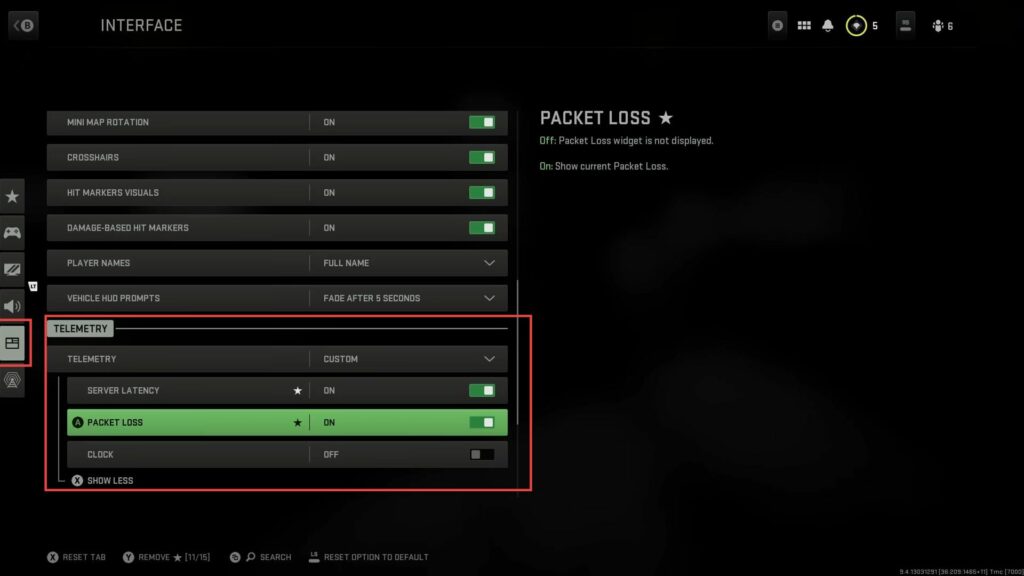
- Scroll down in the settings menu until you find the Telemetry section, and click on the Advanced option within the Telemetry section to access more detailed settings.
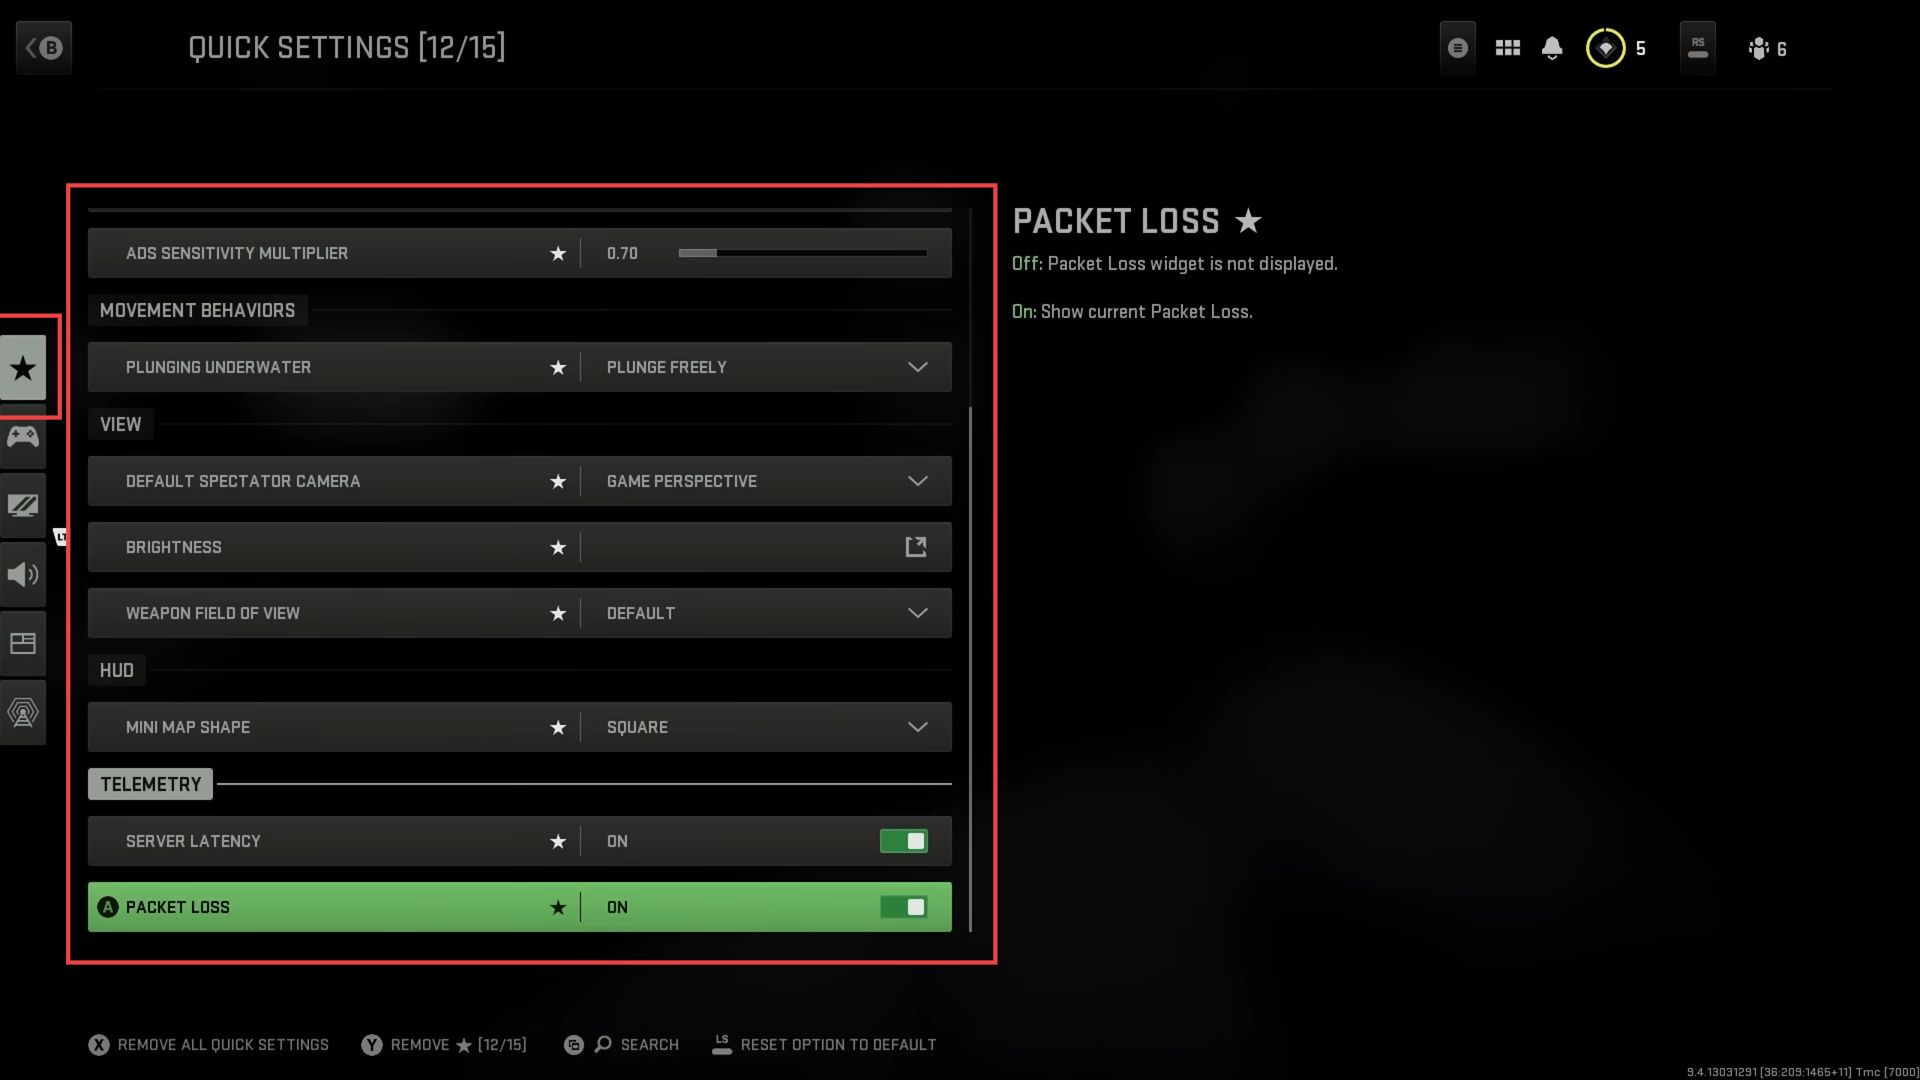
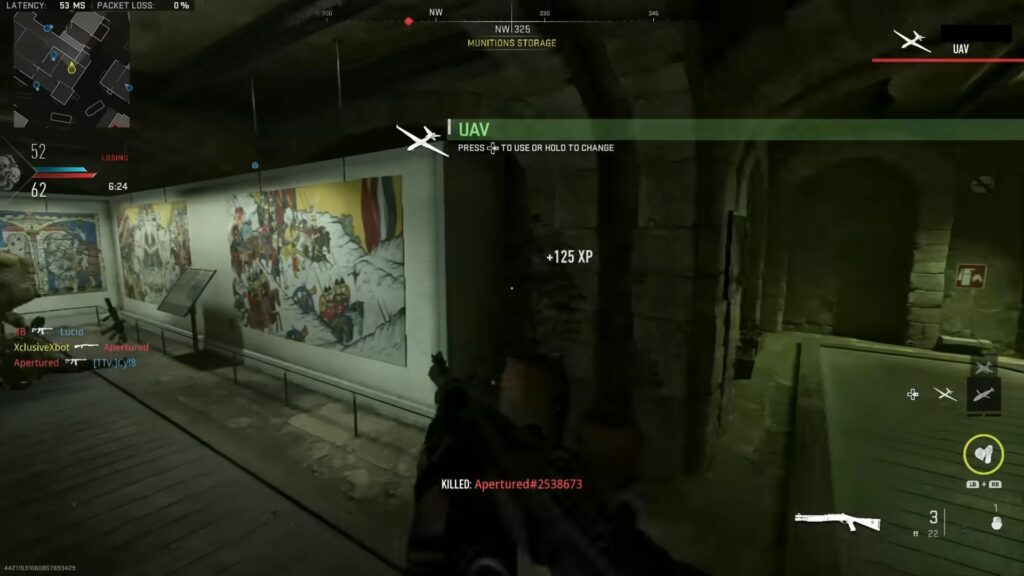
- In the Advanced Telemetry settings, locate the options for Server Latency and Packet Loss. Enable both of these options by toggling them on.
When these options are enabled, you will see real-time information about your server latency and whether you are experiencing any packet loss displayed on the top left of your screen while you are in the game. - Once you have enabled server latency and packet loss displays, you can now monitor this information while playing the game.
- After making changes to the Telemetry settings, ensure to save your changes.
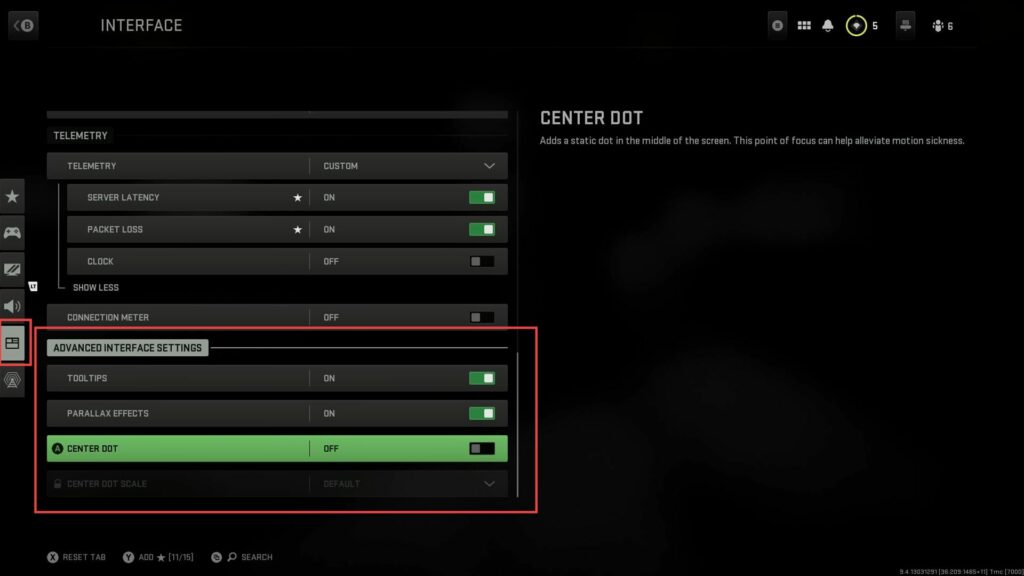
Center Dot
This section describes how to adjust the Center Dot to get the best performance and optimum in-game playing experience.
- Click on the Interface tab from the left side panel to access the related settings and look for the option related to the centre dot, which is a small dot that appears in the middle of your crosshairs.
- Toggle the centre dot option to enable it, and as of now, the centre dot may not move with the other crosshairs in the game.
- After turning on the centre dot, make sure to save your preferences in the game’s settings menu.