This guide will help you to adjust the best in-game settings for GTA Online. You have to adjust these settings as mentioned in the guide to get the best performance and optimum in-game playing experience.
Control Settings
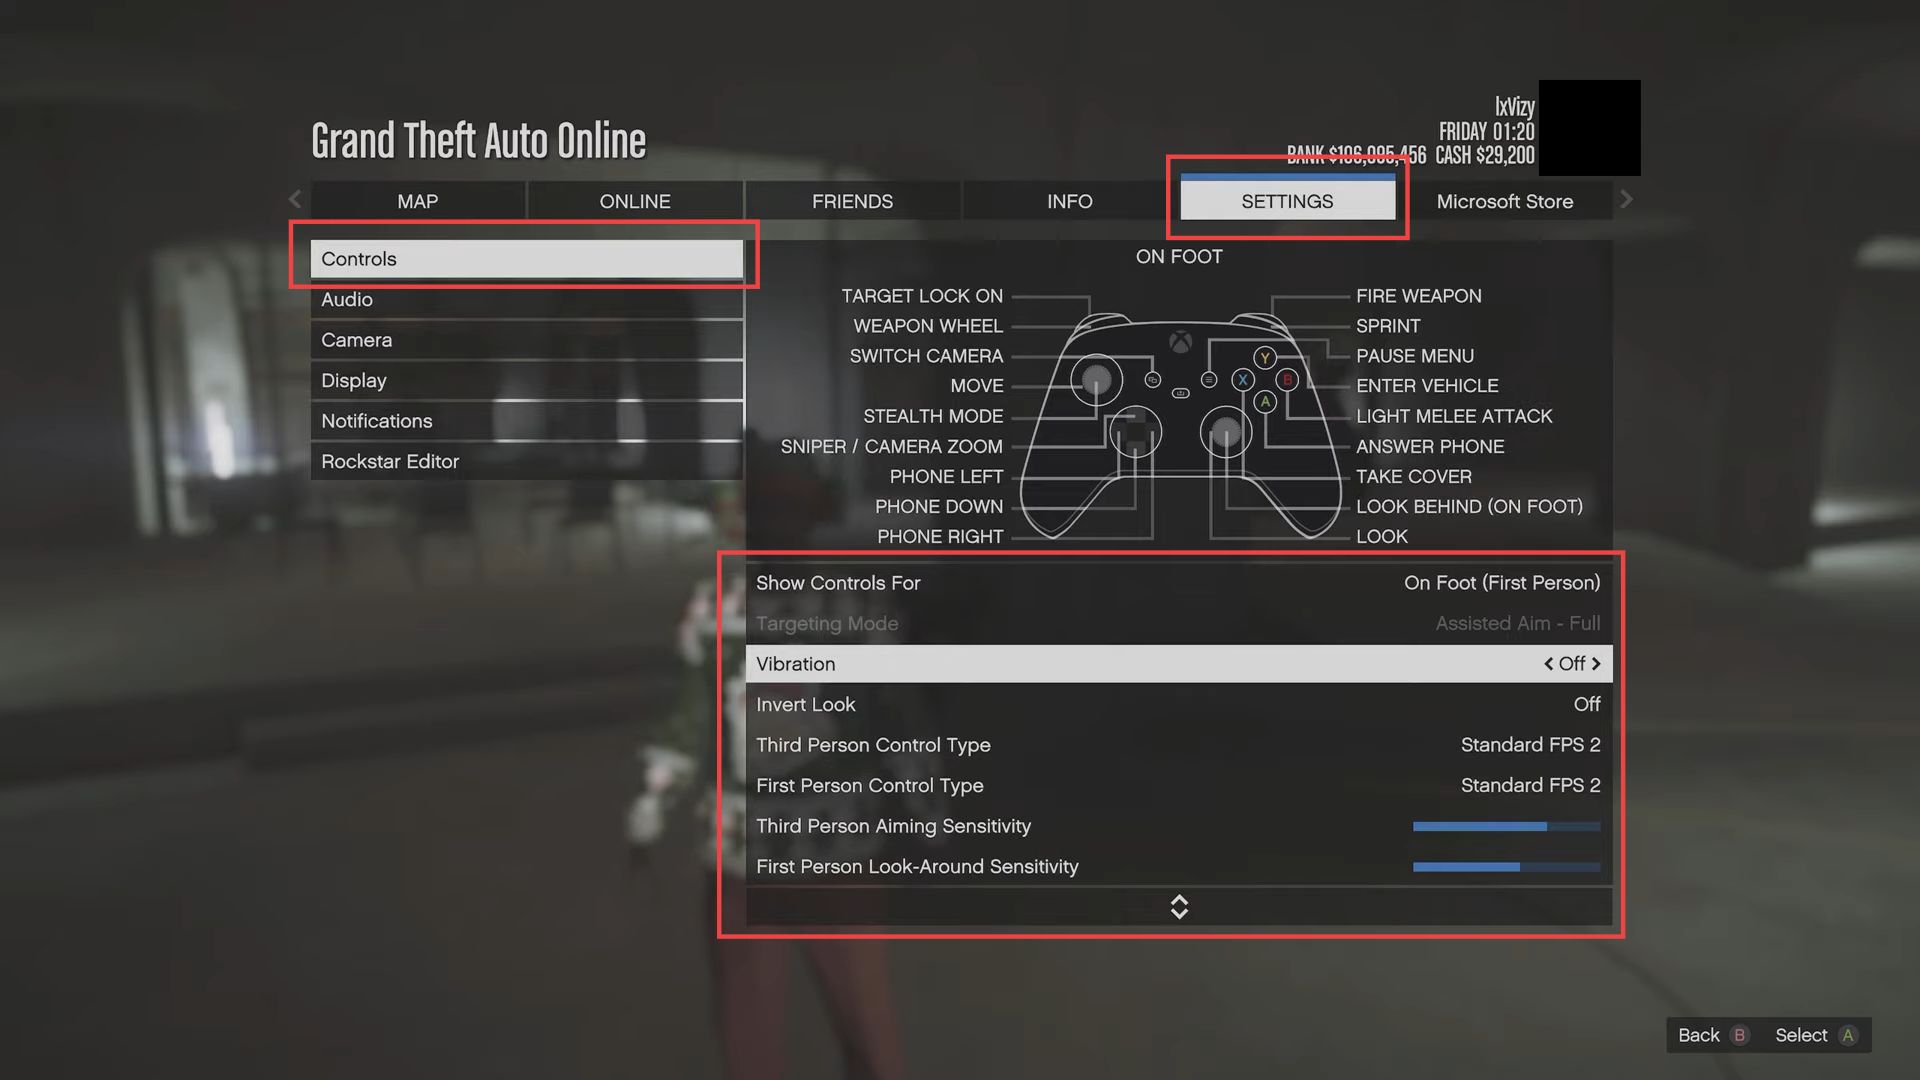
In this section, we will take you through the steps to adjust the Control Settings to get the best performance and optimum in-game experience.
- Launch the GTA Online game on your computer and click on the Settings tab from the quick access toolbar.
- In the settings menu, click on the Controls section on the left side panel.
This will be the first option available in the settings tab. - Before making any changes, ensure that the Show Controls For option is set to On Foot, Third Person.
Changing settings in this tab while having this option selected will affect various control settings. - To change the targeting mode, access story mode first.
In story mode, you can choose between different targeting modes: Assist, Full Assist, Partial 3M Assist, and 3M.
Select a targeting mode based on your preference and experience level.
Assist and Full Assist offer easier aiming assistance, while 3M Assist provides a more challenging experience. - Decide whether you want to enable or disable controller vibration based on your preference.
- You have to turn on the Invert Look option if you prefer playing with an inverted look (up and down movement).
- Choose your preferred control type for both third-person and first-person modes.
Experiment with different control types to find the one that suits you best. - Adjust the third-person aiming sensitivity based on your preference and find a sensitivity level that allows smooth aiming while maintaining control.
- You can adjust the first-person look-around sensitivity to your liking.
- Fine-tune the third-person and first-person look dead zone settings. Adjust these settings to compensate for stick drift, if present.
- After that, set the aim and look for acceleration for both third-person and first-person modes.
- Find a balance that suits your aiming and movement preferences.
- Ensure that the Allow Movement When Zoomed option is enabled.
This allows your character to move while aiming down sights. - You need to choose whether to switch the handbrake button with the duck button.
This can make certain actions more convenient depending on your control type. - Decide between M + Fire or Fire for the drive-by control type.
- Select the option that aligns with your preferred shooting mechanics.
- After adjusting all the desired settings, make sure to save your changes in the settings menu.
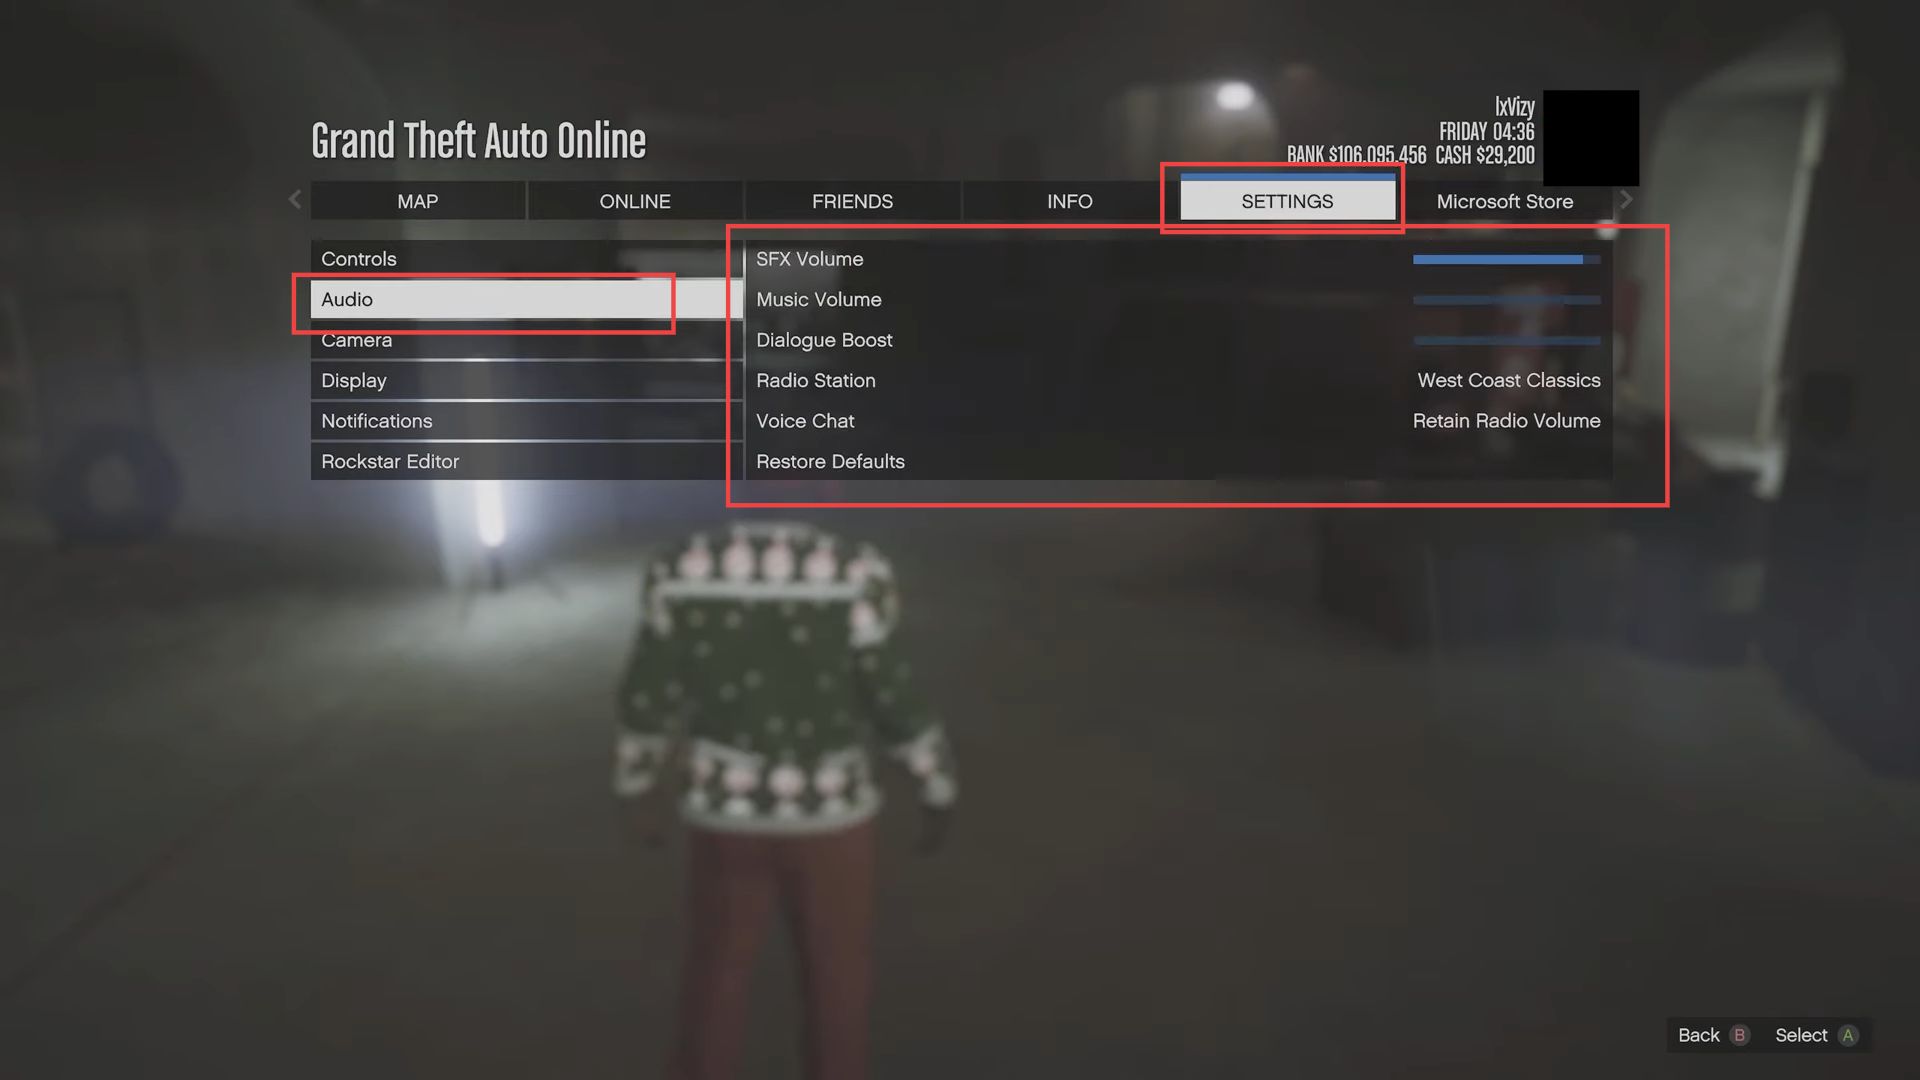
Audio Settings
This section describes how to adjust the Audio Settings to get the best performance.
- Now you have to navigate to the Audio section from the left side panel of the settings tab.
The main focus in the audio settings is the Music Volume option.
Adjusting the music volume will also affect the volume of the radio in the game. Decreasing the music volume to the minimum will mute all songs and audio snippets. - Another option you can change is the Radio Station. If you have a preferred radio station, you need to select it there.
- The selected radio station will default every time you enter a vehicle or different locations like apartments.
- The audio settings are customizable based on your preferences.
Experiment with different settings to find what suits your liking. - You can adjust various audio options to create a tailored audio experience.
- Once you have made the desired adjustments in the audio settings, ensure to save your changes.
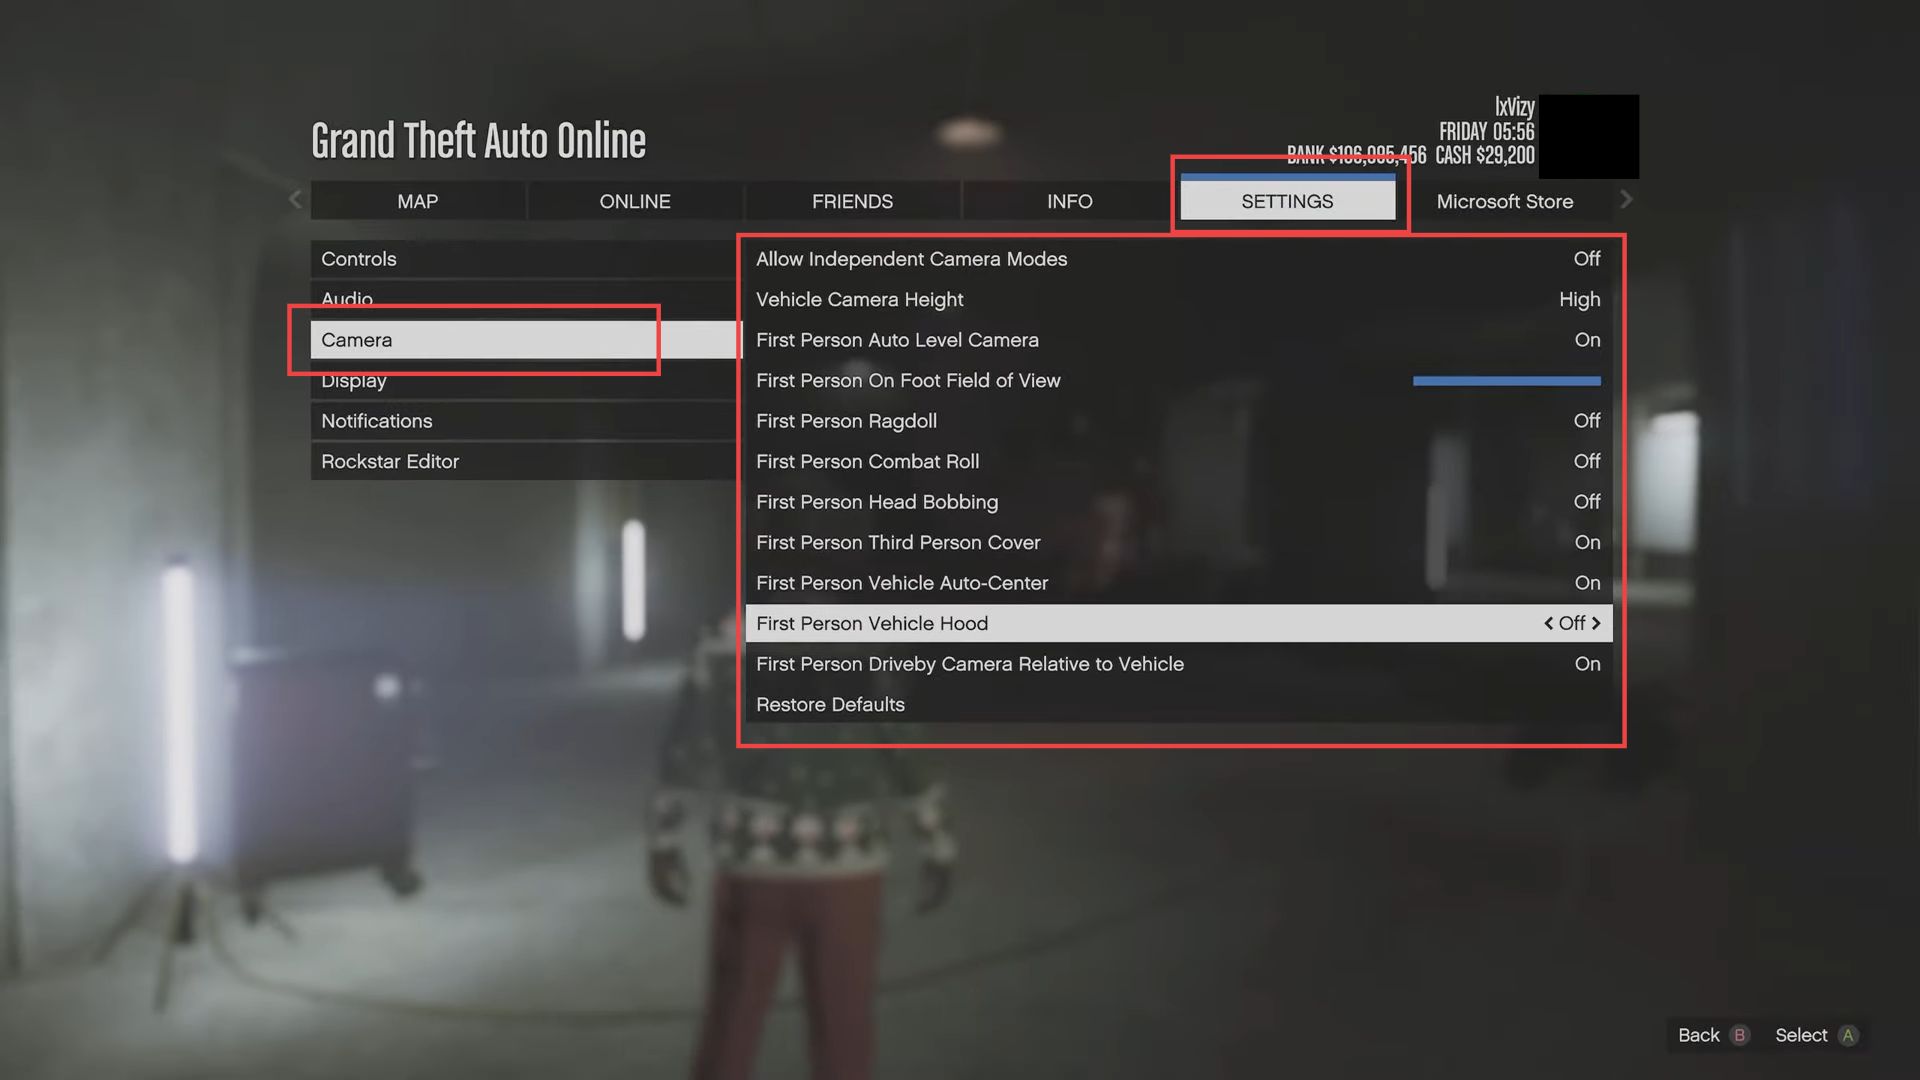
Camera Settings
In this section, we will take you through the steps to adjust the camera settings.
- Navigate to the Camera settings from the left side panel in the settings menu.
- Consider turning off Allow Independent Camera Modes for consistent camera behaviour.
- Adjust the Vehicle Camera Height to High for a broader view in front of your car while driving.
- Keep the First Person Auto Level Camera on to avoid manually adjusting the camera in the first person.
- Adjust First Person On Foot Field of View to the highest setting for a wider view in first-person mode.
- You need to keep the First Person Ragdoll setting on if you prefer first person during ragdoll effects or turn it off for third person.
- Turn off First Person Combat Roll to briefly switch to third person during combat rolls for better visibility.
- Adjust the First Person’s Head Bobbing based on personal preference, turning it on for a more immersive feel.
- Turn on First Person Third Person Cover to briefly switch to the third person when taking cover, providing an advantage in combat situations.
- Keep the First Person Vehicle Auto Center as per default settings.
- Turn off the First Person Vehicle Hood for a standard first-person view while inside vehicles.
- Keep the First Person Drive By Camera Relative to the Vehicle as per default settings.
- Once you’ve adjusted the camera settings to your preference, make sure to save your changes.
Display Settings
This section describes how to adjust the Display Settings to get the best performance.
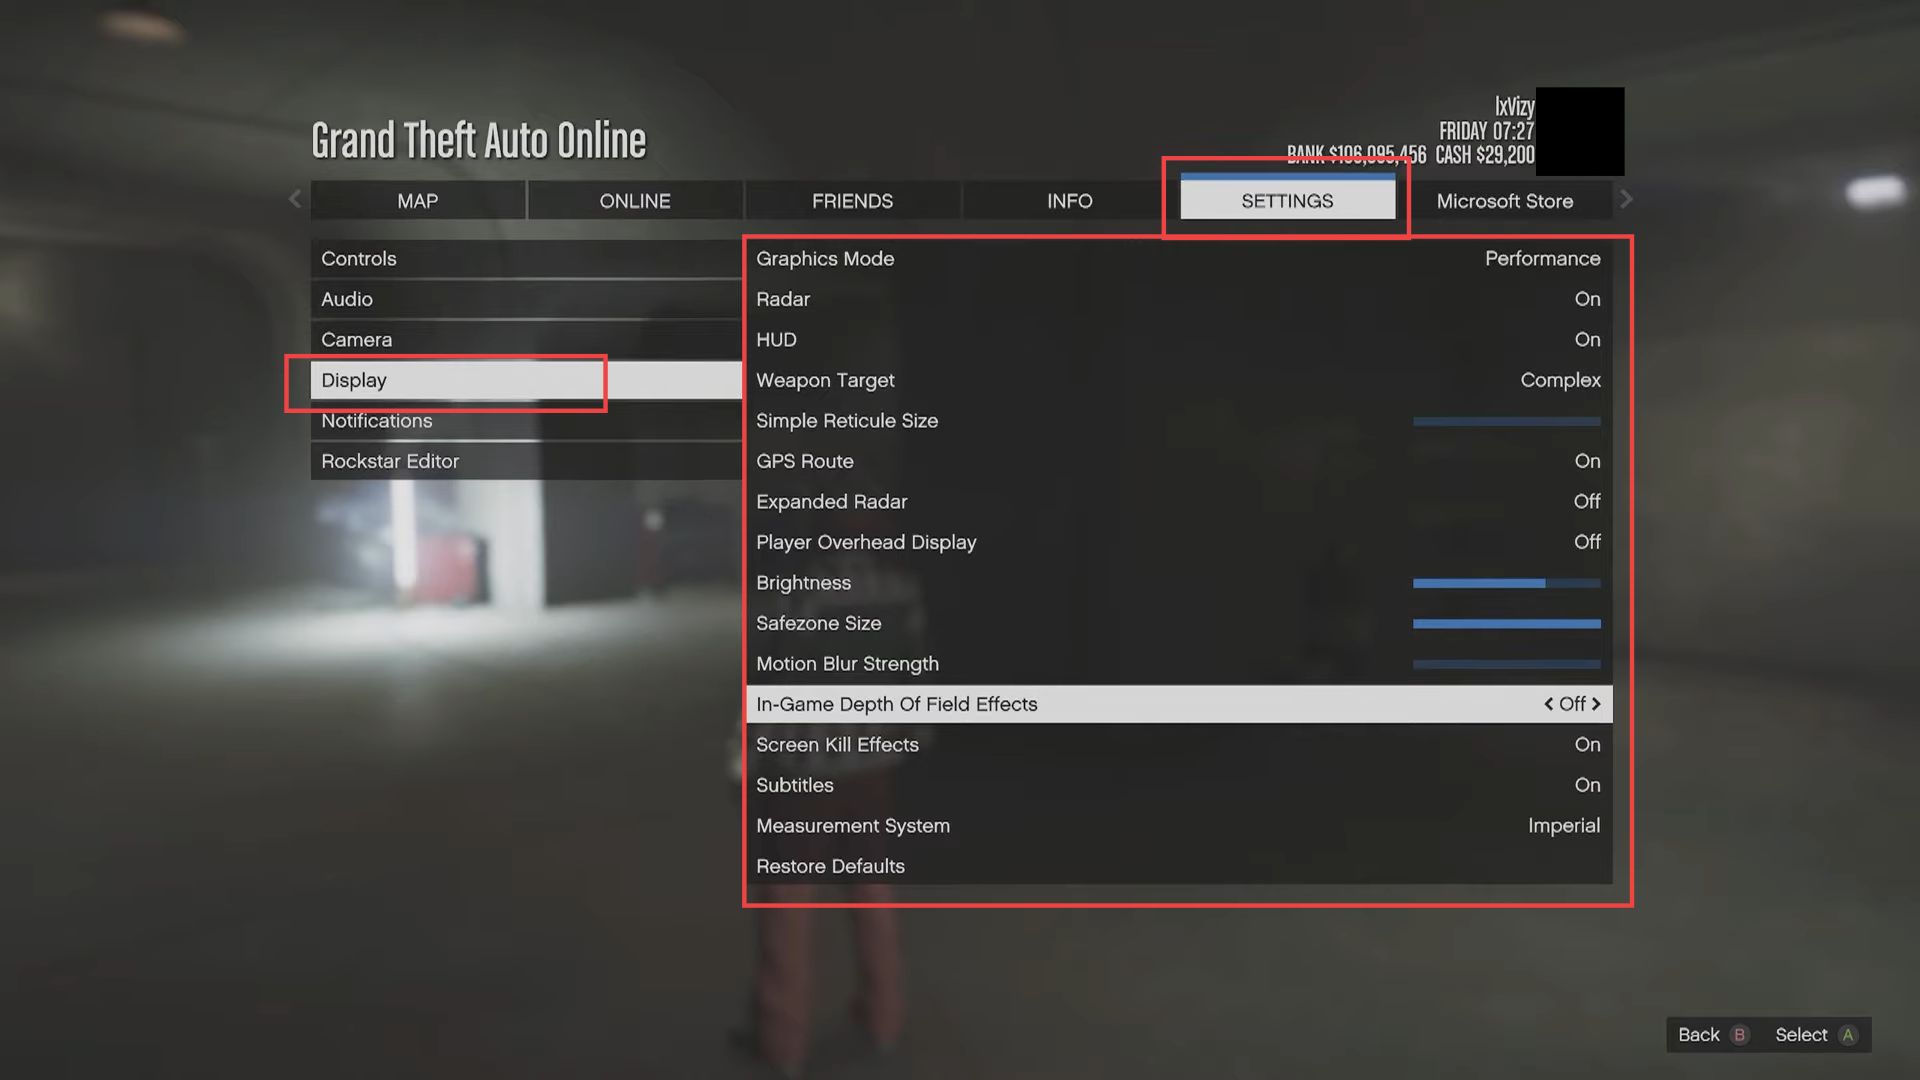
- Navigate to the Display settings from the left side panel in the settings menu.
- For next-gen consoles like PlayStation 5 or Xbox Series X, select the desired graphics mode, such as Performance or Fidelity, based on your preference for smoothness.
- Turn on the Red App and Hood settings for an immersive experience. Red App enhances visual effects, while Hood displays the game HUD.
- Choose Complex Weapon Target for an entire crosshair or Simple Weapon Target for a minimalist one, according to your preference.
- Turn on GPS Route for navigation assistance and consider using Expanded Radar for a permanently larger minimap view.
- Decide whether to turn on Player Overhead Display in GTA Online sessions, showing player names above their heads.
- Set the Brightness and Safe Zone Size according to your liking.
Lowering the safe zone size moves the HUD closer to the centre. - Adjust Motion Blur Strength to your preference.
Higher settings add a realistic blur effect during fast movements, enhancing realism. - Choose whether to enable In-Game Depth of Field.
This feature focuses on objects near your character while blurring the background. - Decide whether to enable Screen Kill Effects and Subtitles based on your preference.
- Choose the preferred measurement system, such as Imperial or Metric, based on your familiarity. Ensure to save any changes you make in the display settings.
Notification Settings
In this section, we will take you through the steps to adjust the Notification Settings to get the best performance.
- Navigate to the Notifications settings tab from the left side panel in the settings menu.
- Decide whether you want to receive phone alerts or not. You can turn off all phone notifications in this section.
- If you choose to keep notifications on, you can manage their frequency. Set the Message Frequency to 1 Hour to receive notifications less frequently.
- Ensure you save any changes you make in the notifications settings.

Rockstar Editor Settings
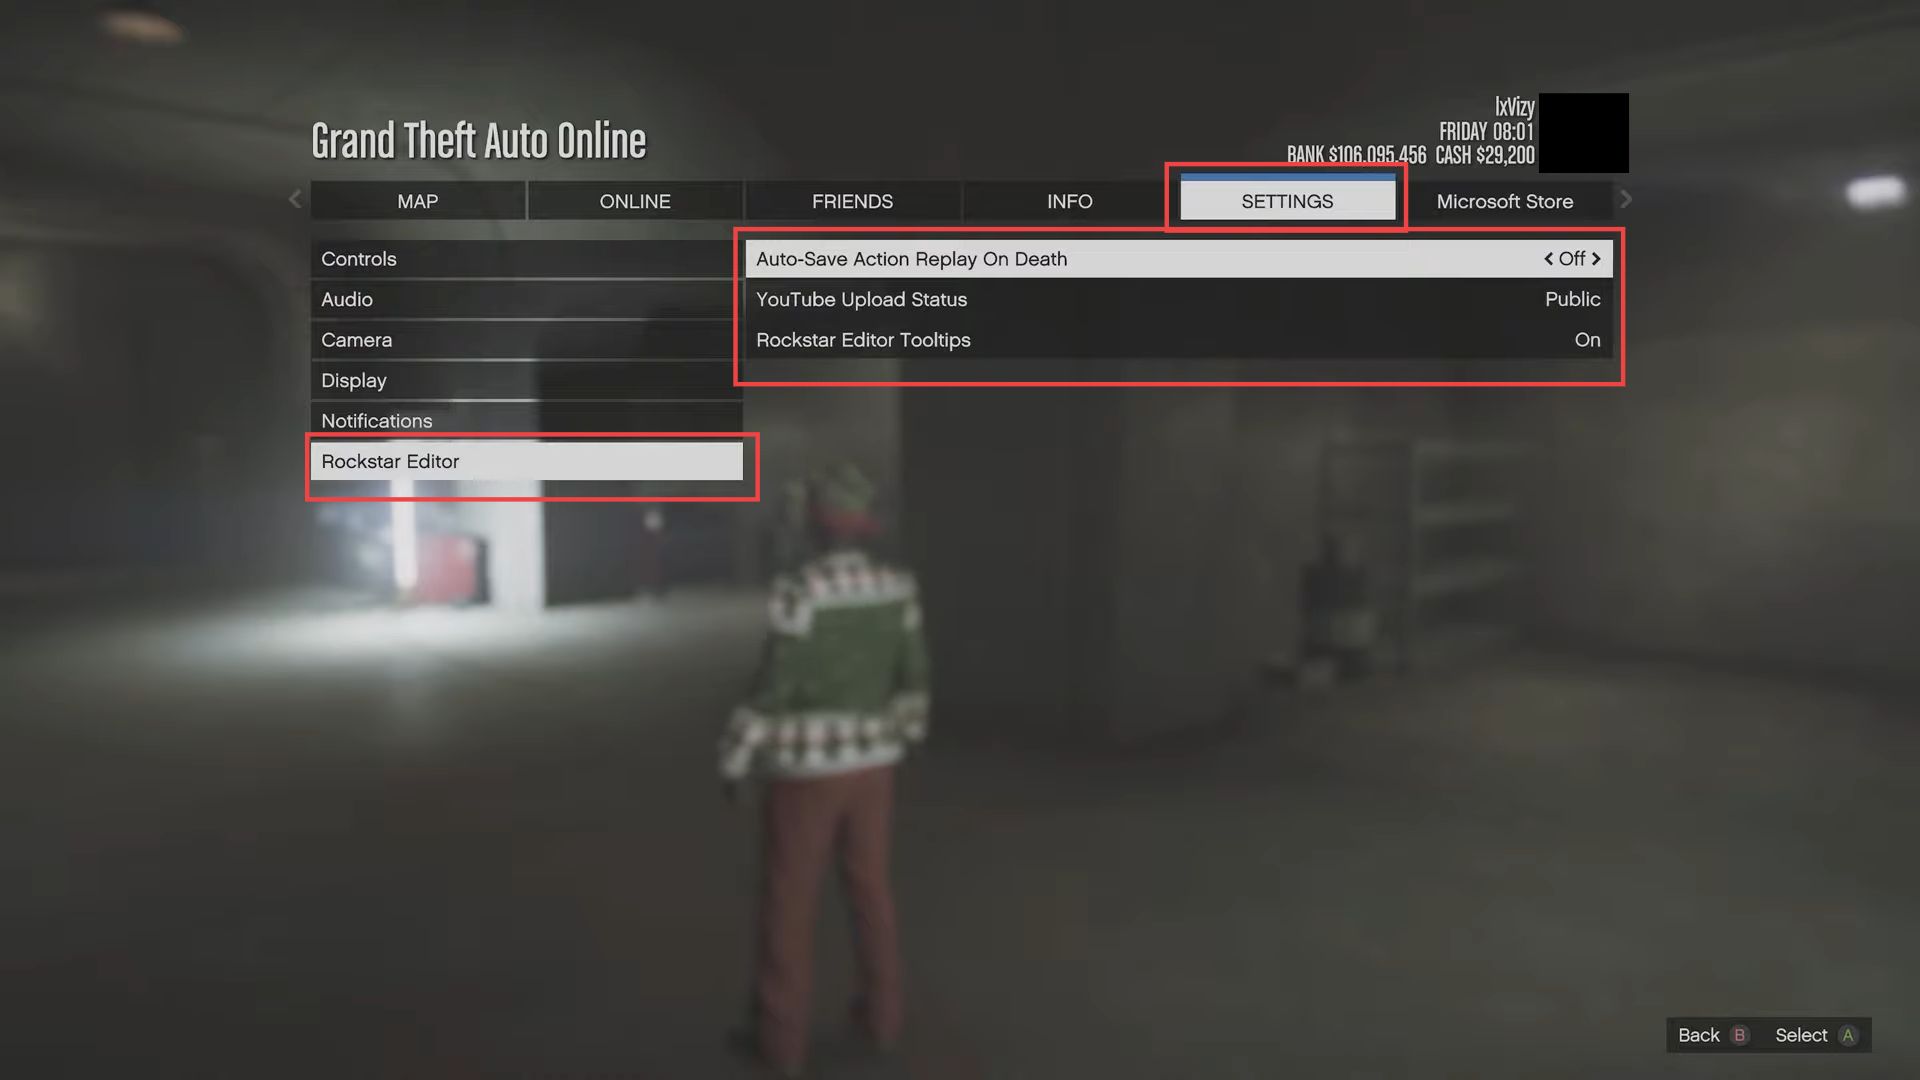
This section describes how to adjust the Rockstar Editor settings.
- If you use the Rockstar Editor, access its settings from the relevant section in the game’s settings menu.
- Take note of the default settings that are already in place within the Rockstar Editor settings.
- Consider how often you use the Rockstar Editor and your preferences for editing and recording gameplay. Depending on your usage and preferences, adjust various settings within the Rockstar Editor settings.
For example, you might adjust playback speed, camera settings, or other options that align with the editor’s use. - Ensure any changes you make to the Rockstar Editor settings are saved.
- Once you’ve customized your Rockstar Editor settings or left them at default, you can now consider your GTA Online settings as a whole.
- Make sure all your settings across various categories controls, camera, audio, notifications, etc. align with your gameplay preferences and needs.
- Now you have to save all the changes you’ve made to your settings.
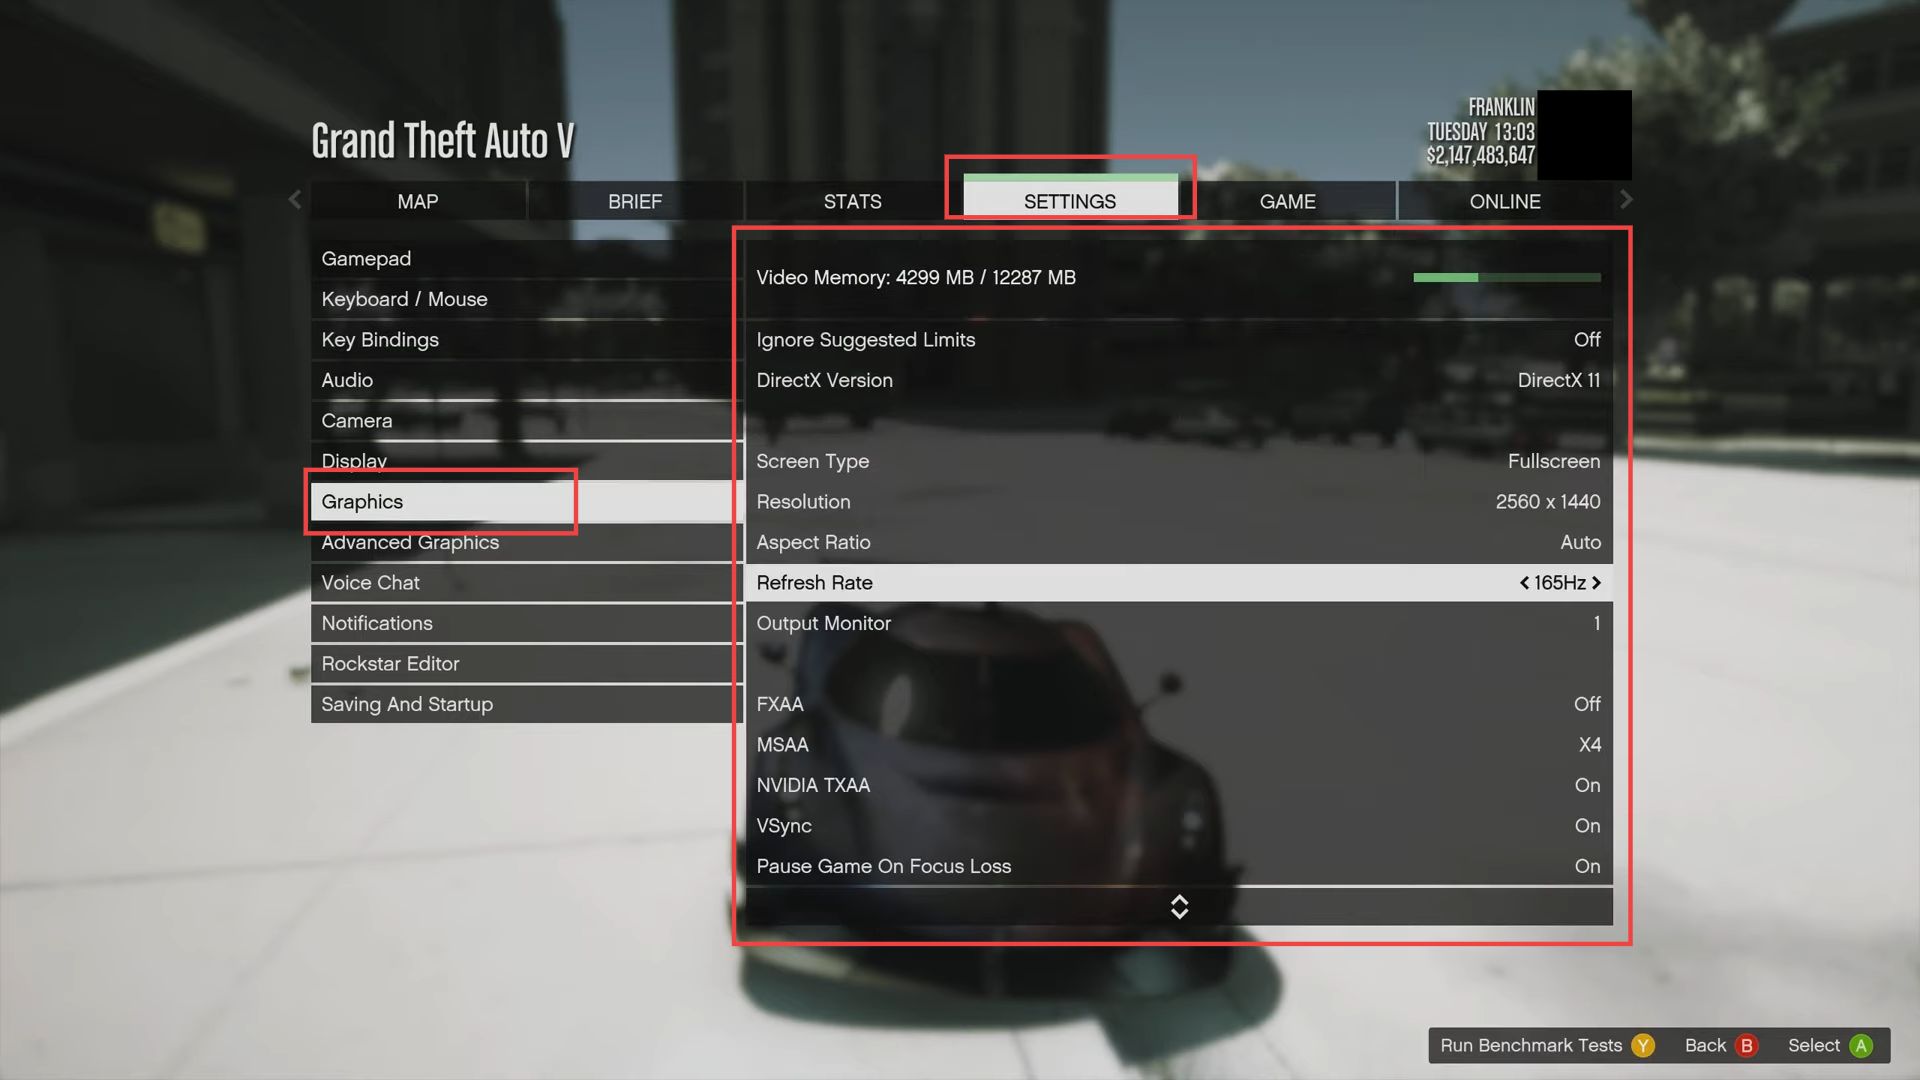
PC Graphic Settings
This section explains how to adjust the PC Graphic Settings to get the best performance.
- Navigate to the left side panel in the game’s settings menu to access the PC-specific settings.
- Note that all keyboard and mouse settings are left at default since you don’t play with keyboard and mouse.
- If you’re seeking better performance on a PC, you can adjust graphics settings.
Lower Population Density and Variety settings to reduce the number of pedestrians and vehicles in the game world. - Adjust Distance Scaling to decrease the rendering distance for objects. After changing the key performance settings, you can further optimize by adjusting other graphics settings.
- Lower various settings to Normal or Low to optimize performance based on your PC’s capabilities.
- Save the changes you’ve made to the graphics settings and restart the game to apply the changes.
- Use the new settings you’ve changed and run a benchmark test to measure the frames per second (FPS) you’re getting.
- Keep in mind that your GTA 5 on PC is modded with different graphics mods, which can impact performance.