This guide will let you know how to use Joycons on a Windows PC with DS4 Windows. You have to download and install DS4 Windows, then enable device mapper support. Now configure controller drivers, download ViGEmBus driver, and other optional drivers. After that, connect Joy-Cons with DS4 Windows, recognize the Joycons, and access the button rebinding.
Download DS4 Windows
In this section, we will take you through the steps to download DS4 Windows. DS4 Windows is a program that simulates an Xbox controller on your computer, making your Joy-Cons compatible with various games.
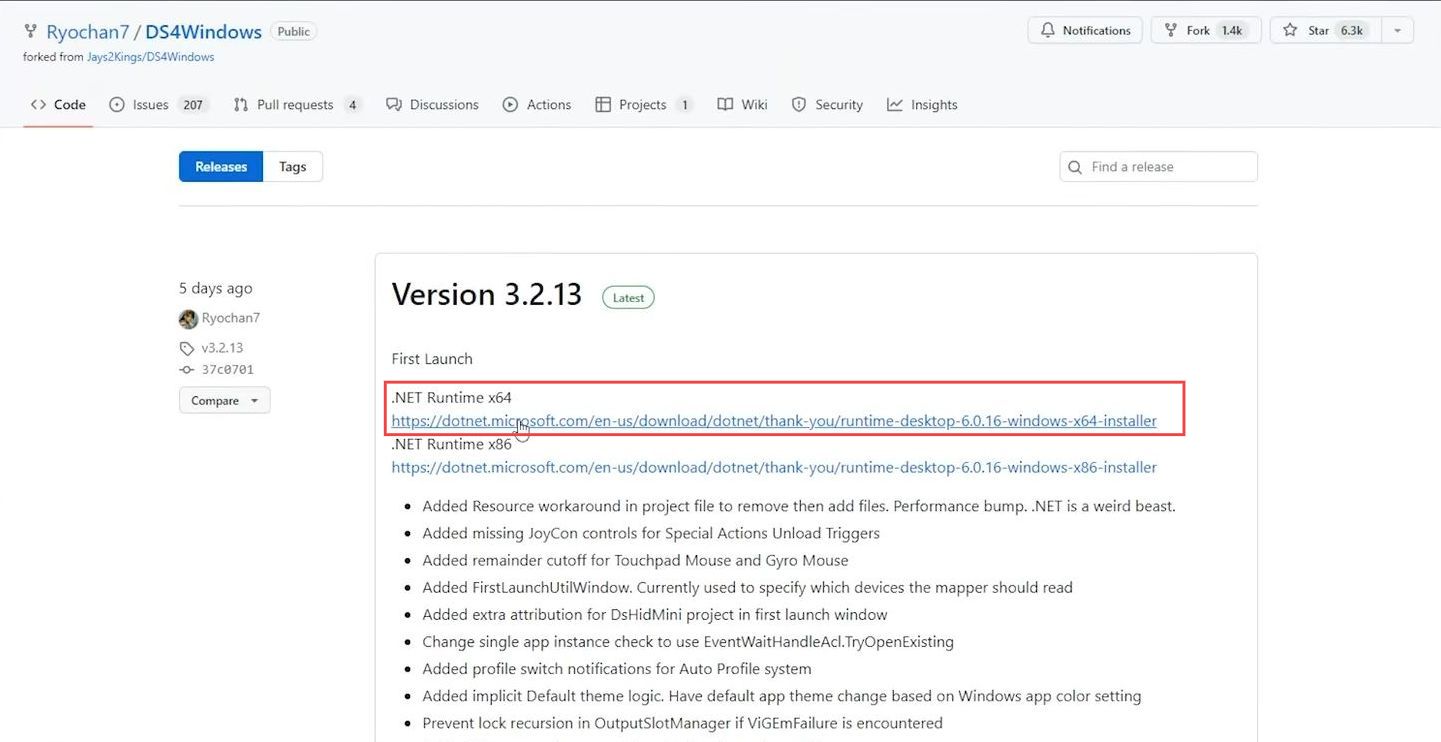
- First, you’ll need to have Nintendo Switch Joy-Cons and a Windows PC. Open up your web browser and download the DS4 Windows Releases.
Xbox controllers are broadly supported by games, and Windows 8 and newer already have built-in Xbox controller drivers. - Make sure to choose the release by Ryochan7, as they are the current developer of DS4 Windows.
- DS4 Windows requires the .NET Framework to function and from the DS4 Windows GitHub page, locate the link for the most recent version of the .NET Framework.
It is recommended to choose the 64-bit version for compatibility. - Download the .NET Framework runtime (x64) and from the same DS4 Windows GitHub page, find the download link for the DS4 Windows program.
- You can choose either the 7-Zip version (.7z) or the zip file version (.zip).
The 7-Zip version requires the 7-Zip program to open, while the Zip version is more commonly supported by various zip programs. - Download the DS4 Windows 64-bit version of your choice.
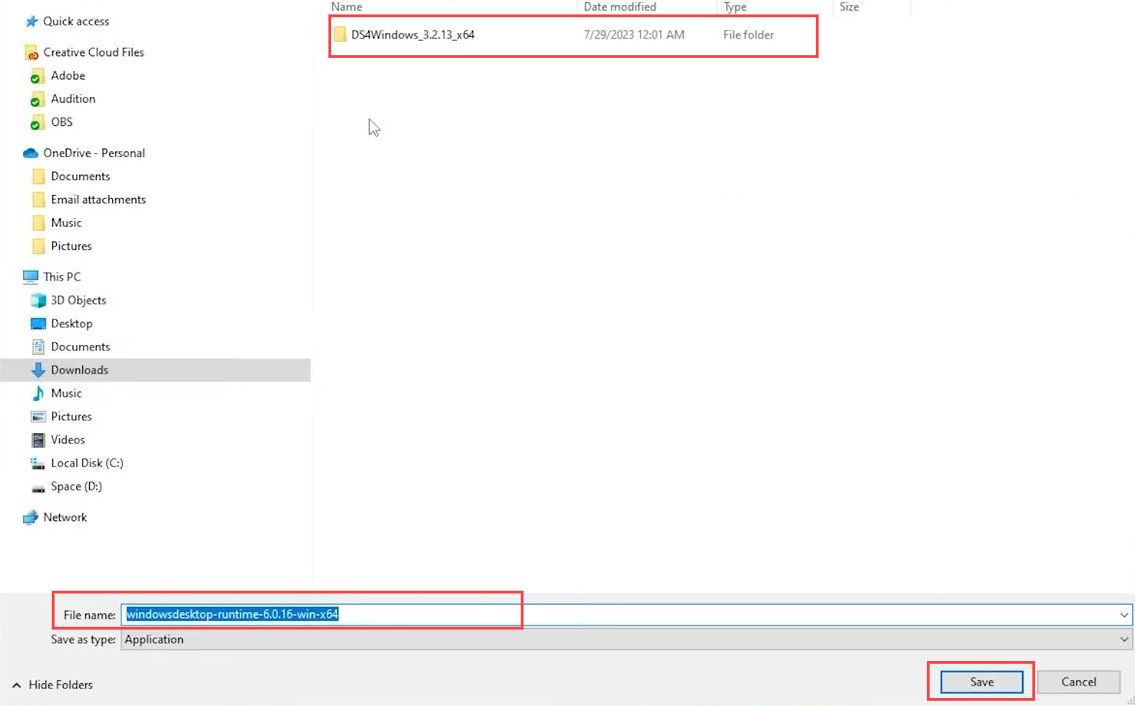
After downloading DS4 Windows, the file will prompt you for an installation location.
- Choose any location on your computer where you want to save the DS4 Windows program. Common choices include the Downloads folder or the desktop.
Install DS4 Windows
This section describes how to install DS4 Windows after successfully downloading it.
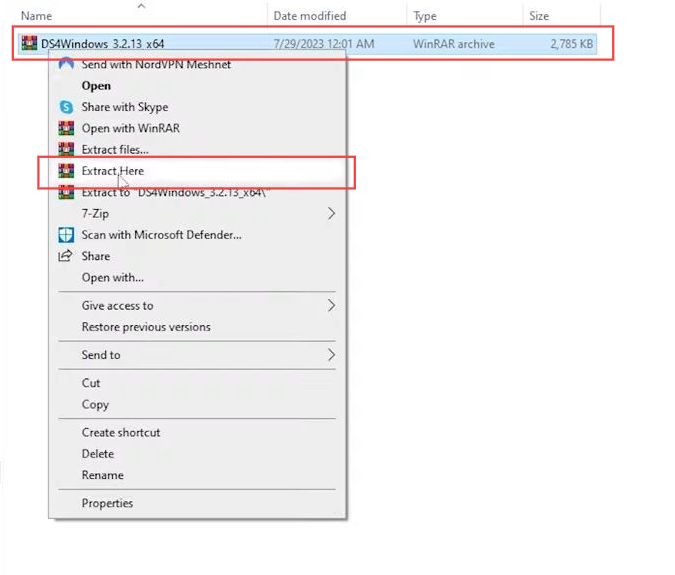
- Once you’ve chosen the installation location, extract the contents of the downloaded DS4 Windows file.
You can use the file manager of your choice to do this. - If you downloaded the 7-Zip version, you may need the 7-Zip program to extract the contents.
- If you downloaded the zip file version, you can extract it using your computer’s built-in zip extraction tools.
- Install the .NET Framework that you downloaded earlier.
This framework is essential for running DS4 Windows and ensuring its proper functionality. - After installation is complete, locate the DS4 Windows executable file within the folder you extracted.
- Double-click the executable file to run DS4 Windows for the first time.
The program will guide you through the process of setting up and configuring your Nintendo Switch Joy-Cons on your Windows PC. - DS4 Windows will prompt you to install the necessary drivers for your Joy-Cons to work with your PC. Follow the on-screen instructions to complete the driver installation.
- Locate the folder where you extracted the DS4 Windows files.
Inside the DS4 Windows folder, you’ll find various files and folders. - Look for a colorful logo in the middle of the files and when you hover over it, a tooltip should appear, indicating that it’s an application and can be run.
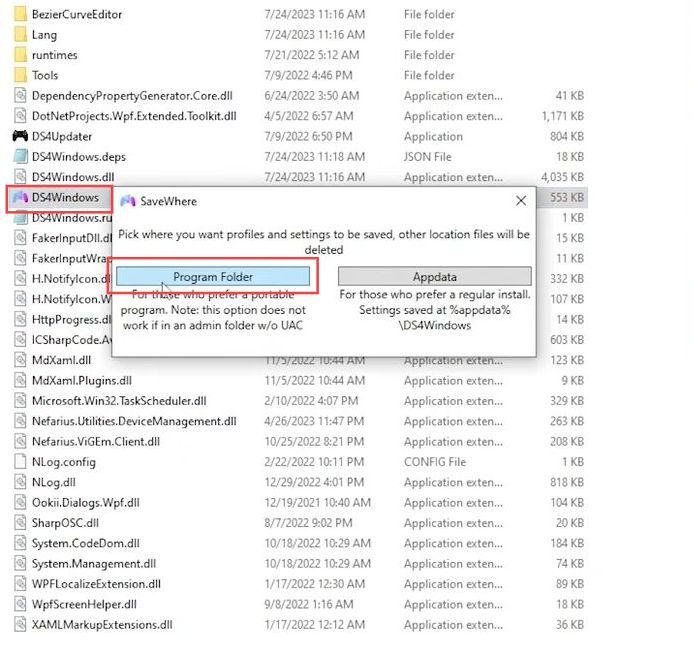
This logo represents DS4 Windows. - Double-click on the colorful logo to launch DS4 Windows and this will initiate the program. After launching DS4 Windows, a pop-up window might appear, asking you where you want to install associated settings and preferences for the program.
- You have the option to choose a location.
Many users prefer to install it in the program folder for easy management in case of future updates or changes. - If prompted to choose an installation location, select the location where you want DS4 Windows to save its settings.
- This could be the program folder where DS4 Windows is located, as it helps keep everything organized and easily accessible.
After you’ve chosen the installation location (if prompted), DS4 Windows will initialize and set up for your use. This might include setting up drivers, controllers, and configurations.
Enabled Devices Mapper Support
This section explains how to enable Devices Mapper Support for using Joycons on a Windows PC.
- Open the DS4 Windows application on your PC.
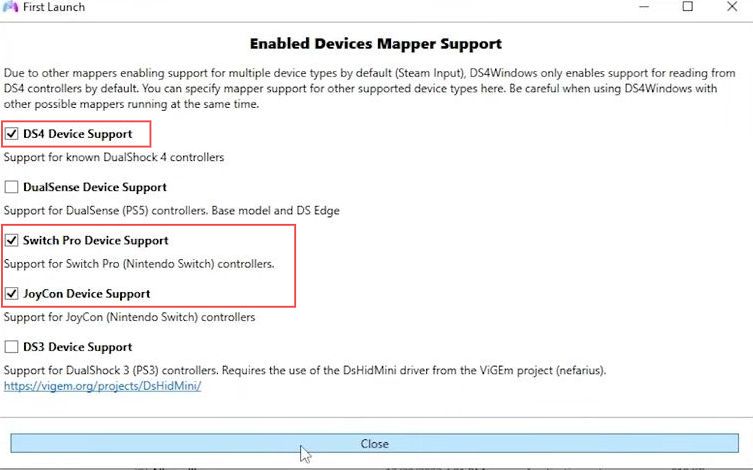
A pop-up window called Enabled Devices Mapper Support will open up. - This new update requires you to specifically enable controller support for the devices you want to use.
This is a one-time setup to ensure compatibility.
In the Enabled Devices Mapper Support pop-up, you’ll see a list of devices that you can enable for support. These might include options like Joy-Con and Switch Pro Controller. - Identify the devices you want to use with DS4 Windows, such as Joy-Cons and Switch Pro Controller. To enable support for these devices, simply click on the checkboxes next to their names.
If you have both Joy-Cons and a Switch Pro Controller, make sure to enable support for both. - After selecting the devices you want to enable, click the Close button on the pop-up window.
This confirms your choices and closes the pop-up.
Configure Controller Drivers
This section will take you through the steps to configure controller drivers.
- After installing DS4 Windows and enabling device support, the program should open automatically. If it doesn’t, locate the DS4 Windows icon on your desktop or in the program folder and launch it.
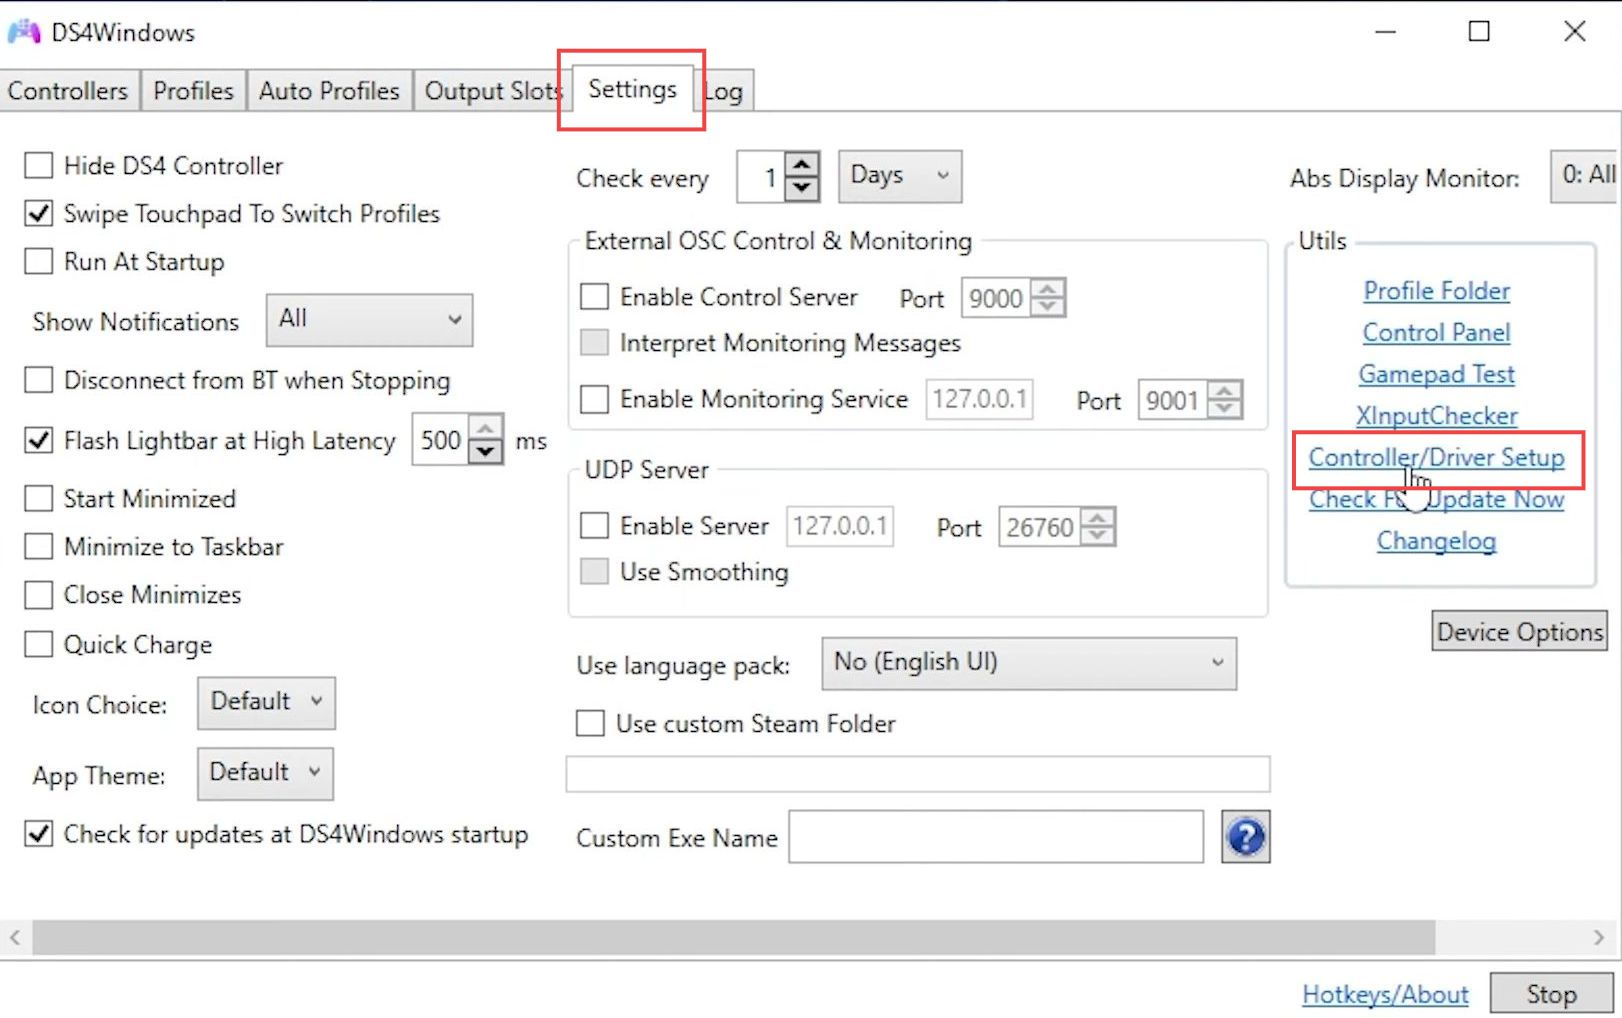
Once DS4 Windows is open, you’ll find a menu at the top. - Look for the Settings option in the menu and click on it. Within the Settings menu, navigate to the Controller/Driver Setup section.
This section is usually located toward the bottom of the Settings menu. - In the Controller/Driver Setup section, you should see various options related to configuring drivers for your controllers. These options allow you to fine-tune how your controllers interact with DS4 Windows and your PC.
- Depending on your specific controllers and preferences, you might need to make adjustments in the Controller/Driver Setup section.
This could involve setting up driver settings or making sure your controllers are properly recognized. - After making any necessary changes, make sure to save your settings if prompted.
This ensures that your configurations are applied to your controllers and the DS4 Windows program.
Download ViGEmBus Driver
This section explains how to download the ViGEmBus driver on a Windows PC.
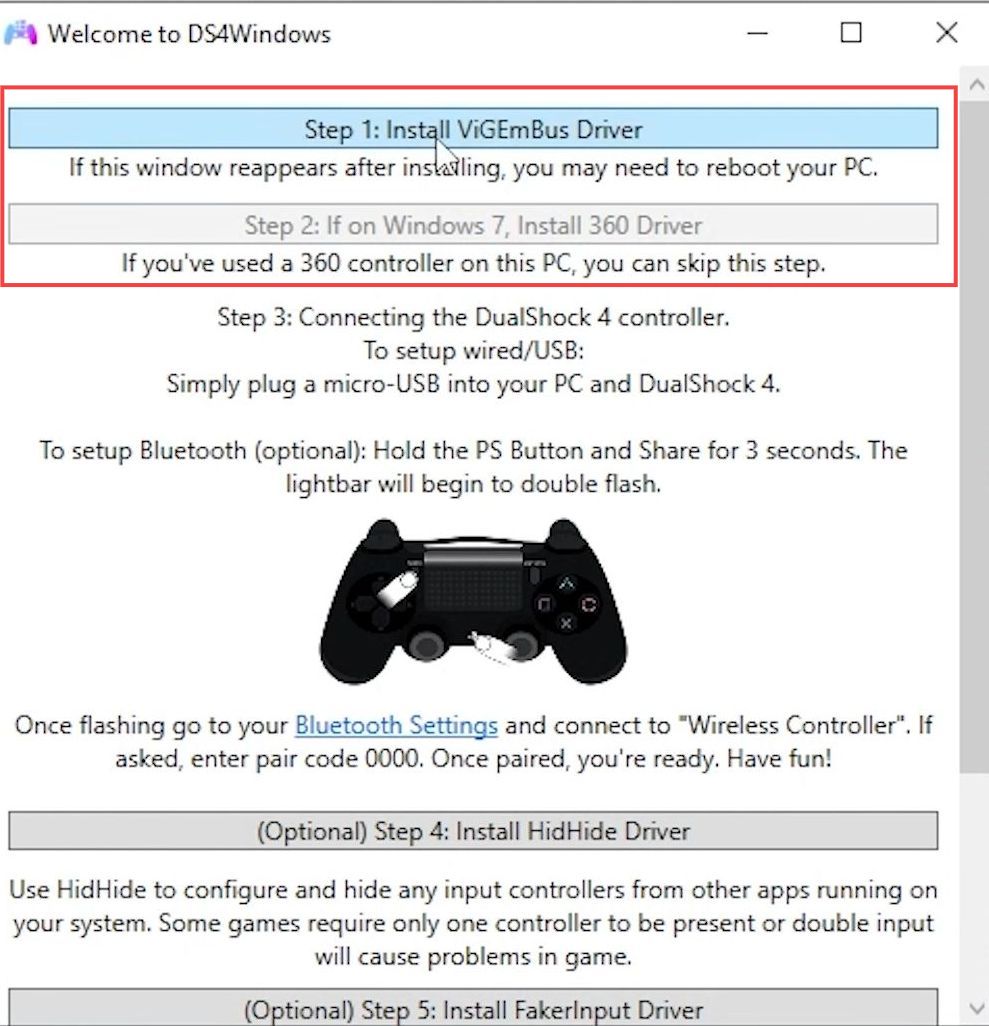
Within the Controller/Driver Setup section, you’ll find a list of additional drivers that DS4 Windows might require.
- Look for the ViGEmBus Driver at the top of the list.
This driver is crucial for DS4 Windows to work properly. - Click on the Download link next to the ViGEmBus Driver to initiate the download of the required driver files to your computer.
- Once the download is complete, locate the downloaded driver file and run the installer to launch an installation wizard for the ViGEmBus driver.
- Follow the prompts in the installation wizard to install the ViGEmBus driver on your computer.
- Typically, you’ll need to accept the terms of the license agreement, specify an installation location, and confirm the installation.
After you’ve successfully gone through the installation process, you’ll be notified that the ViGEmBus driver has been installed. - If you’re running an older version of Windows (like Windows 7) and need Xbox 360 drivers, click on the second button in the Controller/Driver Setup section to access the download link for the Xbox 360 drivers.
Download and install these drivers as needed. - After installing the required drivers, you might need to restart DS4 Windows for the changes to take effect.
This ensures that the newly installed drivers are recognized by DS4 Windows.
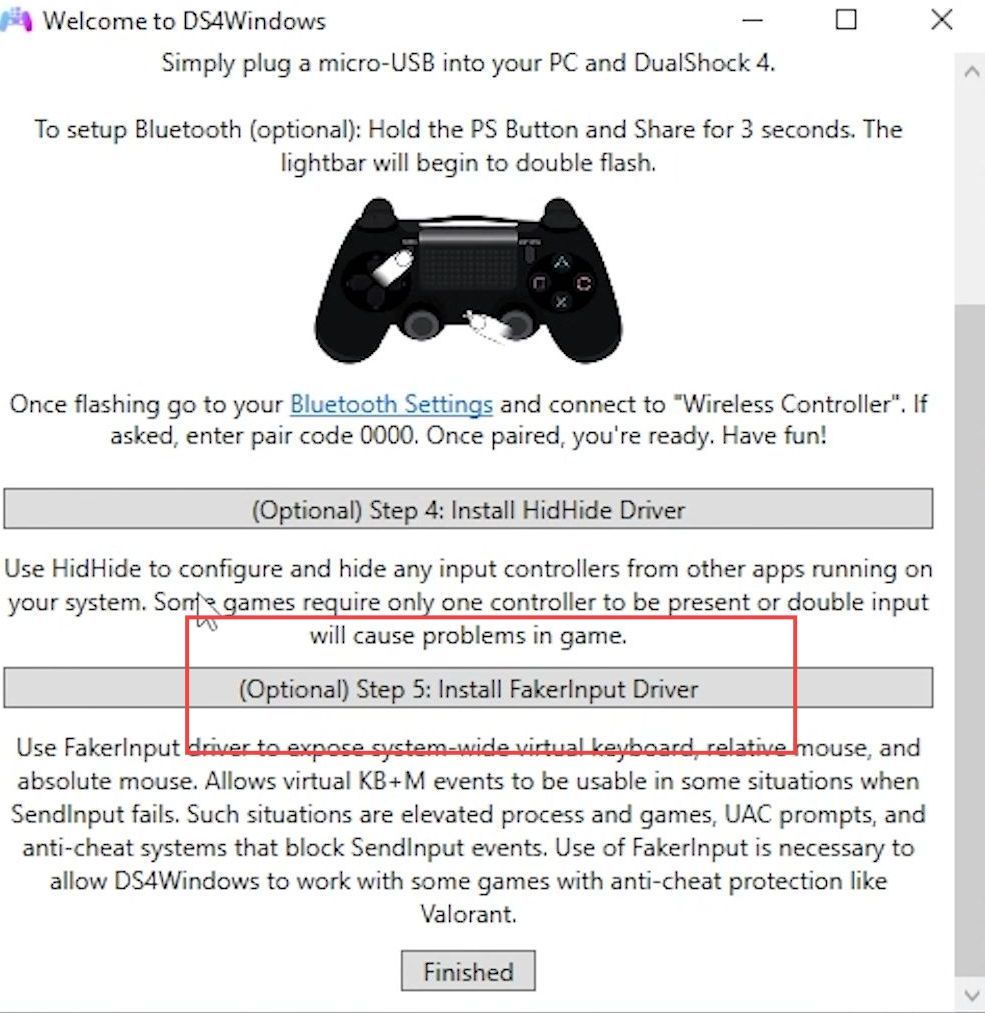
Optional Drivers
This section explains how to download the Optional drivers to use Joycons on Windows PC.
Within the Controller/Driver Setup section, you’ll notice a few additional optional drivers listed, such as the HidGuardian Driver and the Install FakerInput Driver.
The HidGuardian Driver and Install FakerInput Driver are additional drivers that you can experiment with, depending on your specific needs or preferences. These drivers might offer advanced functionalities or specific compatibility features, but they’re not essential for basic functionality.
Once you’ve reviewed the optional drivers and made any necessary installations, you can simply close the Controller/Driver Setup window.
Connecting Joy-Cons with DS4 Windows
This section describes how to connect Joy-Cons with DS4 Windows for using Joycons on Windows PC with DS4 Windows.
- To connect your Joy-Cons to your computer, you have two options; using a charging controller dock or connecting via Bluetooth.
- If you have a charging controller dock that lets you play games while the Joy-Cons charge, you can connect the Joy-Cons to your computer using the dock.
This dock acts as a bridge to connect the Joy-Cons to your PC. - Alternatively, you can connect your Joy-Cons to your computer using Bluetooth.
This method is wireless and allows you to play without the need for a cable. - While Bluetooth is convenient, it’s often recommended to connect the Joy-Cons via cable for a more stable connection, which can lead to better performance during gameplay.
- If you’re using the cable option, connect your Joy-Cons to your computer using a compatible cable. Make sure the cable is securely plugged into both the Joy-Cons and the computer’s USB port.
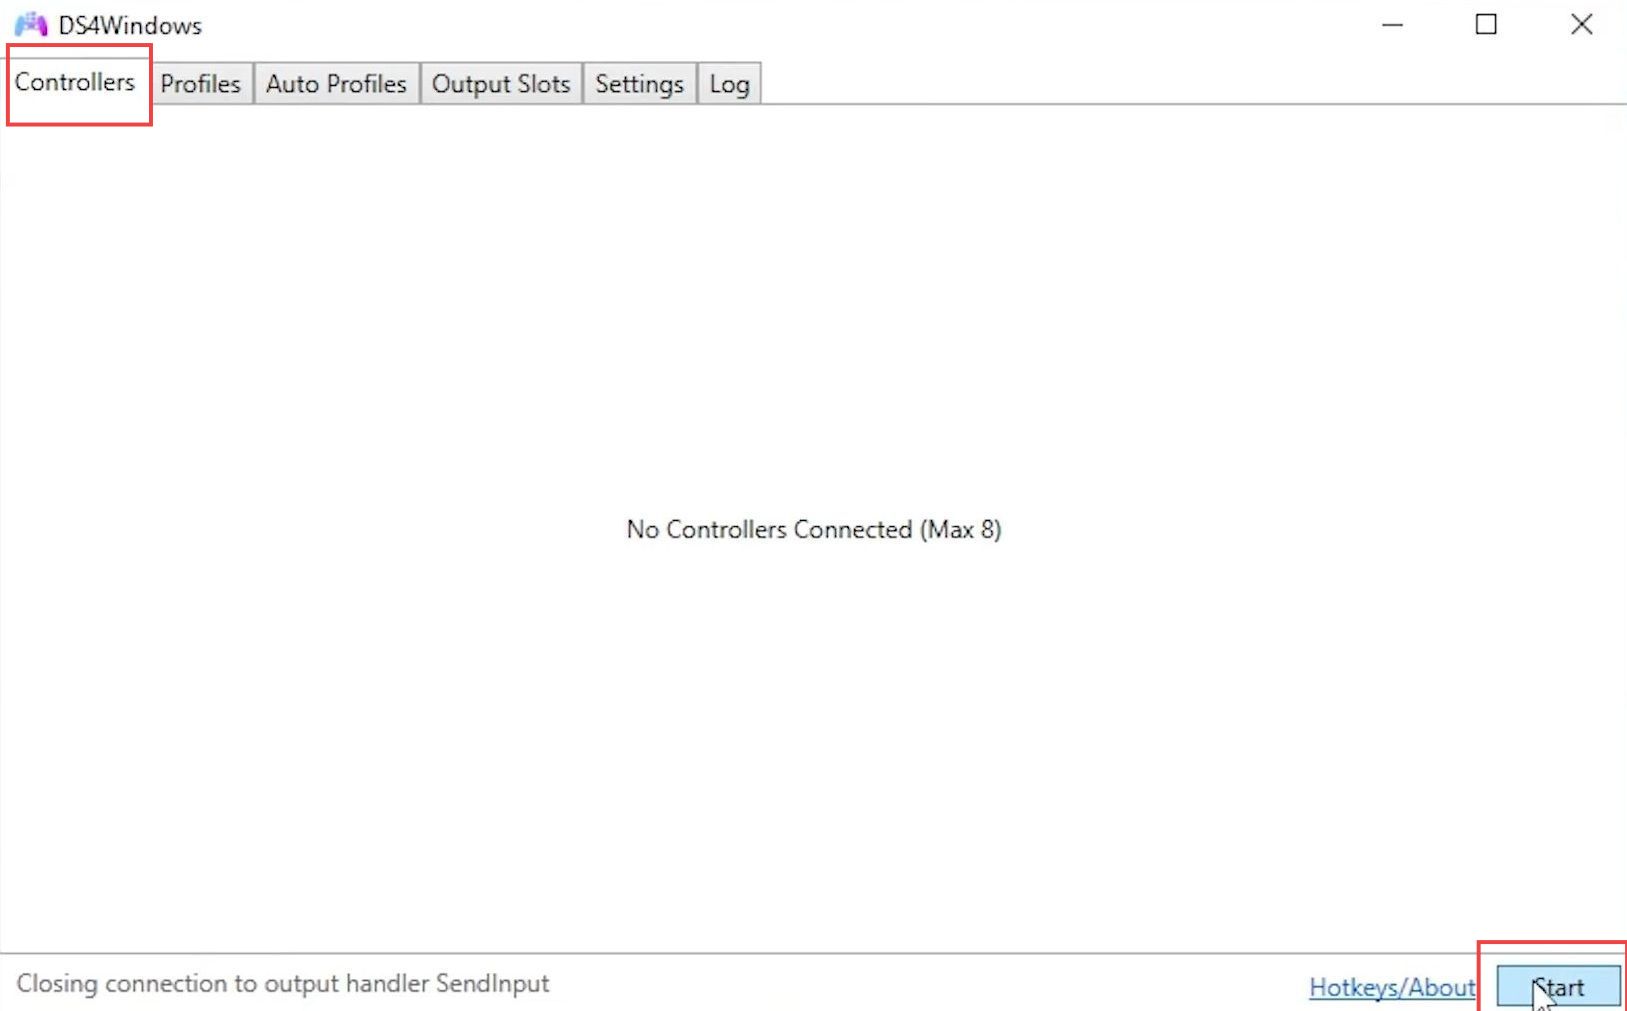
- Open the DS4 Windows program on your computer. The program may start automatically, but if not, click on the Start button within DS4 Windows to initiate it.
Joy-Con Recognition
In this section, we will take you through the steps to access the Joy-Cons recognition.
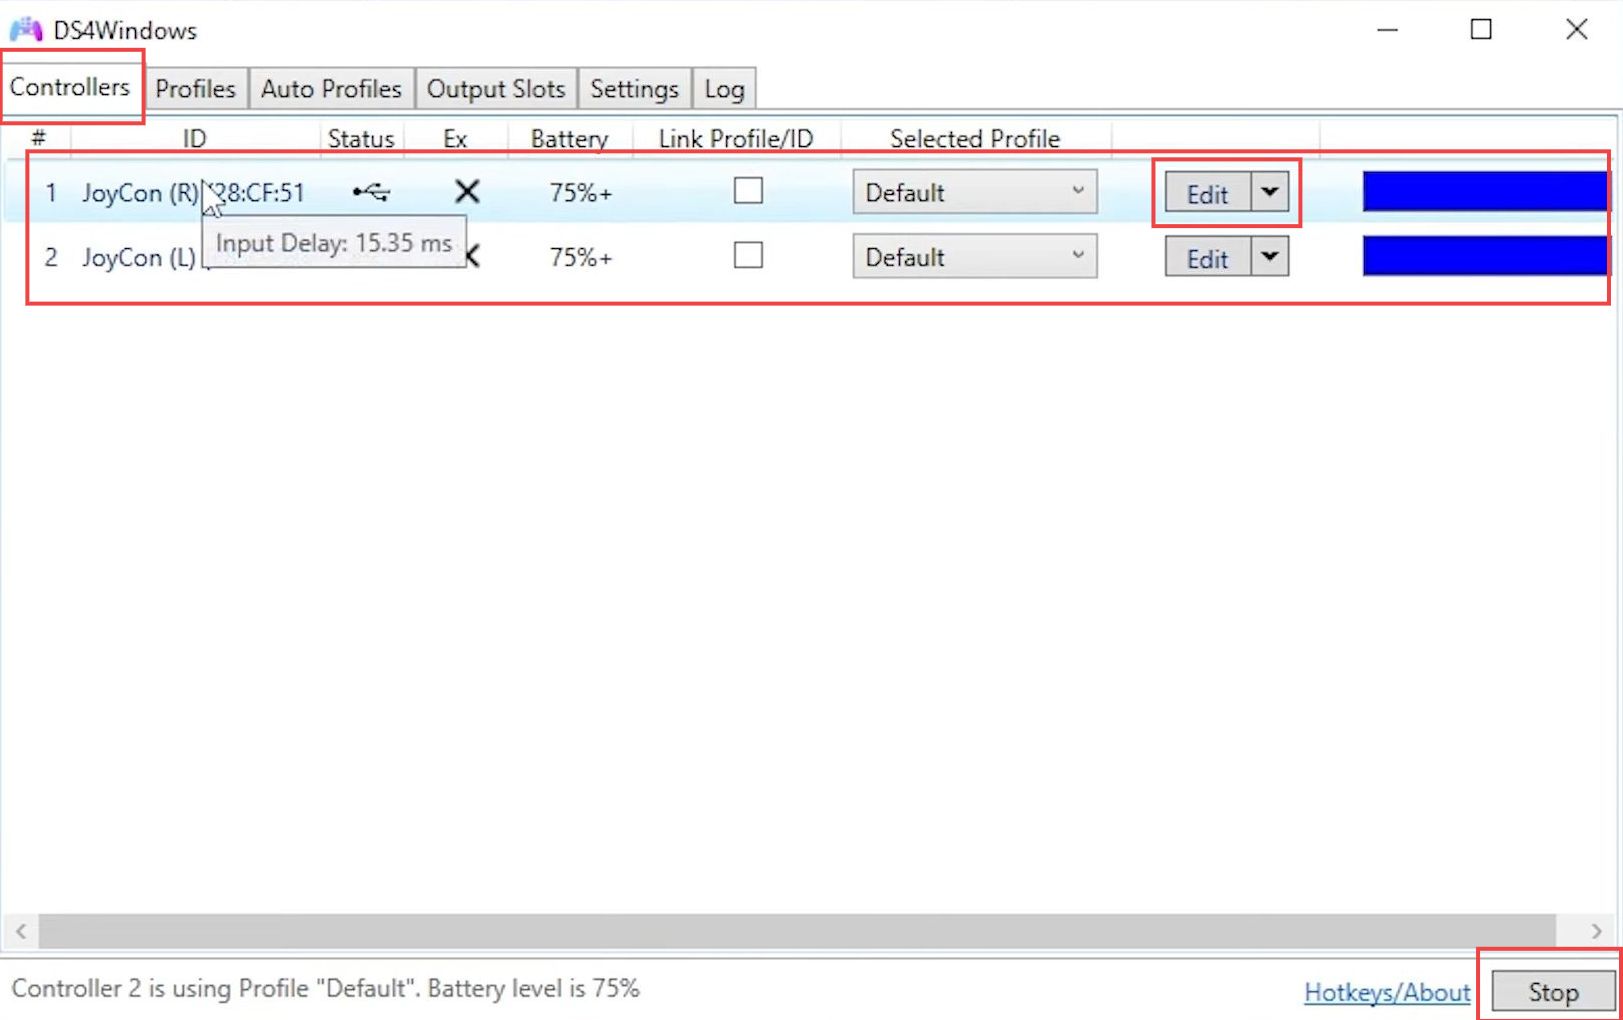
- When you open DS4 Windows, check the status displayed in the bottom corner. If it says Start, click this button to start the program.
- If it says Stop, it means that the DS4 Windows is already running.
Once DS4 Windows is running, your connected Joy-Cons will appear in the list on the program’s interface. Typically, you’ll find a left and a right Joy-Con listed.
The battery levels of your Joy-Cons will be displayed next to each one in the list. You’ll find a percentage indicating the current battery charge. - DS4 Windows comes with pre-mapped controls, where each half of the Joy-Con mimics one half of an Xbox 360 or Xbox One controller.
This means that the gamepad inputs should work without additional configuration. - Unfortunately, you won’t be able to display Nintendo button layouts directly on your games when using Joy-Cons with DS4 Windows. The games themselves don’t support this layout, and DS4 Windows doesn’t provide overlays for displaying different button layouts.
- You’ll need to familiarize yourself with the Xbox button layout, as that’s what the game will recognize.
Although the physical buttons are different on Joy-Cons, you’ll need to think in terms of Xbox buttons while playing. - If you wish to rebind specific buttons, you can do so in DS4 Windows. For example, let’s say you want to rebind a button on the right Joy-Con.
- Find the right Joy-Con in the list within DS4 Windows and click on Edit to access the button rebinding options for that Joy-Con.
Accessing Button Rebinding
This section describes how to access the button rebinding for using Joycons.
In the button remapping interface, you’ll find a list of buttons that correspond to an Xbox controller layout.
- To rebind the A button, which is similar to the cross button on a PlayStation controller, you’ll need to find its equivalent in the Xbox layout.
- Scroll through the list of available buttons until you find the equivalent of the A button on an Xbox controller.
This may be labeled as Cross or A depending on how DS4 Windows recognizes it. - Once you locate the A button equivalent, click on the drop-down menu next to it.
This menu will allow you to select a new function to assign to the button. - From the drop-down menu, choose the function you want to assign to the A button equivalent.
This can include actions like jumping, shooting, interacting, or any other in-game action. - After selecting the new function for the A button equivalent, make sure to save your changes within the button remapping interface.
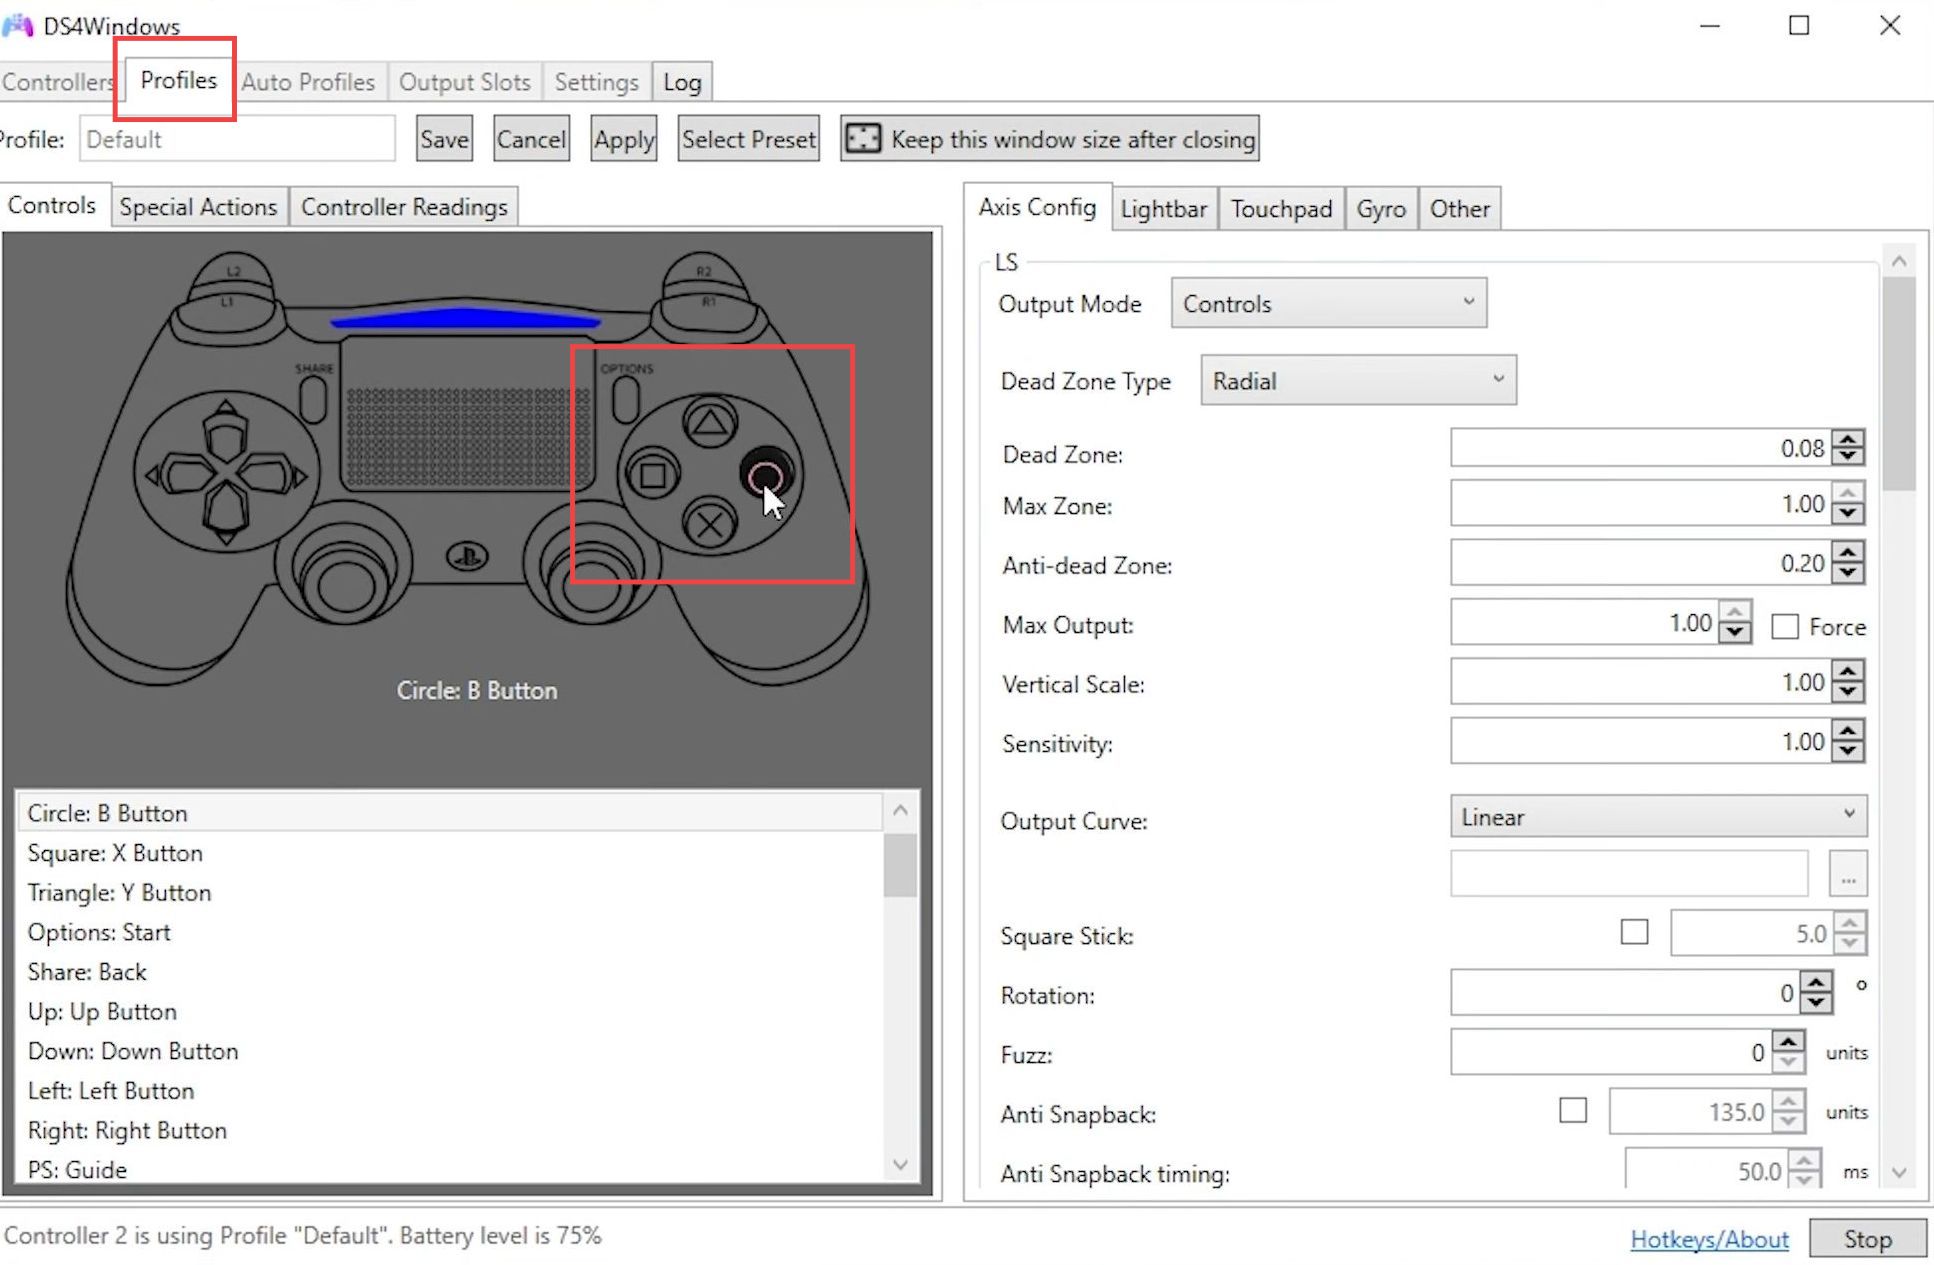
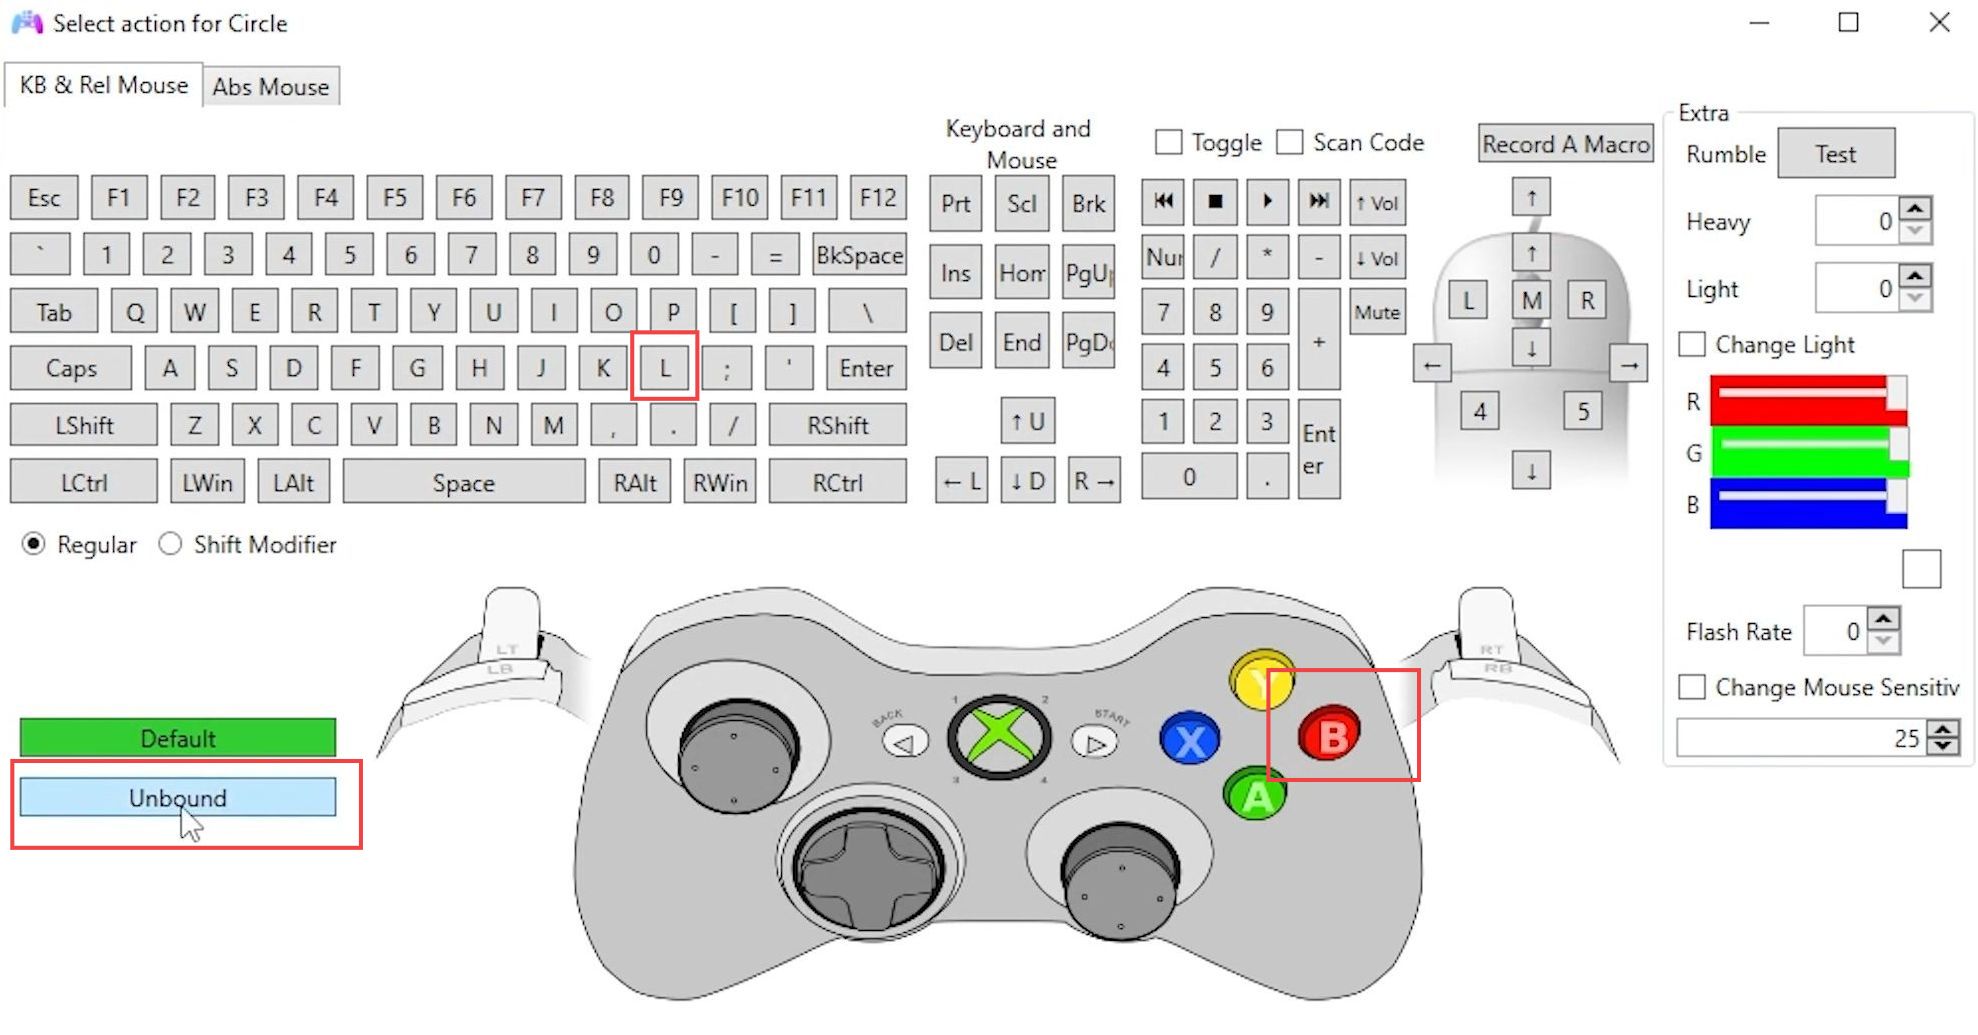
- In the DS4 Windows interface, locate the button you want to rebound.
In this example, you’re focusing on the circle button. - Click on the circle button (or the button you want to rebind) to open a menu that allows you to reassign its function.
- From the menu that appears, you’ll have options to select what you want to bind the circle button to.
You can choose from a representation of a keyboard key, a mouse action, or an Xbox button. - If, for instance, you want to bind the circle button to the L key on your keyboard, click on L in the keyboard representation section.
Alternatively, you can choose an Xbox button if you prefer. - If you decide you don’t want the circle button to be bound to anything, you can also choose to Unbind it.
This means the button won’t perform any action when pressed. - After selecting the new function or choosing to unbind, make sure to save your changes by clicking the Save or Confirm button in the interface.
Creating a New Profile
This section will take you through the steps to create a new profile for using Joycons.
- By default, DS4 Windows emulates an Xbox controller, and if you want to make changes to this profile, navigate to the controller settings interface.
- If you wish to create a new profile, modify settings, and save it, explore the options within the interface to customize your controller’s behaviour.
- Remember that the default profile emulates an Xbox controller, which works well with many games.
This default profile should work for about 90% of games without additional customization. - Keep in mind that the performance of Joy-Cons as a controller in various games can vary.
Some games might work seamlessly, while others may encounter issues such as crashing or freezing. - While some games, like Deep Rock Galactic, may work well with Joy-Cons, others like Sea of Thieves might have compatibility issues. Your experience may differ depending on the game you’re playing.
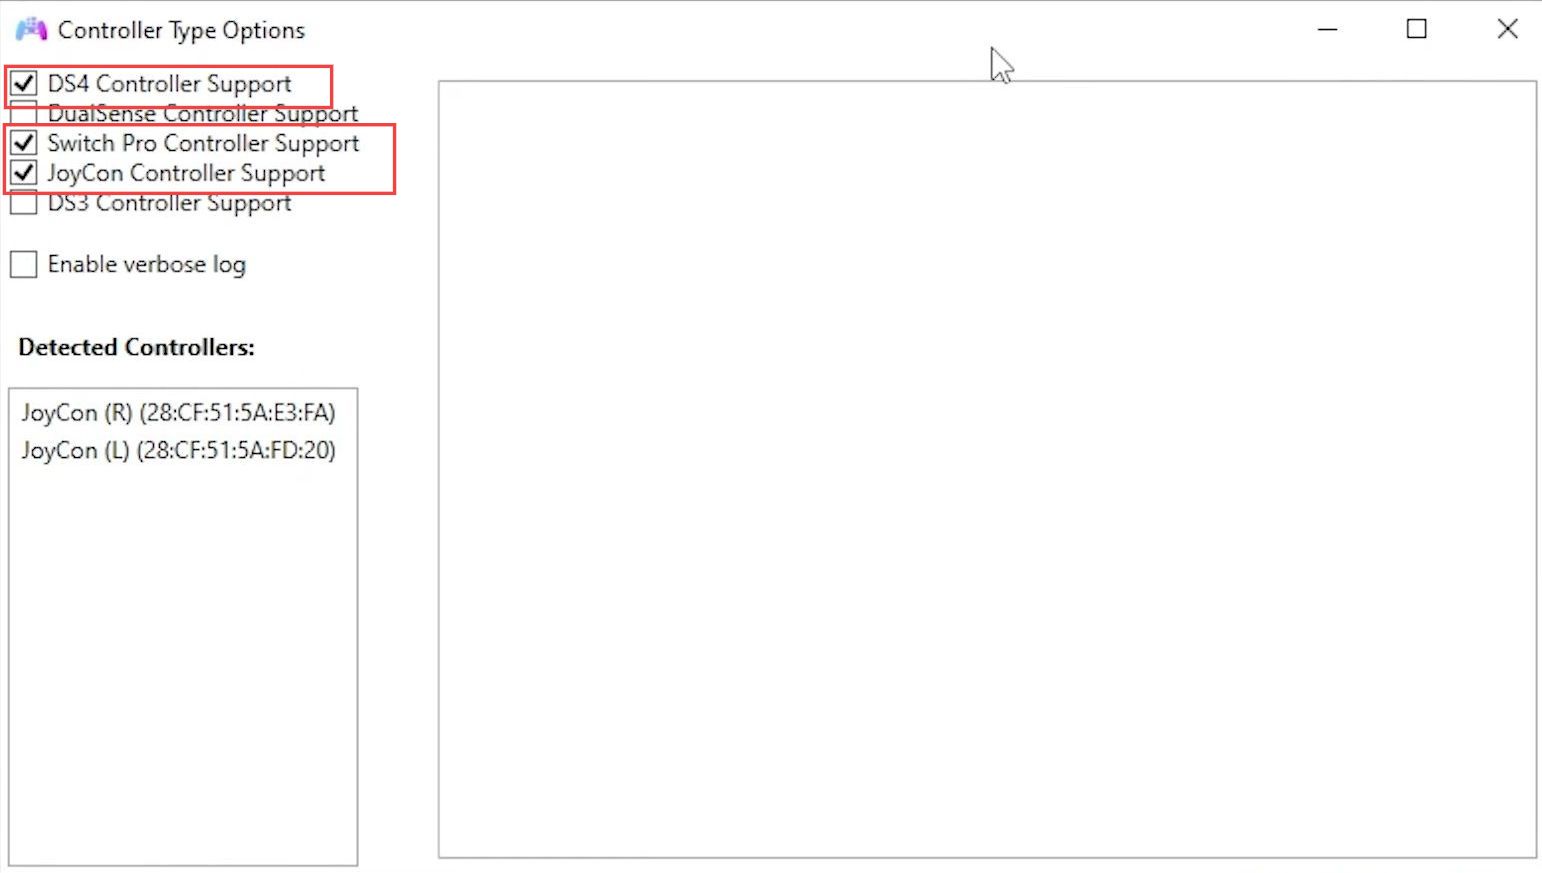
- If DS4 Windows didn’t enable support for controllers other than PlayStation 4 controllers during setup, access the settings tab within DS4 Windows.
- Within the settings tab, locate the Device Options button on the right side and click on it.
The device options menu allows you to modify which controllers DS4 Windows supports besides the PS4 controller. - You can enable support for other types of controllers here and after making any changes, ensure to save your settings.
- Test the controller in the desired games to see if the newly enabled support works.
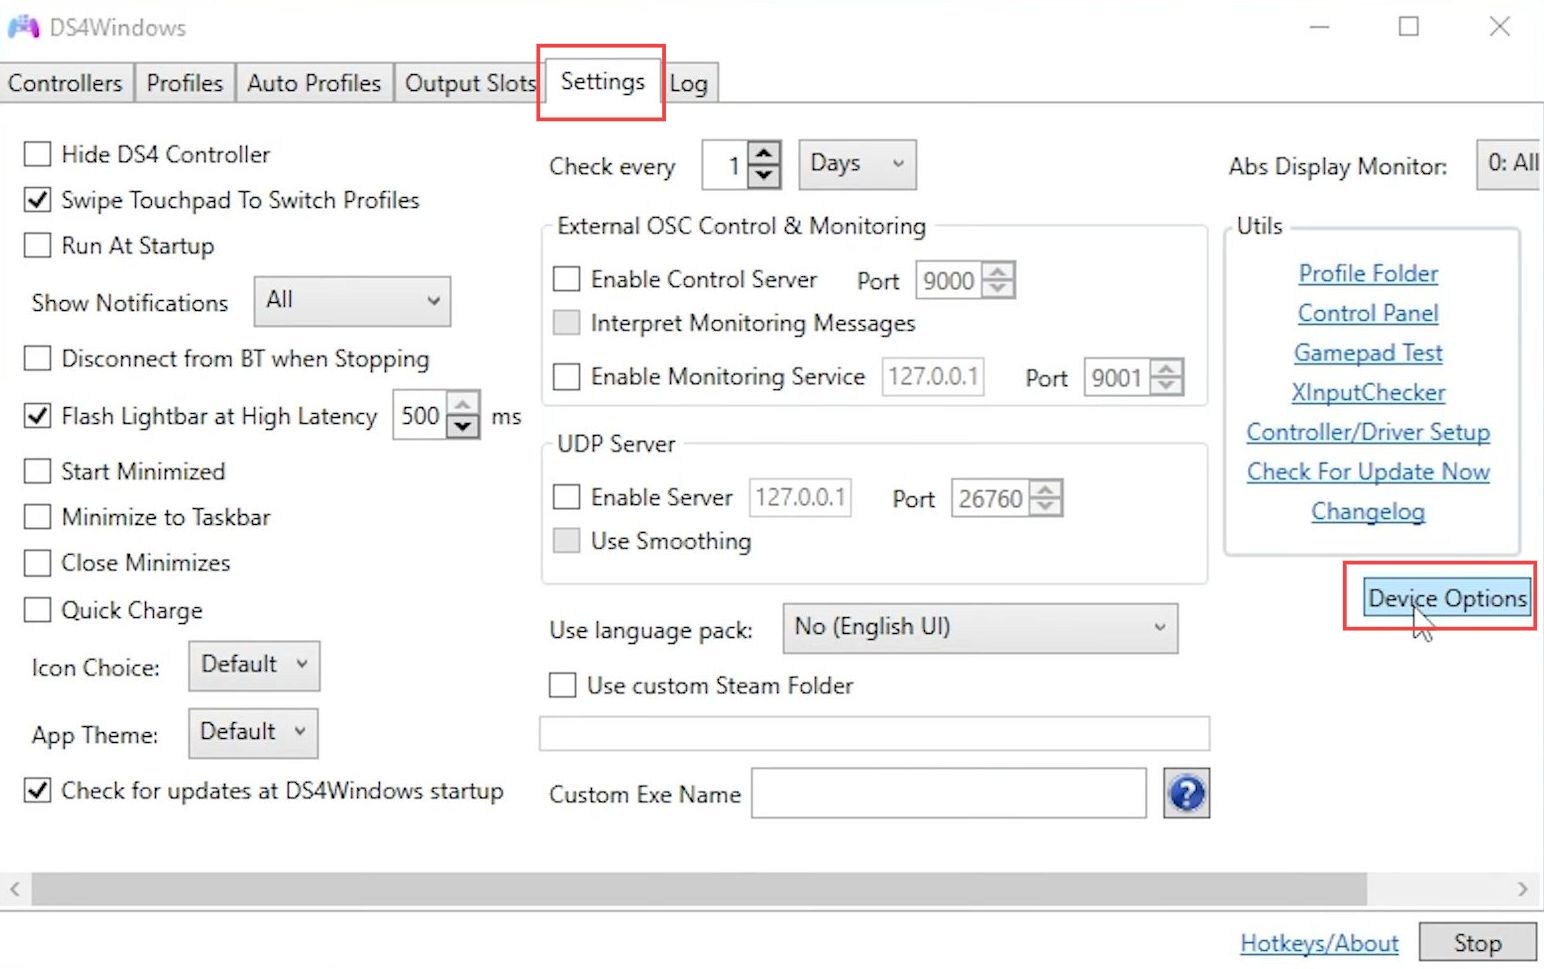
In this window, you’ll find a list of different controllers besides the PlayStation 4 controller that DS4 Windows can enable or disable support for.
- This includes controllers like Joy-Cons, the Switch Pro Controller, the PS5 controller, and the latest edition of the PlayStation 3 controller.
- To enable support for a specific controller, locate its corresponding checkbox in the list.
For example, if you want to enable support for Joy-Cons, find the checkbox associated with Joy-Cons. - If you want to disable support for a specific controller, uncheck the corresponding checkbox.
- After making your desired changes to the controller support settings, there is usually a button to apply these changes. Click on this button to confirm the modifications.