In this guide, you will learn the best in-game settings for ARK: Survival Ascended.
Launch Arguments
In this section, we will take you through the steps to launch arguments to get the best in-game settings.
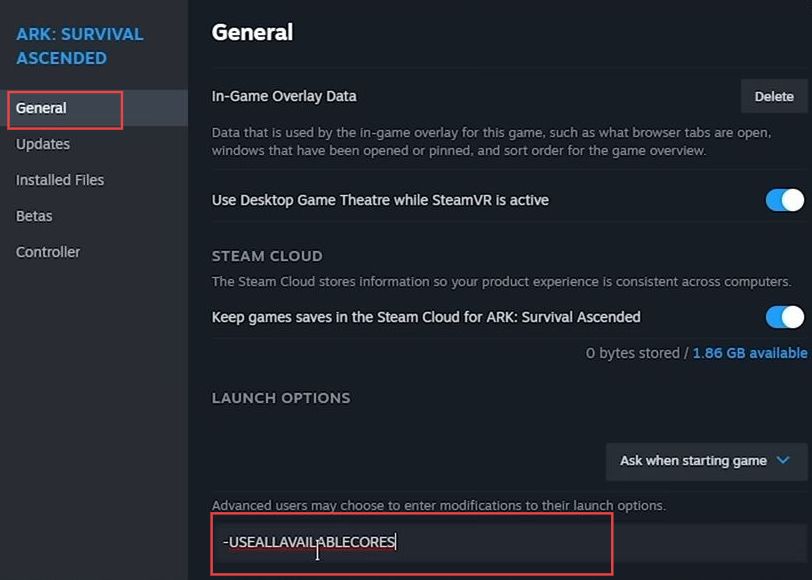
- Open your Steam client and locate Survival Ascended. Right-click on the game’s name to reveal a dropdown menu and select Properties. Navigate to the General tab and scroll down to find the Launch Options section.
- Now type the following command line argument.
This command instructs the game to utilize all available CPU cores, potentially enhancing performance.
-USEALLAVAILABLECORES- If you have a configuration from another Ark game that seemed to work well, you could consider copying and pasting it into the launch options for Survival Ascended.
FPS with default settings
This section describes how to adjust FPS with default settings.
- Launch Survival Ascended and create a new game or join an existing one.
- Once you’re in the game world, notice the performance and visual quality issues you’re facing, such as low FPS, blurriness, and blocky objects.
- Observe the low performance, possibly around 35 FPS.
Volumetric Clouds
This section explains how to adjust Volumetric Clouds to get the best performance.
- Press the Tilda (~) key to bring up the console command line at the bottom of the screen.
- Type the following specific console commands that can significantly enhance FPS with minimal impact on gameplay.
r.VolumetricCloud 0- This command disables the volumetric cloud system in the game. You’ll notice that the volumetric cloud system is deactivated, resulting in a notable and immediate increase in FPS, providing a boost of around 10 to 20 FPS.
Enabling FPS Overlay
This section will take you through the steps to get the best in-game settings by enabling FPS Overlay.
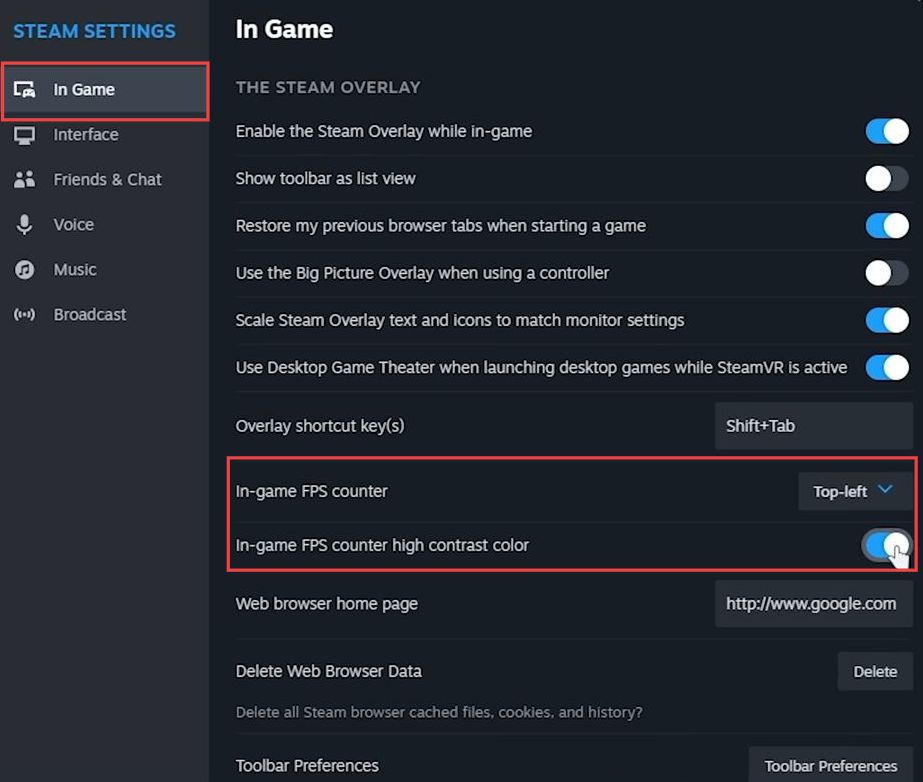
- If you’re using Steam, then press Shift + Tab to open the Steam Overlay. Navigate to Settings and click on the In-Game menu.
- Look for the option labeled In-Game FPS Counter and select it. Choose a corner of the screen for the FPS counter to be displayed. After that, enable High Contrast Color to make the FPS counter bright green and easily visible.
- Additionally, if you prefer more detailed information, you can use third-party software like MSI Afterburner and Rivatuner Statistics Server, which provide more comprehensive system data, including FPS.
Volumetric Fog
This section explains how to adjust the Volumetric Fog.
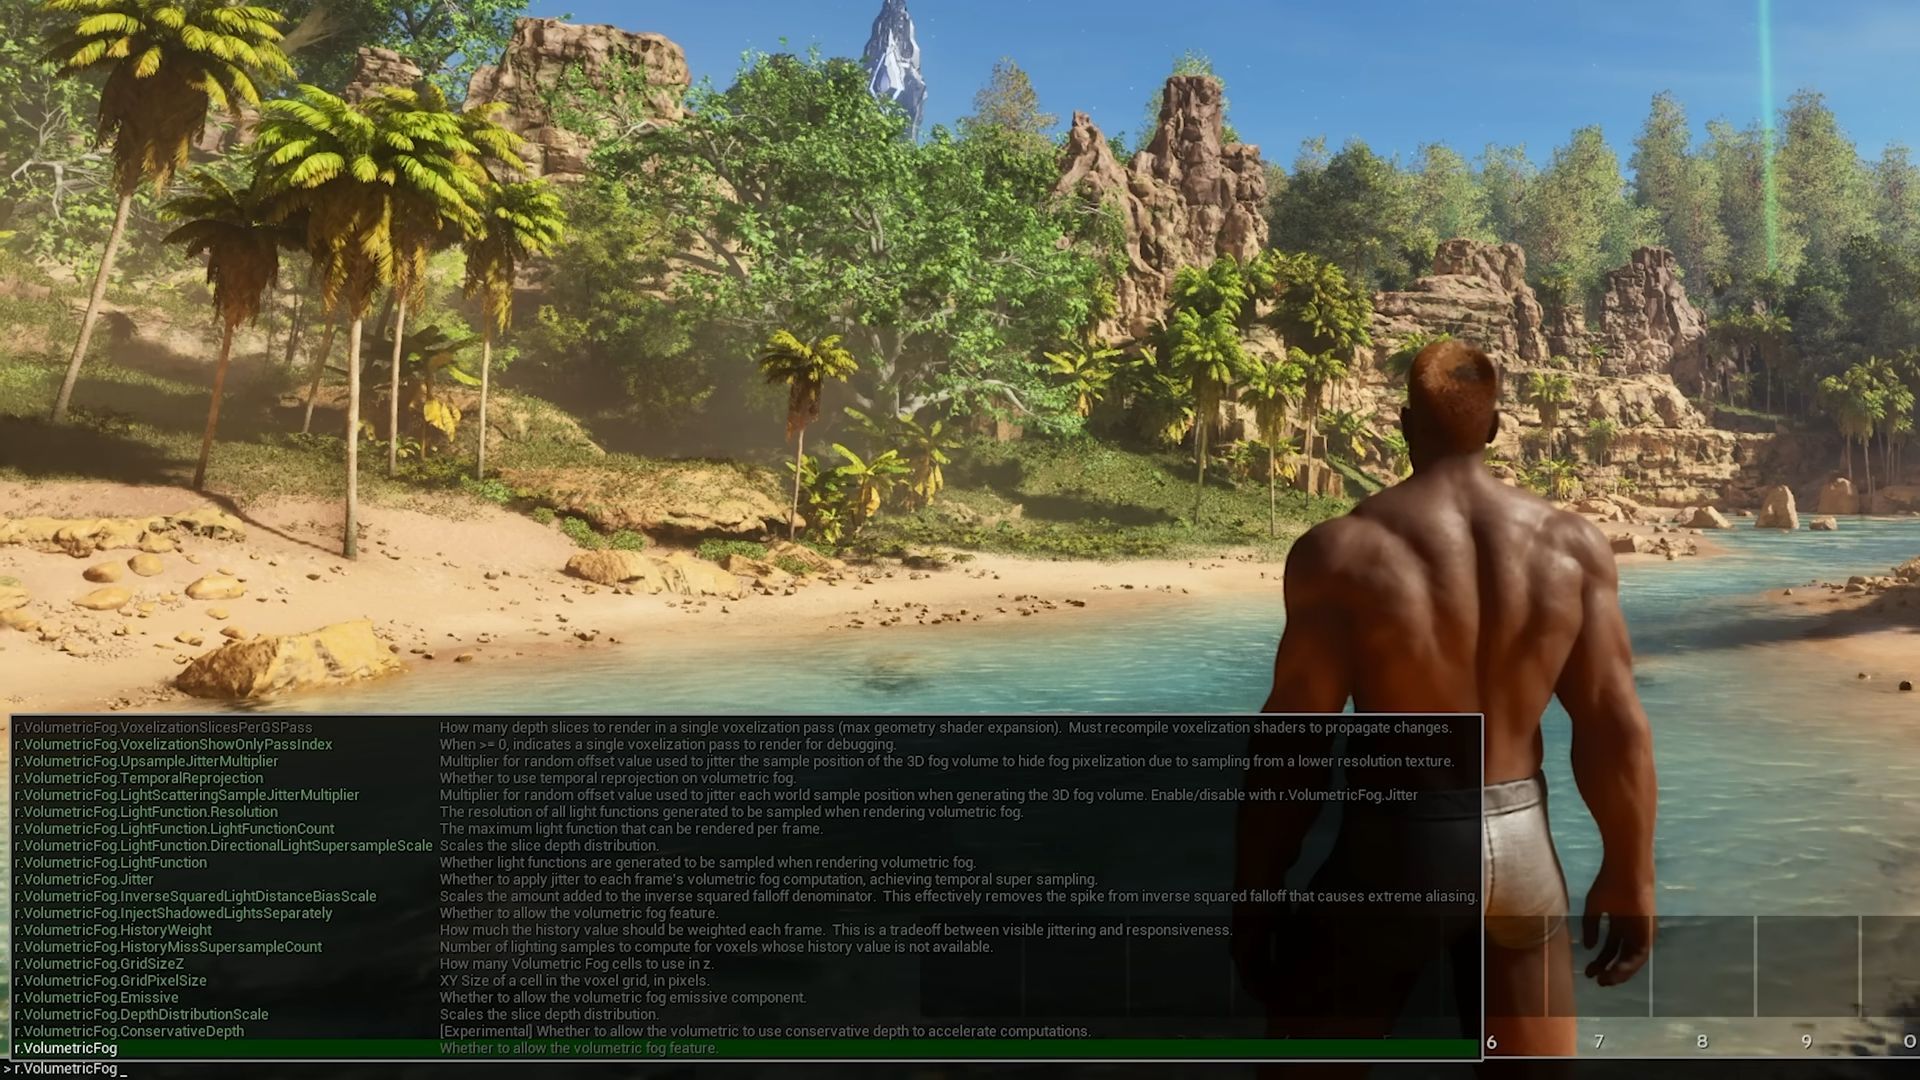
- Use the tilde (~) button to open the console command line.
- Type the following console command and press Enter.
r.VolumetricCloud 0- You’ll notice that the volumetric cloud system is disabled. This adjustment should lead to a significant increase in FPS, potentially boosting it by 10 to 20 units.
- Observe the changes in the performance and graphics after applying the command.
The visuals might be altered, making certain areas clearer and boosting overall performance. However, consider that in certain environments, like the snow biome, fog might play a specific thematic role, and reducing it might impact the intended visual atmosphere.
Water Reflections
This section will take you through the steps to get the best in-game settings by adjusting water reflections.
- Use the Tilda (~) button to open the console command line.
- Type the following command and press Enter.
r.Water.SingleLayer.Reflection 0- This command degrades the quality of water reflections, making the water appear flatter and reducing its visual richness. It can significantly boost your FPS, especially around large bodies of water, relieving lower-end hardware struggling with performance.
This can help to alleviate performance issues, but it’s essential to understand that this change will impact the visual fidelity of water in the game.
Video Optimization
This section explains how to do video optimization to get the best performance.
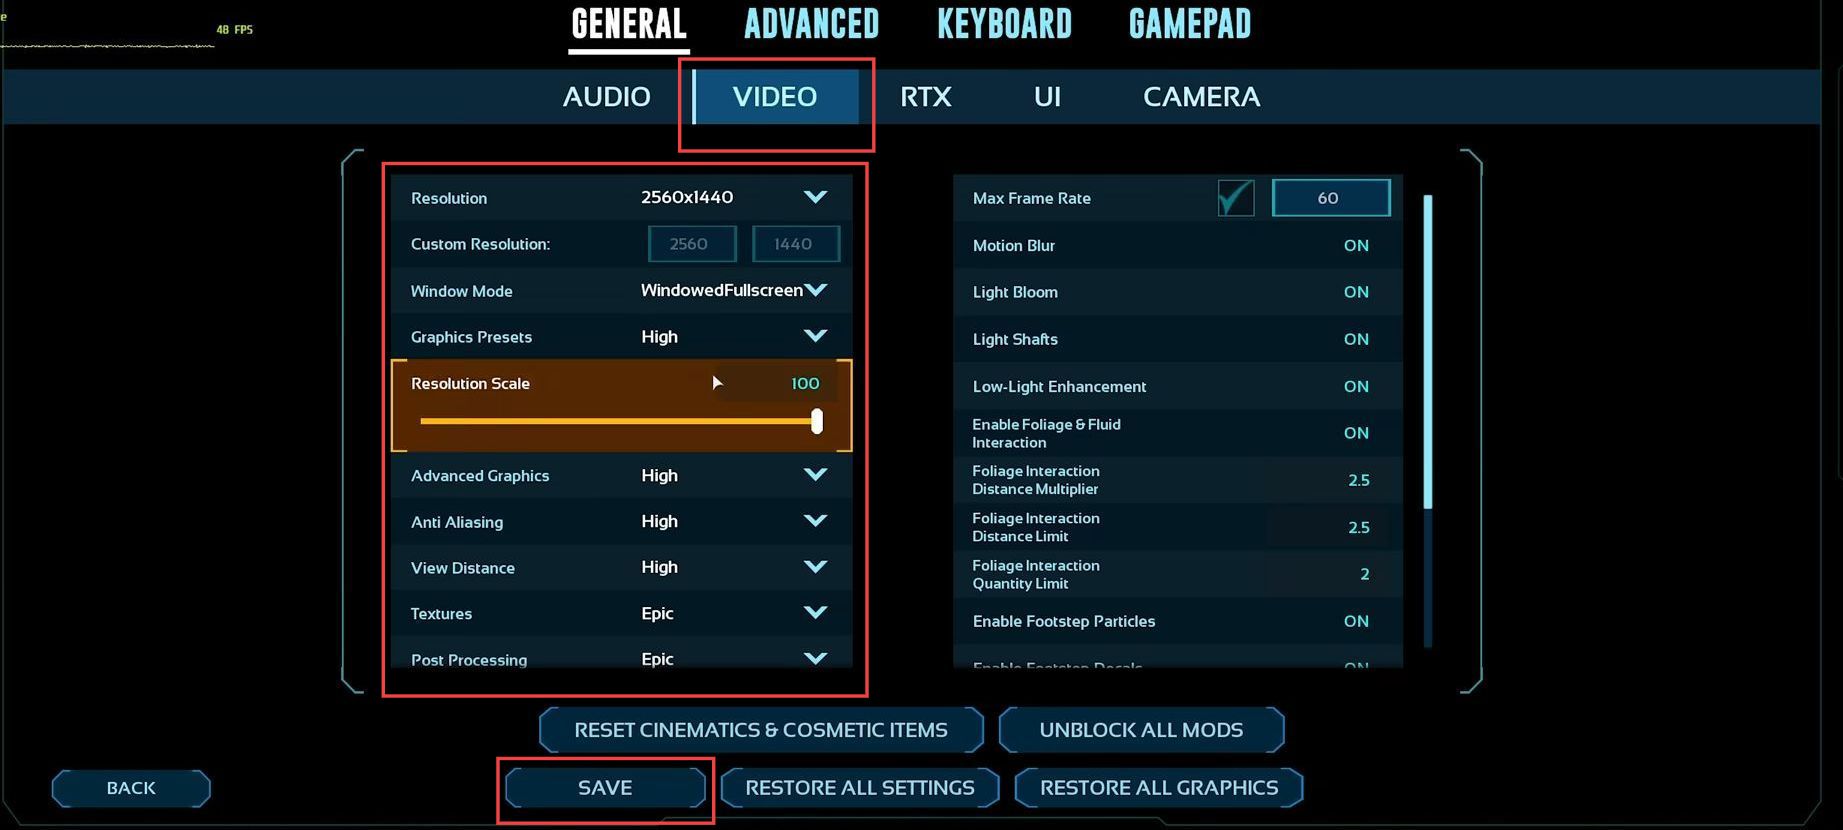
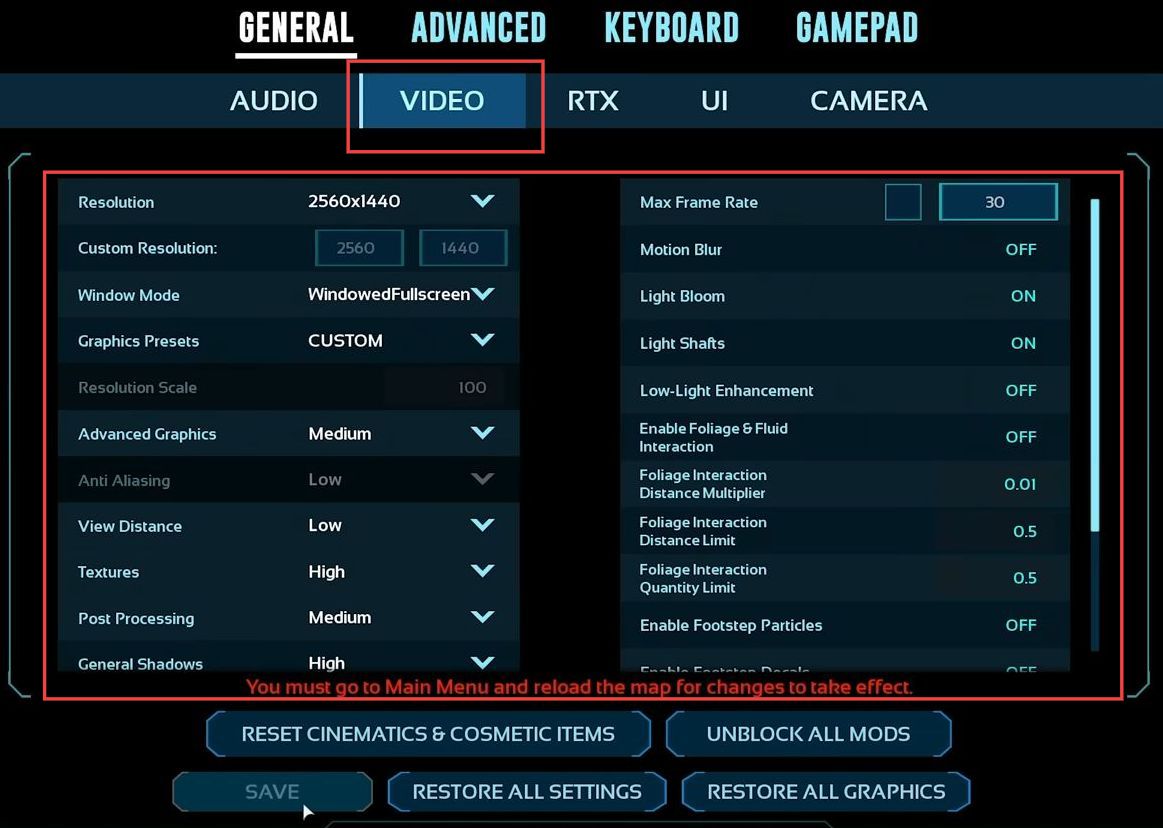
- In the game, go to the settings and click on the Video tab. Ensure that your resolution matches your display’s native settings. For instance, if you have a 2K display, set the resolution to 2K. If you’re struggling with performance on a 2K or 4K monitor, consider stepping down the resolution.
- Set the Window Mode to Fullscreen for optimal FPS performance. Adjust the graphics preset based on your system’s capability. For a high-end system, choose high, medium, or low based on your preference. Set the resolution scale to 100%.
- Keep the Anti-aliasing setting as low as possible for better performance and view Distance to Lower to improve FPS.
- Depending on your VRAM, set Textures too high or epic for 4K, medium for 4GB or more VRAM, and low for anything lower. After that, set Post-Processing to medium, General Shadows to high, and illumination Quality to high or epic.
- Adjust the Effects Quality from Lower to medium and Foliage Quality to medium for better performance, as it significantly impacts FPS.
Advanced Video options
This section describes how to adjust the advanced video options.
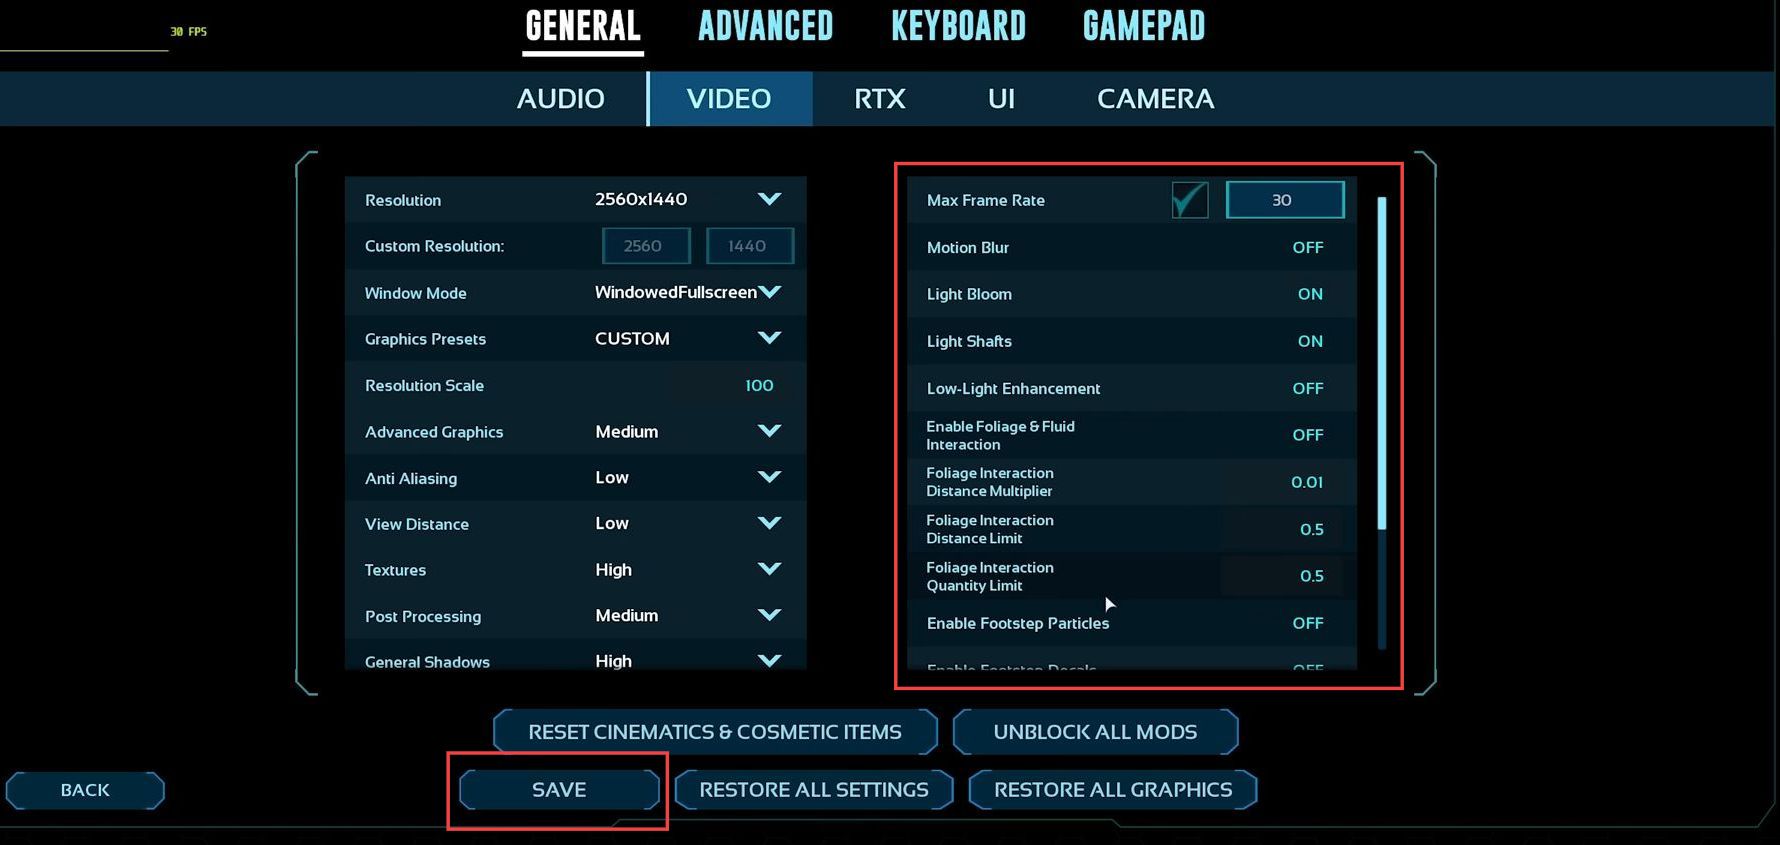
- Scroll up to the right-hand side and untick the Max frame rate box to achieve more than 60 FPS and remove the limit. If recording or streaming with software like OBS Studio, consider enabling this and locking FPS slightly below the in-game performance to reserve some PC resources for recording.
- It’s recommended to disable motion blur. While it can hide frame stuttering at low frame rates, it’s based on personal preference.
- Most of the settings should be turned off except for light blooms and light shafts, which enhance the game’s visual appeal. Consider disabling low light enhancement, foliage interaction, fluid interaction, and disabling hot.
- Enable footstep particles and decals as desired and then save the changes.
Be aware that some adjustments might require a map reload for the changes to take effect.
Nvidia options (RTX tab)
This section explains how to adjust Nvidia options (RTX tab) to get the best in-game performance.
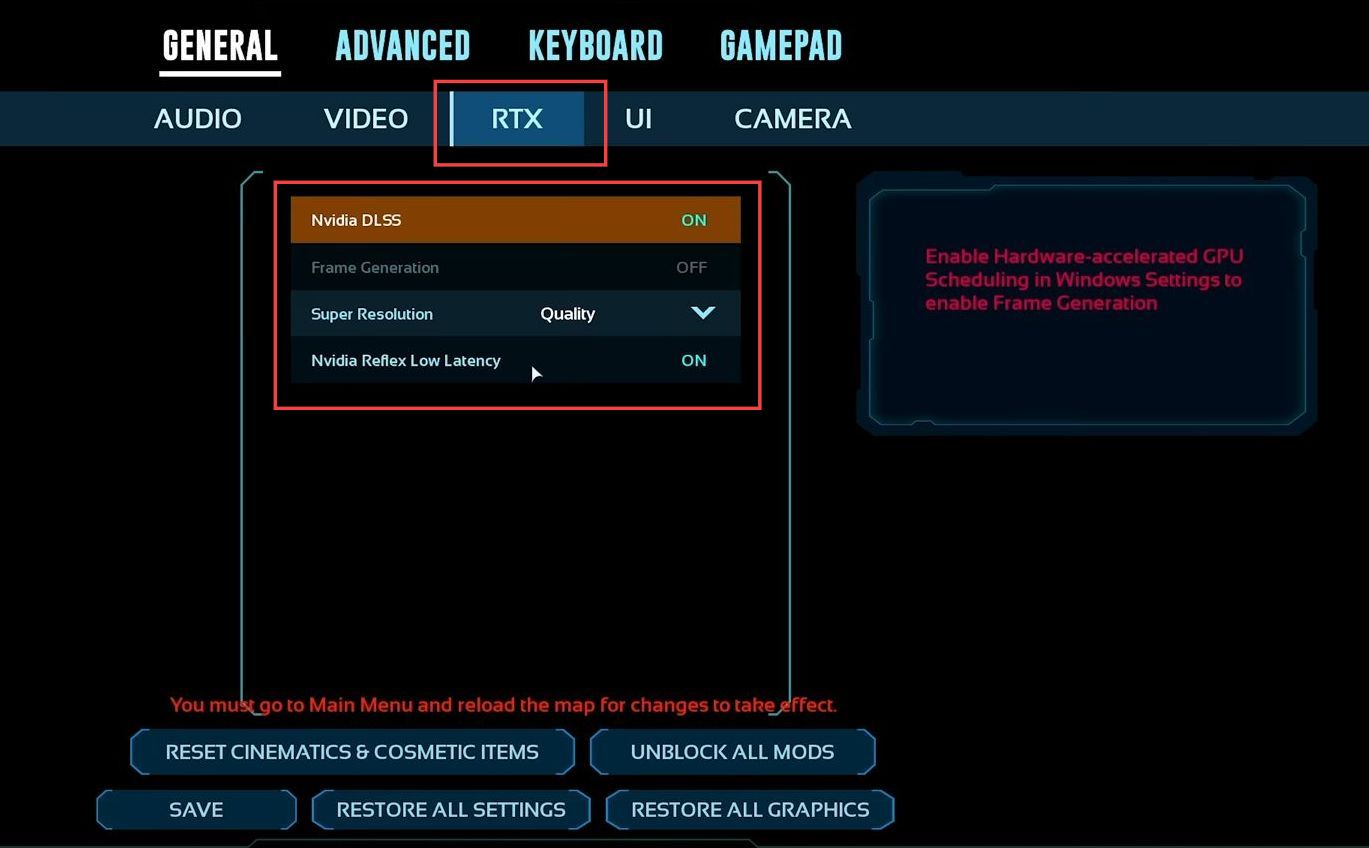
- If you have an Nvidia graphics card, go to the RTX tab in the game settings. Enable the RTX option if you have an Nvidia GPU and set this to Quality for higher image quality or push it towards Performance for increased FPS.
The choice depends on your preferences and performance needs. - This setting keeps your resolution scale at 100% and uses AI to enhance the image. Choose Quality for improved FPS and image quality.
- If you have an Nvidia graphics card, turn this setting on to reduce input latency. After adjusting these settings, save them.
These changes should help enhance your FPS and improve overall performance in the game.
Other FPS options
This section will take you through the steps to adjust the other FPS options.
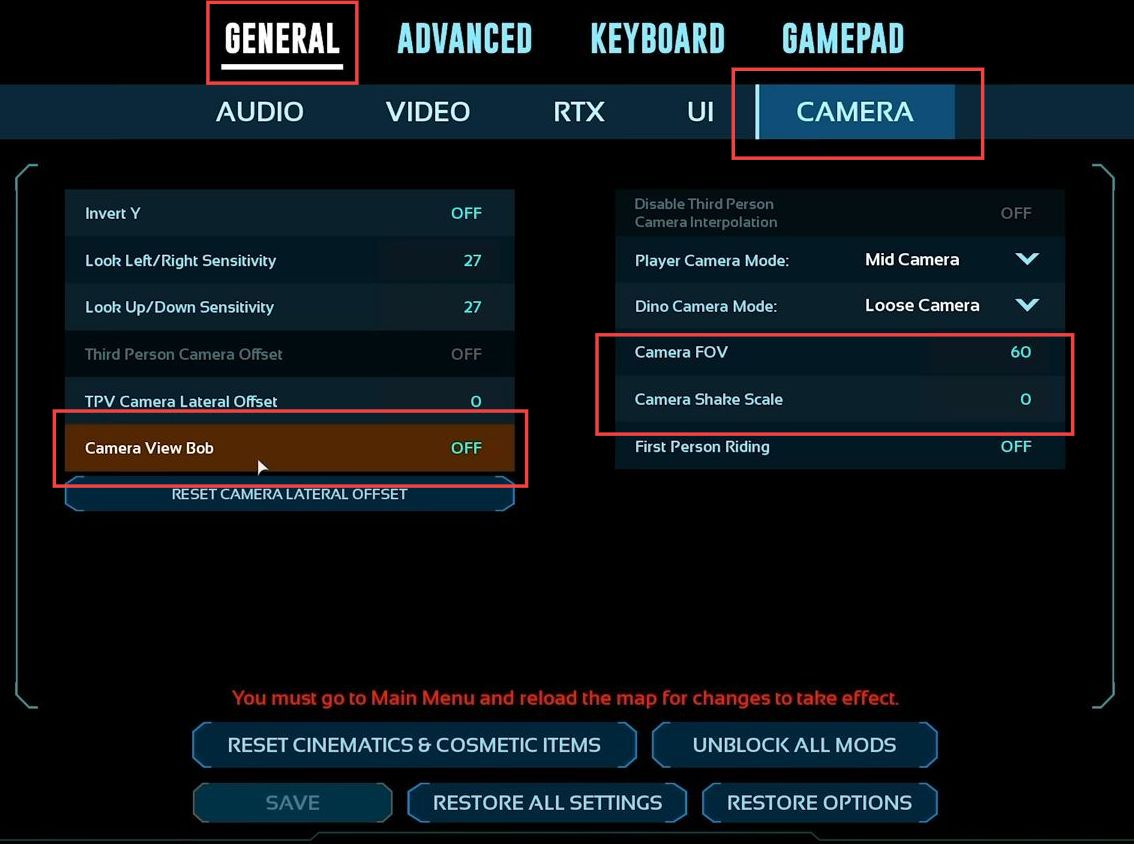
- Go to the Camera tab in the game settings and adjust the camera FOV to your preference.
A higher FOV may increase CPU usage but won’t significantly affect FPS. - Reduce the Camera Shake setting to zero to minimize screen movements caused by in-game actions. Similar to Camera Shake, lower the Camera Bob to minimize camera movements.
Adjust as per your preference for smoother gameplay.
- Access the Video settings in the game, locate the Motion Blur option, and turn off this effect.
Disabling Motion Blur can provide a better experience, especially for those prone to motion sickness. - Turning off all these options can lead to a slightly smoother experience and save the changes made in the settings.
Frame Generation & Fix Hardware-Accelerated GPU error
This section describes how to adjust the frame generation and fix Hardware-Accelerated GPU errors.
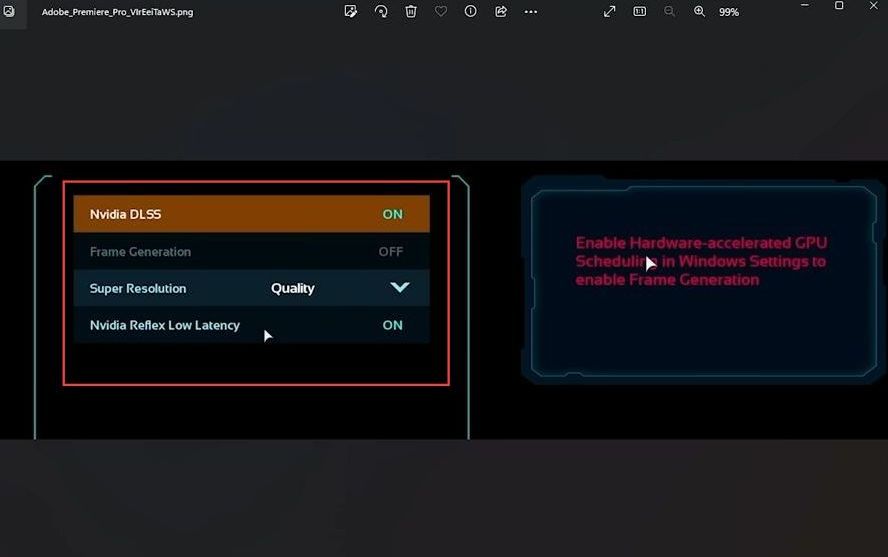
- If you own an RTX 40 series NVIDIA graphics card, navigate to the hardware acceleration settings in Windows. Enable hardware-accelerated GPU Scheduling in the Windows settings.
This will activate the Frame Generation feature. - Access the in-game settings and enable the Frame Generation feature, provided you’ve turned on Hardware Accelerated GPU Scheduling.
This feature is particularly useful for the RTX 40 series and some supported graphics cards.
Frame Generation can enhance the smoothness of the game’s visuals, generating additional frames between actual frames, which can enhance the overall visual experience. However, it might not directly impact input latency. - If you encounter an error while enabling these settings, then you need to exit the game.
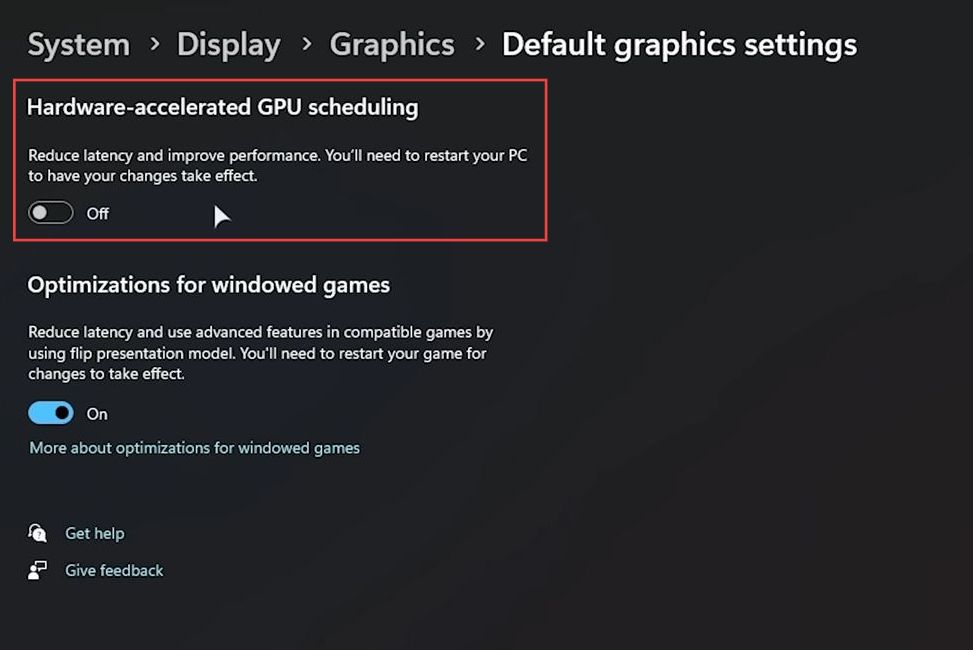
- On Windows 10 or 11, open the Start menu and go to the Graphics settings.
In Windows 11, you can find the Graphics settings in the System section under the Display tab. - Scroll down to find the Hardware Accelerated GPU Scheduling, and enable it. After that, restart your PC for this setting to take effect.
- Now check if you can enable Frame Generation in the game settings. If available, activate this setting to potentially enhance FPS.
This setting may affect different games differently—while it generally enhances performance, it might not positively impact every game. Activating Hardware Accelerated GPU Scheduling and Frame Generation might provide a better gameplay experience in ARk Bival Ascended, particularly if Frame Generation is accessible and functional for your system.
Changing Resolution
In this section, we will take you through the steps to get the best performance by changing the resolution.
- Navigate to the in-game settings and find the Video settings. If you’re using a 3080 TI and playing at 2K, it’s playable. For users with 3070, 3060, or older graphics cards, consider playing at 1080p for smoother performance.
- If you’re encountering performance issues, go to the Video settings and reduce the resolution to 1080p for mid-range GPUs.
This adjustment should provide a performance boost. - If playing at 1080p still causes performance issues, consider decreasing the resolution further to 900p. This can significantly enhance performance, but it might slightly compromise the quality.
- Be aware that reducing the resolution below 900p could noticeably affect the visual quality.

More commands for FPS
This section explains how to input more commands for FPS.
- Consider using the command to alter lighting quality, though it notably lowers the overall lighting quality. Reverting it to 1 restores the quality.
r.Lumen.DiffuseIndirect.Allow 0- You need to experiment with potentially increased performance by reducing the amount of foliage.
However, it may not have a significant effect on some systems.
sg.foliagequantity 0- Using might boost FPS by decreasing or removing grass. Reloading the map might be necessary to see the change after applying this command.
grass.enable 0- These commands can impact shadow rendering and quality. Adjusting these settings can significantly impact the game’s visual quality.
r.Shadow.Virtual.Enable 1
r.DistanceFieldShadowing 1- Adjusting this command could affect shadow rendering. Using it to set to 1 might have different effects on shadows.
r.Shadow.CSM.MaxCascades 1- This command significantly affects the game’s visual quality. Adjusting it to a higher value like 15 reduces the quality of textures and models. It can significantly improve performance, especially on low-end hardware.
r.MipMapLODBias 15- After applying these changes, the game’s FPS will notably be improved. However, the trade-off involves a decrease in visual quality in exchange for better performance.
- If required, setting this command to a different value such as 3 or 0 can balance between performance and visual quality.
- Higher values reduce quality but boost FPS while lower values maintain better quality with a slight impact on performance.
r.MipMapLODBiasDisabling water
This section describes how to disable the water.
- Access the game console by using the designated key (~) and input the command.
- This command turns off the visibility of water, making it completely invisible but still present in the game environment.
r.Water.SingleLayer.0- This command might be useful if you’re in a competitive gaming scenario where achieving higher FPS is crucial, and disabling water visuals helps improve performance significantly.
- Disabling water might not be suitable for normal gameplay experiences as it’ll affect the visual quality and realism, leaving you seemingly floating on an island with no visible water.
- The default setting for this is usually 1, which represents the standard water visibility.