This guide will let you know how to play custom Zombies Maps on Black Ops 3 on Steam. Go through the guide and follow the step-by-step instructions to do so.
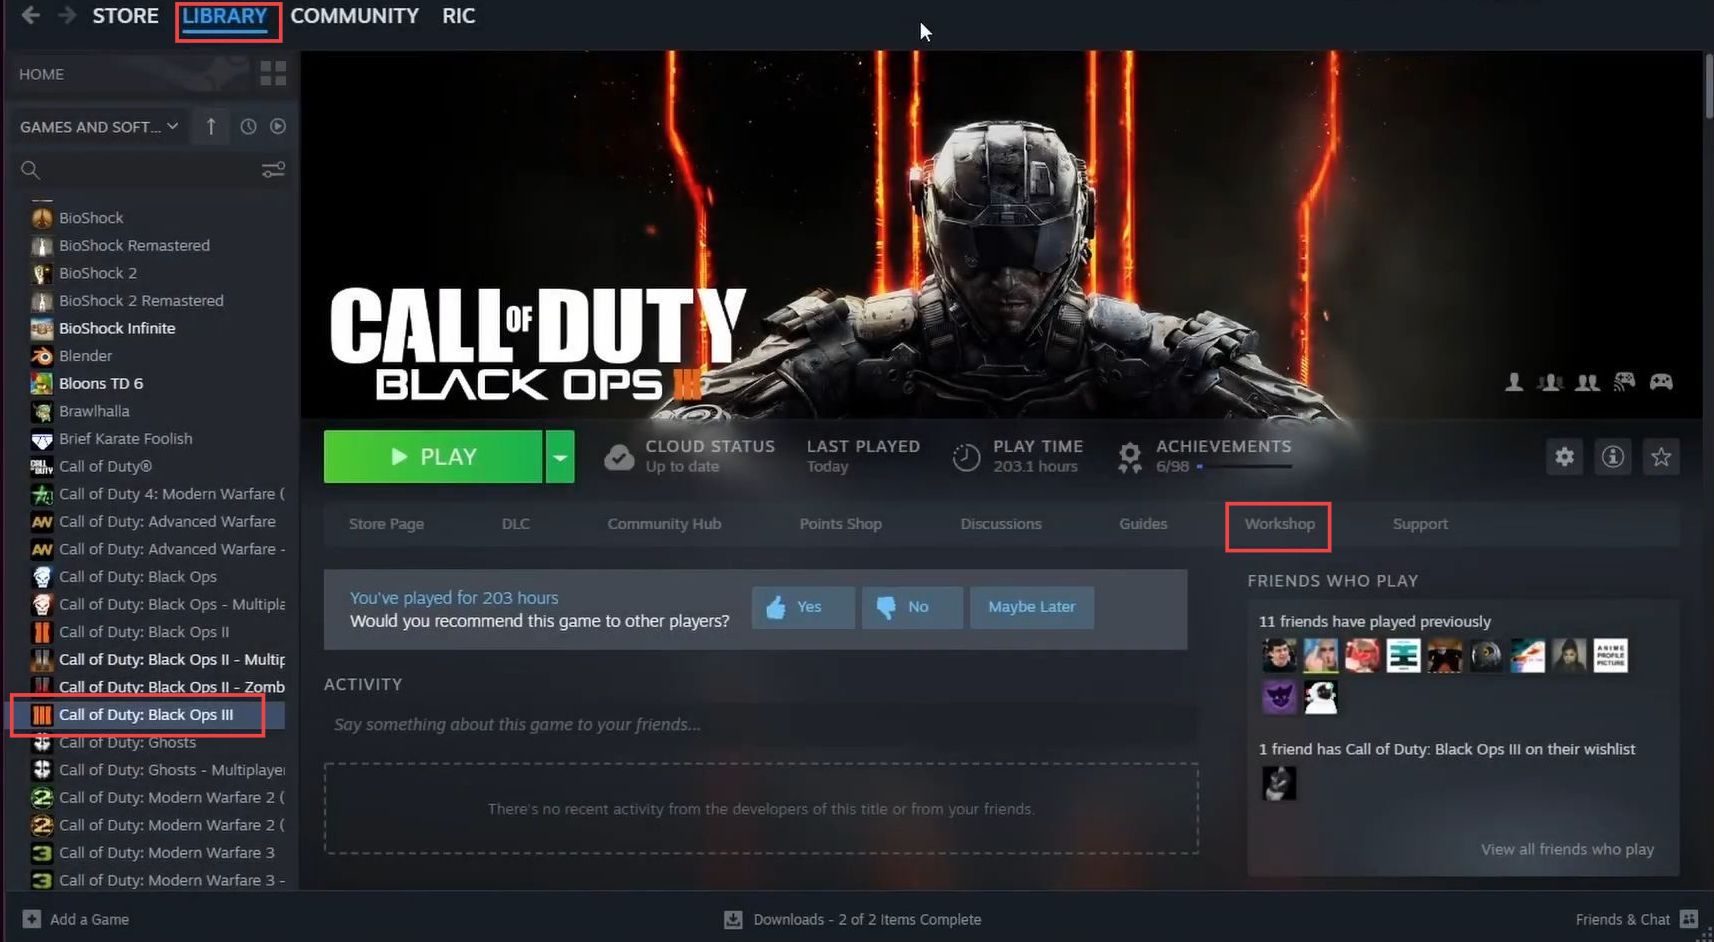
- You need to open the Steam application on your computer and click on the Library tab at the top to access your game library.
- Scroll through your list of games in the library until you locate Call of Duty: Black Ops 3.
- Left-click on the entry for Call of Duty: Black Ops 3 to select it and then navigate to the right-hand side of the screen to select the Workshop tab.
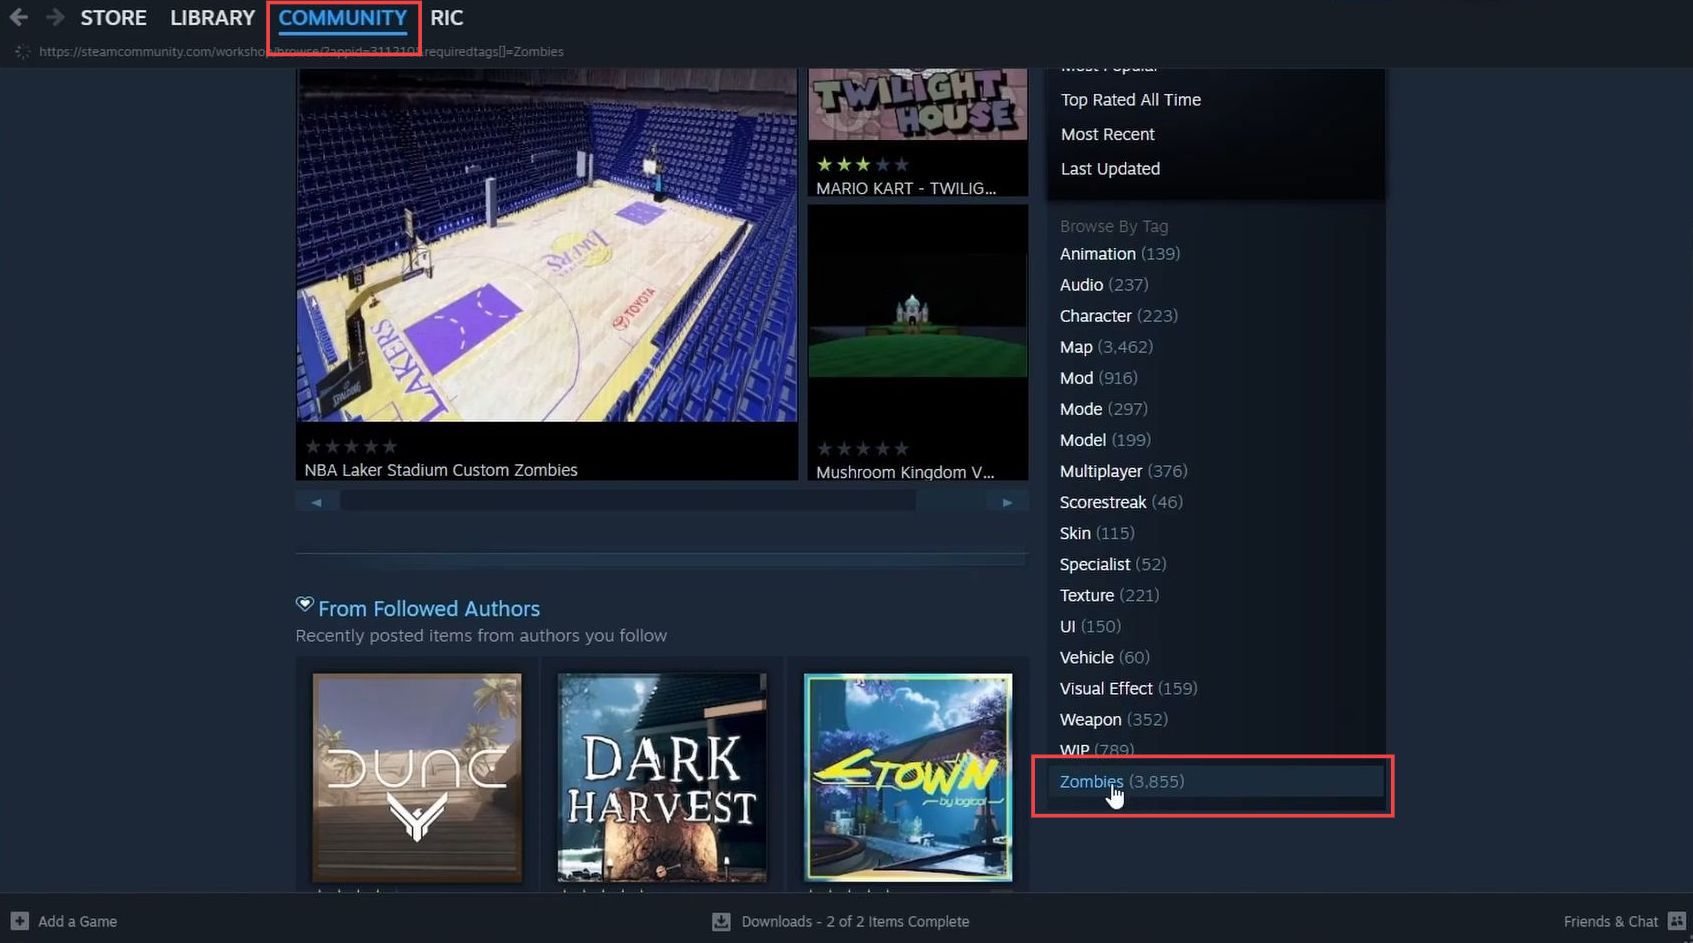
Once you’re in the Workshop, you’ll likely see a variety of user-generated maps and mods for the game.
- Since you’re interested in finding zombie maps specifically, you need to narrow down the content and look for a section that allows you to filter or categorize the workshop content.
- Within the filtering options, locate the Browse by Tag feature. From the available tags, find and select the Zombies tag.
This will filter the content to show only zombie-related maps and mods.
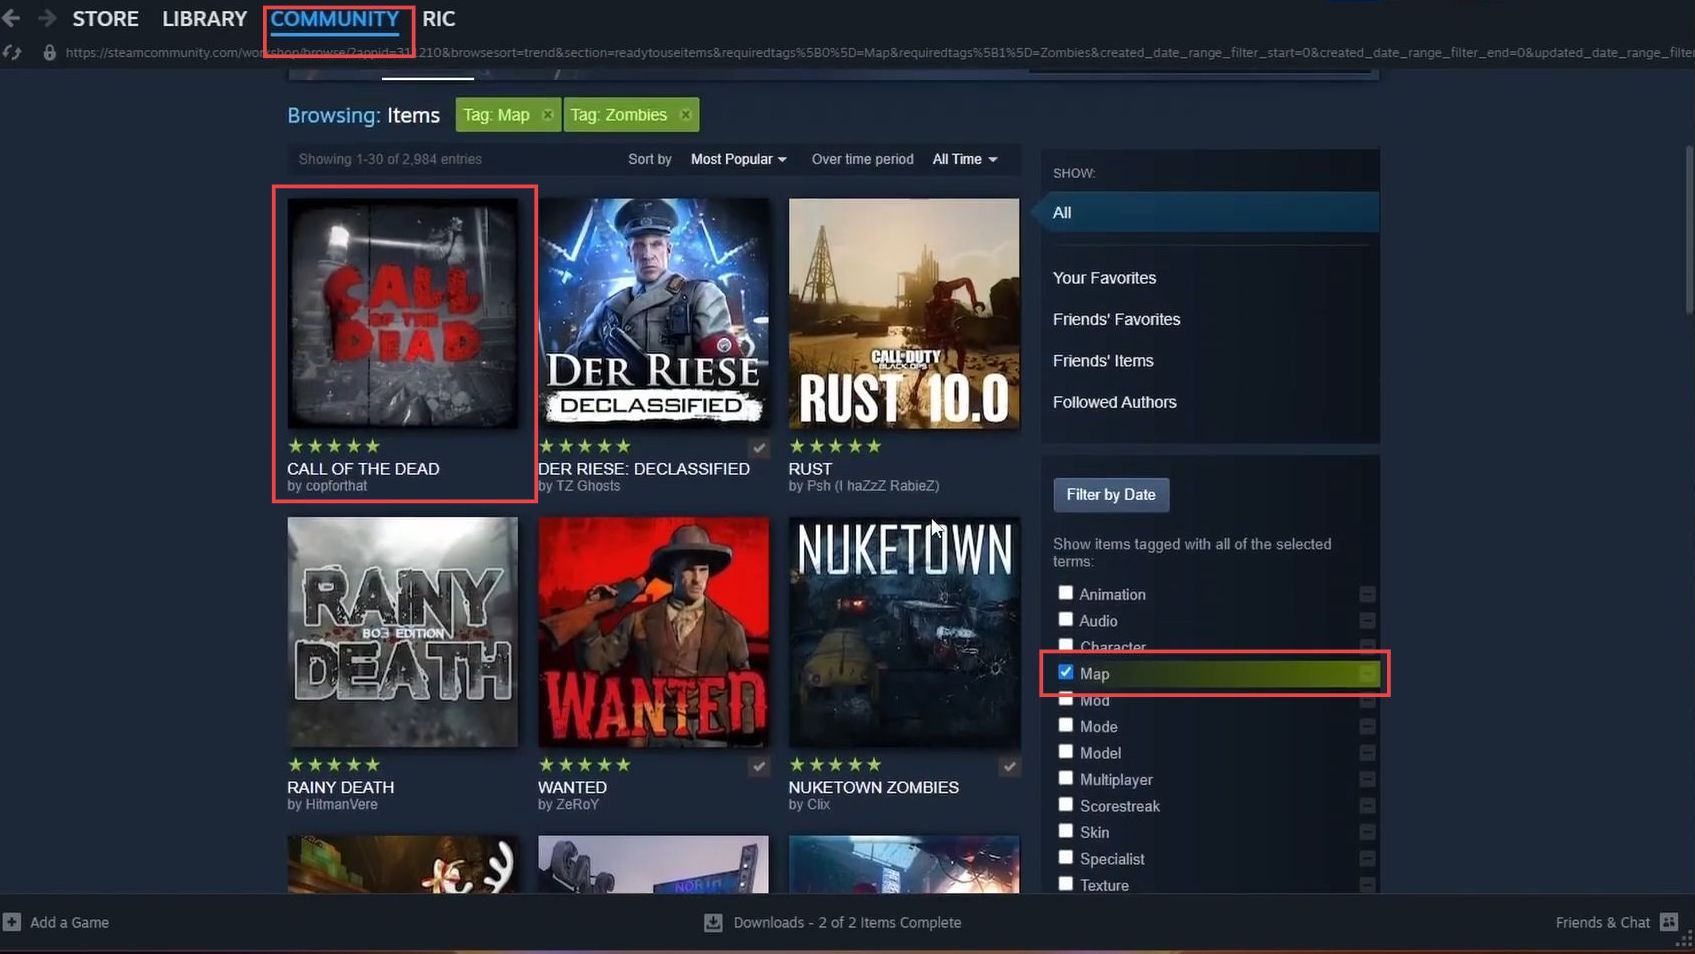
- You have to look at a list of available Black Ops 3 zombie maps and choose one that interests you or that you’d like to download and play.
- Pay attention to the sorting options at the top of the list.
These options allow you to customize how the maps are displayed. - For first-time players or those new to custom maps, consider selecting the Most Popular sorting option.
This will display maps that have gained popularity in the community. - After selecting Most Popular, look for an option that allows you to adjust the time period for which the maps are sorted.
- Change the time period from One Week to All-Time.
This will show you the most popular zombie maps that have gained popularity over a longer period. By sorting maps by Most Popular and changing the time period to All-Time, you’ll find a list of high-quality and well-loved maps that have stood the test of time. - If you have a specific map in mind, you can use the search feature located at the top of the list.
Enter the name of the map you’re looking for to quickly find it.
- From the list of available Black Ops 3 Zombies maps, select the one you’re interested in.
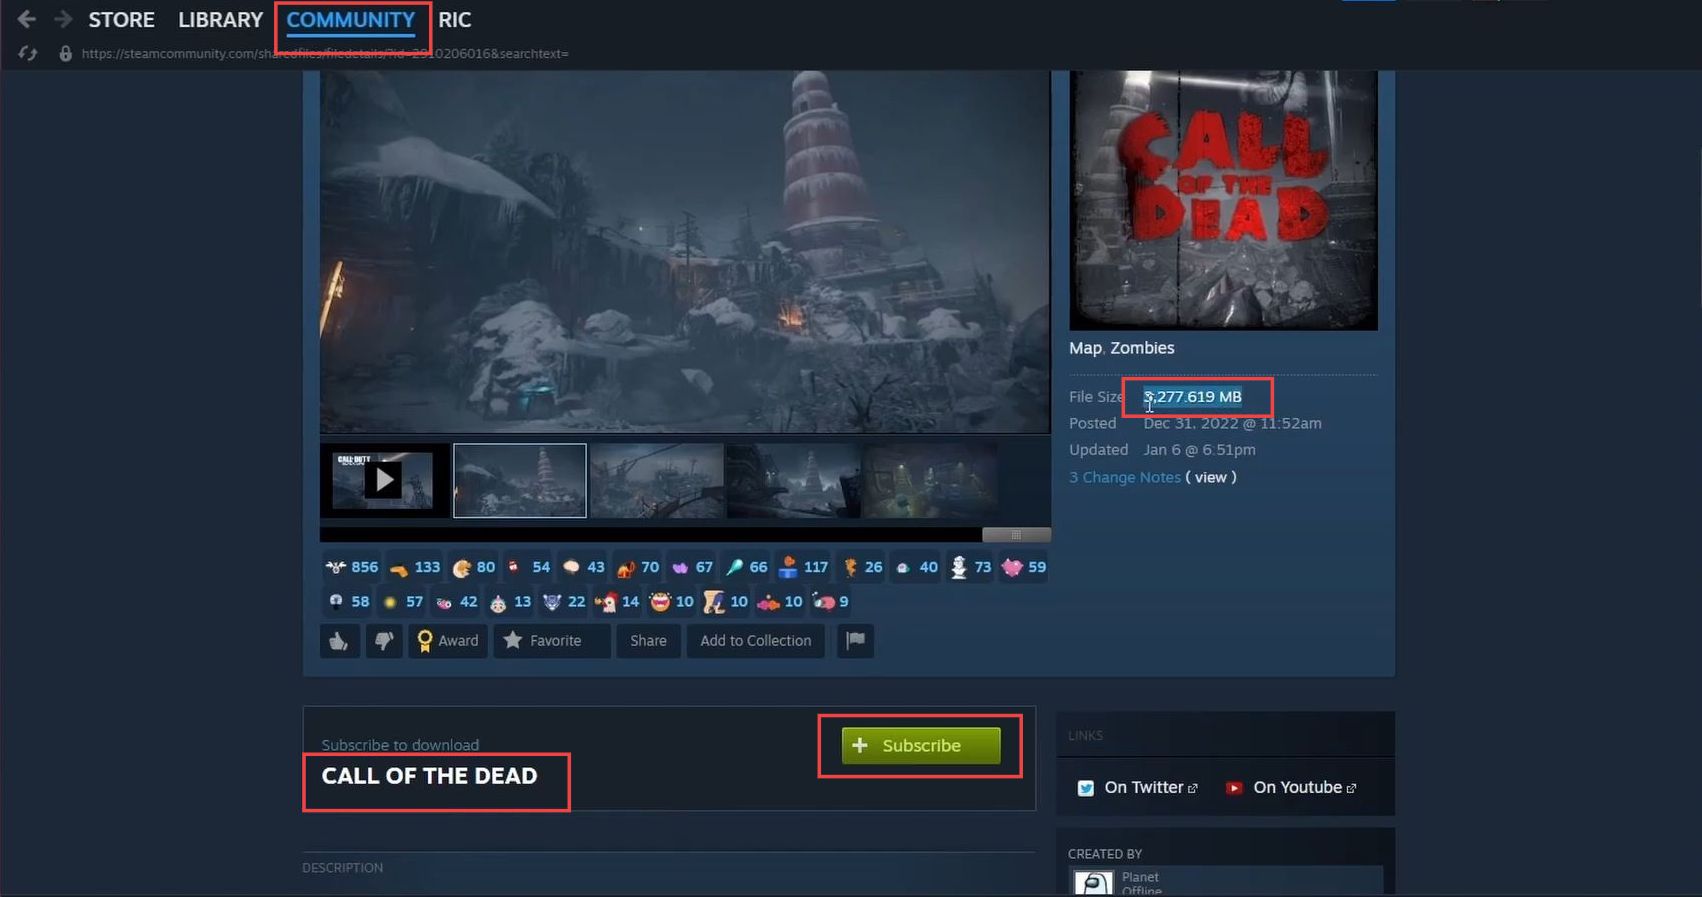
In this case, let’s say you like a map called The Dead. - After selecting the map, click on its title or image to access its dedicated page.
- On the map’s page, click on the green Subscribe button.
This will initiate the download process for the selected map. - Before the download begins, make sure that your Black Ops 3 game is closed.
This ensures a smooth download process. - After clicking Subscribe, the map will start downloading. You can track the progress of the download, which may take some time depending on the size of the map. Allow the download to finish before proceeding to the next step. This is important for a successful installation.
- Pay attention to the size of the map you’re downloading. Some custom maps can be large.
In this case, the map The Dead is mentioned to be over three gigabytes. - Once the map has finished downloading, ensure that it has been completed successfully.
You may want to double-check that the download is fully done before proceeding.
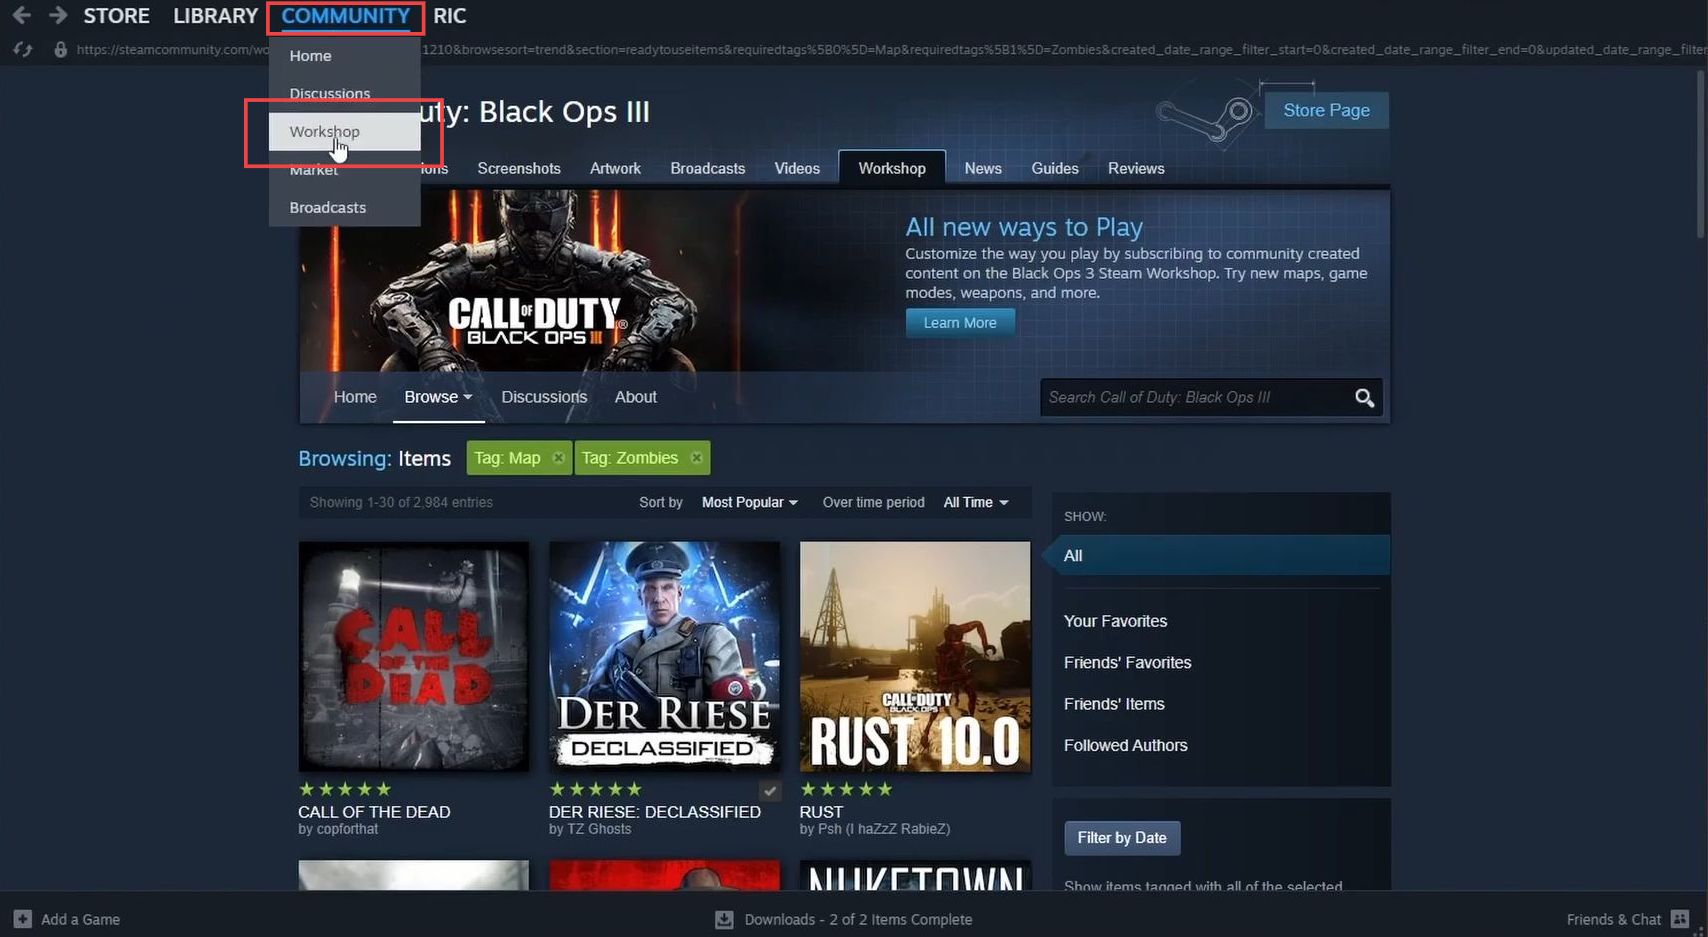
- From the Community section, click on the Workshop option.
This will take you to the Steam Workshop, where you can manage your installed maps and other content.
Once you’re in the Workshop, you’ll be able to see a variety of user-generated content, including maps and mods. - If you have multiple maps installed and want to free up space on your computer by uninstalling some of them, you’ll need to locate and remove the maps you no longer want.
Browse through the list of installed maps in the Workshop. You can recognize them by icons indicating that they are already installed.
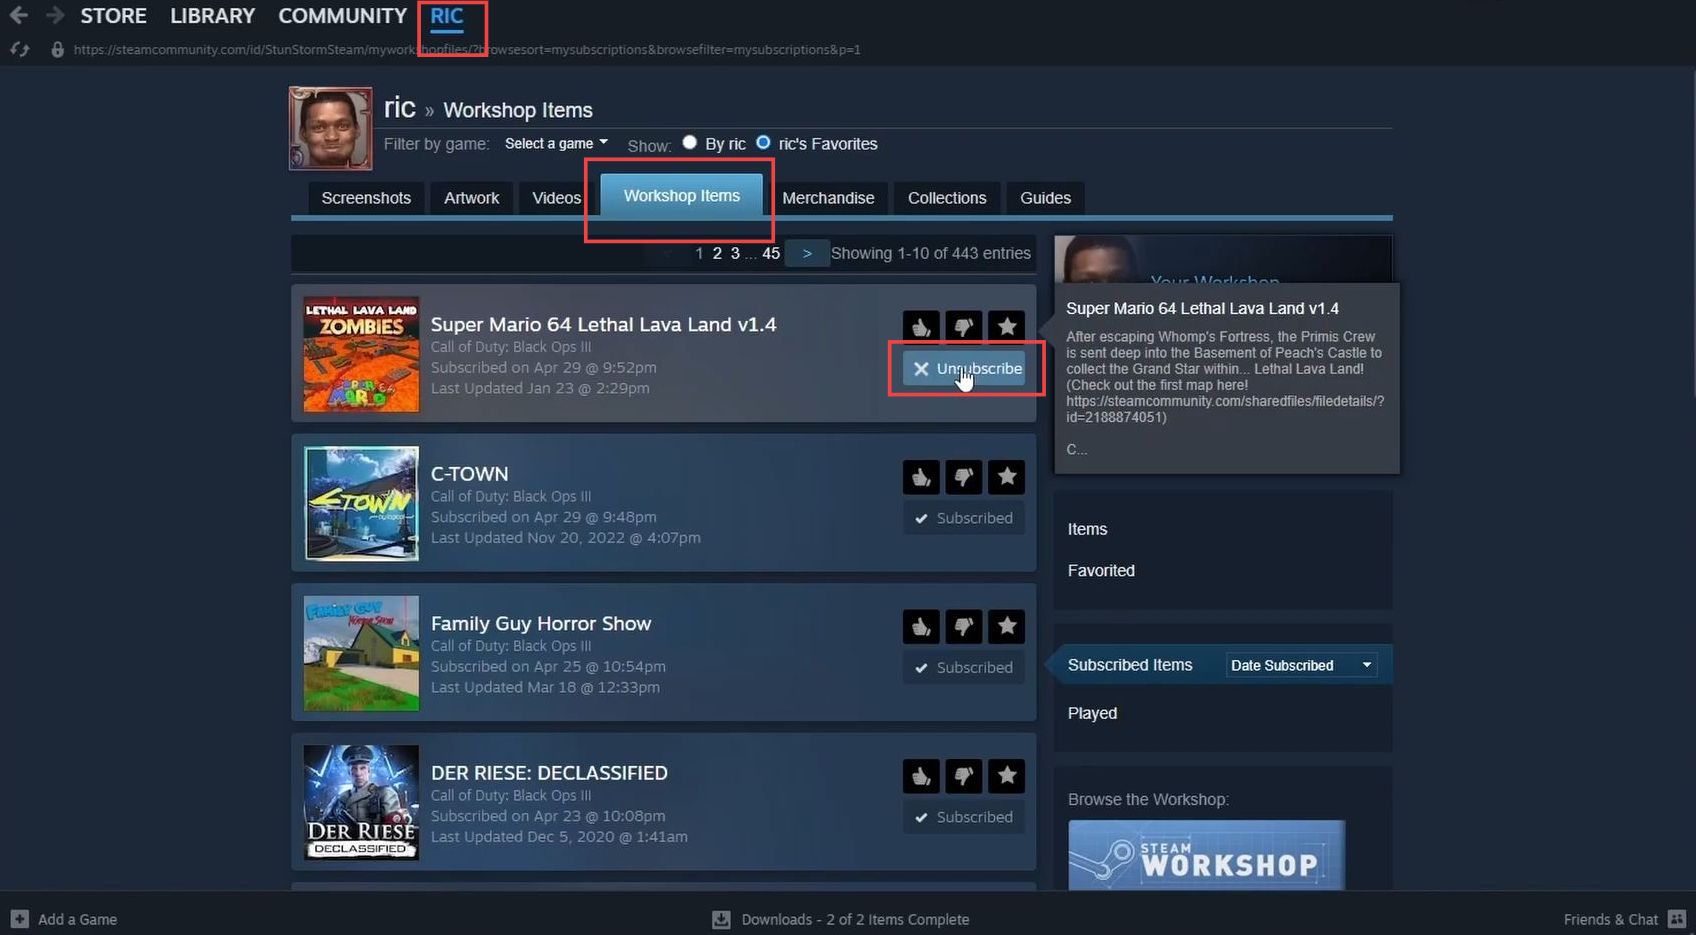
- On your profile page, scroll down until you find a section called Your Files, and click on this section.
- Within the Your Files section, look for the Subscribed Items option and click on it to view a list of content you’re subscribed to.
In the Subscribed Items list, you’ll see a collection of maps and mods you’ve subscribed to. - To uninstall a specific map, click on the Unsubscribe button next to its entry.
- You need to confirm your decision to unsubscribe when prompted.
This will initiate the uninstallation process for the selected map.
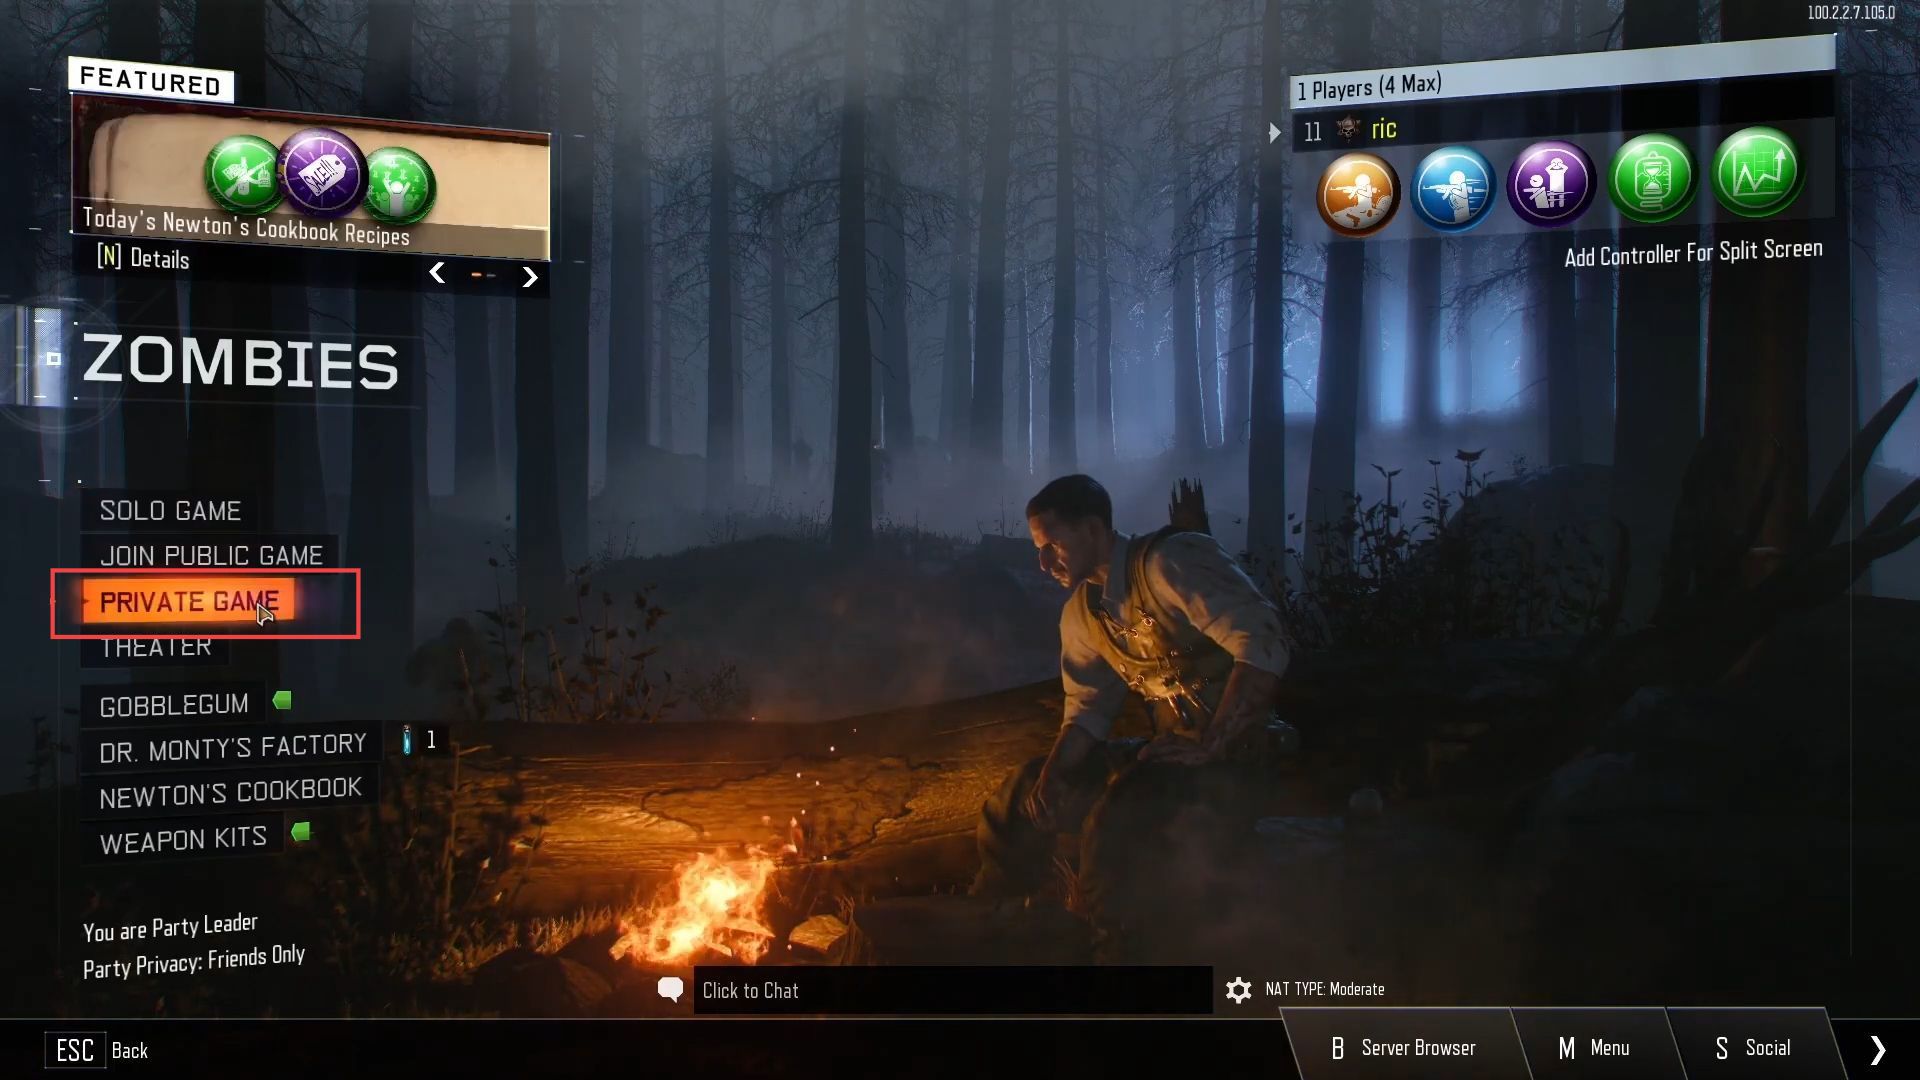
- Launch the game you want to play and once the game is launched, navigate through any introductory menus to reach the main menu of the game.
- Look for an option related to multiplayer or different game modes within the main menu.
- Within the multiplayer or game modes section, locate and select the Private Game option.
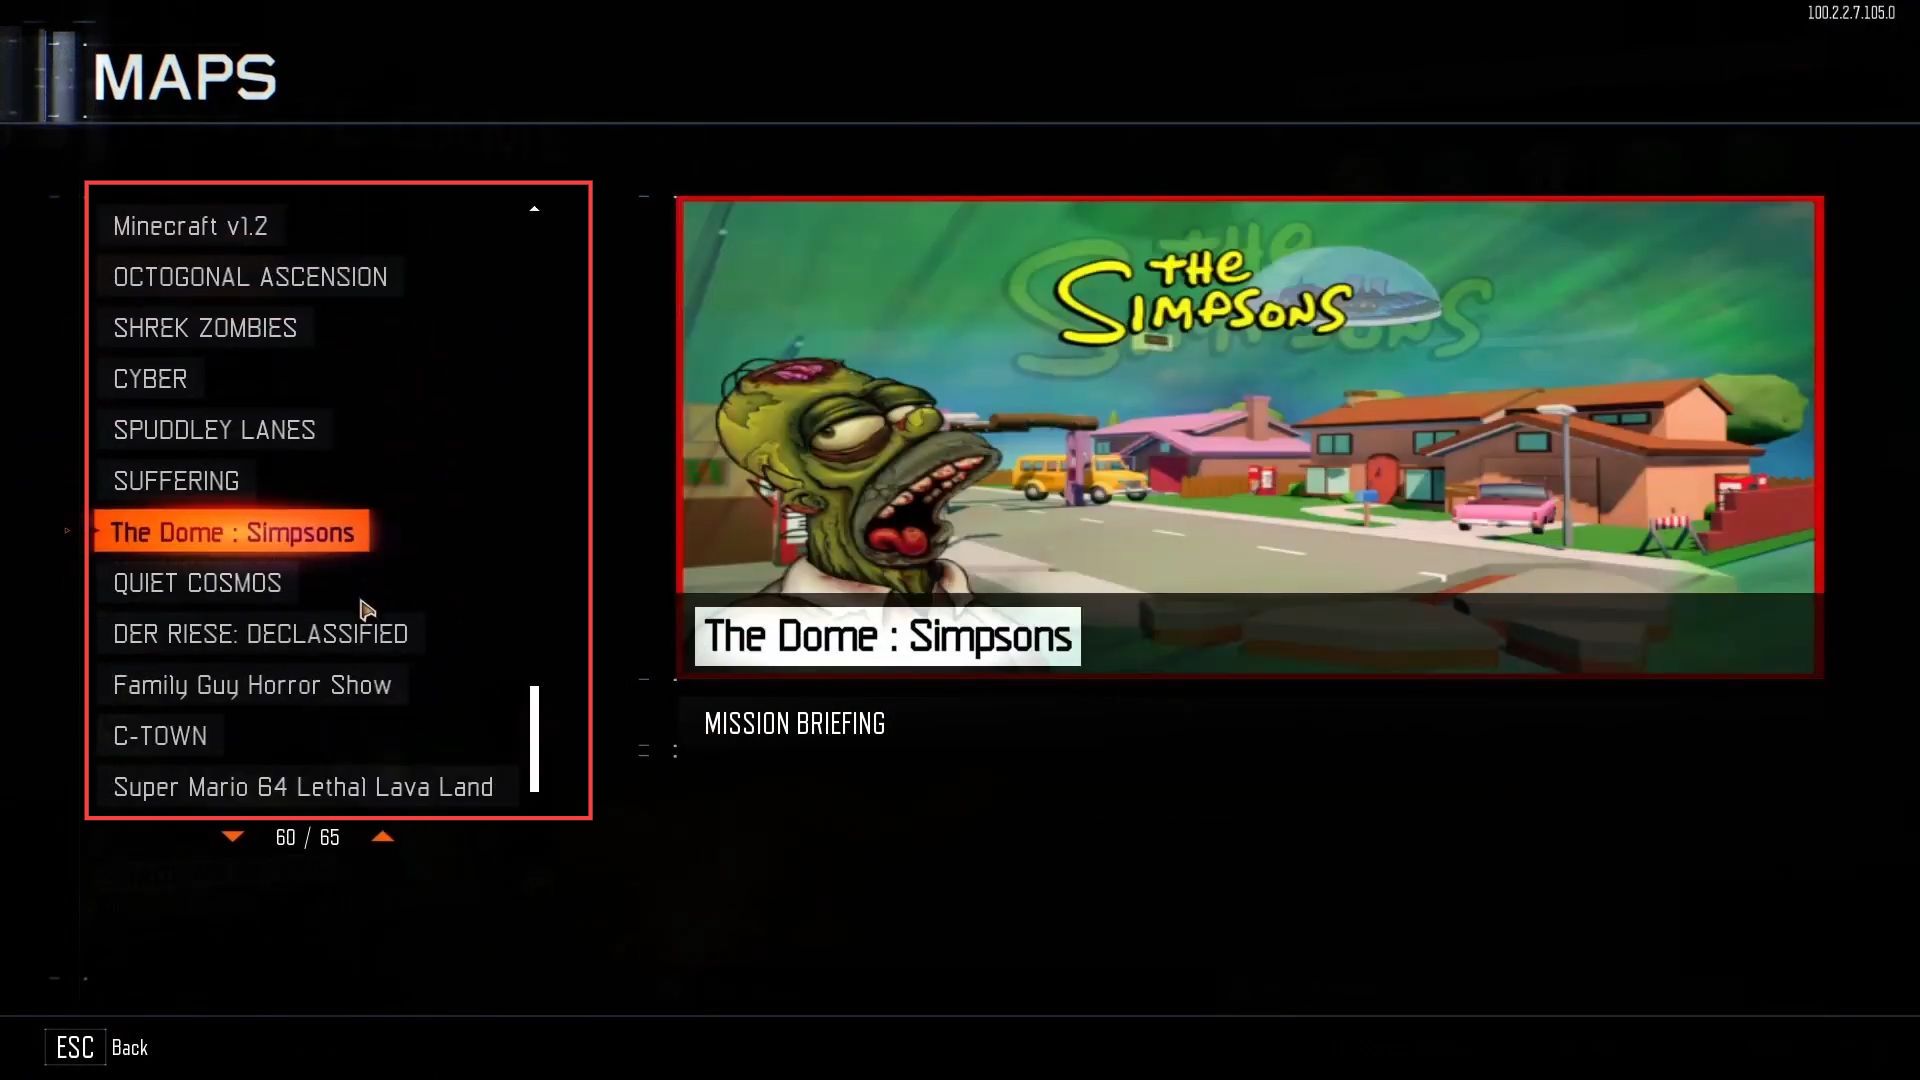
- Within the private game setup, look for an option labelled Change Map.
This option allows you to select a different map for the private match. - Click on the Change Map option to proceed to the map selection screen.
On the map selection screen, you’ll find a list of available maps for the game. These maps may be presented in a scrollable list. - If you have many new maps installed, you might need to scroll down to view them.
- Look for the new maps you’ve recently downloaded and choose one of the new maps you want to play on by selecting it.
This map will be set as the location for your private match.
- While in the game or the game’s lobby, find and access the Social menu.
- Within the Social menu, look for an option that allows you to Manage the Party.
This option is used for configuring party settings for your gaming session. Inside the Manage the Party section, you’ll find various options related to party settings. - Depending on your preferences, you can change the Party Privacy setting.
This setting determines whether your party is open to other players joining or if it’s restricted. - In the same Manage the Party section, look for the Player Limit setting. This allows you to define the maximum number of players who can join your party.
- Adjust the Player Limit according to your preference. You can set it to a specific number or choose options like Open (unlimited players) or Closed (no more players allowed).
- Once you’ve configured the Party Privacy and Player Limit settings as desired, make sure to save the changes.
