King’s Raid is a role-playing 3D game. It is available on Google Play Store for free.
There are several types of characters in King’s Raid. You have the option to customize them.
Some heroes are locked, you can purchase them from in-app purchase.
King’s Raid can be played with your friends or players all around the world. The player’s gears will be unlocked once you win the game. The new chapters in the game will also be unlocked in this adventuring game.
King’s Raid is a 3D game with ultimate graphics. It is one of the top-rated role-playing game. King’s Raid can only be played on the android version 6.1 or higher. Lower versions are not compatible with the game.
We have categorized the characters into seven groups. The first group in King’s Raid tier list consists of Knights. The main characters are Clause and Aselica, They are the first pick of players. The second group in King’s Raid tier list contains Warriors. The top warriors are Gau and Priscila, They are almost as good as the first group characters. The third group consists of Assassins. Top heroes are Tanya and Roi. Tanya and Roi are good additions to your team. The fourth group in King’s Raid tier list consists of Archers. The main characters are Arch and Zafir, their role is vital in the game. The sixth group consists of Wizards. Mian heroes are Veronica and Pavel. They are good in some situations. The seventh group consists of Priests. The top characters are Shea and Rephy. They are effective to some extent.

King’s Raid Tier List – Knights
| Hero | Classification | PvE | PvP | BD |
| Clause | Tank (Protector, AsSlow) | SS | C | SS |
| Aselica* | Tank (Buffer, Amp) | A | B | B |
| Dosarta | Tank (PvP) | B | A | C |
| Loman* | Tank (Amp, Cleanse, Shield) | S | SS | S |
| Morrah | Tank (Protector, Amp) | B | C | A |
| Demia | Tank (PvP) | B | S | B |
| Glenwys | Tank (Protector) | SS | C | SS |
| Jane | Tank (Amp, Shred) | S | B | A |
| Neraxis | Tank (Protector) | SS | B | SS |
| Phillop | Tank (Shred, Amp) | S | A | S |
| Ricardo | Tank (CC, Protector) | B | S | B |
| Sonia | Tank (CC, Amp) | A | A | A |

King’s Raid Tier List – Warriors
| Hero | Classification | PvE | PvP | BD |
| Gau | Tank (CC, Cleanse, Buffer) | A | A | SS |
| Priscilla | Subdealer (Buffer, s2) | A | A | S |
| Scarlet | (Sub-)Dealer (Cleanse, Dispel) | B | S | B |
| Chase | Dealer (Buffprevention) | A | S | A |
| Kasel | Selfish (Acc Debuff, Dodge) | B | A | A |
| Naila* | Subdealer (Amp, CC) | A | A | S |
| Seria | Dealer (Defpen, always crits) | A | A | B |
| Theo | (Sub-)Dealer (CC, Amp) | S | B | S |
| Viska* | (Sub-)Dealer (CC, Amp, Shred) | S | A | A |
| Nicky* | was born nerfed |

King’s Raid Tier List – Assassins
| Hero | Classification | PvE | PvP | BD |
| Tanya | (Sub-)Dealer (Silence, Dispel) | A | A | A |
| Roi | Dealer (Single Target) | B | C | S |
| Reina | Dealer (Single Target) | A | B | S |
| Nia | Dealer (Defpen) | A | A | A |
| Mirianne | Dealer (Single Target) | S | S | A |
| Laudia | Dealer (Single Target) | A | A | B |
| Gladi* | (Sub-)Dealer (Amp) | A | B | S |
| Fluss | Dealer (Anti-Magic) | B | S | B |
| Ezekiel | Dealer (CC, Defpen) | S | A | S |
| Erze | Dealer (AoE) | SS | A | B |
| Epis | Dealer (Main) | S | A | A |

King’s Raid Tier List – Archers
| Hero | Classification | PvE | PvP | BD |
| Arch | (Sub-)Dealer (M.Shield, Defpen) | A | A | A |
| Zafir | Dealer (Aoe) | SS | A | S |
| Yanne | Dealer (Main) | C | C | SS |
| Shamilla | (Sub-)Dealer (Dispel, Pvp) | A | A | C |
| Selene | Dealer (Main) | A | B | A |
| Requina | Subdealer (Amp, Blockred.) | S | SS | S |
| Luna | Dealer (Main) | S | A | S |
| Dimael | (Sub-)Dealer (bit of everyth.) | A | S | A |

King’s Raid Tier List – Mechanics
| Hero | Classification | PvE | PvP | BD |
| Rodina | Dealer (Single Target) | B | B | B |
| Oddy | Support (CDR) | A | B | B |
| Mitra | Dealer (Single Target) | C | D | C |
| Miruru* | Subdealer (CC, AoE) | S | SS | S |
| Lakrak | Dealer (CC, AoE) | S | A | S |
| Kara | Put with Shea or Rip | A | A | A |
| Crow | Dealer (AoE) | B | B | A |
| Chrisha* | Subdealer (Aoe Amp) | S | B | S |
| Annette | Support (CC Immunity, Amp) | S | B | SS |
King’s Raid Tier List – Wizards
| Hero | Classification | PvE | PvP | BD |
| Veronica* | Support (Buffer, Amp) | B | D | A |
| Pavel | (Sub-)Dealer (CC, AoE) | A | S | B |
| Ophelia | (Sub-)Dealer (Buffer, Burst) | A | S | A |
| Nyx | Dealer (AoE, Dispel) | S | S | B |
| Maria | Subdealer (CC, Amp) | S | S | B |
| Lorraine | Subdealer (CC, AoE) | A | B | S |
| Lilia | (Sub-)Dealer (Buffer) | A | A | A |
| Lewisia | Dealer (Single Target) | B | C | C |
| Esker | (Sub-)Dealer (Buffer, Aoe Amp) | A | D | B |
| Cleo | Dealer (AoE) | SS | B | A |
| Artemia | Dealer (AoE) | SS | B | S |
| Aisha | Dealer (Single Target) | A | B | A |
King’s Raid Tier List – Priests
| Hero | Classification | PvE | PvP | BD |
| Shea* | Support (everything) | A | B | B |
| Rephy | Support (Cleanse, Healer) | S | SS | S |
| Mediana | Support (Buffer, s3) | S | A | S |
| May | Support (Buffer, Healer) | B | D | B |
| Lucias | Support (Anti P.Damage) | A | S | B |
| Leo | Support (s3, Shred, Dispel) | C | SS | C |
| Lavril | Support (Buffer, weak heal) | A | C | S |
| Laias | Support (Manabattery) | S | A | S |
| Kaulah | Support (CC, Buffer) | A | B | S |
| Juno | Support (Cleanse, Dispel) | S | S | A |
| Frey | Support (Shield) | S | B | S |
| Cassandra | Support (Disruption, Buffer) | B | S | B |
| Baudouin | Support (s3, Buffer, CC) | C | A | C |
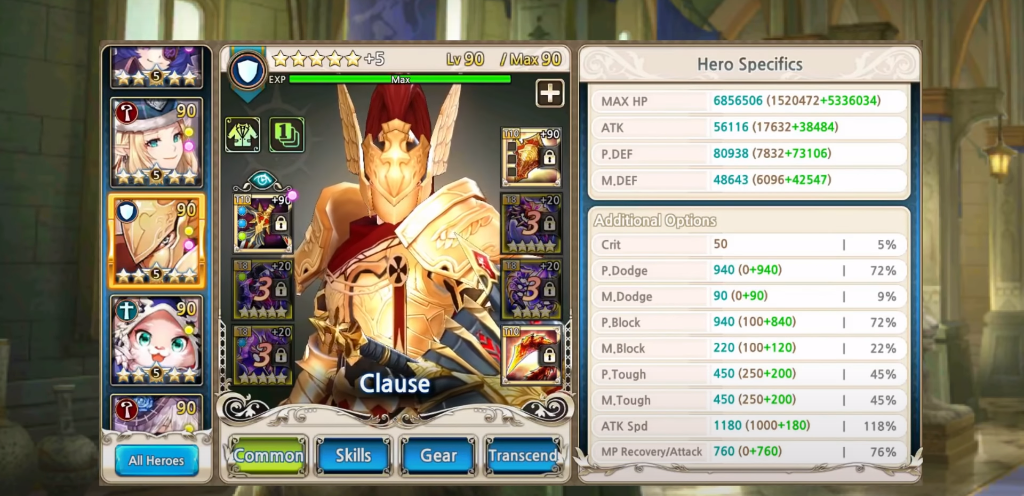
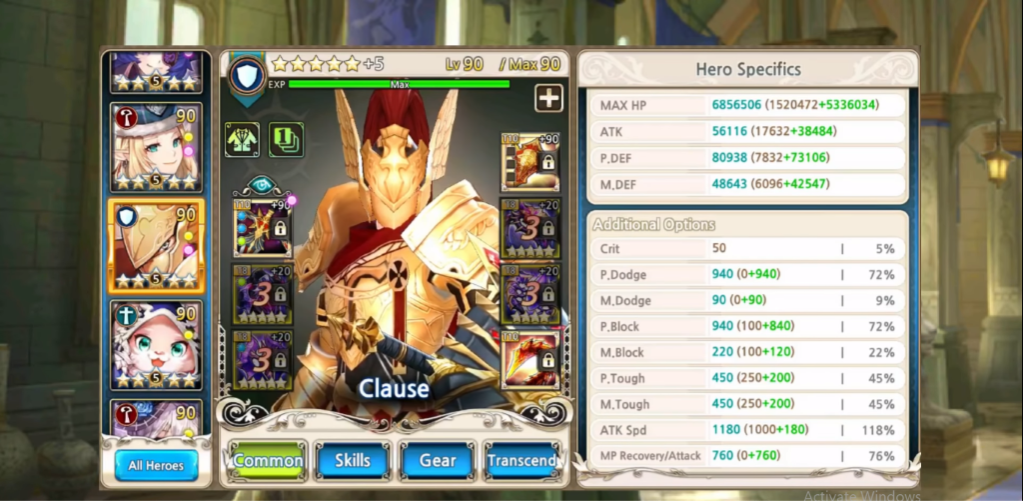
Meet Clause, the friendly tank that we get as a starter. Clause is very useful for a starter team. But he tends to get ignored because he is a free hero. He is one of the heroes with multiple useful utilities. He has good CC looking skill, huge PDEF buff, PDEF reduction buff, slow speed debuff, ATK reduction debuff and PDMG AMP. S1 locks enemies for 5s with low cooldown of 9s. Ling duration CC look is one of the indirect protection methods for the whole team.
He can combo with many different heroes that have minor CC to CC lock groups of enemies. S2 is the skill where most of his debuffs come from.Slow speed, PDEF reduction and PDMG AMP with S2 Light perk, 3 debuffs in a very low mana cost skill. 50% slow speed reduction in just a single skill is a very powerful debuff, it’s very useful for dragon raids to slow down the action of the boss. In higher level ragins, he is the key hero for most teams to solo farm it safely. Slowing down the action of the dragon is an important key for safe runs.
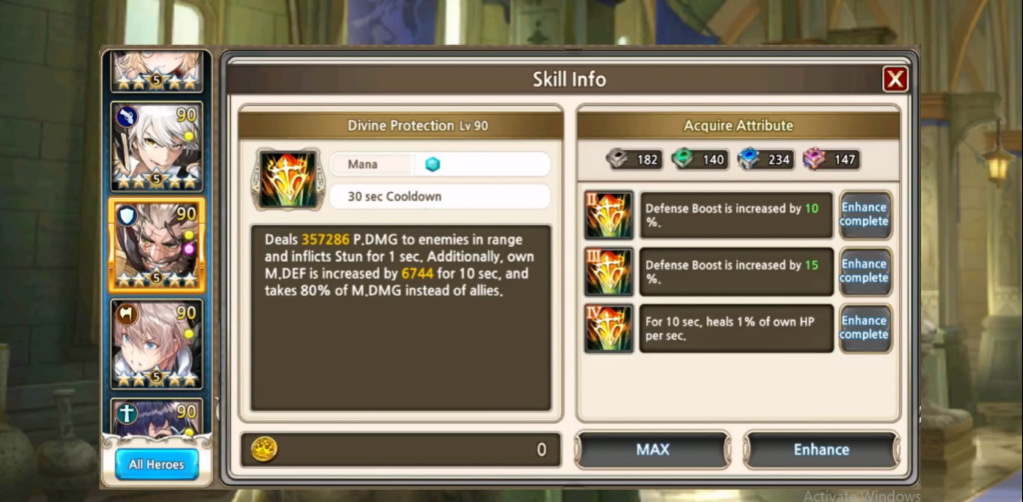
Even though Clause is a defensive tank, he still provides a good amount of damage boost for the team. 30 % PDEF, reduction plus 25 % PDMG AMP in just a single skill of S2. S3 provides huge protection against incoming physical damage. High value of solid PDEF buff plus 25% direct PDMG reduction with S3 Dark perk. Whenever we are trying to survive longer against high incoming physical damage content, Clause’s high PDEF buff is needed. Clause’s S4 has ATK reduction debuff, ATK reduction debuff must not be underestimated, as it can soften the incoming damage to the whole team.

However, Clause must block the damage first and must not be casting any spell to trigger S4. Dodging the attack is not counted too. Trying to just maintain his dodge at 50% is nice enough. For new players that plan to start with a physical team, Clause is the most recommended tank to start with. He will help players to progress better. Showing my anti magic tank gears that i use for all my main tanks. Gear options are focused on maximizing the tankiness for incoming magic damage contents. Gear options are focused on maximizing the tankiness for incoming physical damage contents.
Dakaris
Finally, we get another male hero but in the form of Lizard. Dakaris is mainly a pvp hero, which is more inclined towards 3v3 Guild War contents. Dakaris has average auto attack speed. However, he doesn’t have any specific kit that benefits from it. S1 is a quick small AOE, CC interruption skill with high spammability rate.

He can also combo well with Demia or Dosarta in a Wall or Bruise Team, especially when using UTS1 for a dragged battle. Dakaris is also suitable to be built tanky. Taking S1 Light enhances the CC interruption ability into CC lock. 2s small AOE stun skill with 3s cooldown. We just need to ensure that he has good mana flow.
S2 is a free opener skill. Party shield is only available for 3 heroes party, which is mainly for 3v3 GvG content. Note that the 2 Orbs Mana is not an immediate mana supply, but is slowly supplied over the span of 10s. S2 also improves the spammablility rate of S1 by removing its cooldown for 3 times. Again, a hero with cluster skill is needed if we are planning to use this strategy. S2 provides a party shield and unlocks the dangerous effect of S1 and S3. Opponents could be baited to use their dispel skill on his S2 earlier.
However, since Ring of Spirit Morph exists, shooting down enemy’s DPS too early may not be successful, but is good to reduce his/her power. S4 gives him either extra offensive power or better survival. Also has Arch-like passive effect when receiving fatal damage when using UT S4. Dakaris is considered as an all-rounder PvP or GvG hero, suitable to fit into Burst Team, Bruise Team or Wall Team. Having UW makes him more tanky. Dakaris has spammable S1, so he can gain double skill effects regularly.
UT S1 is recommended when using Dakaris in a tanky Wall Team or Bruise Team due to percentage Max HP healing with highly spammable S1. Scales well with higher UT stars. UT S2 does not seem to fit well in any of Burst Team, Bruise Team, or Wall Team. It’s either we quickly burst down the enemy with S3 ro delay the fight with spam from S1. UT S3 is for usage in Burst Team to improve the power of S3 to be strong enough to take down enemy’s DPS heroes. Dakaris may not be the first hero to receive fatal damage.
Most of his transcendence perks are focused towards PVP. The choice of perks will depend on the type of team we are using. Generally, for Burst Team, the suggested perks will be S2 Light and S3 Light/Dark. While for Bruise Team or Wall Team, I would suggest using s1 Light/Dark and S4 Light. For T5 Dark, the second sentence of the effect will only activate if the buff from his first sentence is not dispelled in the first 5s. Not effective when facing Leo. Lakrak and Kaulah are happy to have Dakaris as a new friend. The Powerpuff Trio can finally enjoy their Summer Holiday together in the Beach Side. Blue Kaulah, Green Dakaris, and Peach Red Lakrak.
Meet Loman, the ambitious Knight. Loman is very ambitious. He wants to be the spotlight and be useful everywhere. Being a Tank does not satisfy him. He wants to be a Warrior and Supporter as well. He prays very hard to Lua- sama everyday for his wish to come true. Finally, Lua-sama grants his wish. He becomes one of the most needed and used heroes in the game currently.
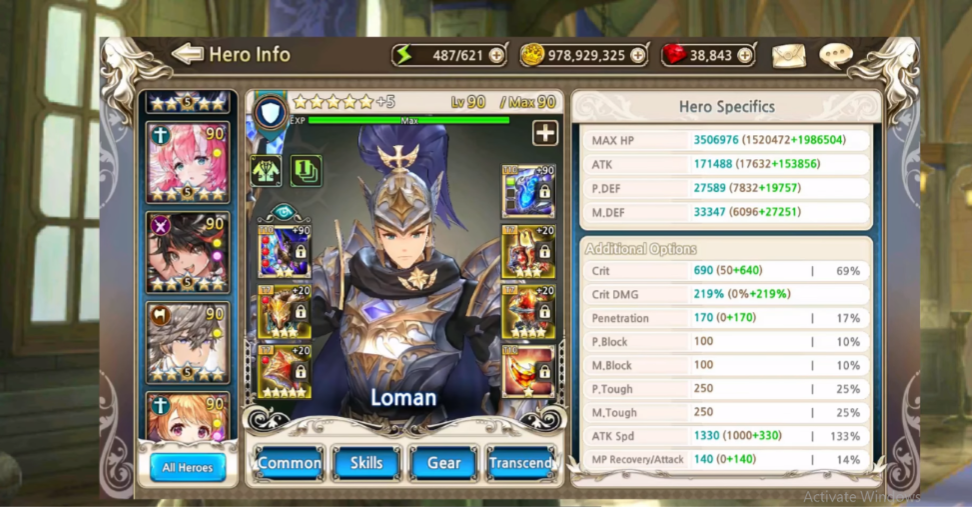
S1 provides 25% PDMG AMP with permanent uptime. He comes with 4s CC bar reduction with low cooldown. S1 Dark is mandatory, considering Loman’s primary role as the damage booster for the physical team. Now, his S1 provides 50% PDMG AMP. Together with S1, 0* UW and 0* UT S3, he can effectively provide 85% PDMG AMP. Higher when his UW and UT S3 is upgraded further.
The ability to provide high PDMG AMP to the physical team is one of the main reasons why Loman becomes the top support choices in many endgame areas. S2 cleanses debuffs and provides short duration shield plus direct damage reduction buff at same time. He is very useful for both PVE and PVP. In PVE, S2 can be used to protect the team from possible fatal damage, providing temporary CC immunity, or removes the negative status from. Loman is the only hero that can partly cleanse and shield up with the same skill. This ability is the primary reason of why he is famous in PVP.

UT S2 is needed for PVP to initiate his S2 as soon as possible when necessary. Ready to burst? Open Loman’s S2. Get heavily CC-ed? Open Loman’s S2. Cleanse all weakening debuffs and protect the team from interruption. But don’t forget to bait your opponent to use dispel first or have your burst heroes act right away when Loman casts his S2.
S3 has 13s worth of CC bar reduction. This skill is also the reason why Loman can be built as the DPS to contribute some damage. When Loman is built as a DPS hero, taking S3 Light improves his DPS or damage performance greatly. When built as a DPS hero, Loman contributes a decent amount of damage to the team as well, aside from boosting up the tea, and helping to reduce the CC bar.
S4 is mainly an ATK Reduction debuff skill. Another layer of party protection indirectly. ATK Reduction debuff helps to soften up the damage received from S4 and potentially avoid one shot damage from enemies. Taking S4 Light provides better uptime of ATK Reduction debug which is more consistent to keep the received team damage softened all the time. Loman’s perk build varies, depending on the content we are using him or the role that we want him to be.

The general perk builds when using Loman as a tank for incoming magic damage contents. Next, the general perk builds when using Loman as a tank for incoming physical damage contents. Similar with incoming magic contents, but just without T5 Dark. The perk build for DPS Mode Loman. Loman is considered as a DPS hero in this build, and there should be another main tank taking the damage.

Meet Morrrah, the double face hero. She has two different modes to play in different situations. She can be switched as you wish. Firstly, the hard volcanic rock mode. The party protection MDEF tank mode. Secondly, the hot flame gladiator mode. The strong single target MDPS mode.
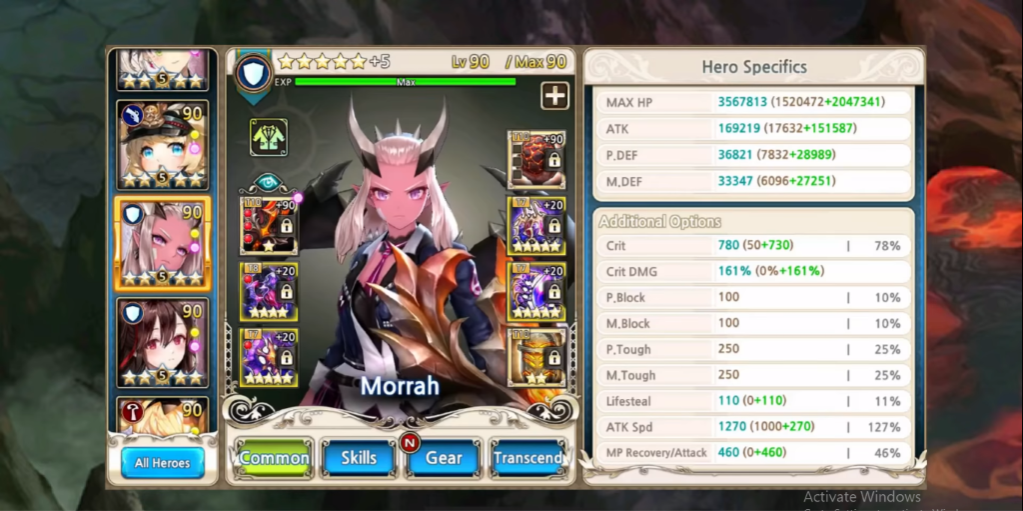
Firstly, as a protective tank, she doesn’t protect allies much with raw MDEF. Just around 10,430 MDEF at max attribute and skill level. But, the 425 MBlock chance she provides at max attribute plus S2 Light gives 42.5% “chance” to reduce incoming magic damage to around half. Chance is still a chance. 42.5% chance is still low.
Secondly, as a MDPS the secret lies in her S1 and “Flame Stack” mechanic. Her auto attack damage imbued with S1 and skill damage grow higher as the “Flame Stack” stacks higher.
When the S1 buff is gone, she turns back to nothing special again. Her DPS keeps rising to full potential at max stack, which is 120 with T5 Dark. Not only her auto attack, but skill damage keep rising higher too.
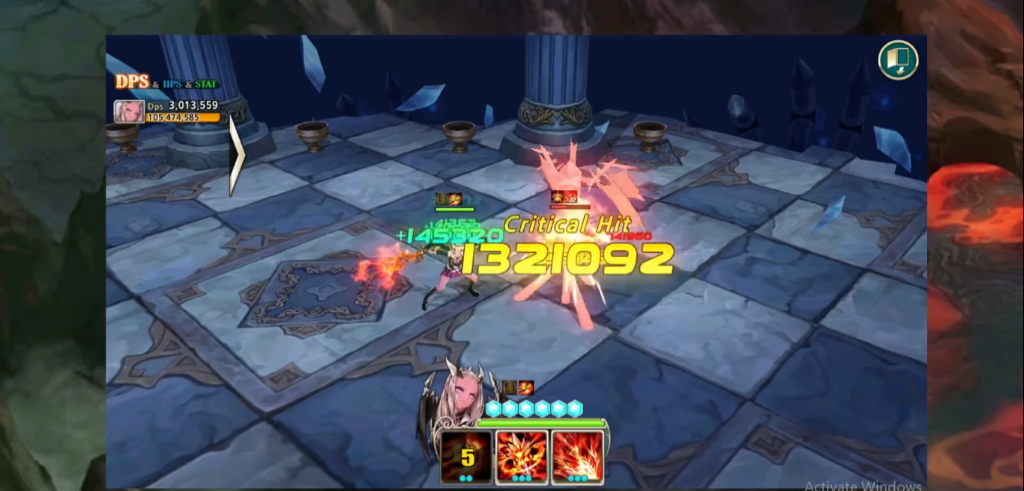
Her DPS mode is mainly used in WB1. As a bonus, she got 40% MDMG AMP for the team and high CC bar reduction. Her bonus high CC bar reduction with short cooldown in S1 is very useful in any mode, doesn’t matter as a tank or DPS. To easily switch using her in 2 different modes, remember to get a Class UW if you don’t want to keep switching the runes.
My gear builds when using Morrah in protective tank mode. Using any standard tanky options are fine.Next, this is the gear build for DPS type. Using DPS gear options. She will get more benefit using Crit DMG lines in a large team with high party ATK buff.

Glenwys is very ambitious. As a knight, she is not satisfied to just tank and protect the team. She wants to be a DPS, CC hero, and team damage booster as well. She tries very hard to be like Loman. Firstly, let’s start with her auto-attacks. Glenwys has fast auto-attacks but she doesn’t have any kit that benefits from her quick auto-attacks.
S1 is her primary DPS skill as a DPS knight specifically for PVE. Required UT S1 and S1 Light to be a more efficient DPS Knight. Besides that, S1 also provides 28% PDMG AMP at permanent uptime. She can be a DPS Knight and Team Damage Booster at the same time. UT S1 is recommended for Full DPS build Glenwys. The cool down reduction effect is only significant when hitting more enemies.

S2 is mainly her CC skill. Comes with a high total CC bar reduction worth 18s if we take S2 Dark. Good to be use against dragons and bosses. S2 Light improves her role as the DPS Knight and Team Damage Booster with added 25% PDMG AMP. Ideal for damage scoring contents. UT S2 improves her CC bar reduction frequency and debuff uptime from S2 Dark. Recommended for her Team Support Build and only if we take S2 Dark.
S3 is all-in-one party offensive and defensive buff skill with cleanse utility added. The value of buff is more significant when taking S3 Dark and using UT S3. UT S3 is the most general UT choice for all situations in her Team Support Build. On par and competitive choice with UT S2.
S4 is good for clearing adventures or in dragon raids with stage transition only. Not significant for other contents due to low duration. UT S4 has limited usage, similar to the original skill effect of S4. Good to sweep through contents with stage transitions quickly.
Additional ATK and Crit DMG buff to the whole team. UW is important to Glenwys to fulfil her role better as the team damage booster. At least a 0* UW for this role. UT S4 has limited usage, similar to the original skill effect of S4. Good to sweep through contents with stage transitions quickly. In all situations, Glenwys should pick T5 Light and T5 Dark as her primary selling point in the team. Then the remaining perks depend on how we want to use her. If we have another Tank in the team and Glenwys is not the main tank, she will have enough points to get 2 more perks from T3. For full DPS mode, we can go for S1 Light and S2 Light. When we just use her in full Support Mode, S2 Light/Dark and S3 Dark is recommended. Swords and Shield Knight are common. Gun and Shield Knight is unrealistic. So, let’ combine both elements into something uncommon and realistic.
Meet Jane, our beloved magic booster tank. She stresses her body too much and exercises very hard by carrying the big coffin whacking sound. Poor Jane. Even though her side story is quite sad. But she is considered as the best magic booster tank currently.

Her most basic way of boosting is to target 25% MDMG AMPP from S2 with very long duration. Second way of boosting is S1 Light. So, T3 is more than enough for Jane as a magic booster tank. Low growth investment. Another direct 25% damage increase with S1 after taking S1 Light perk. It stacks with S2 to 50%.

Her most important and the main source of her title as best magic booster tank is her S3 upgraded with UT. UT S3 is compulsory for Jane. Must get it if you want to use her. It’s the main reason for using her. Permanent 50% MDEF reduction is a huge team boost. Her great damage boosting ability is great to use in damage scoring areas in end game, such as WB1.

She is also usable in almost every situation. From early to end game, as long as you are running a magic based team. Other than becoming a standard magic booster tank, she is capable of becoming a tanky DPS here. Her DPS is mainly for AOE contents. Jane’s main source of damage is from S3 powered up with S2 Mark.
Note that the description shown in S3 should be “123,694 M.DMG per second”. Without S2 Mark, her S3 deals 2,078,354 per second only. Notice that with S2 Mark, her S3 damage per second rises greatly to round double damage, at 4,829,201 per second. She also has an offensive T5 Dark perk, suitable for the “Battle Jane” role.
Jane is also very friendly to use for new players. She can be sacrificed once, while remaining tanking, especially when your healers don’t have enough mana to start healing in the beginning of the stage. She lives twice, compared to other tanks that live once. She is also safer to use as DPS mode in the frontline without worrying about survival.
Meet Neraxis, the direct descendant of Black Dragon. Neraxis has a very complicated story. He was the guardian of Black Mountain, protecting the Black Dragons for many years. One day, he felt bored and decided to go for vacation. One day, he met Laias near the beach. He stayed with Laias for a few years and enjoyed their days and nights together. As a result of playing and enjoying happily for a few years, Lilia is created as a surprise. Complicated. Water fuse with Lightning equals to Tornade.
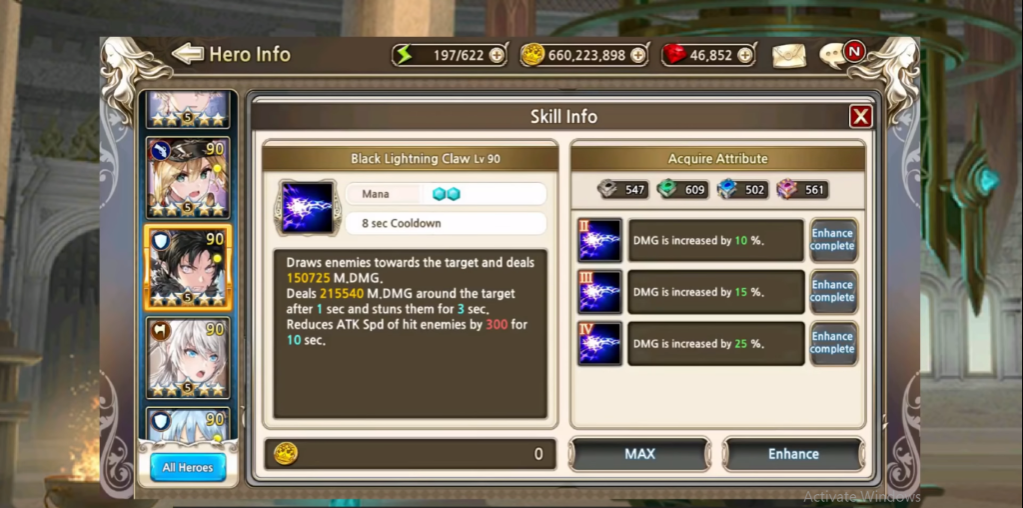
Neraxis is the most recommended magic tank for new players. He offers both defensive and offensive utilities that are helpful for clearing adventure stages and farming dragons. S1 is a fair CC lock skill with ATK Spd Reduction debuff at full uptime. Unfortunately, the suction range and area of effect is small. Taking S1 direct for extra MDMG AMP at full uptime is recommended to boost up the overall damage of the team.
In adventure stages, S1 helps to interrupt and CC lock nearby enemies. In dragon raids, the Slow Speed debuff helps the team to survive better by delaying the actions of the boss. S2 is an all-in-one offensive plus defensive pumping buff to his allies and weakening debuff to enemies. Neraxis can either go for S2 Light or S2 Dark, depending on the team set up.
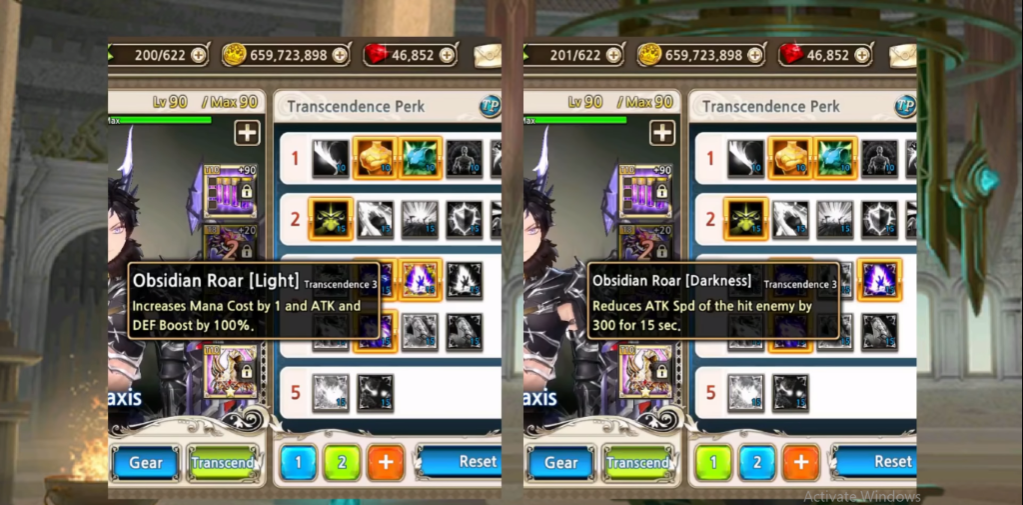
If we have another consistent Slow Speed debuffer in the team, go for S2 Light to double up the value of the buff. Go for S2 Dark when we have another MDEF buffer such as Morrah, Laias, or Rephy. More Slow Speed debuff stacking is always good. S2 is very important to keep the team in dragon raids with high direct protection buffs and multiple indirect protection debuffs. S3 is mainly for MDEF shredding debuff to further boost up the damage of magic teams. The value shredded is considered low for a high mana cost skill.
Taking S3 Dark is recommended to have an acceptable MDEF Reduction buff, unless we have another MDEF shredding hero in the team. UT S3 is also needed to improve the uptime of MDEF Reduction and convert S3 into a decent CC bar reduction skill as well. From 6s upgraded to 12s worth of CC bar. 30% MDEF Reduction debuff is decent enough to boost up the damage of the main DPS for clearing general PVE contents within timer or acceptable clear time.

S4 makes Neraxis tougher and tankier. Good starting boost for new players that have not secure good gears for him yet. Sowing my gears for Neraxis. He is now wearing the anti-magic tank set. Anti-physical set is similar, but using PDodge, PBlock and PDEF instead of MDodge, Mblock and MDEF.

Provides fair damage boost with MDEF Reduction and MDMG AMP debuff. Has a good amount of AK Spd Reduction debuff to slow down the action of dragons. ATK Reduction debuff from S2 is good enough to soften incoming damage as well.S2 provides a high amount of party PDEF and MDEF buff as direct protection. S1 is a fair CC lock skill that contributes to the overall team CC. Neraxis has both offensive and defensive utilities that are good for clearing adventures.

Meet Ricardo, our honourable grandpapa. He is well known as the anti-magic tank. He provides protection to the team against incoming magic damage. He is not just a normal anti-magic tank. But he is an honorable one. He is willing to sacrifice himself for others. Very bright hero indeed.

But nowadays, we have a young boy with an almost similar role and offer even more utility than our grandpapa Ricardo. Ricardo’s signature skill is S2. His honorable protection skill. He absorbs most of the magic damage from allies to himself. His S2 is good to prevent fatal damage from one shotting his allies.
However, he is just limited in absorbing magic type damage only. If the damage he absorbs happens to be too large that may kill himself, he has T5 Dark to prevent it. So getting Ricardo to T5 is important. He also offers a huge and solid 36,875 MDEF buff to everyone with 5 stacks. But, the condition is that allies must get multiple hits of damage first. This condition can be good or bad sometimes.
Good when the stage has continuous incoming DoT damage. Everyone is enjoying the huge MDEF buff but at full uptime. Bad when the stage does not have any DoT. The high damage from the boss may kill team members before the buff stacks up to reduce damage.
Ricardo’s S3 has high CC bar reduction worth 18s total with S3 Light perk. This makes him good to use in raids as the protective tank. Not just limited to knocking down the boss dragon in raid, but his CC bar reduction ability is also useful in any content with boss having CC bar. Take note that Ricardo is not a suitable choice for new players. Firstly, he is more towards a PVP type hero. Secondly, he has kits to make him useful in some end game PVE contents only.

High CC bar reduction helps in knocking down the boss when necessary. Has a good chance to protect the team with S2 against dangerous damage. Stage with continuous DoT is perfect to enjoy full uptime is S4 huge MDEF buff. Performs decently in adventure but not very suitable compared to other major PVE tanks. Suitable use in the magic team for his protective role as well. Even though he is physical based.

Meet Sonia, the continuous and unpredictable interrupter. Mirianne is her best friend. She admires Mirianne’s special growth very much and wants to be like her. Sonia releases lightning from her body. She uses those lightning to zap enemies and interrupt them frequently.
S1 is Sonia’s wide area interruption skill. It can also be used to maintain the CC bar level from recovering temporarily. Min stun does not lock enemies in place but just interrupt them only. More useful to interrupt enemies with a casting bar such as the final stage boss in advantage stages. S2 is Sonia’s signature skill currently. Very high stat boost to herself and activates her “enchanted interruption” mode with high uptime.
In multiple target contents such as adventure stages, using S2 Dark is recommended to interrupt all enemies consistently. Pushing Sonia’s ATK spd to softcap at 1600 is also recommended since she relies on fast auto attack to trigger S2 effect frequently. UT S2 is the most recommended general choice for Sonia in both PVE and PVP.
Sonia starts to rise as the PVP star in wall team because of this UT. The high trigger rate of S2 could interrupt enemies anytime and cancel their skill activation in PVP. Sonia annoys opponent a lot because her interruption is unpredictable.
Sonia’s is mainly used as heavy CC bar reduction skill in PVE. 15s worth of CC bar reduction. Sonia has reduced huge chink of CC bar from enemy with S3 while holding off the CC bar from recovering with S1 and S2.

S4 is Sonia’s electricity and shock mechanic. The effect of S4 is more stable and consistent against single target contents. More importantly, when the enemy is inflicted with shock state, any mini stun CC that just helps to hold off the CC bar now also helps to reduce it. T5 Dark deals additional damage based on HP. However, take note that the additional damage from T5 Dark will not land critically.
As shown in this test, even though Sonia has 100% Critical Rate, all of her attacks land critically, except the damage from T5 Dark. However, dealing 10% of her HP as damage in PVP is very painful. The chase to trigger her T5 Dark is decent with fast auto-attacks plus S2 and multiple hits of S1.
Showing my DPS gear build for Sonia. Using standard DPS gear options. This type of gear lines are used in my Black Dragon Lv75 Labyrinth of Defence (Knight) showcase later. Showing my standard anti-magic tank build for Sonia. Similar kind of gear build is used in all of my showcases, except Black Dragon Lv75 and Labyrinth of Defence (Knight). Showing my PVP build for Sonia. She is using HP stacking build for my wall team.

Heavy CC bar reduction for boss contents. Interruption helps to stall enemies for short moment. Able to reduce CC bar and maintain it from recovering. Has decent damage when using DPS gears and perks. Deals damage and boosts up magic team with MDMG AMP. Continuous interruption CC to protect the team. Temporarily stops the enemies during the downtime of CC skills from main CC hero. Consistent mini stuns stop the actions from enemy.

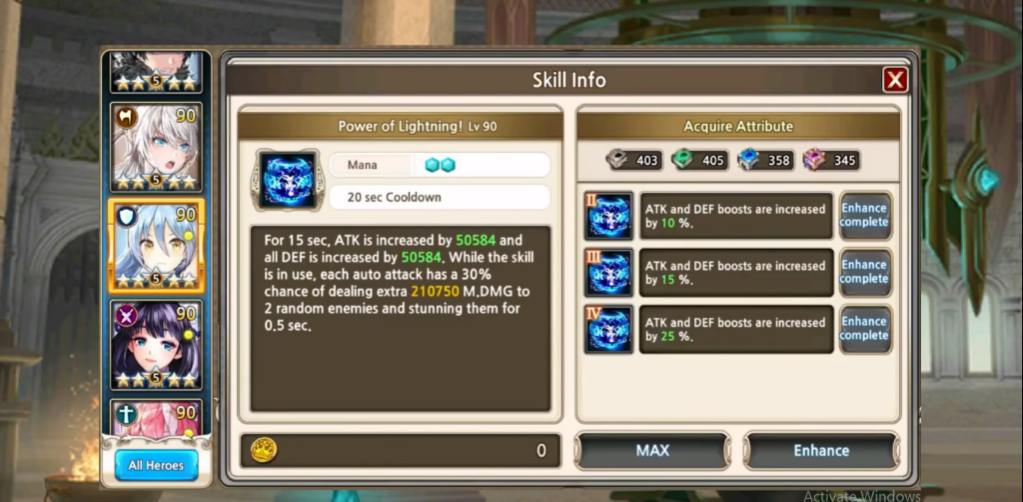
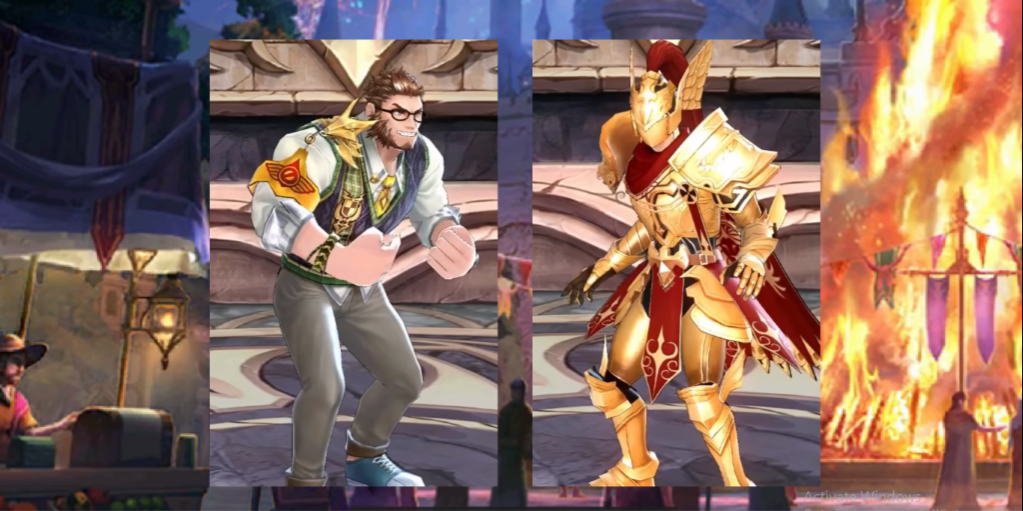
This is our Papa Gau. The Barbaric Gau. This looks better, our gentleman Gau. Doesn’t matter what Gau is, he is famous for his spinning ability. The well known instant CC bar knockdown. Eventually, all players are required to get him when starting to farm high level dragons for gears and scrolls. Dragons are afraid when they see Gau. His main job is to spin. Gau prevents the dangerous flying breath from the dragon.
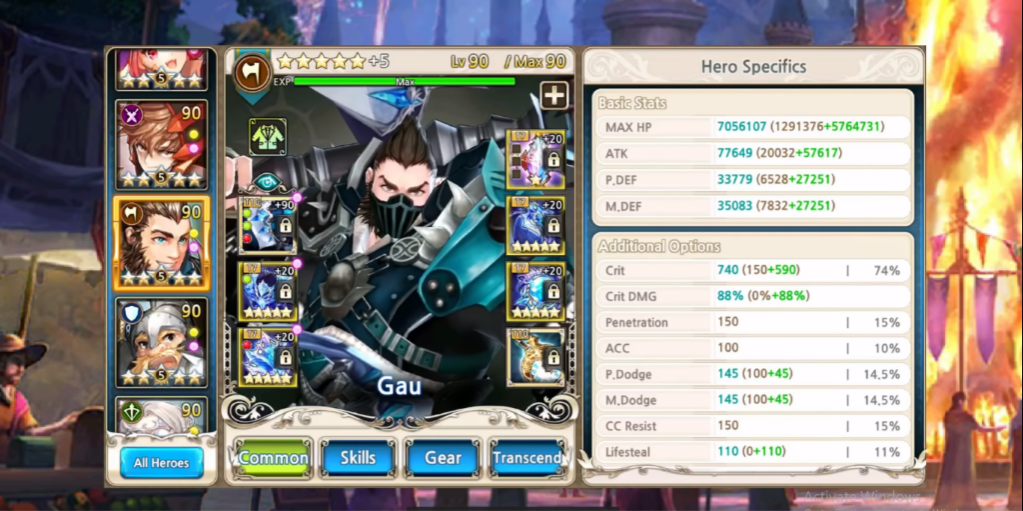
He is also good as a stress reliever. Gau’s S3 cooldown seems too long and RNG in auto mode for preventing dragon’s fly. Yes, it is RNG, but we can increase the RNG chance if we execute properly. Firstly, number one. We got a pocket watch artifact. Now Gau’s S3 CD becomes around 18s.
Secondly, number two. Next, we have S3 Light perk. The CD is around 15s now.
Thirdly, number three. Dragon will be knocked down for 5s. If Gau uses S3 at the wrong time, he can recover back 5s of CD. Therefore, Gau’s effective CD of S3 is now at 10s. Can Gau stop the dragon if it wants to fly within this 10s?

Lastly, number four. Now, we have the best friend of Gau. Meet Clause here.
Normally, dragni takes around 6s motion from ground to launch flying breath. With Clause 50% slow down, it needs around 10s to fly away. Gau needs 2s to finish casting S3 knocking the dragon down. So, latest by the 8th second of the dragon trying to fly, Gau must use S3. In conclusion, as long as the dragon doesn’t fly at the start of phase 2 or at the first 2s after wrongly knocked down, Gau can continuously prevent the flying breath for the whole match.

I have a very high chance to avoid dragon flying during auto mode in a correct team, especially with my buddy Clause and Phillop. For new players, don’t pick Gau to clear adventure. Pick Gau only when you are ready to farm high level dragons, especially T7 Black Dragon onwards.

Without good buddy Clause, spin timing is not so efficient. Aim to quickly burst the stage rather than spinning. But it is still possible to do it.

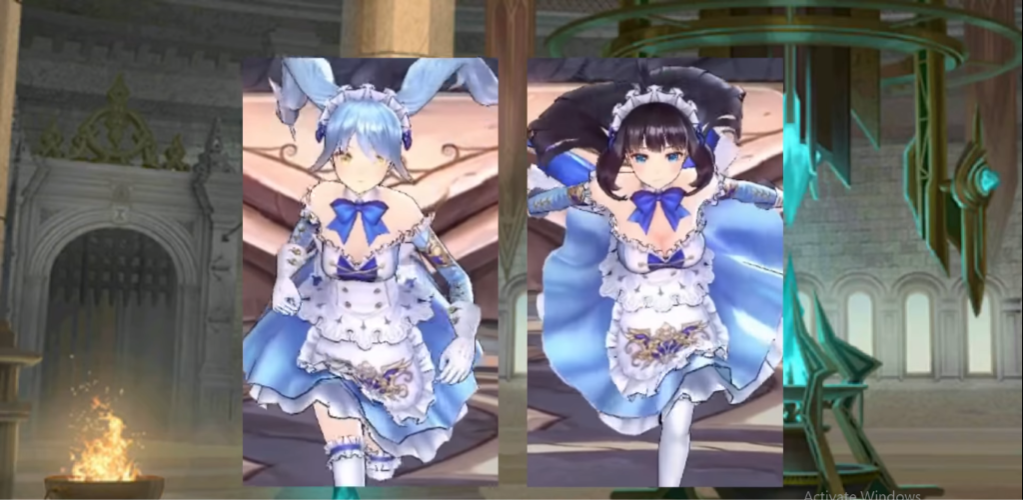
Meet Priscilla, the iron lady. Priscilla was once a War General for the Empire. One day, she felt tired of wearing such heavy armor. Then she decided to retire and enjoy her life. Now she works as a maid and enjoys drinking tea together with Aisha. Priscilla is considered as a “DPS Pump” hero, similar to Mediana or Lavril, which is more for end game usage in damage scoring content.

S1 is quite underwhelming and considered as a filter skill if we did not take any perk for this skill. S1 Light upgrades this skill to be a good CC lock skill. This perk is more for clearing adventures or in contents that require a good chain CC locks.
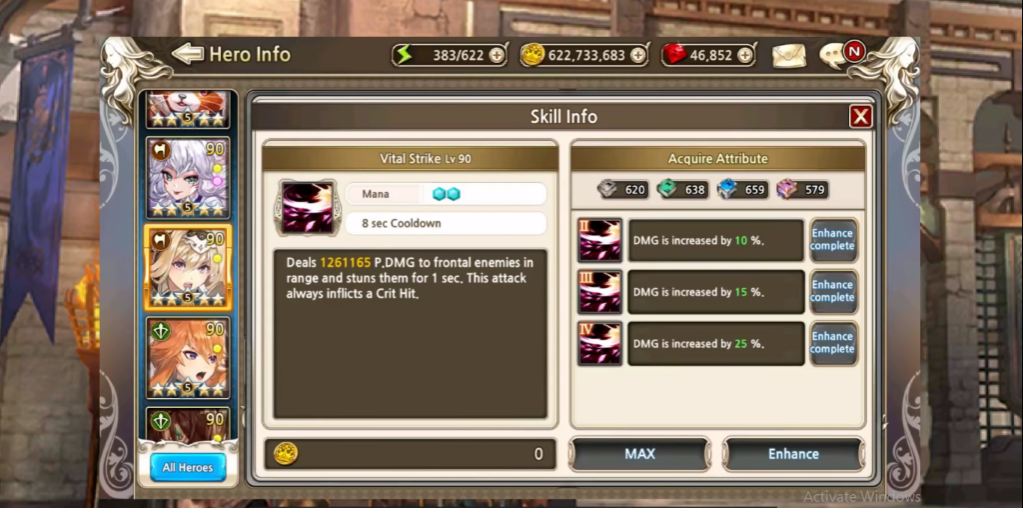
If the team does not have good overall CC lock ability, we can use S1 Light to keep the group of enemies locked down for better safety. S1 Dark allows Priscilla to contribute some damage to the team as well. However, don’t expect high DPS from Priscilla.
S2 is her “DPS Pump” skill. She boosts up herself and the primary DPS hero in the team with a good amount of flat ATK buff at permanent uptime. S2 Light is recommended to boost up the primary DPS hero further especially in a team setup of pumping up one primary dealer only.

The combination of high flat ATK buff and high Crit DMG buff pumps up the damage of primary DPS heroes greatly in any content. However, when we have a team setup with two primary dealers or more, taking S2 dark is better to boost up the damage of everyone in the team. Since Priscilla is all about her S2 as the “DPS Pump” hero, UT S2 is the most recommended choice among her UTs that suits her role very well.

S3 is mainly a medium AOE range clustering skill that collects enemies closely together. The DMG AMP is good but uptime is considered low by default. UT S3 is not recommended for end game damage scoring contents usage, especially for her main role as a “DPS Pump”.
This UT is to improve Priscilla’s CC ability only. For contents with multiple targets of enemies, S3 Light with UT S3 plus S1 with S1 Light is good to CC lock a group of enemies efficiently. For special contents, such as World Boss Xanadus, taking S3 Light improves the debuff uptime of DMG AMP.

S4 is her direct stat boosting passive. Nothing much to comment about this. T5 Dark is optional. The value of party ATK boosted is quite low unless we have 4* or 5* UW on her. However, the party PDEF buff is quite good when using PDEF gear build. The PDEF buff from T5 Dark is good to boost up the survival of the team against incoming physical damage while acting as the “DPS Pump” at the same time.
Meet Chase, the golden berserker. He is being used as an experimental object in the lab. Very sad history. Even though he made it out alive, he often dream of getting chased. That’s how he got his name. Chase is getting chased. But the experiment is worth it. He is one of the very top DPS in WB2 or most of the single target boss stages.
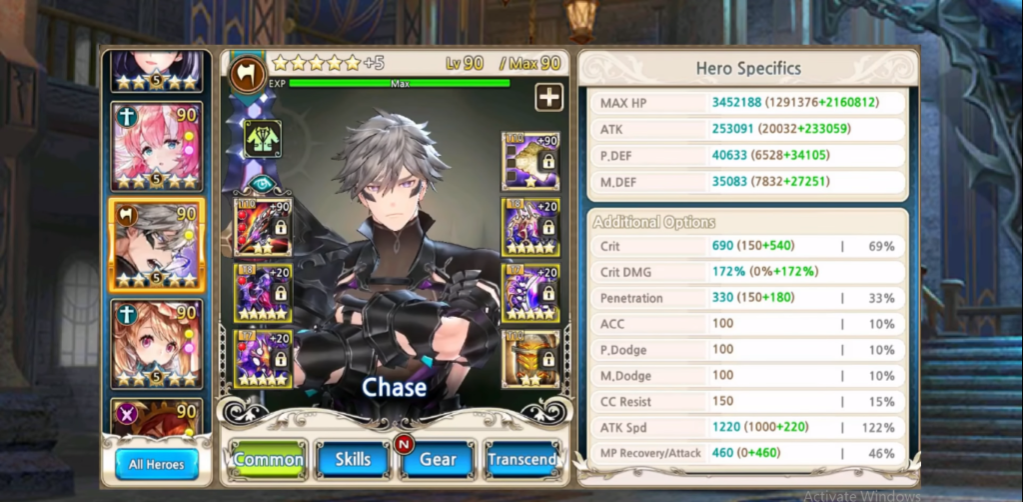
Chase’s main DPS power comes from his golden mode in S2. Sacrifice HP continuously to grow offensive powers gradually. The longer he maintains his golden mode, the higher his DPS grows. S2 Dark perk doubles the effect of this offensive power ramping. He gains a maximum of 500% Crit DMG buff with his perk along with huge ATK Spd.
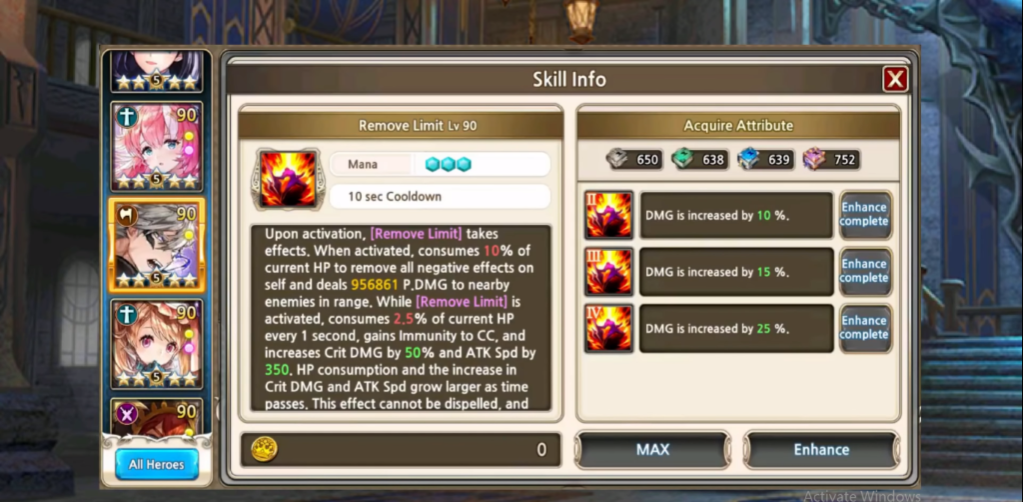
How do we know it’s 250% Crit DMG buff without S2 Dark and 500% Crit DMG Buff with S2 Dark? Let’s experiment Chase. Refer to the first HP value he absorbed. 87,148 with 98% crit DMG buff(50% initial S2, 28% UW, 20% Artifact). Converting it to non-critical value would be 87,148/(2+0.5+0.48)=29,244. His damage doesn’t grow anymore after 1 minute. Now, he absorbs 145,636 HP constantly. So, 29,244*(2+2.5+0.48)=145,635, which is the same, proving S2 gives him 250% crit DMG maximum.
The HP consumption part is manageable, especially against single target content. The HP lost is absorbed back immediately with UW effect. During his golden mode, he gains permanent CC immunity. He can freely DPS or lands his CC peacefully uninterrupted.
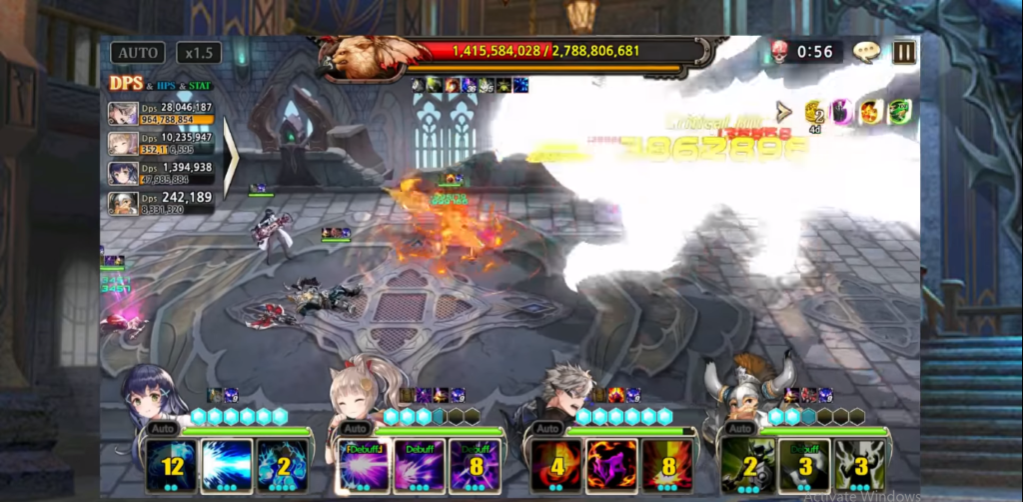
He has very good CC reduction ability. 3s+16s on S3 alone. This is a very rare ability to a super DPS hero type. S1 also has 1s+4s bar reduction. Chase seems to be a DPS specialist against any boss with CC bar. Able to deal huge damage and drain the CC bar at the same time. However, he is not good in adventures or stages with minions.
He is both the main DPS and heavy CC bar reduction hero at the same time. Phase changing stage is not very ideal for him. But he still can manage well. The key of doing this stage safely is not to get frozen, especially our DPS. Chase is immune here. Recovery to his lost HP becomes better in a larger party with more continuous heal around. Contributes both damage and high CC bar reduction in a large raid party. DPS scales greatly with a huge flat ATK buff from the party. One of the very top DPS in WB2.
- More Tier Lists