Desert Treasure is one of the most popular quests in OldSchool RuneScape. Asgarnia, an archeologist is looking to find the diamonds of Assanadra, burried in Kharidian dessert by the warriors of Zamorak and has resquested your help. He wants you to dig around for information down at the Bandit Camp, while he searches for clues amongst the Bedabin nomads. He has agreed to split the treasure evenly if the quest is successful and reward you with the “Ancient Magicks Spellbook”, which you can then use along with the standard spellbook when you pray at the altar within the quest. In addition to that, you also get 3 Quest Points and 20,000 magic XP.
The quest typically takes around 5-6 hours to complete and is packed with boss fights that force you to employ different fighting styles and approaches. You need a very well-rounded bag of skills to conquer this quest as each boss presents a different fighting challenge and is unique in his own regard.
It is a good idea to get a teleport and antipoison before starting this quest. If you are one of the Pures and don’t want to gain hitpoints, you can also defeat each boss with cannon balls. Just make sure to bring more than 500 cannon balls.
Enchanting the mirrors
The desert treasure starts in Bedabin Camp in the Kharidian Desert.
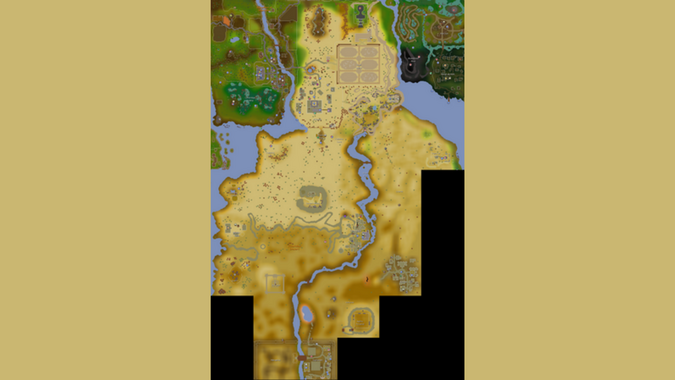
You should travel through the Shantay Pass and then travel west using the flying carpet or running till you reach the Bedabin Camp. You will find an archeologist near the small water pool. He will tell you to take some etchings to the archeological expert Terry Balando, present at the digsite exam center. Digsite exam center is located east of Varrock. Once there, give the etchings to Terry and in return, he will give you a translation that you need to take back to the archeologist.
When talking to the archeologist, choose the Don’t read book option, then agree to help.
You now need to go south to the Bandit Camp. You need to remove any equipment that depicts Zamorak or Saradomin imagery. Now enter the camp and go talk to the bartender and buy a drink for 650 coins. Ask him about the four Diamonds of Azzanadra. Now go directly east of the bar past the general store and talk to Eblis. You need to ask him again about the four diamonds. He will tell you that he needs the following items to create some scrying glass.
- 6 Steel bars
- 6 Molten glass
- 12 Magic logs
- Blood rune
- Ashes
- Charcoal
- Bones
Give the items to Eblis (You can go back to the bank to get these items if you didn’t bring them).
Eblis will disappear and then reappear on top of a hill, near the southeast. You need to go there to talk to him again. He will be surrounded by six mirrors, each showing you the location where diamonds are present.
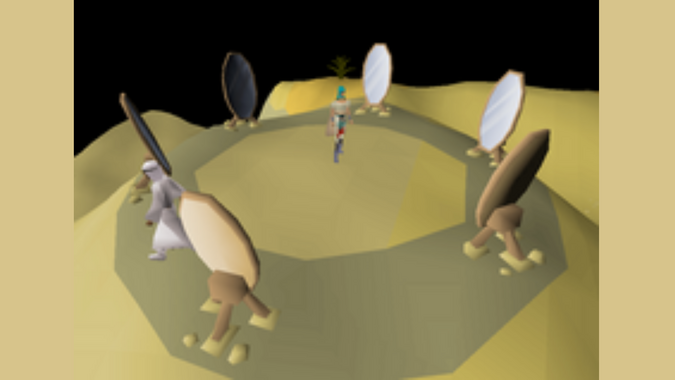
Bedabin Camp and Jaldraocht Pyramid are not the right locations but the other four are. You can go there in any order. When you find the diamonds, you should deposit them in the bank or the pyramid because from this point on, a level 95 Stranger can appear at any time and attack you with a poisoned dragon dagger. In case of an attack, use antipoison and teleport as mentioned in the beginning.
Blood diamond
To find blood diamond, you need to go to Canifis. Once there, go to the pub and talk to Malak about the diamond. He will agree to give you the diamond if you kill Dessous. Once you agree, you must ask him how to kill Dessous (Not asking this question effects future events). He will then give you a list of items.
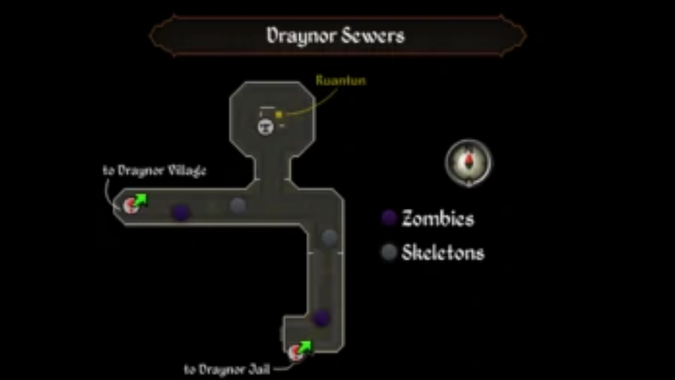
You now need to go to Draynor to find Ruantun. Go down the trapdoor located by the jaihouse just east of the bank to enter Draynor Sewers. Head north to find Ruantun. He will use his crafting skills to turn your silver bar into silver pot.
You now need to go to the holy island of Entrana. You should deposit all your weapons and armor in the deposit box at the ship before going there. Once there, head to the Entrana Chapel and get the silver pot blessed by the High Priest.
After that, go back to Canifis to talk to Malak again. He will fill the blessed pot with your blood causing you 5 Hitpoints.
Add spices and garlic to the pot and make sure the examine for the pot says: “A blessed silver pot filled with blood, garlic and spices”. If it says something else, you can’t kill Dossous
Now go to the Graveyard to summon Dessous. Pour the blood on the tomb and he will come out of the grave.

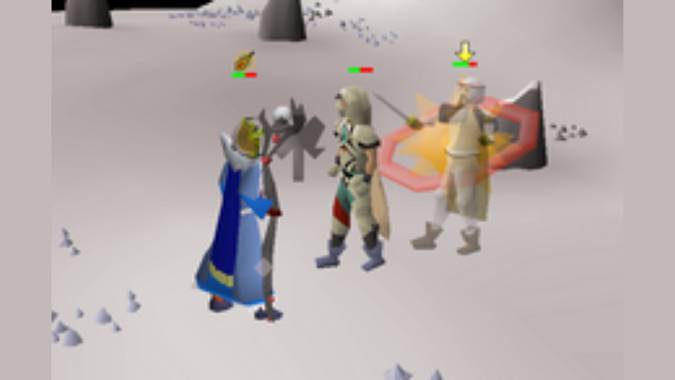
Dessous has two major attacks. A combination range/magic attack that hits double 5’s and a melee attack that can hit up to 19. Using protect from melee limits the attack to 10. One thing to note is that his double 5’s lag sometimes, stacking up to 15 and you should thus keep your health above 16 at all times. You can attack him through the fence using magic, range and halbred. As he teleports, just run behind the fence when he appears and attacks. However, if you use prayer, he teleports right next to you at random times making it difficult to safe spot him. You can use Protect from Magic to stop him from teleporting.
Dessous is weak to air spells and magic in general. Use a spell with a higher max hit in your attacks. You can also exploit his low stab defence by using a stabbing weapon. Additionally, those who want to avoid gaining hitpoints can use a Dwarf multicannon to kill him. Be sure to set it up before opening the coffin and immediately click on the other side of the fence after using the blood on the coffin. You should bring gear that gives you the highest accuracy as the dwarf cannon is very inaccurate against Dessous and you are going to need at least 50 cannon balls.
Once you have killed Dessous, go back to Canifis to claim the Blood diamond from Malak. After getting the diamond, deposit it in the bank or the pyramid immediately to avoid being attacked by the stranger.
Smoke diamond
The Smoke Dungeon is located west of Pollnivneach and can be seen marked on the world map. Once there, Climb down the well.

Enter the dungeon after putting on your facemask or equivalent headgear. Following is the map of the smoke dungeon.
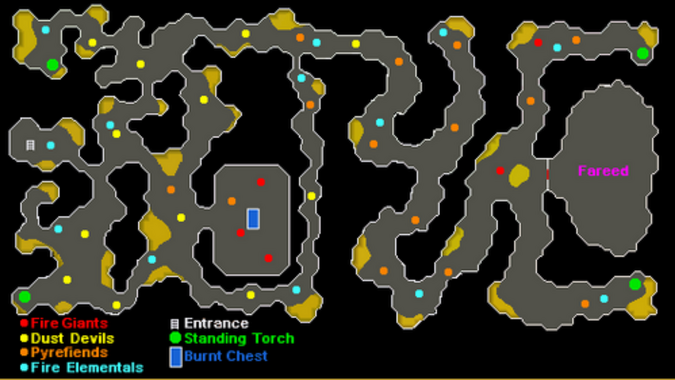
There are torches in each corner of the dungeon that you need to light using your tinderbox.
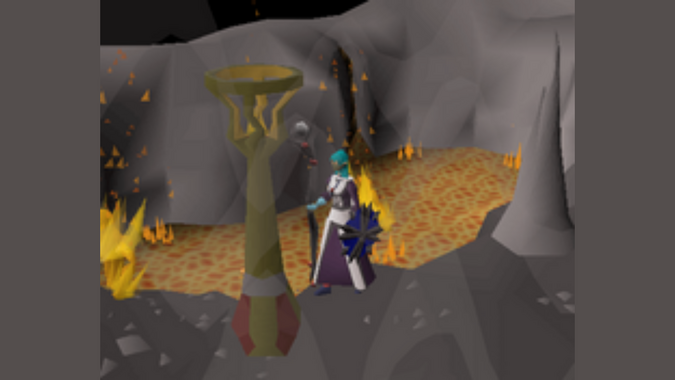
The torches burn out if you take too long and you should run instead of walking, it would be wise to use energy potions to maintain the run energy. You should start with the northeast torch. Once all 4 are lit, go to the center of the smoke dungeon and open the burnt chest. Inside you will find a warm key. You can stop running after this point. Now head to the east part of the dungeon and use the warm key on the gate to face Fareed.
Fareed’s main attack is a melee hit capable of doing 40 damage. You can use ice gloves to lower the damage to 36. It is wise to use Protect from melee as he is largely ineffective against that. He can also use a magic attack which is most effective against those with a less than 43 Prayer. You can get studded leather or dragonhide if you find his magic very difficult. If you don’t use ice gloves, Fareed will remove your weapons although mages can still be cast from the spellbook. One of the most effective weapons against Fareed is water spells, however you can also use ice arrows.
For Pures, it is recommended to bring runes for the Snare Spell. Fareed is unable to move when ensnared, and you should cast water spells in that time. As soon as he moves, cast the snare spell again. Keep in mind that you have to wait a few seconds after he breaks free and it is advised to maintain a fair distance while you are waiting to recast.
Once you successfully kill him, the Smoke Diamond automatically appears in your inventory. Deposit it in the bank to avoid interacting with the stranger.
Shadow Diamond:
You can use a skills necklace to teleport to the Fishing Guild where there are several moss giants. You will find an NPC called Rasolo walking around near a fenced area just to the north-west of the moss giants. When you talk to him, he will give you a Ring of Visibility in exchange for a gilded cross.
You need lockpicks, antipoison and food in order to progress further. If your thieving level is fairly high, you can steal lockpicks and antipoison from nearby bandits. Lockpicks can also be bought from Martin Thwait’s Lost and found if you have 50 Agility and Thieving each.
Once you have these items, you should go to the Bandit Camp. Once there, go to the most Southern tent in the camp to find a locked chest.

You now need to try opening all three of its locks using the lockpicks. All of these locks reset themselves after a failed attempt making the process a bit laborious. Furthermore, you also lose a lockpick every time and you only have so many of them. There is also a fair chance of you getting poisoned here so don’t forget to bring the antipoison.
After you successfully open the chest, you will gain 150 Thieving experience and the gilded cross.
Now, take this gilded cross back to Rasolo and exchange it with the Ring of Visibility. When you equip the ring, a ladder will appear to the east of Rasolo in the fenced area.
It is important to note that the whole Dungeon is a multi-combat area and is full of Giant Skeletons and Shadow hounds. You should use protect from melee to minimize the damage. After climbing down the ladder, follow the map given below. Go east till the end and then take a turn to go north till the end. Go east again and you will see a cave to the south. Recharge hitpoint and Run energy here. Take the next turn to go north as far as possible. Finally, take the last turn to go east until you reach Damis’ Cave. Run around a bit in this area with the ring of visibility equipped to make Damis appear,

- Entrance east of Baxtorian Falls with ring of visibility
- Damis
G: Giant Skeletons
S: Shadow Hounds
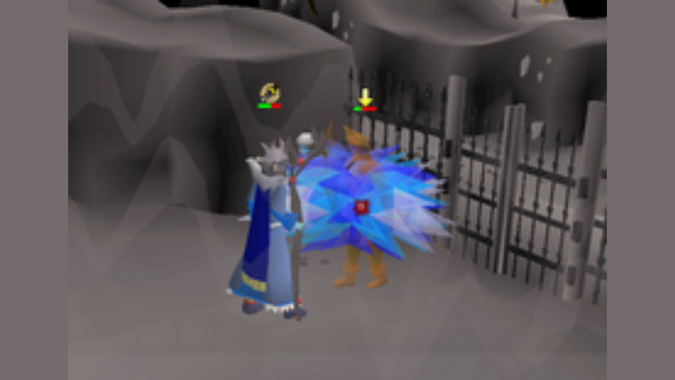
Damis has two forms. If you want to use the safespot, lure Damis’ first form there. This form is level 103 and only attacks with melee.
After you have killed his first form, his second form will then appear. This form is level 174 and much harder to beat. It rapidly drains the player at a rate of 4-5 points per second. However, if you want to use prayer, Damis can only drain it when he is within a few tiles of you and a snare spell is advised for it. It is a good idea to use Protect from melee to render the giant skeletons and shadow hounds harmless. The best way to kill this form is via magic. All spells are equally effective on him and you can use a trident of seas for both forms. Also, if you are using magic, make sure to bring a one click teleport, Runes, Food and prayer potions. . Damis can be killed via ranged attacks and melee in addition to magic but he has a very strong Melee defense. In addition to that, you can also poison Damis via the draggon dagger.

If you are a pure and dont want to gain hitpoints, go back to the entrance from where you came and head south and then east. You will then see a giant rat. You can also look for a small bat found in the southwest corner of the arena from which you came. Attack the giant rat from behind using a weak spell and use the rat to safespot Damis. Pures who do not have access to prayers can also fit a cannon in the most southerneast end of the dungeon and use cannon balls to kill him.
Once you have defeated Damis in his second form, he will drop the shadow diamond. Pick it up and run or teleport out of the dungeon.
Ice diamond:
Troll Child:
You need to go to Trollheim by following the path used in Troll Stronghold. If you have level 61 magic or have completed Eadgar’s Ruse, you can use the Trollheim Teleport spell to get there. Once there, go towards the western path to the Troll Child. If you use the path from Burthorpe, you will come across thrower trolls. You should use protect from ranged to render them ineffective. When you run past them, do not use the path with a boulder in the way as it leads to the God Wars dungeon. Continue until you see the Troll Child standing by an ice gate. It starts to snow as you approach the gate. Beyond the gate is the Ice Path. When you talk to the troll child, he will start to cry. Give him the cake and talk to him again. He will reveal that his parents are frozen in the ice path. To open the gate, interact with it once and then listen to the troll child’s reason for it being frozen. Now interact with it again and the gate opens.
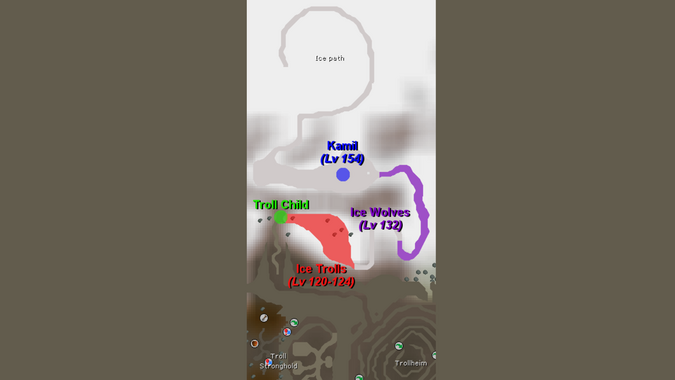
Ice trolls:
Being on the ice path drains your stats every few seconds. You can restore your stats using restore and super restore potions. After entering the ice path, you need to kill five ice trolls although not all five need to be killed in the same session. The trolls can hit up to 21. You can also use cannon to kill the trolls if you are a pure. Pures can also choose to enter a PvP mode where they can attack a friend to keep them by their side in order to avoid being attacked by the trolls. Once you are done with all five, the cave at the back opens up allowing you to enter and get to Kamil. At this point, it will be wise to go back to the bank and replenish your supplies before entering the cave.
Kamil:
Keep following the ice path in the cave until you reach the wolves. Go past them and the path will open up, allowing you to turn left. As you carry on, you will find a rock. This is the spot where you will find Kamil.
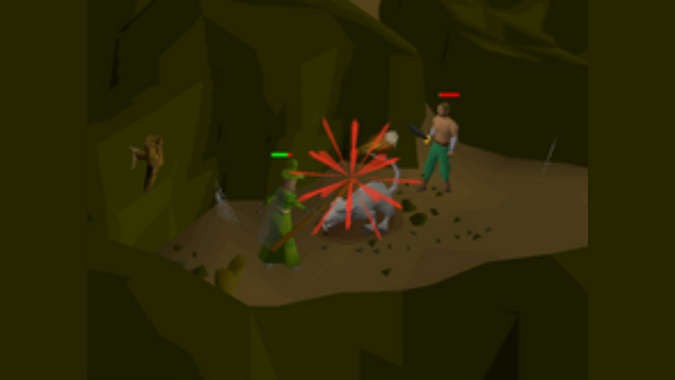
Kamil is one of the hardest bosses of the quest. The ice path is filled with several level 100+ creatures with ability to hit 20s in multicombat.
Kamil mainly uses two attacks, a strong melee attack capable of hitting up to 23, and a combination attack which always hits 5. however, the lag makes it possible for two of them to get stacked making a total of 10. It is a good idea always have more than 12 hp. Kamil also uses a spell similar to Ice Barrage to consistently freeze you. During the spell, you’re unable to attack or move for several seconds.
It is highly recommended to use protect from melee when fighting Kamil. You can use ranged, melee attacks and magic on him. Mages are required to use Fire Spells because they are the only ones that work on him. Fire bolt is one of the most effective ones and very accurate. It can be cast continuously without needing to restore for quite a while. You can also increase the spell’s maximum hit by using the chaos gauntlets. You can also use toxic blowpipe for ranged attacks as it is fairly accurate against him.
In addition to that, cannons can also be used by pures to kill him. Just make sure to set the cannons up at least two squares north of the rock to hide them from Kamil. You may need more than 100 cannon balls to kill him. Taking a friend allows the players to avoid being hit by having their friends block Kamil.
Troll parents
After successfully killing Kamil, there is a very hard to see path that you need to follow to get to troll parents. Just make sure to bring extra super restore potions as this step is the hardest. First go west, then north and then east along the path until you reach the ice formations surrounding the edge of an ice ledge.
After putting on your spiked boots, you need to right click the front end of the ledge and select “use ledge”. You can then climb up. You will see a long ice path. Follow this path all the way to the top until you reach the ice gate. Enter through the gate and another path will appear before you. Follow this path until you see the troll parents in ice cases. You can use magic to melt the cases.
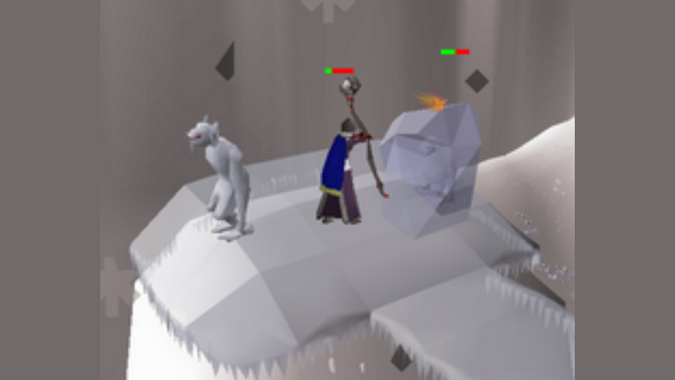
As the cases are melted, the troll parents will come back to life. Once freed, the troll parents will escort you outside the gate and give you the Ice Diamond.
Your stats must be all depleted by now. You can use a ring of dueling or minigames teleport to Ferox Enclave to get to the pools of refreshment and drink from one of the pools to restore all your depleted stats.
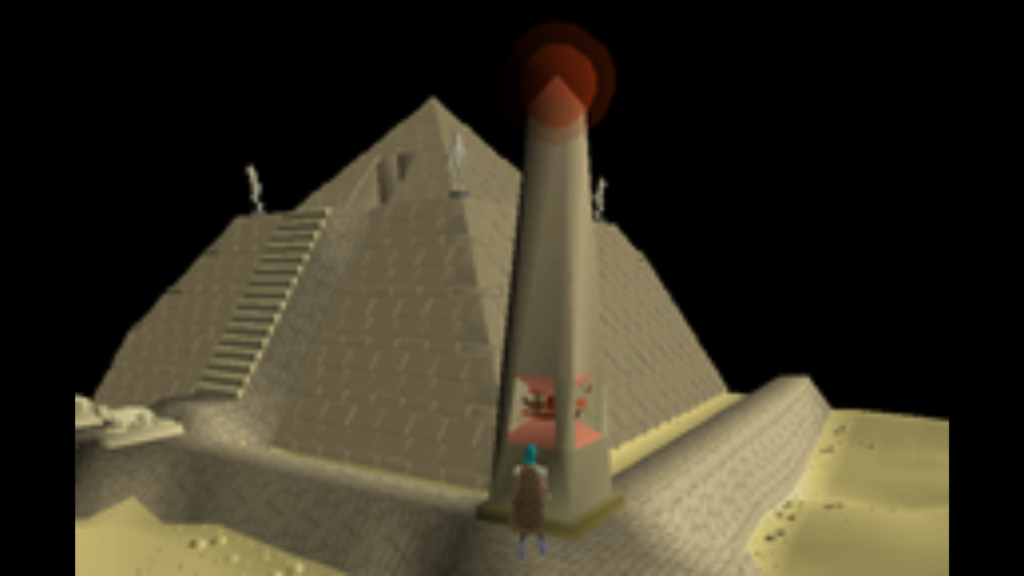
Jaldraocht pyramid:
Once you have all the four diamonds, you need to go back to Eblis at the six mirrors in the desert. There is a pyramid located southeast of Eblis. There are four obelisks at the outside corners of the pyramid. Each obelisk takes a specific diamond and you need to place each of the four diamonds in their respective obelisk. When all four obelisks are filled, the pyramid will open giving you access from the top.
Tomb Raider:
Except for the room that contains the alter on Level 4, the inside of the tomb is filled with level 124 scarab swarms and level 110 mummies. All the creatures use Melee except scarab swarms which can also poison in addition to melee. The pyramid is also filled with randomly activated traps that will send you outside to the south side of the pyramid and you are going to have to walk north to re-enter the pyramid. A good way to avoid these traps is by bringing weight reducing clothes and stamina potions. Every time a mummy comes out of a sarcophagus or a scarab swarm appears, you lose the ability to move for a couple of seconds.
The levels in the pyramid are numbered in the order you encounter them.
The outside of the pyramid looks like this

Level 1:
You need to enter the pyramid from the top as the southern entrance can only be accessed once the quest is completed. After entering the pyramid, you need to run from the entrance ladder to the Level 2 ladder. This is the smallest level in the pyramid with the fewest enemies.

Level 2:
You need to run from level 2 ladder to level 3 ladder. This is the second smallest level in the pyramid and in addition to a couple of traps, there are a few more enemies compared to level 1.
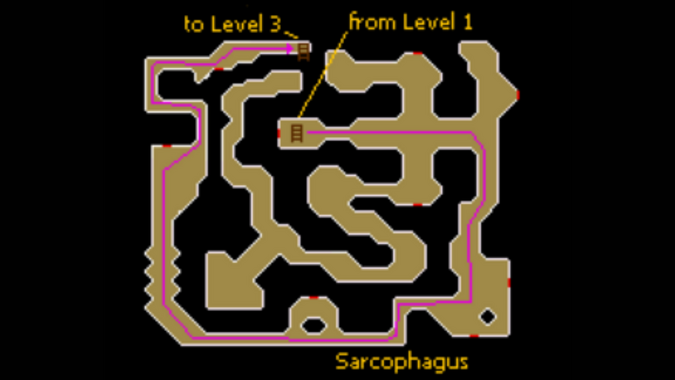
Level 3:
You need to run from level 3 ladder to level 4 ladder. A significantly larger level than level 2, it has a lot more enemies and a handful of traps.

Level 4:
You need to run from Level 3 ladder to the alter room. The only safe place in the pyramid that is free of enemies and traps, is the alter room at level 4. The rest of the level is still very large with a lot of enemies and traps all around the level.
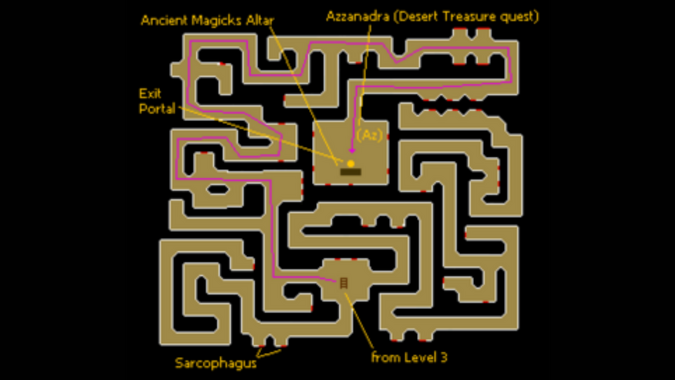
As mentioned before, altar room is the safest room in the pyramid free from all enemies and traps. One exception is that sometimes there can be a scarab swarm boiling inside the altar room. This only happens if it was boiling up right when you were entering the room. You can get rid of it by trapping it between the door and an obstacle present just in front of the door. You will find Azzanadra in the altar room who can’t separate reality from his projections. He believes that the God Wars are still going on and talks about some ancient civilizations. He is shocked to realize that he cannot hear Zaros in his mind anymore. When he finally comes to terms with the truth, he rewards the player with the Ancient Magicks of Zaros as reward for finding the four diamonds of Azzanadra.
After exiting the pyramid, you can go to Eblis and get an endless supply of ancient signets for free in addition to the ancient staff (for 80,000 OSRS gold).
More OSRS Quests: